Einleitung

  1. uafCY53KMvss3WP2
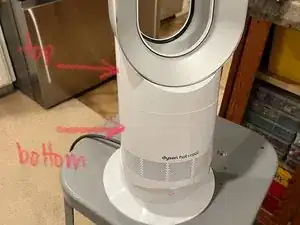
    • Der rote Pfeil zeigt auf die Stelle, auf die du dich bei der Reinigung besonders konzentrieren solltest.

    • Schalte zunächst den Ventilator auf der höchsten Stufe ein.

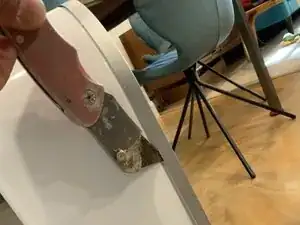
    • Blase mit Druckluft auf den Spalt im hinteren Teil des Ventilators. (dorthin, wo der Pfeil zeigt). Blase unter verschiedenen Richtungen so lange in die Spalten hinein, bis kein Staub mehr herauskommt.

    • Stelle dich darauf ein, dass eine Menge Staub aufgewirbelt wird, da dieser Bereich mit der Zeit ziemlich schmutzig werden kann! Der Staub kann sich an den Heizelementen ansammeln und eine Isolierschicht bilden. Dadurch werden sie zu heiß.

    • Kontrolliere, ob das Gerät immer noch überhitzt. Wenn es nicht geholfen hat, gehe zum nächsten Schritt weiter.

  2. nPSSsYIB6BAspNnc
    • Um an die Heizelemente zu gelangen, muss man den oberen Teil abnehmen, der über dem Zylinder mit den kleinen Lüftungslöchern sitzt. Der gesamte Teil oberhalb der Trennlinie kann in einem Stück entfernt werden.

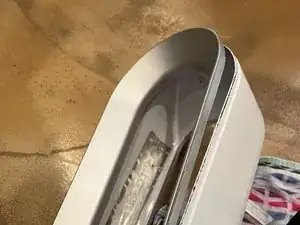
    • Ziehe zunächst die D-förmige Schraubenabdeckung am unteren Ende des Ovals nach oben aus. Sobald die Abdeckung entfernt ist, kann man eine T8-Schraube sehen, die auch entfernt werden muss.

  3. CYANApXfWVhiaRdW
    • Um das obere Teil vom unteren zu lösen, drehe es um 15 Grad in Gegenuhrzeigersinn (wie bei einer rechtshändigen Mutter). Der zylindrische Sockel kann schwer zu greifen sein, also verwende einen Gürtel als Bandschlüssel zum Lösen.

    • Es gibt Geräte mit einer griffigen Oberfläche, die dies erleichtert.

    • Wenn du Schwierigkeiten hast, an den Kabeln zu arbeiten, kannst du versuchen, den Lüfter von der Kippmechanik zu entfernen.

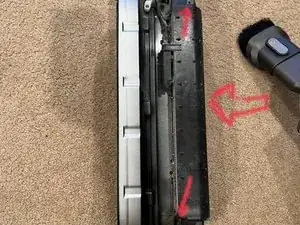
    • Löse dazu die vier T8-Schrauben, die sich unterhalb des Lüfters befinden (zwei Schrauben sind an jeder der maximalen Neigungspositionen sichtbar). Auf diese Weise kann man den Lüfter abnehmen und leichter an den Kabeln arbeiten.

  4. 2ahnXJyDORNLVeLP
    2ahnXJyDORNLVeLP
    1emWOLJXuS1BiaWQ
    MZLOJhnH6uk1anHN
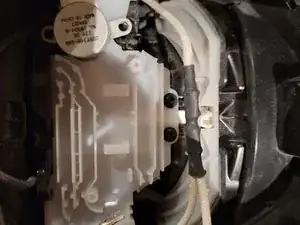
    • Zwei T8-Schrauben halten die Abdeckung darüber fest. Die Flachstecker haben eine kleine Verriegelung, die beim Abziehen gedrückt werden muss.

    • Das schwarze Kabel gehört zu den Temperatursensoren.

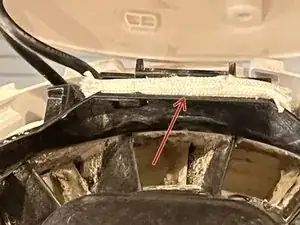
    • Das weiße Kabel ist der Stromanschluss. (es wird unter einer gewebten Manschette, die weggeschoben werden kann, nahe an der Basis abgetrennt. Den Kühlkörper brauchst du nicht anrühren). Der Stecker für den Servo lässt sich leicht abziehen.

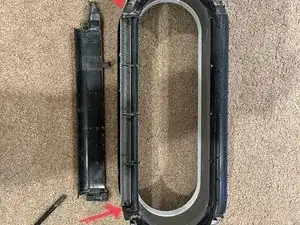
    • Die Pfeile zeigen die vier Stellen, an denen die Kabel getrennt werden müssen, damit man das Oberteil vom Unterteil trennen kann. Die weißen Anschlüsse unter der Ummantelung können auch eine winzige Verriegelung haben, die du zum Abziehen eindrücken musst. Merke dir den Verlauf der Kabel für den Zusammenbau, bevor du die Abdeckung abnimmst.

    • Markiere die schwarzen Kabel bevor du sie abtrennst, damit du sie später wieder richtig anschließen kannst. (Fotos in umgekehrter Reihenfolge).

  5. E5Z3UFQBDHIZLfug
    • Es gibt zwei Schrauben, die das Servo unten halten (auf diesem Foto entfernt), und zwei, die die weiße Platte unten halten.

    • Es ist nicht notwendig, diese zu entfernen, könnte aber die nächsten Schritte ein wenig vereinfachen.

  6. aZBVcFQbDv2cPQlp
    aZBVcFQbDv2cPQlp
    OdpSnGYnZe5tHMKN
    IW5KujRhi1bxXjeQ
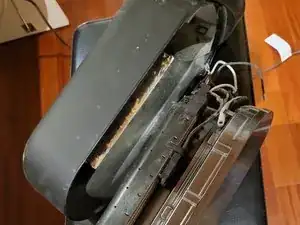
    • Verwende einen Cutter, um die Seiten und die Oberseite der Außenverkleidung wiederholt einzuritzen, um Zugang zur Heizung zu erhalten.

    • Diese ist zwar verklebt, aber an der Unterseite ist nur wenig Kleber vorhanden. Wenn du den Kleber an der Seite und oben ganz aufschneidest, kannst du den Kleber unten abbrechen. Die Einheit mit den Luftschlitzen und der Heizung sollte herausgleiten.

    • Sei hier sehr vorsichtig. Verwende die dünnste Klinge, und ritze lieber mehrmals ein, anstatt es mit Gewalt zu tun. Das geht nicht leicht, ohne sie zu beschädigen.

    • Wenn die silberne Frontplatte entfernt ist, kannst du das jetzt sichtbare schwarze und weiße Teil aus der weißen Rückabdeckung herausheben.

    There is a thin flange at the end of the main body, all around the oval opening, that is glued into the grey/silver outside trim. The photo of the black unit shows this step having been performed by deliberately slicing the thin flange through, at the edge of the grey/silver trim. The other side of the trim has features that align it to the main body, so if you do it this way, it is possible to glue everything back together without any sign of disassembly. But, it probably won't be as strong. The photos of the white unit show a cutter being used to slice the glue, in order to preserve the main body flange. You may find that you have to damage the trim this way, but will preserve the ability to glue it back in place in exactly the same way it was to begin with.

    breadandbits -

    After I seperate trim with a utility knife I still do not have access to the heating element, there is another casing inside which is held together with 6 rivet like plastic screws. Any recommendations

    Icykoolflame -

    As the above person mentioned, even after you remove the trim, you still can not access the heating elements. I was able to use canned air and a thin bottle brush to clean the elements from the bottom looking inside. It worked after I did this.

    Patrick Shiner -

  7. u342mylTMbVf1REL
    u342mylTMbVf1REL
    TWVJCZiHobFJw5Sw
    • Entferne die zwei Schrauben (kleine Pfeile), hebe dann die Abdeckung des Heizschlitzes (schwarzer Kunststoff ) an der durch einen großen Pfeil bezeichneten Stelle hoch. Entferne dann die Heizer. (Bild 2). Drehe sie heraus, ohne eine der Laschen zu verbiegen. Das Gleiche gilt für die Temperatursensoren.

    • Der festsitzende (und geröstete) Staub kann einfach abgesaugt werden.

    • Fertig. Gehe die Schritte rückwärts, um das Gerät wieder zusammenzubauen. Du kannst das Teil mit weißem Isolierband wieder am Teil befestigen, das du mit dem Cutter abgelöst hast.

    I had success with simpler steps
    1 - Cleaning the top part, after removing the fixing bolt as described in steps 2 and 3; and
    2 - Cleaning the bottom part, after unscrewing the four T8 screws located beneath the fan core as described in step 4.
    The steps above are very much the easiest, because they don't require cutting anything or dealing with cables. I was able to vacuum out a lot of dust, and now the heater is working normally.

    Felipe Pait -

    It stopped working after a few days. No dust left anywhere, I suspect that it's an electronics failure. Not happy with the whole Dyson design - difficult to clean, complicated electronics for a simple task. Pity, the heater had been convenient until now.

    Felipe Pait -

Abschluss

Um den Gerät wieder zusammenzubauen, folge diese Anweisungen in umgekehrter Reihenfolge. Befestige die Luftschlitzeinheit mit Klebeband an der Außenseite des Gehäuses oder binde einfach den oberen Teil der Schleife mit einem Reißverschluss fest.

breadandbits

Mitglied seit: 19/07/20

384 Reputation

11 Kommentare

Hey, thanks for posting this. I used it as a general guide for my Dyson AM01 which also was throwing an error when using the heat function. Opened it up expecting to find and least some dust on the heating elements… and to my surprise and annoyance they were basically clean.

Any thoughts or other ideas? Not sure if there is a temp sensor incorrectly reporting the temperature of the heating elements that I can try to replace?

Thanks

David -

Hi All, thanks for the walkthrough on opening up the heating elements. Same as David, I put up filters around the air intake since day 1 of owning the unit and the elements are clean without any clogs. (Confirmed once I opened up the unit).

I still get the H2 error whenever I use the heating function, I noticed that if I turn it to around 23-24C with the lowest fan speed, the H2 error may not come on. And often time I cannot increase fan speed probably due to some issues with the circuit board or components. I'm suspecting that the H2 error may be due to electrical/component failures because I have 2 units and both experienced H2 error.... I'm suspecting that they were built to have a life timer or something, and when the time comes, it'd fail no matter what.


Did some digging around on the components and it seems that the 2 components next to each heating elements are thermal switch and thermal fuse, I think that's just for safety purpose and they're not heat or flow sensors.

cAL -

Yea I had actually unplugged the heating elements and set it to heat and still sometimes got that H2 error, which means its not from overheating... since it literally wasn't heating up then :(

David -

I'm stuck on step 7 since I don't know exactly where to cut. Is the air slot trim the silver/gray part on the outside? Is there any way more pictures could be provided? Thanks!

Thien -

It is the outer grey rim that needs to be separated from the white body. See edits to the instructions for photos and details.

Adrian -

Are you &&^&^$^ with us?! There is absolutely no reason to use a razor knife to remove the air slot trim. In fact, for disassembly it’s only necessary to complete up to the second step. You don’t even have to pull the heating coil out!

Once the upper half is removed, use a long toothbrush to clean the heating coil. Tape a chopstick to a normal toothbrush if you’re desperate. I used a gun cleaning brush. From there some compressed air and a vacuum will finish the job

Hope nobody looses a finger jamming a knife into an area that shouldn’t be messed with…

Stephan Cross -

The first instruction notes that no disassembly is necessary (not even up to the second step). The rest is provided to show how this conclusion was reached, and in case others are interested in how it's put together or want to disassemble for other reasons.

breadandbits -

not every one is as lucky as you, I clean the top part with air gun, still getting h2, removed the base partially and air gun it, still getting h2, so I removed the blade completely, clean it well, still getting h2 when using heat. And there was a lot of dust compare what I see from other people's article.

before I found this article, I see lot of YouTube comments some are able to fix it with simple cleaning, some have to take the whole thing apart. Maybe it's good to be nice and respectful, so would know that you are a self-centred Mr. Know-It-All axxhole?

and thanks @breadandbits for sharing. :)

mioche -

Fantastic guide. Saved me a lot of money,.

James MacLean -

Glad to hear it!

FarmYard Gaming -

Thank you, very helpful. Didn't have the courage to the disassemble the air slot trim. Blew out the top part with 100 psi. Found a lot of gunk coming out from the fan core. Opened it up blowing 100 psi and repeating the process from top to bottom till the dust cleared out. My fan was just a bit dirtier than pictured. Thirty minutes running with the heater on, no H2 error code. In case the error comes back, I plan spray WD40 and repeat the cleaning process with compressed air. I'm just hoping for the best that it ends here.

AMDG -