Einleitung

Diese Anleitung zeigt, wie die Antennenleiste im MacBook Air (M1) von Ende 2020 ausgetauscht werden kann.

  1. VPEGroiLj2rq1TsX
    • Bevor du anfängst, solltest du die Auto Boot Funktion deaktivieren. Auto Boot schaltet deinen Mac beim Aufklappen ein und kann während des Öffnungsvorgangs versehentlich ausgelöst werden. Benutze diese Anleitung oder folgende verkürzten nachfolgenden Anweisungen um Autoboot auszuschalten.

    • Wenn dein MacBook unter BigSur v11.1 oder einer späteren Version läuft, lässt sich AutoBoot möglicherweise nicht stilllegen. Arbeite zuerst normal weiter, trenne aber den Akku sofort ab, wenn du ins Innere des Gerätes hinein gekommen bist.

    • Schalte dein MacBook vollständig aus und ziehe den Stecker aus der Steckdose, bevor du anfängst. Schließe das Display und drehe den Laptop um.

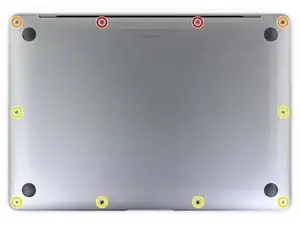
    • Entferne folgende P5 Schrauben:

    • Zwei 7,9 mm Schrauben

    • Zwei 7,3 mm Schrauben

    • Sechs 2,6 mm Schrauben

    • Halte während der gesamten Reparatur deine Schrauben gut geordnet und achte darauf, dass jede Schraube an ihren Ursprungsort zurück kommt.

    ESD safe mat, plugged into ground, with a wrist strap, also grounded, are the best best to protect the logic board.

    Robin Ray -

    Re-Assembly Tip: Before putting the screws back in, snap the lower case on and test to make sure the MacBook powers up. When I first re-assembled, I became very nervous I did something wrong because it would not power on. It turns out I just needed to plug the laptop into a power source for it to power up (despite having a good charge before disassembly). It was the perfect way to test the new USB-C ports!

    Austin -

    Big points to this one, especially for mentioning needing to plug the laptop in. The bottom case needs to be screwed in and laptop needs to be plugged in before it will boot.

    Bayden Yazalina -

    Wiha 4PL driver for these screws.

    Greg Worrel -

    Printing out all the images from this Ifixit guide prior to starting and using duct tape help me keep track of screws.

    raju midjdeya -

    This Guide has a high chance of not working if an aftermarket display is used as MAC serialization was introduced post ~2023. Likely you will need an original MAC screen replacement and to serialize the display for it to work.

    Tron Computers -

  2. JM2r2fTloLj1HGHv
    JM2r2fTloLj1HGHv
    qWKL1OR1c1CmZJKh
    qfGXhnWu5SInbUHj
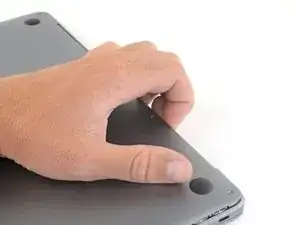
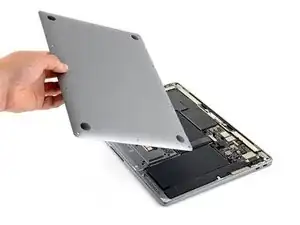
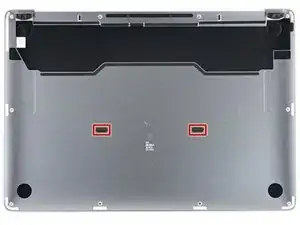
    • Zwänge deine Finger zwischen das Display und das Gehäuseunterteil und ziehe nach oben, so dass sich das Gehäuseunterteil vom Air ablöst.

    • Entferne das untere Gehäuse.

    • So wird das untere Gehäuse wieder eingebaut:

    • Setze es passend auf und drücke fest darauf, damit die beiden darunter versteckten Rasten einschnappen. Du solltest das hören und spüren können.

    Los tornillos se ruedan fácilmente :(

    Mishelle Cerón -

  3. NWhygZ3NuFfSLrCC
    NWhygZ3NuFfSLrCC
    kRYFRljHKcJHQMni
    VevmEYadgKPXgXRH
    • Heble den metallenen Sicherungsbügel am Akkustecker mit dem flachen Ende des Spudgers hoch und entriegelt den Akkustecker.

    • Achte darauf, dass der Sicherungsbügel nicht mehr in die Lasche der Verriegelung eingreift, bevor du den Akkustecker heraushebst. Der metallene Sicherungsbügel sollte sich leicht öffnen lassen.

    • Ziehe den Sicherungsbügel senkrecht nach oben, damit der Akkustecker aus seinem Anschluss auf dem Logic Board herauskommt.

    • Drücke den Stecker beim Zusammenbau gerade in seinen Anschluss hinein und achte darauf, dass er bündig im Anschluss sitzt.

    • Drücke, falls nötig, zuerst die hintere Seite mit den Kabeln fest, dann die vordere Seite des Steckers.

    Reassembly: I had difficulty going straight down. The connector has some angled edges that made it difficult. Instead, I slotted the wire side in first, then rocked it forward towards the hinge into position.

    Sean K -

    If having difficulty in flipping the bar up, place the machine vertical and not that there is a small “locking nib” that the bar has to clear. You may have to give the bar honest persuasion to clear the nib.

    Harry Dulcamara -

    The bar can lock backwards making it very hard to even see let alone move. Great care is needed to shift it. I had to use two thumbnails, one on each side, then once flipped forward it takes more push than I expected to clip it in place. Ensure the plug is fully seated first !

    Simon Anthony -

    As others commented, it can be hard to click the battery connector back into place. First make sure the bar is not underneath the connector. Then, turning the computer so the connector pins are facing you (LCD hinge end closer to you) can also make it easier to position the connector on top and then click it into place.

    madmaxmedia -

    Some replacement batteries have a retainer bar that differs from OEM batteries. I had to swap the retainer bar to properly secure it under the "locking nib" to ensure it didn't release on its own (before it could freely swing).

    Anthony Collier -

  4. pMA6bFPjPuCcCuXw
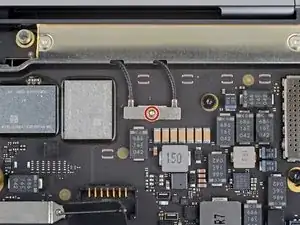
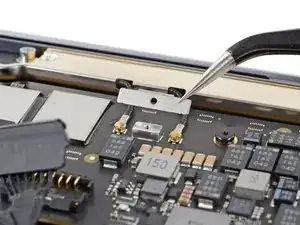
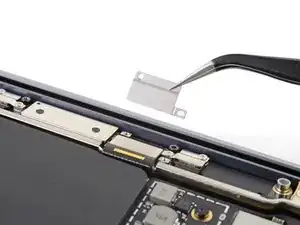
    • Entferne die 1,4 mm Torx T4 Schraube, mit der die Abdeckung des Antennenkabels befestigt ist.

    • Wenn sich das T3-Bit doch etwas zu klein anfühlt, dann versuche es mit einem T4.

    I needed a T4 for this

    MaFt Morley -

    Wiha tools T3 fit perfectly.

    Robin Ray -

    I found this screw difficult to reinstall. Very small and fiddly. 15-20 minutes on this step.

    Harry Dulcamara -

    The T3/T4 screws are tiny!!!

    raju midjdeya -

    To reinstall a tiny screw first turn it counterclockwise until you feel it engage the tread, then turn them clockwise to tighten it.

    Patrick Langvardt -

    If you are not sure if it needed a T3 or T4 (seems people needed one or the other) place the smaller one into the screw head and make sure it feels seated. Same using the T4. It should seat snugly. Snug fit especially important for hinge screws (T8). They can be a bit tight!

    John Nagy -

    I just did one and it needed a T5 to remove this screw.

    John McKee -

  5. DolxfCVyMJbuVaYK
    • Entferne die Abdeckung des Antennenkabels.

    Make sure the 90 degree bend on the cover is towards the hinge when reassembling. It will fit in backwards, but will cause problems.

    Robin Ray -

  6. YjXHvrYawVQGdCsF
    YjXHvrYawVQGdCsF
    ghAw1ida5JywpKYy
    Gei2HaBBD4QLOChH
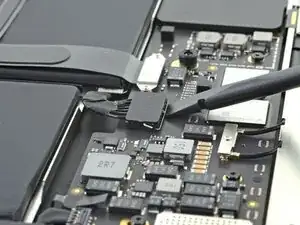
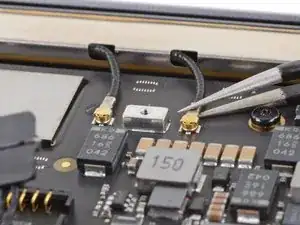
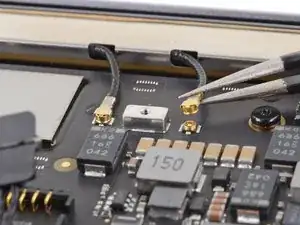
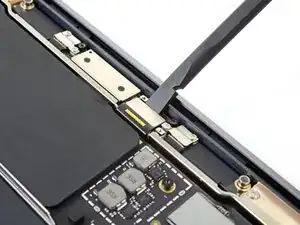
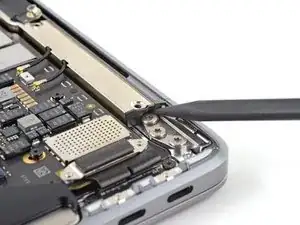
    • Greife den Antennenstecker mit einer Pinzette nahe am Anschluss an.

    • Ziehe ihn gerade nach oben und trenne das Kabel ab.

    • Wiederhole das Ganze für das zweite Kabel.

    • Halte die Stecker beim Zusammenbau an ihre Positionen und drücke sie behutsam gerade nach unten. Die Stecker rasten in ihre Anschlüsse ein.

    These are tiny, and hard to reconnect. The key was to position the cables so their ends are very close to the posts on the board.

    dexter -

    Yep. Good call. Me too folks.

    Harry Dulcamara -

    So anyone that’s had experience with keyboard and antenna, connectors, or previous Apple iPhone products, knows that these antenna connectors go on from front to back so you kind of have to position the noncable end of the antenna cable first and then push it towards the back I’m not sure if that makes sense, but try from the front to the back connecting Put pressure on the front first and then put pressure towards the cable in if you do it wrong and put too much pressure in it, you can ruin the cables. Be careful with it.

    babs martin -

    This was the hardest part of the reassembly for me. One side connected easily, the other took 10 minutes of fanagling. Using the flashlight from my phone up close helped me see better what was going on and then pushing the connector slightly towards the hinge to create more bend on the cable so that it would line up correctly.

    quackerback -

  7. 1VJvIwAxTOJogU5w
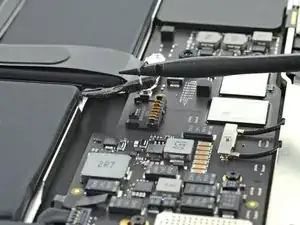
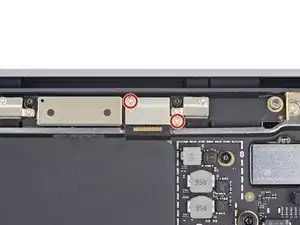
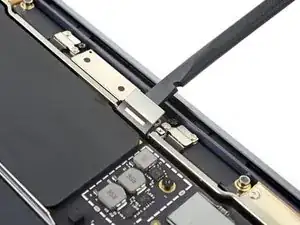
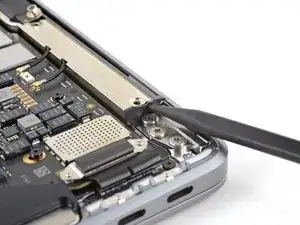
    • Entferne die beiden 1,5 mm Torx T3 Schrauben, mit denen die Abdeckung des Displaykabelsteckers befestigt ist.

    None of the screws in this repair are T3. All the smaller ones are T4. Which is good, ‘cause my (cheap) repair tool kit doesn’t have a T3.

    dexter -

    The T3 screws called out were indeed T3, not T4 on the MacBook Air I replaced the display on.

    --Mac Ace, Inc.

    Robin Ray -

    I dropped one of these - can they be purchased? Or is there a matching screw in an older MacBook Air? I have a ton of those for parts... :-)

    Jimmy Anderson -

    weird, for my model A2337 it is even T2 screws. tested it two times and I have the ifixit mako precision bit set.

    Otto Klassen -

    On my MacBook Air M1 Early 2020, I had to use a T4 bit on one of the screws. The other one came out with a T3. I am using a HyperTough 77-piece precision repair set.

    Raj Venkat -

    T3 worked on mine, but getting this cover to line up with the holes was tricky due to the slope, it kept sliding out of place. I finally held it in place with one finger while carefully inserting the screw on one side. Once I had that in, then it was easy to line up the other side.

    quackerback -

  8. 4LyTebwNMFNoFqJf
    • Entferne die Abdeckung des Displaykabelsteckers.

    Wth my new assembly, there were no covers for the connectors either side of this cover. I had to transfer them from my original display assembly

    John Haywood -

    Also note that all these covers have one precision hole (ie round) and one 'loose' (ie trapezoid). Fit the round one first, not super tight. Then the second and tighten all

    John Haywood -

  9. yGHHGP6i2yHfUM4N
    yGHHGP6i2yHfUM4N
    NCZ4EGyX5OgOcx4R
    • Heble den Displaykabelstecker mit dem flachen Ende des Spudgers von der Antennenplatine hoch.

    • Um Druckstecker, wie diesen hier, wieder anzuschließen, musst du ihn erst sorgfältig ausrichten und auf einer Seite herunterdrücken, bis er einrastet. Wiederhole dann das gleiche auf der anderen Seite. Drücke nicht in der Mitte. Wenn der Stecker schief sitzt, können die Kontakte verbogen und dauerhaft beschädigt werden.

    Since this step is the most crucial in the reassembly process I suggest connecting the flat cable to the board BEFORE placing the board in to its cavity in the antenna bar. MUCH easier and SAFER to do.

    J Patrick Dowling -

    When putting back together, be sure to not trap the display cable underneath the antenna bar as I did!

    quackerback -

  10. 2b1wYIiFCJDuN2s5
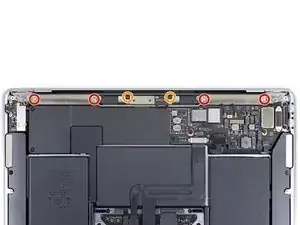
    • Entferne die folgenden sechs Torx T5 Schrauben, mit denen die Antennenleiste befestigt ist:

    • Vier silberfarbene 7,4 mm Schrauben

    • Zwei schwarze 4,7 mm Schrauben

    Mine here is T6 Torx not T5.

    David Jones -

    When putting it back together, make sure to get the display cable connector out from under the antenna board before screwing the antenna bar back down. The connector has to go behind the bar in the little notch as the board goes through the opening in the bar.

    Matthew Granger -

    Mine here were Torx T4. Came with the kit.

    Jace Sheppard -

    My 4.7 mm screw is stripped.

    Any suggestions to get it removed?

    B S -

    B S,

    Darn, sorry that happened! Here's a guide with five different methods you can try to get it loose: Wie man eine rundgedrehte Schraube entfernt

    Best of luck!

    Carsten Frauenheim -

    These are T5. A T4 might work but you might strip it.

    A T6 shouldn't fit at all; if it does, your driver is either worn or just poor quality.

    maccentric -

  11. SAEGGdfncZdeZYYm
    SAEGGdfncZdeZYYm
    BAsqqhw4iQ4CWtpH
    qeEvDZBflVmW4Nlw
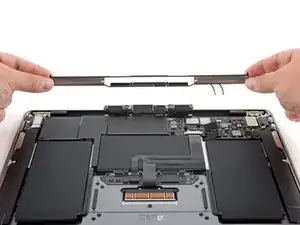
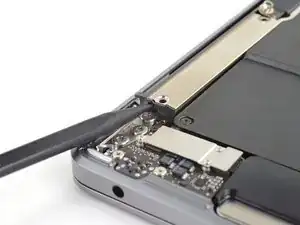
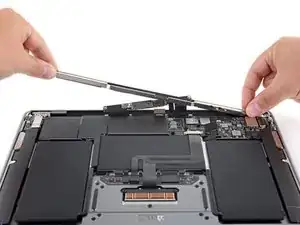
    • Setze die Spudgerspitze in den Spalt zwischen Antennenleiste und Displayscharnier ein.

    • Kippe den Spudger gegen das Scharnier und heble das Ende der Antennenleiste hoch.

    • Wiederhole das Ganze am anderen Ende der Antennenleiste.

    This step can’t be accomplished without first loosening the adhesive beneath both right and left metal sides of the bar. I used a heat gun set at 150 degrees with a narrower airflow attachment to carefully heat up just on the metal parts of the bar while slowly applying pressure until the adhesives gives. The first comment on step 12 is also helpful.

    scentaur -

    I didn't have a heat gun and the instructions didn't mention it; managed to pry it off with a bit of force. Though I'd have used a heat gun if it were available.

    Robert Monfera -

  12. Iokx4fkJ45pYlhlf
    Iokx4fkJ45pYlhlf
    TFAUPiYpoxIFaihc
    AanhCNNBiMLVkvFG
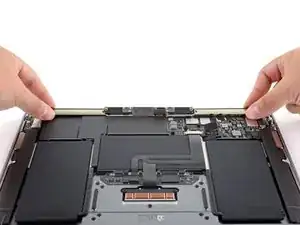
    • Hebe die Antennenleiste mit den Fingern gerade nach oben vom Gehäuse weg.

    • Die Antennenleiste ist verklebt, eventuell ist etwas Kraft nötig, um sie abzulösen.

    • Führe die Antennenplatine durch die Öffnung in der Mitte der Antennenleiste.

    • Achte darauf, dass die Flachbandkabel zur Antennenleiste nicht übermäßig angespannt werden.

    • Entferne die Antennenleiste.

    Separating antennae bar from case after removing screws is challenging. Author’s directions are good but what needs to be addressed is a thin strip of adhesive on both sides of the bar that needs to be separated. the strips are located on the hinge edge of the logic board mount area. I used a metal, razor thin, wide, blade type spudger to gently “wedge” underneath the bar along both adhesive strips to loosen the bar and lift it up. Careful!

    Macrepair SF -

    Thanks for this hint!!

    Benjamin Bradshaw -

    Before removing the antenna bar see if the right side is slightly elevated than the left. Upon replacement I could not get the right side to sit as flush as the left. However it may be intentional to protect the wifi wires.

    Harry Dulcamara -

    I was stuck on this step (removing the antenna bar) but this video helped me: https://www.youtube.com/watch?v=tHhHNjzO...

    Matthias -

Abschluss

Vergleiche dein Ersatzteil mit dem Originalteil — möglicherweise musst du fehlende Bauteile übertragen oder Schutzfolien vom Neuteil abziehen, bevor du es einbauen kannst.

Um dein Gerät wieder zusammenbauen, folge den Schritten in umgekehrter Reihenfolge.

Es kann sein, dass das Laptop sich nach der Reparatur nicht gleich anschalten lässt. Schließe es dann erst an das Netzteil an.

Entsorge deinen Elektromüll fachgerecht.

Hat die Reparatur doch nicht den richtigen Erfolg gebracht? Frage in unserem Forum nach Hilfe.

Carsten Frauenheim

Mitglied seit: 10/03/20

144841 Reputation

0 Kommentare