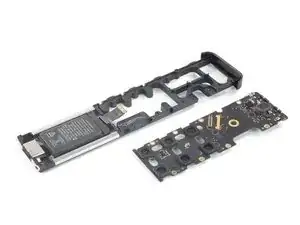
Einleitung

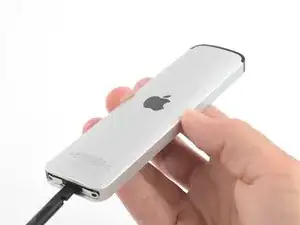
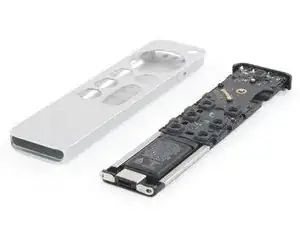
Diese Anleitung zeigt, wie die Akku- und Ladebuchseneinheit in der Apple TV 4K 2021 Siri Fernbedienung ausgetauscht wird. Die Ladebuchse und der Akku in der Siri Fernbedienung bilden eine Einheit.

  1. rcaxy6nLUP6jLCOF
    rcaxy6nLUP6jLCOF
    pJ35PQvpaEdfoeYB
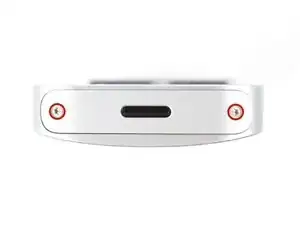
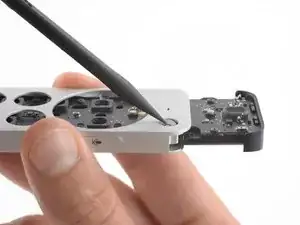
    • Entferne mithilfe eines P2 Pentalobe Schraubendrehers die beiden 6,1 mm langen Schrauben, mit denen die untere Abdeckung befestigt ist.

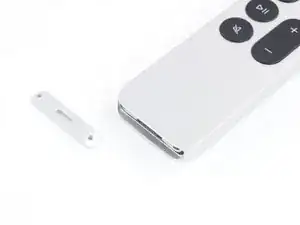
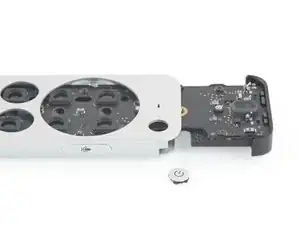
    • Entferne die untere Aluminiumabdeckung.

    These screws seem larger than a P2. My P2 keeps slipping on the screws.

    prplecake -

    The two screws are at a slight outwards angle. Also the iFixit screwdriver is a little too small for the screws. I had to file off the tip a bit to get a secure grip.

    Bachsau -

  2. oejDhRsQlImTItBB
    oejDhRsQlImTItBB
    NidDLaoXStWENXIF
    yQsfDqGDULRqA3qY
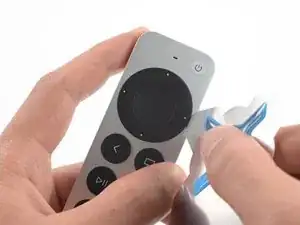
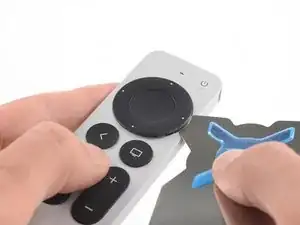
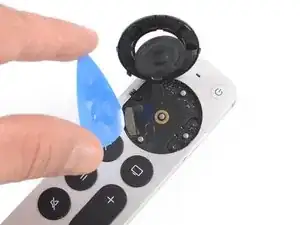
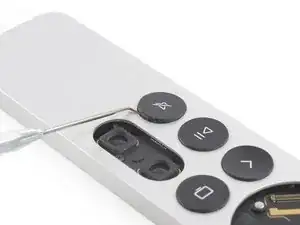
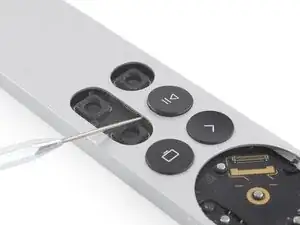
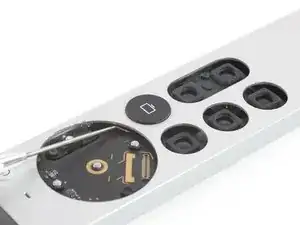
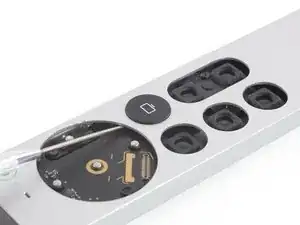
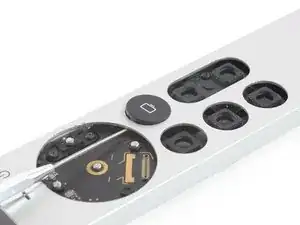
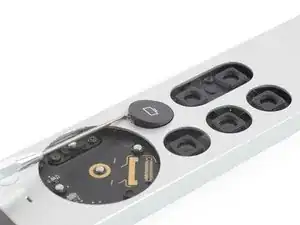
    • Setze ein iFlex in den Spalt auf der rechten Seite des runden Klickpads

    • Führe den iFlex ca. 3 mm ein.

    • Erzeuge einen Spalt, indem du das Klickpad nach oben hebelst.

  3. MBBfULhYrhOWZGTy
    MBBfULhYrhOWZGTy
    cMgV33xD1PgiSAmp
    eA5QbTDh5aZ2tH2w
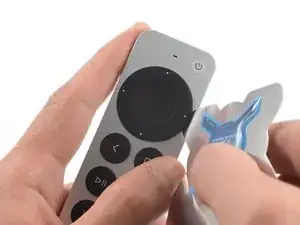
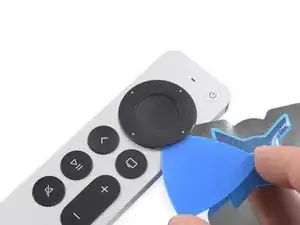
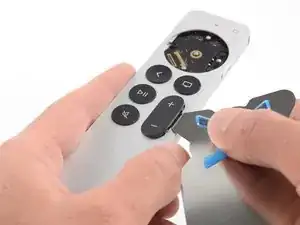
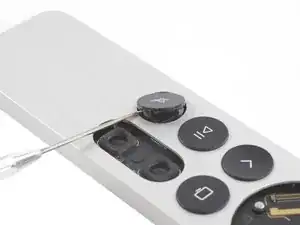
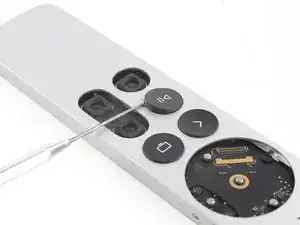
    • Schiebe ein Plektrum in den Spalt und entferne danach den iFlex.

    • Schiebe das Plektrum um die obere Hälfte des Klickpads herum.

    • Schiebe das Plektrum nicht unten entlang, da dort ein Flachbandkabel verläuft!

  4. EjGIpVCUhWoH3BDN
    EjGIpVCUhWoH3BDN
    NSPrRjxQVRnjOUjF
    hPAOEtWo2jJ3NZkQ
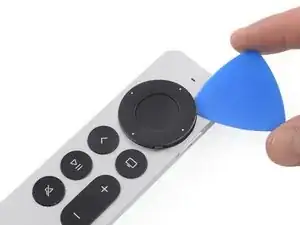
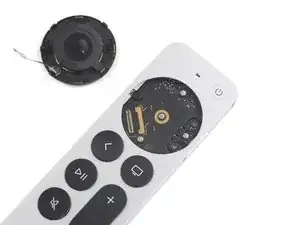
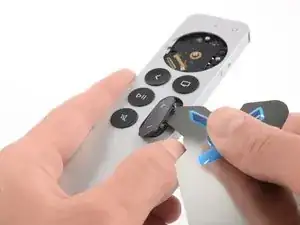
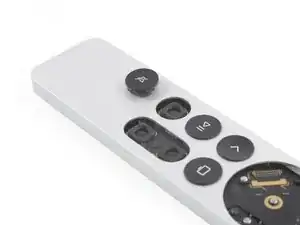
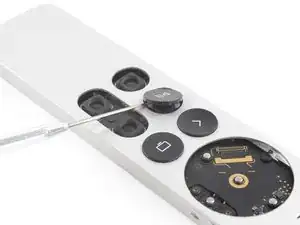
    • Hebe das Klickpad von der rechten, unteren Seite an, um an den Flachbandkabelstecker zu kommen.

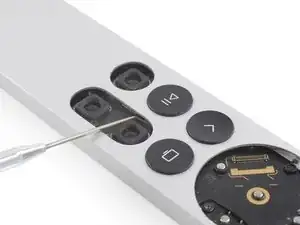
    • Nutze ein Plektrum, um den Klickpad-Stecker hochzuhebeln und abzutrennen.

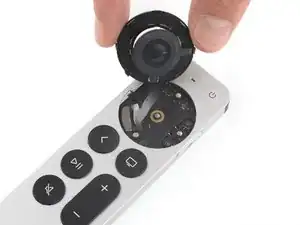
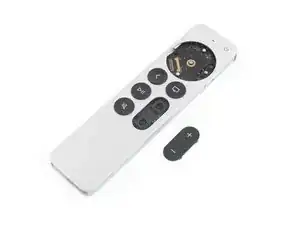
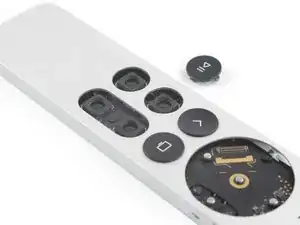
    • Entferne das Klickpad.

    Why doesn't iFixit sell replacement clickpads? This component is the most likely to fail on these remotes, and it is one of the easier things to replace.

    BitingChaos -

  5. aEXDdF2Gtv6CWPdg
    aEXDdF2Gtv6CWPdg
    2OnRwcMCPEVgYUXT
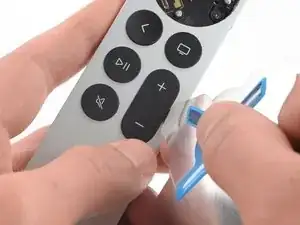
    • Setze den iFlex in den Spalt an der rechten Kante der Lautstärketaste.

    • Setze den iFlex ca. 3 mm tief ein.

  6. N2kBUVUYBKpDtGFF
    N2kBUVUYBKpDtGFF
    SuTWkmHLMsW5D3rZ
    liUO5t5CAxaSwVdD
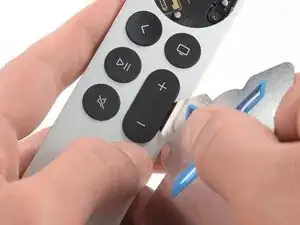
    • Drücke die Taste mithilfe des iFlex nach oben, um die Klammern zu lösen, mit denen die Lautstärketaste befestigt ist.

    • Entferne die Lautstärketaste.

  7. ke2PD3alBwklFAD2
    ke2PD3alBwklFAD2
    jYZJvdQEeAjT3RI2
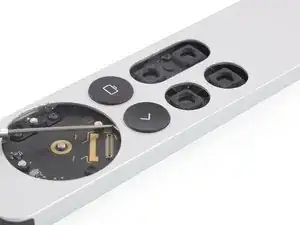
    • Setze eine abgewinkelte Sonde in das Gehäuse, um die rechte Klammer der Stumm-Taste von innen zu lösen.

    • Drücke vorsichtig von innen gegen die Klammer.

    • Achte darauf, dass die Sonde keine Komponenten auf der Hauptplatine berührt und waagerecht eingeführt wird.

    Getting the power button aligned when reassembling is very tough.

    Tracey -

    It's much easier to just use one's fingernails to pull the buttons out.

    Bachsau -

  8. ZJsdb41ZZacf6awG
    ZJsdb41ZZacf6awG
    YVaOTRVxrYK2XTHi
    42UDGP42OlcyjLL4
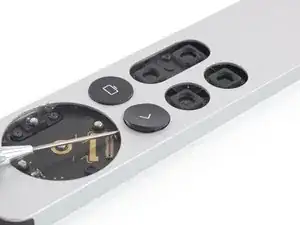
    • Schiebe die Sonde in den zuvor entstandenen Spalt auf der Oberseite der Stumm-Taste.

    • Hebel die Stumm-Taste nach oben, um die restlichen Klammern zu lösen.

    • Entferne die Stumm-Taste.

  9. YpgA2nfpGFBlMSw6
    YpgA2nfpGFBlMSw6
    KyjoML6ps5vtsX4S
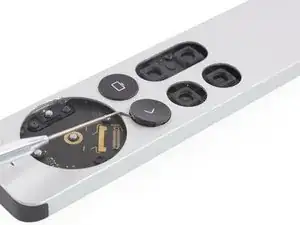
    • Setze eine Sonde in das Gehäuse, um die rechte Klammer der Play/Pause-Taste von zu lösen.

    • Drücke vorsichtig von innen gegen die Klammer.

    • Achte darauf, dass die Sonde keine Komponenten auf der Hauptplatine berührt und waagerecht eingeführt wird.

  10. TO626cgl2ZbfGPIc
    TO626cgl2ZbfGPIc
    Sch2j3e1dHAV11KQ
    qP3jganrUGV4m16j
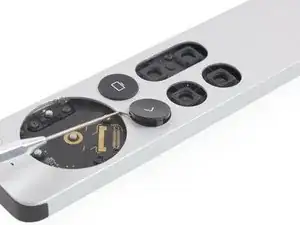
    • Schiebe nun die Sonde in den zuvor entstandenen Spalt auf der Oberseite der Play/Pause-Taste.

    • Hebel die Play/Pause-Taste mithilfe der Sonde nach oben, um die restlichen Klammern zu lösen.

    • Entferne die Play/Pause-Taste.

  11. xvXIpXcMyrXGvQEG
    xvXIpXcMyrXGvQEG
    wm1bemBrSbbFLj2A
    • Führe die Sonde in das Gehäuse ein, wo sich zuvor das Clickpad befand, um den oberen Kunststoffclip der Zurück-Taste zu lösen.

    • Drücke vorsichtig von innen gegen die Klammer.

    • Achte darauf, dass die Sonde keine Komponenten auf der Hauptplatine berührt und waagerecht eingeführt wird.

  12. qmJGiOxqTFUOUCqx
    qmJGiOxqTFUOUCqx
    rTSMaAAXDr2CbMIy
    f3Bl2ftZrNm3L1Kc
    • Führe die Sonde in den Spalt an der Oberfläche der Zurück-Taste ein.

    • Verwende die Sonde, um die Zurück-Taste hochzuhebeln und die verbleibenden Kunststoffklammern zu lösen.

    • Entferne die Zurück-Taste.

  13. eHFKQYQwQwwdiAOa
    eHFKQYQwQwwdiAOa
    Op2wpQTTeisYJy1a
    J1lp4WkaIsLvEyE1
    • Setze die Sonde in das innere Gehäuse ein, wo sich vorher das Klickpad befand, um den oberen Kunststoffclip der TV-Taste zu lösen.

    • Drücke vorsichtig von innen gegen die Klammer.

    • Achte darauf, dass die Sonde keine Komponenten auf der Hauptplatine berührt und waagerecht eingeführt wird.

  14. UQBLKg4l36CZNOKs
    UQBLKg4l36CZNOKs
    1sVhpw4eoBNNTK6n
    tsFMFJk3HvOIyPob
    • Schiebe nun den Stift in den zuvor entstandenen Spalt auf der Oberseite der TV-Taste.

    • Hebel nun die TV-Taste nach oben, um die restlichen Kunststoffklammern zu lösen.

    • Entferne die TV-Taste.

  15. SblBsrokLoiRnHyi
    • Nutze einen T3 Torx Schraubendreher, um die beiden 4,7. mm langen Schrauben zu lösen, mit denen die Siri-Taste an der rechten Kante der Fernbedienung befestigt ist.

    Those are T4 on my remote.

    Jason Tertadian -

    They are on mine too. That’s a good thing for me because I have a T4, but I don’t have a T3.

    Michael Caldwell -

  16. kotaTbayqfBU4lXT
    kotaTbayqfBU4lXT
    bCyHOHJcxWZDaH5K
    YJYCQKPF2m2GgAG4
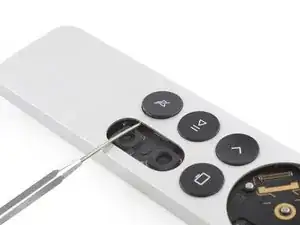
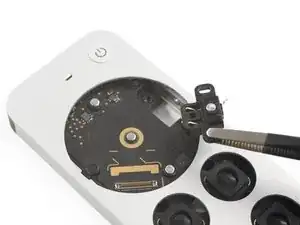
    • Nutze eine Spudger oder eine Pinzette, um die Siri-Taste aus dem Gehäuse zu entnehmen.

    • Entferne die Siri-Taste.

    Just leave it inside and slide it out with the main board. With the screws removed, it can be slid inwards far enough as to not be an obstacle.

    Bachsau -

  17. xKMqVCRpCGQxCKPH
    xKMqVCRpCGQxCKPH
    XAFYMIOwg5jcPETo
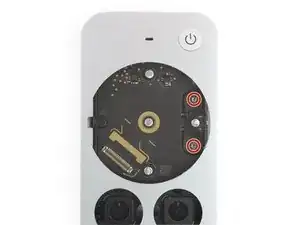
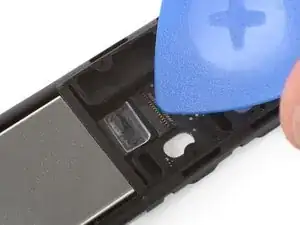
    • Drehe die Fernbedienung um.

    • Das vermeidet, dass die Einschalttaste ins Gehäuse fällt und sich verkeilt.

    • Stecke das flache Ende des Spudgers in den Ladeanschluss.

    • Keine Sorge, das beschädigt den Anschluss nicht.

    • Drücke den Spudger nun ca. 2,5 cm ins Innere des Gehäuses.

    • Schiebe den inneren Teil noch nicht vollständig raus, da die Einschalttaste erst noch entfernt werden muss!

    It's very hard to push out. Do NOT insert a spudger into the charging port, as it WILL damage the port. You might need to press it against a flat surface to even get it moving, which is not possible with the sharp tip of the spudger. I'd recommand a flat piece of wood or plastic to push against the full length of the tray instead of inserting something into the port. Also during sliding out and back in later, pay special attention to that knobs of aluminum around the clickpad. They are held in place only by adhesive tape and there's already one missing on the images of this guide. I had to replace one with a piece of plastic. They are exactly 1mm in height and 2mm in diameter.

    Bachsau -

    Those aluminum knobs that Bachsau mentions seemed to be the primary reason why I couldn't get the board out of the case. I used my tweezers to twist the three of them off and I was able to finally remove the board according to the rest of the directions. There was still plenty of adhesive to put them back during reassembly.

    Michael C -

  18. pwLWXuHXdgPtmVtW
    pwLWXuHXdgPtmVtW
    5bOVpeoICDbjjuLk
    KGVpBPO4M55QQojw
    • Drehe die Fernbedienung wieder um und achte darauf, dass sich die Aussparung im inneren Rahmen auf selber Höhe, wie die Einschalttaste befindet.

    • Drücke die Einschalttaste in die Aussparung im Rahmen, wenn sie nicht sowieso schon runtergefallen ist.

    • Entferne die Einschalttaste.

    Someone picked the power button off from the front and broke two of the four little black clips that hold the power button in place.

    Where does one get a new power button, or maybe just the black plastic piece on the back?

    Cuepawn -

    I have the same problem! Power button fell out on a short drop to the hard floor. Help anyone!

    Eric Pattengill -

    When reassembling, don't try to put it back before sliding in the tray. Instead push it in from the top afterwards. Hook in the plastic piece on the right side first, then push it in.

    Bachsau -

    this would be helpful in the actual guide. I just destroyed my remote by trying to do it in reverse order as instructed.

    Jason Tertadian -

  19. iAfRBABeFIgyeMFr
    iAfRBABeFIgyeMFr
    qu1ZFX1PD3E2x4v3
    • Ziehe den inneren Rahmen aus dem Aluminiumgehäuse.

    • Beim Ziehen wirst du einen kleinen Widerstand spüren.

  20. mVuekUNPBMAmfPCy
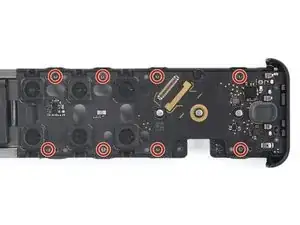
    • Entferne die acht 4,7 mm langen Torx T3 Schrauben, mit denen die Hauptplatine am Rahmen befestigt ist.

    • Entferne die Hauptplatine noch nicht ganz. Sie ist noch am Akku angeschlossen.

    So. Anyone trying this: This is the remote with the lightning connector! (2021!) The guide is indeed properly labeled. Up till here all is fine and dandy. From this point forward things change for the USB-C remote... For this specific step: there are TWO (2) more screws, right smack in the middle of the board. Make sure to unscrew those before you start tugging on the board...

    Raphael Ferreira -

  21. dSCLvopHKgLORS1J
    dSCLvopHKgLORS1J
    xOpY5KU31vRDYJWw
    • Drehe den Rahmen um.

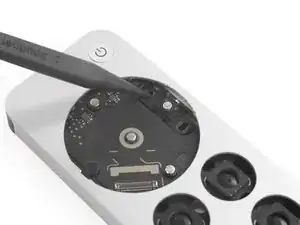
    • Hebe den kleinen Sicherungsbügel am ZIF-Anschluss des Trackpadkabels mit einem Plektrum hoch.

    If you, like me, was "smart enough" to pull on the white plastic tab BEFORE unlocking the flap, and completely tore the white/transparent flap off, unsuccessfully NOT detaching the cable by doing so.., don't despair. (Yet) After you lift up the locking flap, wiggle wiggle, gently, and the cable comes off easily. (The worse is YET to come...)

    Raphael Ferreira -

  22. MDIUgRPAi6Exh2Qy
    MDIUgRPAi6Exh2Qy
    QuZbBoDD6LSVRTWa
    PgXYsIcDkGeQDahA
    • Hebe die Hauptplatine nach oben vom Akku weg und entferne sie.

    Unless it is, read title, the 2021 remote, do NOT do this just yet. There is ONE more power cable running all the way from the battery to the middle of the board for the USB-C remote! And, guess what? Apple GLUES the connector, on BOTH sides. As if they soldered the connector to the socket, instead, it's two droplets of glue (Loctite?) Well, in my case, the reason I was tearing the thing apart was damage precisely in that connector. (So I found out.) Even if I had managed to break off the solid droplets of glue, remove the power cable, and then proceed to remove the board, it would have been no use. The cable attaches to three pins. The damage to my remote was liquid spilled over the remote. The water short-circuited precisely that connector, and one of the connecting pins was toast. It was stuck inside the connector and broke off of the board. And that was it for me. Well, at least it was fun! And good thing it's a less then $100 device... This was HARDER than replacing my HDD on my iMac 27" (Fusion Drive)!

    Raphael Ferreira -

  23. JhVLxbrMcUUdyYCW
    JhVLxbrMcUUdyYCW
    BTsOvIPYktjGQtNK
    u4BlTVXrjatPMeik
    • Der Akku ist leicht festgeklebt.

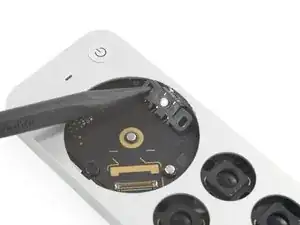
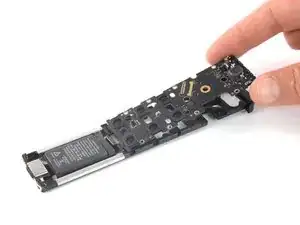
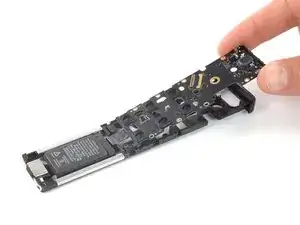
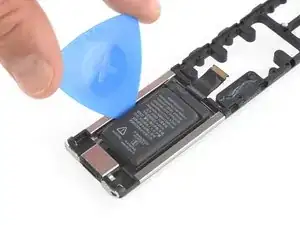
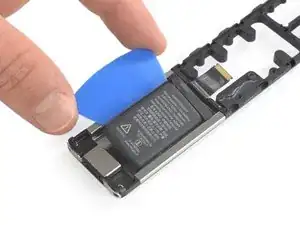
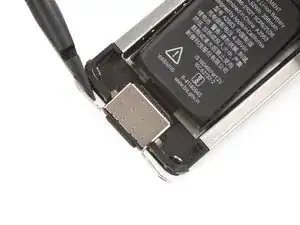
    • Setze auf jeder Seite des Akkus ein Plektrum ein und heble den Akku nach oben aus seiner Vertiefung heraus.

    • Achte darauf, dass du das Plektrum unter den Akku schiebst und nicht in den Akku hinein. Verbiege oder verforme ihn nicht.

    • Entferne den Akku noch nicht ganz. Die Ladebuchse ist noch im Rahmen verankert.

  24. GWQj4plRkyYZFS6Z
    GWQj4plRkyYZFS6Z
    EUhWrJrtI15yEBB4
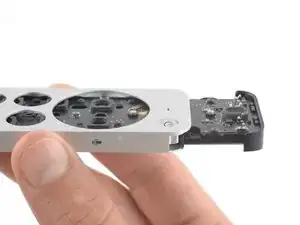
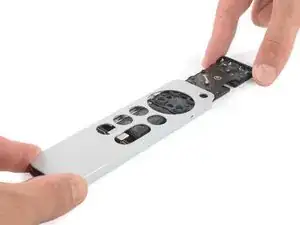
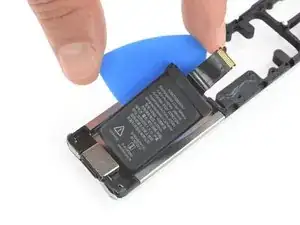
    • Schiebe die Akku- und Ladebuchseeinheit mit dem flachen Ende des Spudgers zur Unterkante des Rahmens hin, bis sie sich aus den metallenen Halteklammern löst.

  25. PaC6WHmwgevMMQas
    • Entferne die Akku-und Ladebuchseneinheit.

    What is the replacement battery assembly part and where can I purchase it?

    Martin Basil -

Abschluss

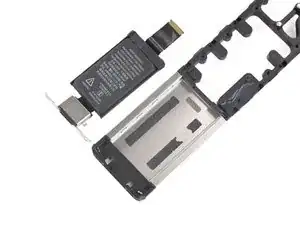
Vergleiche das Ersatzteil mit dem Originalteil. Es kann sein, dass du vor dem Einbau des Ersatzteils fehlende Komponenten übertragen oder Schutzfolien entfernen musst.

Um dein Gerät wieder zusammenzubauen, folge den Schritten dieser Anleitung in umgekehrter Reihenfolge.

Entsorge deinen Elektromüll sachgerecht.

Hat die Reparatur nicht ganz geklappt? Versuche es mit ein paar grundständigen Lösungen, ansonsten findest du in unserem Forum Hilfe bei der Fehlersuche.

Adriana Zwink

Mitglied seit: 18/12/19

58292 Reputation

5 Kommentare

FWIW, I don’t like having a “non-replacable” battery remote control. I idid find that my old AppleTV remote works with the new device, so if my battery ever dies I will just use my old remote with the button battery.

Phil -

Here here, heartily agree.

Brian Crawford -

And, remember: Push comes to shove, you can use your iPhone as a remote as well. Even the Apple Watch. Sortah. The AWU sometimes works, sometimes it doesn't. Works 10~ 20% of the time. You can definitely choose, say, a playlist, start playing from your watch to the AppleTV. Pausing and unpausing, sure. Now, l0hd fohbid you decide to try and control the volume... Or go back one song in the playlist... Or forward... Nope. No can do. But iPhone works "well". Not perfect, but OK.

Raphael Ferreira -

But where do I get a battery?

Robert V. (Polysculpture) -

Exactly where the &&^& do we buy the replacement battery

Kezza Z -