Einleitung

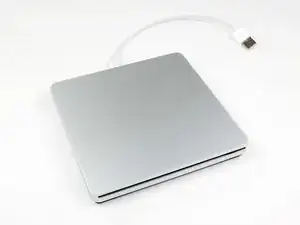
Eine einfache Anleitung zum Ersetzen des optischen Laufwerks im externen optischen Laufwerk, das von Apple für das MacBook Air verkauft wird. Wenn dein optisches Laufwerk defekt ist, kannst du es mit Hilfe dieser Anleitung ersetzen.

Hinweis: Hier ist eine Methode, um die OS X-Konfigurationsdatei für das SuperDrive zu hacken, damit es auf älteren iMac-, MacBook- oder MacBook Pro-Systemen verwendet werden kann, mit denen das Laufwerk normalerweise nicht funktioniert. Mit Vorsicht verwenden!

Öffne die Datei com.apple.Boot.plist in einem Texteditor oder verwende im Terminal nano, dann siehst du den Schlüssel <key>Kernel Flags</key>

Füge darunter diese Zeile ein:

<string>mbasd=1</string>

Starte deinen Mac neu.

Wenn du das neuere Modell A1379 hast:

Leider musst du das interne Laufwerk durch ein anderes identisches aus einem externen Apple SuperDrive Laufwerk ersetzen, da die Kontakte auf der Platine direkt mit dem USB-Kabel verlötet sind. Das Modell, das vor 2012 produziert wurde, ist ein Standard-PATA-Slimline-Laufwerk, aber jedes SuperDrive-Laufwerk, das 2012 oder später bei Apple gekauft wurde, benötigt zur Reparatur einen Lötkolben.

  1. gDPCLVLObdps2EN2
    gDPCLVLObdps2EN2
    mSJOHqyMKJ2YuxMM
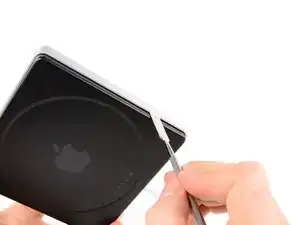
    • Um das SuperDrive zu öffnen, müssen wir das untere Gehäuseteil entfernen.

    • Das untere Gehäuseteil ist mit 8 Clips befestigt.

    • 6 an den Seiten

    • 2 auf der Rückseite

    <<Add the following>>

    Note: Here's a method to hack the OS-X configuration file for the SuperDrive to be used on the older iMac, MacBook, or MacBook Pro systems that the drive normally won't work with. Use with caution!

    open the com.apple.Boot.plist file in a text editor or in terminal use nano you will see a key <key>Kernel Flags</key>

    under it add the following line

    <string>mbasd=1</string>

    reboot your Mac

    Dan -

  2. xlFRQnRPYlLiJZDE
    xlFRQnRPYlLiJZDE
    Fd2rAy1PXK2GYvRo
    • Führe einen Metallspatel zwischen dem schwarzen unteren Gehäuse und dem oberen Aluminiumgehäuse ein.

    • Drücke ihn vorsichtig so weit zurück, bis der Clip sich löst

    • Nicht zu weit anheben, sonst verkeilt sich der Clip auf der gegenüberliegenden Seite des Laufwerkes.

  3. xUMSq652QWK2KGko
    xUMSq652QWK2KGko
    BrSVOgVMDS32BqHi
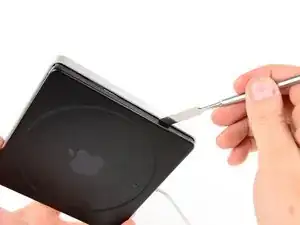
    • Wiederhole Schritt 2 für jeden der 8 Clips.

    • Fahre fort, bis alle Clips gelöst wurden und sich das untere Gehäuse löst.

  4. WlATOoKxWw4MxRGK
    • Hebe das untere Gehäuse hoch und lege es zur Seite.

  5. X3JMqAnIcERVI24c
    X3JMqAnIcERVI24c
    tCK24XX2wIqYtrvx
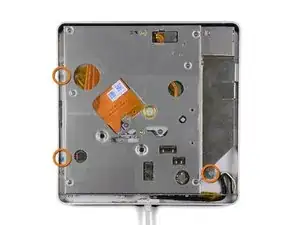
    • Entferne die Schrauben, welche das optische Laufwerk im oberen Gehäuse befestigen.

    • (A1270) drei 3,8 mm Schrauben mit 1 mm tiefem Kopf, #00 Kreuzschlitzschrauben.

    • (A1379) zwei #00 Kreuzschlitzschrauben (Ich hab die Länge nicht gemessen, sorry)

    • (A1379) eine T9 Torx Schraube.

    On later models the bottom-right screw is a TR10 (Torx) screw.

    boelaars -

    The 2 #00 screws in the A1379 are 3mm in length

    Mal -

  6. yTUaeutJIQGRHlxr
    yTUaeutJIQGRHlxr
    UYPLMv5xnwxYOwPd
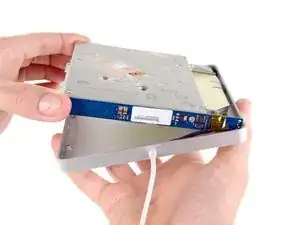
    • (A1270) Hebe das optische Laufwerk von der dickeren Seite aus an und ziehe es dann heraus.

    • (A1379) Bei diesem Modell musst du noch vorsichtiger sein, weil es dort weniger Spielraum gibt. Ziehe das Isolierband zurück, um den Stecker freizulegen.

    • Sei vorsichtig mit den Kabeln, da diese immer noch mit dem Gehäuse verbunden sind.

    • Wenn du das optische Laufwerk wieder einbaust, setze die Nut und Feder Seite, wie gezeigt, zuerst ein.

    On later models the cable goes left instead of right, after entering the enclosure. This makes lifting the optical drive harder, but if done carefully it can still be done safely. The cables and the tape that fixes it in place is flexible and sturdy enough.

    boelaars -

  7. ZdwNYCNUQyMUCPkg
    ZdwNYCNUQyMUCPkg
    tXRTgmYVpwH1CRJZ
    • (A1270) Entferne die Schrauben, mit denen die Platine am optischen Laufwerk befestigt ist.

    • Zwei 3,8 mm #00 Kreuzschlitzschrauben.

    • (A1379) Hier sind ähnliche Schrauben vorhanden, die aber nur die Abschirmplatte aus Metall entfernen, welche den Zugang zu den USB Kabeln ermöglicht.

    • Leider kann man das Laufwerk nicht weiter ausbauen, ohne einen Lötkolben zu benutzen.

  8. wdZDfjECaP53p3fQ
    wdZDfjECaP53p3fQ
    nviNUDjZFHRPLLf3
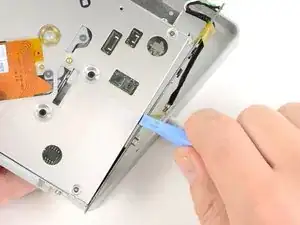
    • Benutze ein Öffnungswerkzeug aus Kunststoff, um die Platine vom optischen Laufwerk zu lösen.

    • Das optische Laufwerk ist jetzt vom Gehäuse getrennt.

Abschluss

Um das Gerät wieder zusammenzubauen, befolge diese Anweisungen in umgekehrter Reihenfolge.

Alex Jansen

Mitglied seit: 22/04/10

9197 Reputation

23 Kommentare

After you pry open, inside there is an internal Super Drive.

Please tell me what's the markings/printed words model, name, brand, part number, etc....

Thank you.

gwen kent -

My drive has nothing on that orange part in the middle of the drive (like you can see in the pictures here) except for two QR codes; it has absolutely no markings/printed words model, name, brand, part number, etc. on the inside, except the manufacturing date 2012 stamped inside the black aluminum bottom case cover.

Hope this helps.

cubanpete -

Thank you. My drive from 2012 ist fastened with a six-sided star-shaped Torx screw on the right side. The ones on the left side are black Philips screws and they are so tiny that they are hard to see in normal light. All I want to do is clean the drive from dust since it won't read DVDs anymore, while it has no problems with CDs at all. So now this Torx screw is another obstacle. I will have to waste more time & money buying an extra tool, thanks to Apple.

cubanpete -

Is it possible to replace the internal DVD drive by a Bluray? Does macOS Sierra work with external Bluray drives?

Thanks for helping.

Sincerely

thomasli -

Yes, but the only drive that is known to be an ATAPI (EIDE) connecting drive that supports Blu-ray is the Panasonic UJ-215-B. They were astronomically priced new in 2007-2008 when they were released. Good luck finding one today, and if you do it will still be very expensive and almost never a new one. But it seems to be a direct drop in replacement. I myself have already begun this project, and have one on the way right now. Bought it for $250 so it was pricey but considering it was new I got very lucky.

matthewknice -

Will any drive works? Is is SATA?

Philippe Morin -

Nope, it's two different models- the first model was IDE, the second model has the USB cable soldered straight to the drive. Most unfortunate.

Josh Calvetti -

Thanks Alex. If you want to clean the internals there are 4 screws holding the top of the drive. There is one a bit longer than the other three. Make sure you mark the hole for the longer one. Removing these screws and the top of the drive exposes all of the areas to be cleaned. Also, if anyone tinkers around with these and other computer devices even occasionally, it will make your tasks much easier if you buy the Ifixit Pro Tech Tool Kit.

Owen Gascoigne -

Not sure why I wasn’t told till step 7 that I can not replace my optical drive because its soldered together. You can't just use another mac optical drive to replace it, they aren’t the same. Waste of time

Ryan Meyer -

The guide does mention that there are two different versions in the introduction, and that if you have the newer version you’ll have to use an identical drive from another 2012 or later SuperDrive. It’s a stupid decision to be sure. Sorry it didn’t work out for you!

Josh Calvetti -

Does anyone have any information about the drive that I need for the soldered type drive. I can’t find out which drive to order. (part number or model number) I can find the earlier model drive, but not the newer drive.

kevs -

Mine won't erase RW-DVD/CD and I was thinking in replacing the internals with a MacBook drive…

I probably will have it figured out before anyone answer but do they have the same interface?

Carlos Ferrari -

Is there a replacement USB cable available for this unit? Bad design causes the section where it exits the case to get crunched. Need a replacement cable.

Thanks,

Andy

Andy Espo -

Hey Andy,

unfortunately I do not think a replacement cable has ever been made available. On the later revisions the cable is soldered straight to the contacts on the drive- in theory, you could desolder it and re-solder the replacement, but there is no quick fix.

Josh Calvetti -

Is there a way to tell what version you have without tearing it down?

Stanley Smith -

Directly on the bottom of the case itself.

matthewknice -

@swsmith1971. under the Apple (upper left hand corner) > about this Mac > System Report > SATA/SATA Express >. should be the top item

mayer -

Can I replace usb A conector with usb C?

Parsa Meshkini -

No, you can’t replace the connector, you can get an adapter which will allow the drive to connect to your USB-C Mac.

Dan -

Well, depending on your definition of "replace" you can surely solder in a USB-C cable, though one will have to figure out the best course of action with A) Removing the existing cable or B) Just soldering on a new USB-C plug (won't require disassembly).

Martin Winkelmann -

Just use a USB-A to USB-C adapter, don't hardwire the drive.

Dan -

In step #6, it can help to disconnect the "tongue" part (connected by two screws to the side of the internal drive) before removing the drive. When reinserting make sure that the part is properly inserted into the grooves of the silver case, one on the side and two small ones in the roof. When screwing it back onto the drive you will have to hold the drive up a bit so the screws will line up.

Martin Winkelmann -

Muchísimas gracias.

Me has ahorrado 89€.

Saludos.

Pedro Garcia -