Einleitung

Schneller und leichter Auseinanderbau der Präsentationsfernbedienung.

Ich habe am Ende aus Versehen ein Teil kaputt gemacht, aber es ist nicht notwendig...

Die Anleitung sollte für den R700 und den R800 ähnlich aussehen, aber ich habe keinen von beiden.

  1. WlSwGIObtj2LCYqp
    WlSwGIObtj2LCYqp
    UZnhJHRkXH1LvPEV
    • Entferne das USB-Dongle.

    • Öffne das Batteriefach.

    • Nimm die Batterien heraus.

  2. doovfqp3onhdpwXs
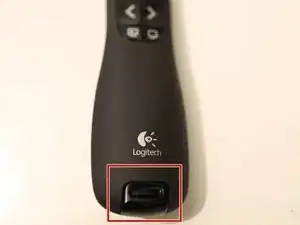
    • Zum Entfernen des Klebestreifens habe ich einen kleinen Schlitzschraubendreher verwendet und ihn sorgsam an der gezeigten Stelle angesetzt. Dort gibt es eine kleine Einkerbung, die dich unter den Sticker führt.

  3. 4veKpaG3naHB2w3n
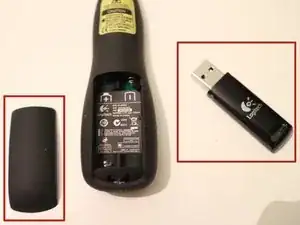
    • Unter dem Klebestreifen kommen zwei Kreuzschlitzschrauben (rot eingekreist) zum Vorschein. Löse sie.

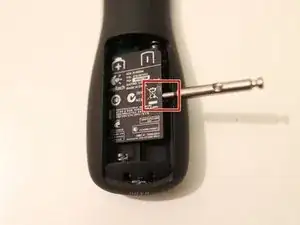
    • Edit von Simon (siehe Kommentar): Im gelb markierten Schlitz befindet sich eine Lasche, die zum Entriegeln nach unten gedrückt werden muss. Wenn du ein Plektrum in die Nut zwischen der oberen und unteren Hälfte des Gerätes einführst, sollte es sich leicht öffnen lassen, wenn du auf den Riegel drückst.

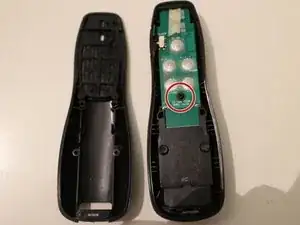
    • Heble nun vorsichtig die beiden Gehäusehälften auseinander, beginne von der Seite des Batteriefaches.

    In the yellow slot there is a tab that is to be pushed down to unlatch it. If you insert a pick in the seam between the top and the bottom half of the device it should open easily when downward pressure is applied to the latch.

    Simon Virenfeldt -

  4. WhRf5pcStcxVZjP1
    • Die grüne Platine ist der Ort, an dem die ganze Magie abläuft, also verkratze sie nicht.

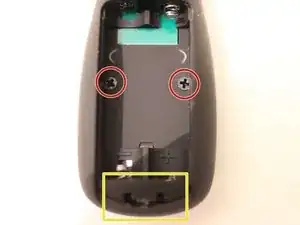
    • Es gibt eine einzige Schraube. Löse sie.

    • Nimm die grüne Platine vorsichtig heraus. Die Anschlüsse des Akkus sind daran angeschlossen, also mach sie nicht kaputt (trotz ihrer Robustheit). Schritt 6 zeigt auf dem Bild, wie die Platine von der anderen Seite aussieht.

  5. W62nVSXngq2mxQZB
    • So sollte das Endergebnis aussehen.

  6. n66KAJXCok3fZHt4
    n66KAJXCok3fZHt4
    RoXJ2ngCxhb54QXK
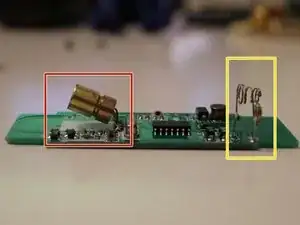
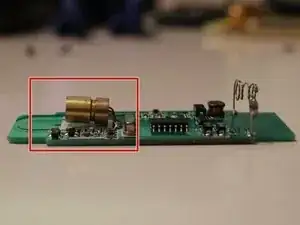
    • Der Grund, warum ich meinen Presenter zerlegt habe war, dass die Laserdiode (rot) nicht mehr aus dem Gehäuse raus geleuchtet hat. Man sieht, dass der Laser in einem merkwürdigen Winkel steht. Ich kann mir nicht vorstellen, wie das passiert ist.

    • Der gelbe Marker zeigt die Batterieclips, die in Schritt 4 nicht abgebrochen werden sollen.

    • Im letzten Bild ist die ausgerichtete Laserdiode. Ich habe sie einfach vorsichtig nach unten gebogen. Jetzt funktioniert es wieder.

    you should upgrade the unit to a green laser! :)

    Thanks for your tutorial. I fixed my R800 that had a sticking button.

    Good job

    doug

    dgourlay -

    In my device, they had an additional fixture for mounting the laser diode to the case that had to be unscrewed. Probably to prevent the issue you were having.

    Thanks for the guide!

    Andy -

Abschluss

Um dein Gerät wieder zusammenzubauen, befolge die Anleitung in umgekehrter Reihenfolge.

Stephan

Mitglied seit: 13/08/16

1309 Reputation

14 Kommentare

excellent description. it works immediately.

wafiq shafiq -

well done … I did not expect to dissamble an electronic device and it is going to work again :)

wafiq shafiq -

god bless you mate!

Filip Liebert -

R800 disassembly is indeed similar, although the sticker is in two parts. The battery image should also be removed.

Dave Geerardyn -

Seems that Logitech has produced several generations or versions and calls them call R400. Mine looks all different inside, for example the laser diode cannot bend any longer, it has got its own bolting-down-plate and two flex cables to connect it. My PID is WD502XM. Mine was purchased in Denmark or Sweden some time in 2014 or 2015. My laser stopped working too (while the rest of the functionality is still working). How can we set up different versions on ifixit, so that we will not confuse versions and discussions/instructions? I am new here, joined today.

Martin -

I don’t really know if there is a way to do sub-products or something here in iFixit. Maybe you just create a separate instruction and we cross-link them, so when people see that they did not find the correct one, they can try the other.

Stephan -

Thanks so much! I suspect the laser stopped working fro some other reason and when you opened the case it got bent. By straightening it, it fixed the original issue. Anyway an instructor brought in a wireless presenter this morning and said she dropped it and the button cover popped off so I was able to open the case just the 2 screws and slip the button cover back on. Thanks SO MUCH for these instructions!

creepy6400 -

Great Tutorial, worked perfectly. It is on point! Thank you Sir!

Projekt59 -

Thank you!

We all hate the hidden screws behind stickers.

Your manual helped me with a stuck timer button on my R700.

The industry should take Sony as model and putt nice arrows on all important service screws.

Christian Meinert -

Hehe, yes, but that would lead to more people trying to repair their stuff, not just buying new!

Stephan -

Great tutorial. My board looked a little bit different (the laser was on a separate board), but the general instructions were still applicable.

Jonathan Haas -

Very useful indeed. May remote got sticky over time. Is there a way / place to buy the plastic parts of ths remote?

Silvino Almeida -

Just putting this here, it might help others.
My batteries leaked from being unused in the device for years.
The sticker from step 2 actually stuck to the bottom of the chip, and due to the battery leakage it started to form some connections between some of the connectors on the chip where they shouldn't. Removing the sticker and all sticky residu on the chip fixed it for me.

Thomas -

Very nice guide, I have a R800 the opening mechanism is the same, although the insides are completely different. My laser pointer is dead, no brigthness whatsoever, I don't think it's replaceable :(

Guilherme Capii -