Einleitung

Wenn du keine Selfies mehr schießen kannst und keinen Videoanruf mehr tätigen kannst, solltest du die Frontkamera austauschen. Dies wird hier gezeigt.

  1. ULnvPKaBlYPFFuHV
    ULnvPKaBlYPFFuHV
    caH3h5y1ySegaUef
    5oNv2q4UOCRoWXGB
    • Vergewissere dich, dass dein Telefon ausgeschaltet ist, bevor du beginnst.

    • Nimm ein SIM Auswurfwerkzeug oder eine Büroklammer und entferne den SIM Karteneinschub.

  2. UJOqoDPSoMa2OHRt
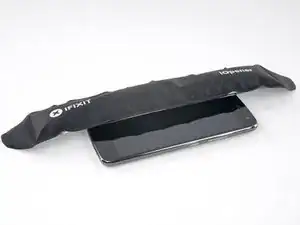
    • Bereite einen iOpener vor und erhitze die Vorderseite des Smartphones entlang der linken Kante für etwa 2 Minuten oder so lange, bis es zu heiß ist, um es anfassen zu können. Das hilft den Kleber des Displays zu lösen.

    • Es kann sein, dass du den iOpener mehrmals erhitzen und auf das Smartphone legen musst, damit es warm genug wird, um den Kleber aufzuweichen. Beachte die iOpener Anweisungen, um eine Überhitzung zu vermeiden.

    • Du kannst auch einen Haartrockner, eine Heizplatte oder ein Heißluftgebläse nehmen. Achte aber darauf, dass du das Smartphone nicht überhitzt. Sonst kann der Akku und oder das Display Schaden nehmen.

    Heat not only along the phone’s left edge, right?

    Rémi Boissonnas -

    I used two suction cups on the screen. Just above the finger print reader and the other near the top. Then used my heatgun set at 390 degrees. Low speed and had the wide, flat blade attachment so the heat spread to a narrow/wide area. Heated the left edge from corner to corner, then pulled up on the suction cups until I could work in a plastic triangle guitar-like-pic under the screen. Continued to heat and add another pick around the screen . Do not rush and take your time. Got the screen off and didn’t damage the adhesive too bad. Was able to reuse it. Once reassembled, I heated the screen around the edge and rubbed with a plastic tool to make sure the adhesive was working. So far so good with the adhesive. Good Luck!

    strtrekbuf -

  3. wV3Y6cOk3GQQjXvM
    wV3Y6cOk3GQQjXvM
    aJLVwQlmven4VYa4
    1RofNbJArgVgONK4
    • In den folgenden Schritten wirst du den Kleber an den Kanten der Displayeinheit durchschneiden.

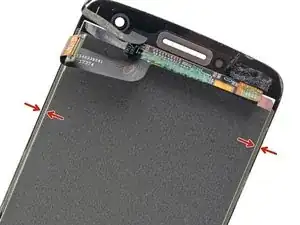
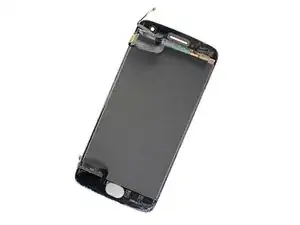
    • Betrachte das zweite und das dritte Bild und mache dich vertraut damit, wie breit die Klebestreifen um die Kanten des Displays sind.

    • Wenn du das Display wiederverwenden willst, musst du an den Seiten des Displays besonders vorsichtig sein. Schiebe das Werkzeug nicht tiefer als 2 mm ein und halte den Winkel zum Display so flach wie möglich.

    2mm ONLY on the SIDES of the display. The top can have adhesive as far as 10mm from the edge, and at the bottom as much as 12mm. And there’s no way to cut this adhesive with the tools at 45 degrees. Once the left side is open, carefully insert the tool a little further at a time on the top and bottom, whilst attempting to keep a little pull force on the suction cup. Hard to do, and almost inevitably the on-off button will be hit at some point unless you’re really careful. The adhesive pieces are quite tough, and I used a tiny scissors to cut some of the adhesive “ropes” when the case was far enough open. A highly detailed photo of the adhesive locations top and bottom (and on both parts) would help here. This is likely the most difficult step (well, don’t know for certain, ‘cause I haven’t got further yet…), and warrants better photos and explanation IMO.

    max barcalounger -

  4. YhhZ5A6h1FS1dMHN
    YhhZ5A6h1FS1dMHN
    cUSOvqjYyhveOMdK
    DLRcJyIqVALqIYdy
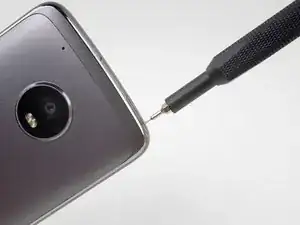
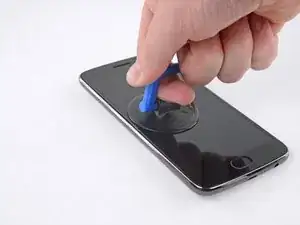
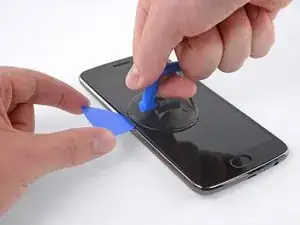
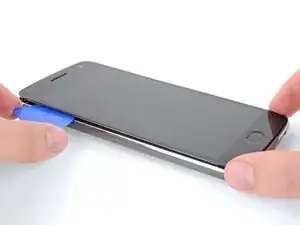
    • Setze einen Saugheber nahe der Mitte der linken Seite an.

    • Ziehe den Sauggeber mit fester und konstanter Kraft hoch, so dass ein kleiner Spalt zwischen dem Displaypanel und dem Rückgehäuse entsteht.

    • Wenn die Scheibe gebrochen ist, oder der Saugheber nicht gut hält, dann versuche ihn mit starkem Klebeband anzuheben, oder befestige den Saugheber mit Superkleber und warte bis er getrocknet ist, bevor du weitermachst.

    • Wenn sich das Display selbst mit größerem Kraftaufwand nicht ablösen lässt, dann erwärme es nochmals und probieren erneut. Der Kleber kühlt schnell ab und muss häufig wieder erwärmt werden.

  5. OMi6uIEQf1ODFlVI
    OMi6uIEQf1ODFlVI
    tXkwyBpN1IuJZkZv
    DllgcJcSDhJQLy4Q
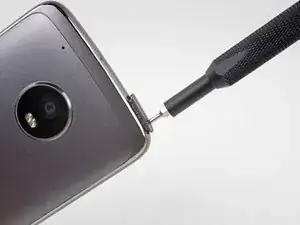
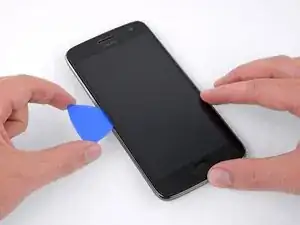
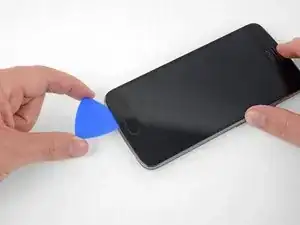
    • Schiebe das Werkzeug an der linken Kante des Smartphones entlang und trenne so den Kleber des Displays auf.

    • Es ist hilfreich, während du den restlichen Kleber am Display auftrennst, das Plektrum stecken zu lassen und ein anderes für den nächsten Schritt zu verwenden.

  6. w4WUOVGfEpdXPMjU
    w4WUOVGfEpdXPMjU
    FIGcgGpasKDBk1VB
    • Schiebe das Plektrum nach unten und trenne den Kleber am unteren Rand des Displays auf.

    • Wenn der Kleber zu zäh zum Auftrennen ist, dann erwärme ihn erneut, bis er sich leicht trennen lässt. Zu starkes Hebeln oder zu viel Kraft kann das Display oder andere Komponenten dauerhaft beschädigen.

    • Sei vorsichtig, wenn du das Plektrum an der Ober- und Unterkante entlang schiebst. Die Displaykabel, der Fingerabdrucksensor und sein Kabel befinden sich ziemlich nahe an den Kanten des Displays und können leicht beschädigt werden. Dieses Bild zeigt dir, wo sich die Kabel genau befinden.

  7. gkfpcPAVFSCjV3Rt
    gkfpcPAVFSCjV3Rt
    ZnFGVALEwlJ4KqJP
    JxnTTRc4wipDpotm
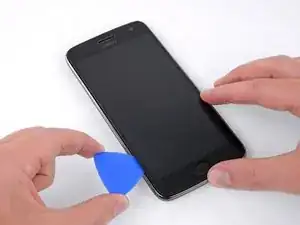
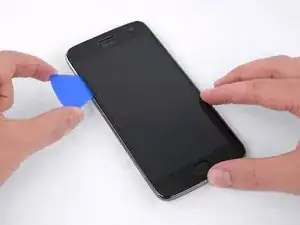
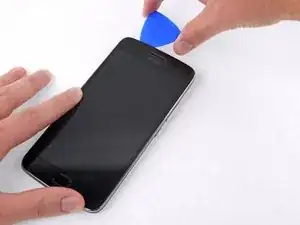
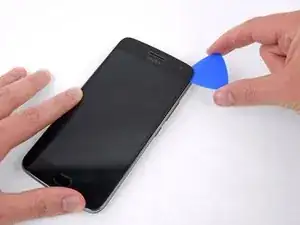
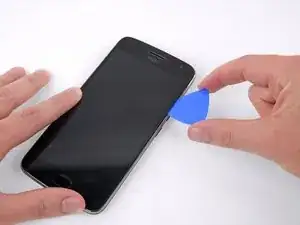
    • Fahre mit dem Auftrennen des Klebers an der oberen und rechten Seite des Smartphones fort.

    • Der Näherungssensor, der Ohrhörer-Lautsprecher und die Frontkamera befinden sich alle an der Oberkante des Smartphones, allerdings sind sie unter der Displayeinheit. Du solltest sie keinesfalls berühren, wenn du den Kleber mit dem Plektrum aufschneidest.

    Pues se me fastidia la pantalla al hacer esto

    Carolina Folgado -

    This is a great guide except for one thing. My screen works fine but it is separating from the phone on both sides. I need to remove it just enough to clean up the old adhesive and reattach. The instructions on repeating the steps in reverse order to replace the screen doesn't help with getting the regluing right, what kind of glue or double sided tape to use, etc …

    Gretchen Zimmermann -

  8. 4xnSJILyBbtIxFJB
    4xnSJILyBbtIxFJB
    RdnXj2MmLPxekwMU
    dQ5CZTF2QTCWCkIP
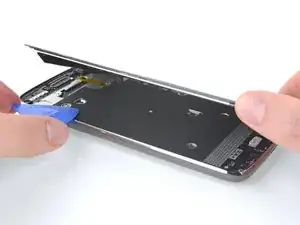
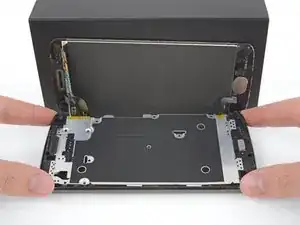
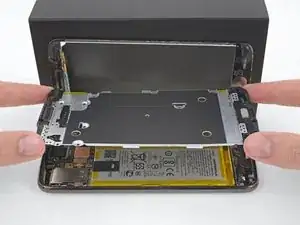
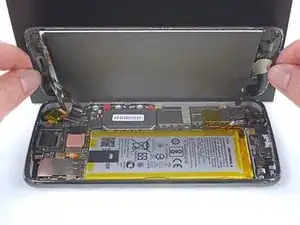
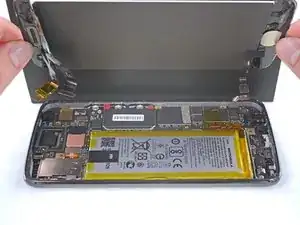
    • Wenn der Kleber komplett getrennt ist, dann hebe das Display vorsichtig von der linken Seite her an.

    • Entferne das Display noch nicht ganz. Es ist immer noch an ein paar Kabeln angeschlossen, die leicht abreißen können.

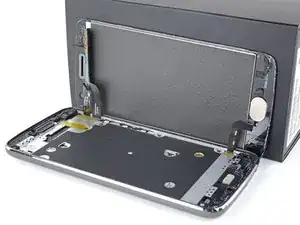
    • Stütze die Displayeinheit im 90° Winkel gegen eine Schachtel, so dass die Kabel vom Display und vom Fingerabdrucksensor nicht verbogen oder zerrissen werden können.

    it should be pointed out that the fingerprint cable is easy to tear as it lays next to a sharp angle of the display unit.

    Vincenzo -

  9. sv3pISXuZjSM6qhk
    sv3pISXuZjSM6qhk
    vMdYqlZX6WdLyXKR
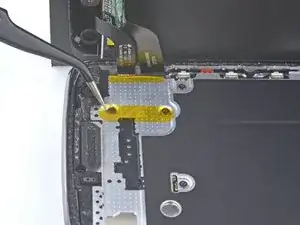
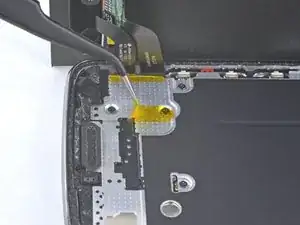
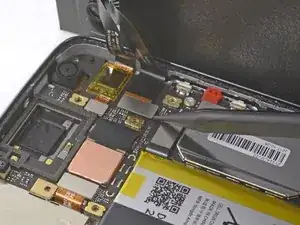
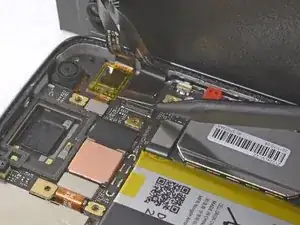
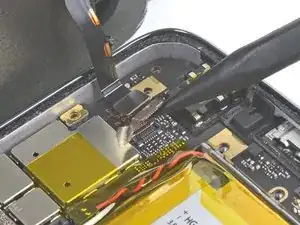
    • Entferne den gelben Aufkleber, welcher zwei der schwarzen Kreuzschlitzschrauben unterhalb des Ohrhörers bedeckt.

    Attention must be paid not to lose the small rubber gasket around the proximity sensor - I found it best to collect it with all the screws of the midframe and reinstall it at the end during re-assembly.

    Fabrizio Sassi -

  10. QiwmwFwrb6VPLDBR
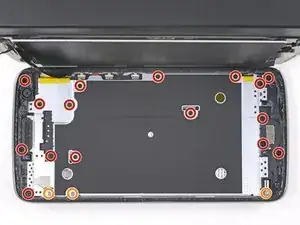
    • Entferne folgende Kreuzschlitzschrauben vom Mittelrahmen:

    • Sechzehn schwarze 3,8 mm Schrauben

    • Drei silberfarbene 2,4 mm Schrauben

    Esa placa se levanta por el otro lado, por donde estan los botones de volumen por ahi se puede levantar de una mejor manera.

    Hector Juarez -

  11. uB55HBT65gPWYrj4
    uB55HBT65gPWYrj4
    YZYSBBwcvyCI6okI
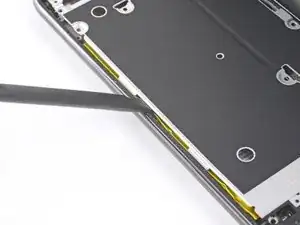
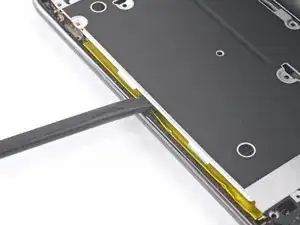
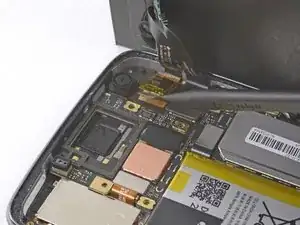
    • Setze das flache Ende des Spudgers zwischen Mittelrahmen und der linken Seitenkante des Smartphones ein. Heble vorsichtig nach oben, damit sich die beiden Rasten lösen, welche den Mittelrahmen festhalten.

    A lot easier to pry open from the right side of the phone.

    Kevin Limanta -

  12. kCPGPGPJEMUeGHQK
    kCPGPGPJEMUeGHQK
    ObQoSbluXNpjBQAl
    • Hebe den Mittelrahmen hoch und entferne ihn vom Smartphone.

    If replacing the battery, jump to that section at this step.

    [deleted] -

  13. VQ2dqAILVgKRmxUm
    VQ2dqAILVgKRmxUm
    oJmBrXcsec5RYwR2
    • Löse mit der Spudgerspitze den größeren der beiden Displaykabelstecker.

  14. lxgoSiwJgb6k66oX
    lxgoSiwJgb6k66oX
    4dXTAcnRPeFRhrM2
    QZHSyV2GQoDeALSa
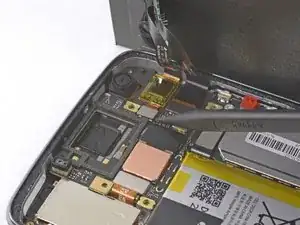
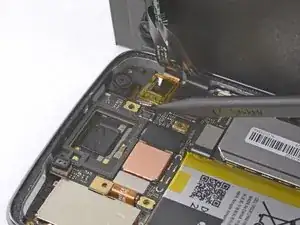
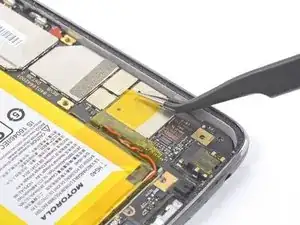
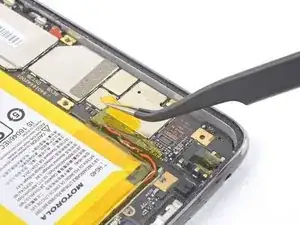
    • Löse den kleineren Displaykabelstecker.

    • Dieses Kabel beherbergt einen Kontrollerchip für das Display, der mit gelben Klebeband ummantelt ist. Du musst das gelbe Klebeband nicht entfernen. Der Chip ist leicht mit der Hauptplatine verklebt, sollte sich aber relativ leicht ablösen lassen.

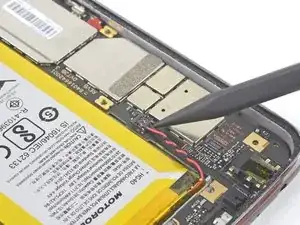
    • Fahre vorsichtig fort, das Kabel hochzuheben, damit sich die Klebeverbindung löst. Ziehe das Kabel von der Hauptplatine weg.

  15. oeYdm2ZnDvHCxy4C
    oeYdm2ZnDvHCxy4C
    bTC54klH3mCLSiCd
    • Löse das Kabel zum Fingerabdrucksensor am gegenüberliegenden Ende des Smartphones ab.

    • Das Kabel ist mit einem Klebestreifen an einem Abschirmblech befestigt. Während du das Kabel hochhebst, ziehe auch den Klebestreifen ab. Du kannst den Klebestreifen auch zuerst abziehen, bevor du das Kabel löst.

  16. JRhCOOxC3huhZ5hQ
    JRhCOOxC3huhZ5hQ
    WN3OkghoYWqmHtCZ
    • Entferne die Displayeinheit vom Smartphone.

    • Bevor du das Display wieder einbaust, musst du erst mit Isopropylalkohol alle Reste von Klebstoff und Glas gründlich vom Rahmen des Geräts entfernen.

    • Schalte dein Smartphone erst an und teste es ausführlich, bevor du neue Klebestreifen befestigst und die Displayeinheit wieder verklebst.

    • Wenn dein neues Display keine Touch-Funktion hat, obwohl du sicher bist, dass alles richtig eingebaut ist, dann stelle ein Backup deiner Daten her und setze das Gerät auf Werkseinstellungen zurück .

    If your digitizer appears to be "dead", power down the phone (which you can't because the digitizer is dead) and disconnect the battery connector by prying the connector up out of its socket (with something NONE conductive like your spudge tool) for few seconds. (It does not "slide" out, but pries straight up.) This will FORCE a cold boot and initialize the digitizer WITHOUT a factory reset, preserving all setups and all your files. :-)

    Glenn Hagfors -

  17. DBvdPnn6INIiljuY
    DBvdPnn6INIiljuY
    4yF3DrbRBOEDGcZR
    • Entferne den gelben Klebestreifen, welcher den Akkustecker bedeckt.

  18. Chc2liloF5lk2GKm
    Chc2liloF5lk2GKm
    nQyy5Hr1OJTIdoIM
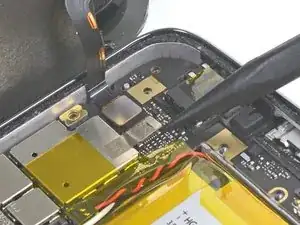
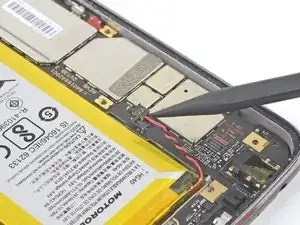
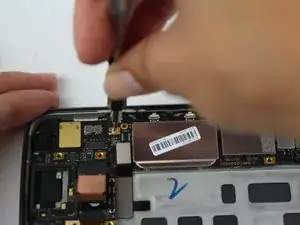
    • Heble den Akkustecker mit der Spudgerspitze senkrecht zur Hauptplatine nach oben und trenne so den Akku ab.

  19. wYtmpHWncAg2nhS3
    wYtmpHWncAg2nhS3
    UfwfCAR5HRK6JwSa
    oZdWZtlUCi1PhlbG
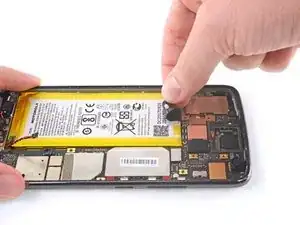
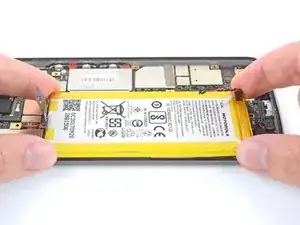
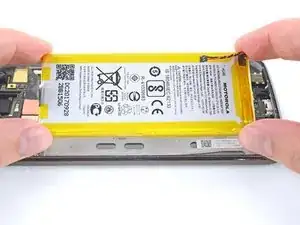
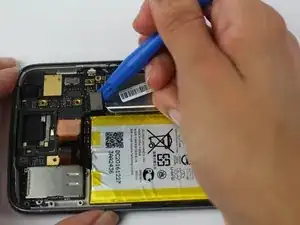
    • Löse die schwarze Zuglasche oben am Akku ab und ziehe sie kräftig und gleichmäßig heraus, so dass die Klebeverbindung, welche den Akku befestigt, gelöst wird.

    • Der Akku ist mit mehreren Klebestreifen befestigt. Du kannst sie möglicherweise alle mit der Zuglasche ablösen. Wenn das aber nicht gelingt, dann lege einen erwärmten iOpener auf die Rückseite des Geräts, damit der Kleber weich wird und fahre mit dem nächsten Schritt fort.

    You don't even need to remove the battery! You can just leave it glued in and pop out the motherboard from around it.

    Nathan Friedly -

  20. dCYIlgAvoPTvJHVY
    dCYIlgAvoPTvJHVY
    tkj12GWnb4JTtrQo
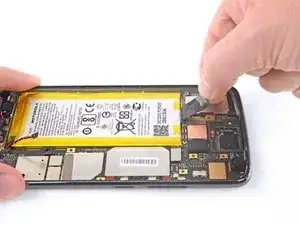
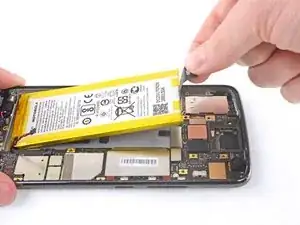
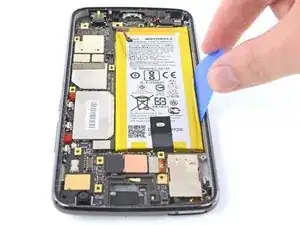
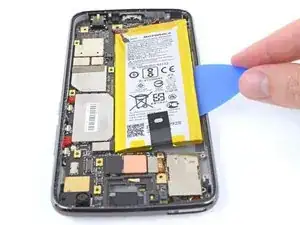
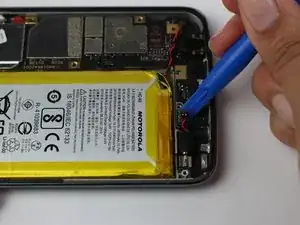
    • Wenn die Zuglasche abgerissen ist oder die Klebeverbindung zu stark ist, dann heble den Akku vorsichtig mit einem Plektrum aus dem Gehäuse.

    • Heble nur gegen den Gehäuserand. Wenn du an anderen Stellen arbeitet, kannst du freiliegende Bauteile stark beschädigen.

    In my case the battery was very securely attached to the case. The only way I managed to get it out was by inserting one of the picks pointy-edge in on the same side where the pull tab is located. Even then, I bent the battery slightly and fully agree with the suggestion of not reusing it.

    Fabrizio Sassi -

  21. olJwETZQDiouCrMT
    olJwETZQDiouCrMT
    wapLsGPZBwPtT3sN
    • Wenn der Akku frei ist, dann entferne ihn vom Gerät.

    • Benutze den Akku nach dem Ausbau nicht mehr. Die Belastung beim Ausbau kann den Akku beschädigen, ohne dass dies sichtbar wäre, und ihn zum Sicherheitsrisiko machen. Ersetze ihn durch einen neuen Akku.

    • So wird der neue Akku eingebaut:

    • Entferne alle Klebstoffreste vom Smartphone. Reinige den gesamten Bereich unter dem Akku mit Isopropylalkohol.

    • Bringe ein paar neue Streifen vorgestanztes Klebeband oder Tesaband an.

    • Wenn du den Akku mit fertig zugeschnittenen Klebestreifen festkleben willst, dann benutze diese Anleitung.

    • Drücke den neuen Akku 5 - 10 Sekunden lang fest.

    It would be nice to have some instructions on how to use the adhesive sticker. I finally just kluged it on, then saw there was a double part to the blue shield, with part of the adhesive cut so that it can go behind the ribbon cables.

    Robert Lynch -

    Hi Robert,

    Thanks for the suggestion! I’ll add some more instructions on how to apply the battery adhesive.

    Arthur Shi -

    Why won't anyone show a back door removal? Yes it's difficult, but you won't damage the display and other components between you and the battery. I did this procedure and I damaged the display, and when it was all put back together the proximity and fingerprint sensors didn't work, and the phone has a big bulge in it where before there was none. Yes it was operator error (me), but I'm not retarded and I had the proper tools. It could save much frustration and money if someone would show a back door removal for battery replacement on these phones (moto g5 plus, moto g6, moto g7). Thanks!

    Albert Einstein -

    That’s an interesting idea! I’m not certain if the you can get in from the back panel, as it is attached to the frame and seemingly screwed in from underneath the display. But, I may be wrong!

    Arthur Shi -

    It's not possible, unfortunately. The bottom frame comes between the battery and the back cover.

    https://youtu.be/H_Z_-uJ8l9U?t=293

    Elliott -

    Hmm, no mention of:

    1. take the (black on mine) battery-removal/grab-able tape section off the old battery and install it on the new one in the appropriate place. Otherwise gonna be much harder to remove the battery next time. Too late for me.

    2. what to do about the little foam-tape sections around the top and bottom of the phone between the screen and the interior cover plate. I’m just gonna leave ‘em in place, as I can’t see how you could effectively mimic the original factory stuff with the tesa tape.

    3. how to install the perimeter seal. I saw on a you-tube that you should cut the “cable” side of the perimeter strip off of the rest of the sheet and to install that piece (must align very carefully with tape guides) before attempting to install the screen and its cables.

    max barcalounger -

    OK, correction on the perimeter seal; here’s how it should be done (don’t cut anything; ignore my comment item 3. above):

    1. The perimeter seal is a sandwich of 4 layers, the translucent white release sheet, the adhesive layer (black), a removable release layer (turquoise) that matches almost exactly the shape and configuration of the adhesive layer, and then the positioning sheet (also turquoise). 2. BEFORE the internal frame/cover/whatever-it-is to be installed, BEFORE the screen ribbon cables are installed, the perimeter seal must be installed.

    3. Remove the translucent white release sheet. VERY carefully align the entire rest of the sandwich over the open rear frame ledge (with battery already installed). Notice that where the frame ledge is a bit fatter at the upper corner, so is the seal width. The entire positioning sheet can fit just inside the edges of the rear frame when it is positioned properly. Start at the bottom and fit it very lightly into position (too hard—>it will be stuck). cont.

    max barcalounger -

    continued from above:

    4. when the whole thing is fit properly into place, you can remove the entire positioning sheet—just peel it up. Note that it’s a bit tricky at the top where the rear camera and light protrude. But there is a tab in this area in the positioning sheet to pull up the positioning sheet and better allow for fitting the seal into place along the top.

    5. At this point the seal should be properly positioned around the entire perimeter. Note that there is still the final release part of the sandwich still on top. Woo-hoo! You can now press that down with a tool so the seal is well-attached to the rear frame. Leave this in place until you’re ready to install the screen permanently.

    6. When you’re ready to install the screen, THEN remove this final release and carefully fit the screen into position. And, yes, I’ve left out a LOT of steps between item 5. and 6. in this list. Those things are more straightforward and are just reversing what you did to disassemble. You’re welcome.

    max barcalounger -

  22. CfOhPYM6gYxPI4Qj
    • Entferne die einzelne 3,1 mm Kreuzschlitzschraube #000.

  23. pRVLsjHWg3Nxtqw1
    • Trenne den Anschluss des Vibrationsmotors mit dem Plastiköffnungswerkzeug ab.

  24. LJ5RI3nQEwHlBCyJ
    • Löse den Flachstecker mit dem Plastiköffnungswerkzeug.

  25. JepkvO3dR6TmCDU3
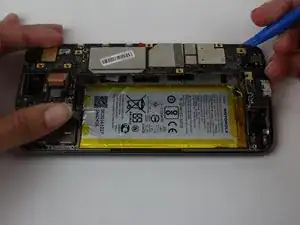
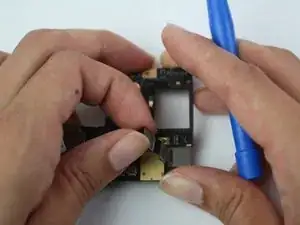
    • Hebele die beiden Rasten auf, welche die Hauptplatine am Rahmen des Smartphones befestigen.

  26. C1ZkB3pHBkcwaH5u
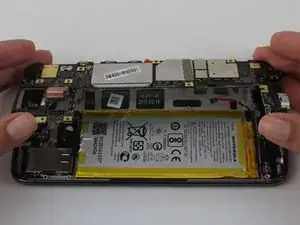
    • Heble die Hauptplatine mit dem Plastiköffnungswerkzeug vom Smartphone weg und entferne sie.

  27. xZea2GjT2WUp61wp
    • Die Frontkamera befindet sich in der oberen rechten Ecke, über der Einschalttaste und der Lautstärkewippe.

    • Drehe die Hauptplatine herum.

    • Löse den Flachverbinder der Frontkamera.

  28. QO1Q6Fhc5xyPvBGq
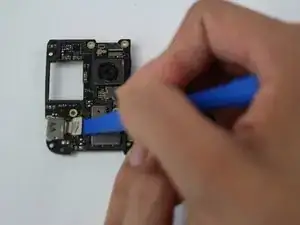
    • Drehe die Hauptplatine wieder um.

    • Löse vorsichtig die Frontkamera aus der Klebverbindung zur Hauptplatine. Schiebe dabei das Kabel durch die kleine Öffnung.

Abschluss

Um dein Gerät wieder zusammenzusetzen, folge den Schritten in umgekehrter Reihenfolge.

Gabriel Malestein

Mitglied seit: 09/10/17

1492 Reputation

0 Kommentare