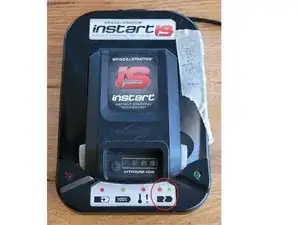
Einleitung
Wenn die grüne und die rote LED am Ladegerät abwechselnd blinken, liegt mit hoher Wahrscheinlichkeit ein ungleichmäßiges Ladezustand der Batterie vor. Dies tritt in der Regel auf, wenn die Batterie lange Zeit nicht geladen wurde und sich die einzelnen Zellen unterschiedlich entladen haben. Das Ladegerät kann diese ungleiche Ladung nicht ausgleichen. Diese Anleitung beschreibt, wie die Zellen wieder auf die gleiche Spannung gebracht werden können.
-
-
Schließe den Akku an das Ladegerät an und prüfe, ob die grüne und die rote LED am Ladegerät abwechselnd blinken. Ist dies der Fall, liegt mit hoher Wahrscheinlichkeit eine ungleiche Ladung der Batteriezellen vor und die folgenden Schritte könnten das Problem lösen.
-
-
-
Öffne den Akku indem alle vier TR10 schrauben entfernt werden.
-
Der Deckel sollte ohne grossen Kraftaufwand entfernt werden können.
-
-
-
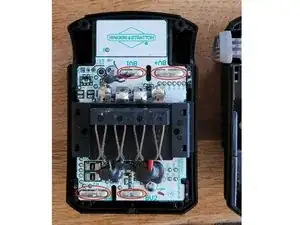
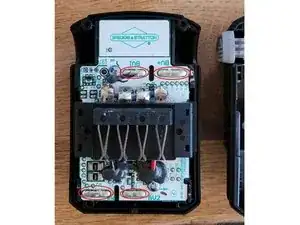
Messe die Spannung der 3 Batteriezellen
-
Zelle 1: BV+ - BV2
-
Zelle 2: BV2 - BV1
-
Zelle 3: BV1 - BN
-
Wenn die Zellen eine unterschiedliche Spannung aufweisen (>0,1 V), liegt eine ungleiche Ladung der Batterie vor.
-
-
-
Lade jede Zelle einzeln auf die höchste Zellenspannung im System auf (es ist nicht notwendig, alle Zellen vollständig aufzuladen).
-
Stelle dazu die Spannungsversorgung auf 4,1V und begrenze den Strom auf 750mA. 750mA ist der Standardladestrom für eine LGDAHB21865 Zelle. Wenn die Batterie einen anderen Zellentyp hat, muss zuerst das Datenblatt überprüft werden.
-
Wichtig: Überschreite nie die Nennladespannung oder den Nennstrom des Zellentyps. Siehe Datenblatt.
-
Schließe das Netzteil an die Klemmen der einzelnen Zellen an und lade sie, bis die Klemmenspannung erreicht ist. Achten Sie auf die richtige Polarität (Plus an Plus und Minus an Minus). Behalten Sie den Ladevorgang stets im Auge.
-
Wichtig: Einzelne Zellen sind nicht gegen Verpolung geschützt. Bei falscher Polarität wird die Zelle zerstört.
-
Hinweis: Wenn die Batteriezelle nicht geladen wird, ist sie möglicherweise defekt. Setze den Ladevorgang nicht fort, sondern tauschen Sie die Zellen aus oder recycle die Batterie.
-
Prüfe am Ende des Ladevorgangs mit dem Multimeter, ob jede Zelle die gleiche Spannung aufweist (+/- 0,01 V). Beachte, dass die auf dem Netzgerät angegebene Spannung während der Messung mit der Spannung auf dem Multimeter möglicherweise nicht übereinstimmt.
-
-
-
Setzen Sie den Akku wieder zusammen und lade ihn mit dem original Ladegerät auf.
-
Der Akku wird normal geladen, bis er vollständig geladen ist.
-
Hinweis: Wenn das Problem während des Ladevorgangs erneut auftritt, bedeutet dies, dass die einzelnen Zellen mit unterschiedlicher Leistung geladen wurden. Die Zellen sind verschieden gealtert und der Innenwiderstand ist nicht mehr gleich. Nur ein Austausch der Zellen würde das Problem lösen. Kontaktiere ein Unternehmen, dass Zelltausch anbietet.
-


12 Kommentare
Is it possible to replace the cells?
Thanks, David.
David -
That's cerainly possible since the battery management does not lock the charger after an under discharge event (like some do). Replacement comes with some effort. Here I found a step by step disassembly guide. Challenges I see in finding a specific battery type with similar properties. Replacing the batteries would also require a spot welder. Avoid soldering the batteries to the terminals since the high temperature could permanently damage the cell. Always replace all the cells, not only individual ones.
If you are not firm with the topic consider buying a new one or contact a so called re-cell service.
My battery keeps working so far but in case a cell actually dies I will replace them and create an additional guide for this process.
Good luck and best regards,
Joel
Your solution worked. I charged the cells with two wires from phone charger..., cause it was the only thing ive got:) 5V 0.7A. For now its ok but I fear that the voltage of the cells will decrease individually again, and imbalance will return. Whole procedure took me 2 hours, so i will repeat it if needed.
I'm glad it helped you. Your approach is fine. Charging with 5V should not do any harm as long as the actual battery voltage is monitored and does not exceed 4.1V (absolute max. 4.2V). There is a good chance that the problem will return in the future as the battery management is poorly designed and does not take into account the individual condition of the cells. As a result the cells tend to drift apart. The only option is to correct them from time to time. It is recommended to charge the battery to around 60 % before storing it for a longer period of time in order to avoid an undervoltage shutdown.
Good day and thanks for the instructions so far. My question is where to load the cells? Should I connect my charger to the steel clamps on the top, like the original charger does, or do I need to connect to the cells at the tin spots at the corners which are marked by the red lines on your picture? The steel clamps are marked with +, E, TH and -
Rob -
Thanks for the question. It is important that you connect to the terminals of the individual cell and therefore use the tin spots I marked in my picture. If you were to use the terminals that the charger uses only the whole pack (all 3 cells together) could be charged. To solve the problem each cell must be charged individually. Best regards. Joel