Einleitung

Irgendwann muss der Akku für die Corsair Kopfhörer ersetzt werden. Glücklicherweise ist der Austausch h des Akkus ein simpler Prozess, dazu müssen lediglich die Abdeckung einer Ohrmuschel sowie der Akku ausgebaut werden.

Die Anweisungen für den Ausbau des alten Akkus beziehen sich alle auf die rechte Ohrmuschel.

  1. ajprhlKy4PdPQNoK
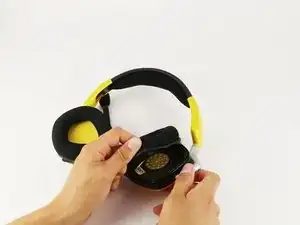
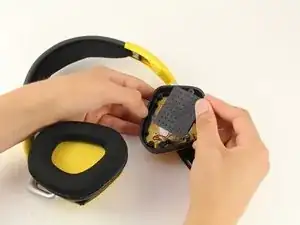
    • Entferne die Ohrpolster vorsichtig von den Kopfhörern, indem du unter der Polsterung der Ohrpolster ansetzt und diese über die Rand, durch den sie festgehalten werden, ziehst.

  2. BIumAmJYynXU2jEk
    BIumAmJYynXU2jEk
    DmUAOBCER6IuhN1g
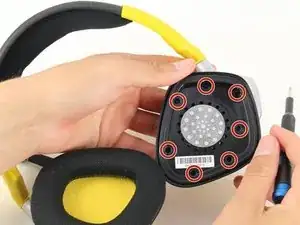
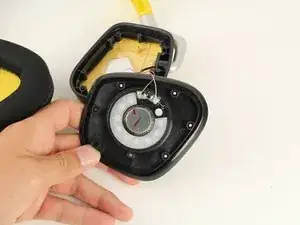
    • Löse mithilfe eines #0 Kreuzschlitzschraubendrehers die sieben 6,4 mm Schrauben, mit denen die schwarze Lautsprecherabdeckung befestigt ist.

    • Bei der Demontage der linken Seite sind acht 6,4 mm Schrauben statt sieben zu entfernen.

  3. yEdxnKLpjX3IH44q
    yEdxnKLpjX3IH44q
    LxTxTP6u1aaFSPYG
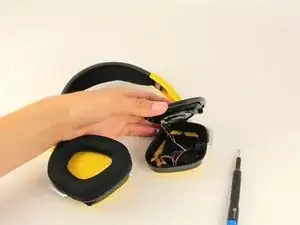
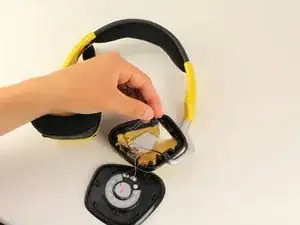
    • Entferne die schwarze Abdeckung und lege diese beiseite. Dabei muss darauf geachtet werden, dass sich die Drähte nicht lösen oder abgerissen werden.

    • Die Abdeckung sollte sich mit wenig Kraftaufwand anheben lassen. Wenn sich die Abdeckung nicht ablöst, kann sie mithilfe des iFixit Öffnungswerkzeugs ausKunststoff angehoben und entfernt werden.

  4. QoCnrohcQDMfJ4Ej
    QoCnrohcQDMfJ4Ej
    dZkYWdRpKBAEDtVS
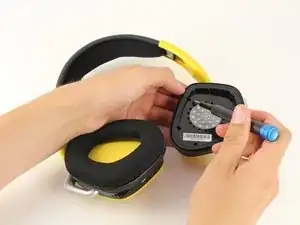
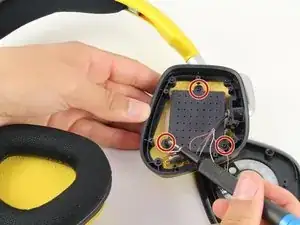
    • Entferne die drei 6,4 mm Schrauben auf der Rückseite des schwarzen Kunststoff-Panels mit Lochmuster, mit Hilfe des Kreuzschlitzschraubendrehers #0.

  5. kLwEGGGx1EIxwAT6
    kLwEGGGx1EIxwAT6
    G4CngFUGbdRNyqbE
    • Löse vorsichtig das Kabel, das das Akkupack mit den Kopfhörern verbindet.

    • Dies sollte nicht allzu viel Kraft erfordern.

  6. WcYEqIFPpEOphwNP
    • Entferne vorsichtig die durchsichtige Plastikabdeckung und lege diese beiseite.

    Hola Gianna, cómo estás?

    Te consulto: mis auriculares de repente dejó de funcionar bien el auricular izq (el del micrófono), se escucha muy bajo y cuando no hay sonido hay una especie de fritura de fondo aunque la PC esté apagada. Desarmé el auricular derecho para comprobar el estado de la bateria y veo que ésta está hinchada. Crees que la falla mencionada anteriormente, puede deberse a la batería en mal estado o nada tiene que ver una cosa con la otra? Desde ya muchas gracias y muy útil y clara la guía.

    Horacio -

    Absolutely use a Phillips #1 and not a #0. The 0 is too small and you will risk stripping the head on the 7 screws for the shell.

    Phil -

Abschluss

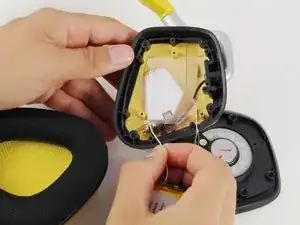
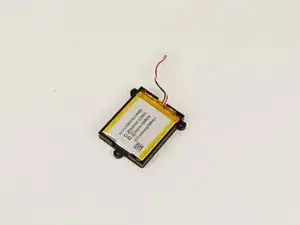
Um das Gerät wieder zusammenzubauen, folge den Anweisungen in umgekehrter Reihenfolge.

Gianna Nobili

Mitglied seit: 15/04/19

854 Reputation

14 Kommentare

Someone knows where to find the charging connector for the headset or can it be changed for usb-c?

Vincent Poirier -

It can be charge with any other USB mini/micro cable like the one for android phones, prior to USB-C

Unless your model of headset only allows USB-C then yes use any USB-C

Cesar Ruiz -

Can someone please add a link to where you can buy this replacement battery - I would like to order a few.

Cesar Ruiz -

So the battery that I ordered from here is a 700mAh. The on that I ordered from the link here is an 700mAh. Time to send this back and shop again

Justin Bell -

Can u show how to change “Charging Port”??

Jason HKB -

Would be interested too.

Sam Coss -

Could anyone tell me the battery dimensions and which JST plugsize is used?

Velo -

How can anyone unscrew those screws? I stripped all of them with my phillips screwdriver, and could not unfasten them no matter what DIY tricks I tried. I laid a rubber band over the top, tried a flathead, even tried prying the panel open. Nothing worked. I can try pliers, but I’d have to cut holes around the screw heads to even reach them, and I don’t know if I can even do that without damaging anything underneath. Probably just going to have to save up my money and buy another wireless headset at this point.

Lee Adcock -

Great guide, was able to do this with little issue. Hardest time I had was getting the earmuff fitted back on.

Chris Eaton -

Does the battery pack use a standard JST connector?

Texus Noe -

consulta: mis auriculares (Corsair Void Pro RGB) de repente dejó de funcionar bien el auricular izq (el del micrófono), se escucha muy bajo y cuando no hay sonido hay una especie de fritura de fondo leve aunque la PC esté apagada. Desarmé el auricular derecho para comprobar el estado de la batería y veo que ésta está hinchada. Crees que la falla mencionada anteriormente, puede deberse a la batería en mal estado o nada tiene que ver una cosa con la otra? Desde ya muchas gracias.

Horacio -

A couple notes I would like to share from doing this myself. Directions are nice to the point of getting to the battery.


Be careful taking the battery out its got some darn strong double sided tape. use a guitar pick or something similar to pry the battery out.

When looking for a replacement battery 700mAh is smaller the the original. the original battery is 1000mAh, I found a replacement 1100mAh battery on amazon, all you have to do is make sure the batteries are the same size and has a similar plug. https://a.co/d/bjE5FB6 This is the link to the battery I got.

As for the screws dont use a Philips #0 it will strip the screws. A Philips #1 fits the screw much better, I did not go to a #2 since the #1 fit so well. I was starting to have an issue when putting the screws back in so I moved to the #1 and everything went well.

For putting the earmuff padding back on start at the side towards the headband. And dont be too afraid to stretch it a little. if the fake leather is falling off probably replace it

whyett78 -

why you installing a 700 mAH when it supost to be 1000mAh?

Kenny Roy -

Battery replacement was easy as a whole, hardest part was getting the old battery out of the housing that's screwed down.

revamp6160 -