Einleitung

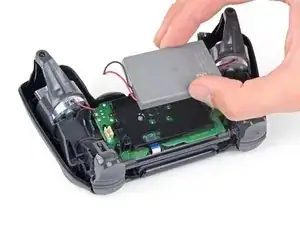
Diese Anleitung zeigt, wie der Akku im Sony DualShock 4 CHU-ZCT2U Playstation-Controller ausgetauscht wird.

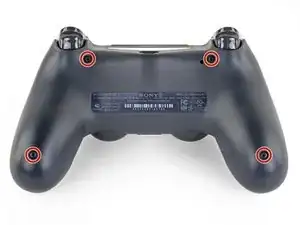
Diese Anleitung gilt auch für den älteren CHU-ZCT1U Controller, du musst aber den richtigen

JDM-030 Akku bestellen, er hat einen anderen Stecker. Die genaue Modellnummer findest du auf der Rückseite.

Wenn der Akku aufgebläht ist, musst du geeignet Vorsichtsmaßnahmen treffen.

  1. tUikjiOGBaxcOEkP
    tUikjiOGBaxcOEkP
    TmnKQyKCNFSJTcJc
    • Entferne die vier 6,4 mm langen Kreuzschlitzschrauben, mit denen das hintere Gehäuseteil befestigt ist.

    A driver size recommendation would be nice. I tried several and found that a size 2.5 Phillips worked nicely

    Justin Vander Ziel -

  2. w1bkfQZMxAAHtQgX
    w1bkfQZMxAAHtQgX
    plRPM3kHcVdnHKKr
    • Die Gehäuseteile werden von vier empfindlichen Kunststoffclips zusammengehalten. Die Stellen, wo sie sind, kannst du in dieser Anleitung besser sehen.

    • Die Clips halten die Teile an der Naht zusammen. Wenn sie kaputt gehen, funktioniert der Controller trotzdem noch.

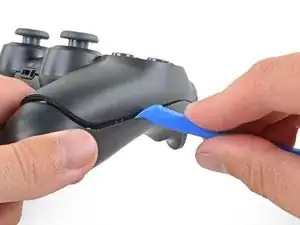
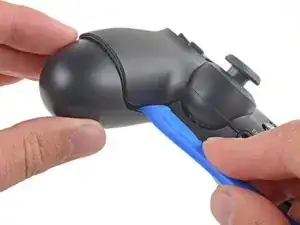
    • Setze das Öffnungswerkzeug in die Naht zwischen den beiden Gehäuseteilen ein, fange damit an den Außenseiten der Griffe an.

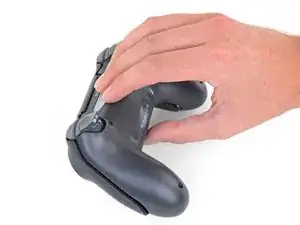
    • Heble die beiden Gehäuseteile vorsichtig auseinander, bis sie sich teilweise voneinander gelöst haben.

    easy, but quite brute way of opening the rear panel without the opening tool: https://www.youtube.com/watch?v=wYybiBBL...

    watch the opening from the back part only, then return here.

    christianviali -

    That worked but a couple clips broke in the process. Beware for people trying this method.

    Bryan Remely -

    There are 4 tab clips total, 2 at the top corners (very easy to break) and 2 at the bottom near the ports. The screws will keep it together even if they do break but be careful if you don’t want to break them.

    Fungi -

    I've written a guide to help others find the clips and unlatch them.

    Wichtiger Schritt zum Öffnen des DualShock 4 CUH-ZCT2

    Richard -

    Hi Richard,

    Thanks for writing this up! I'm going to link your guide into the step.

    Arthur Shi -

  3. DIJIOhITDeiAwtRH
    DIJIOhITDeiAwtRH
    NF4xVXtPZufVHicc
    QeIjsGkBIonmDXX1
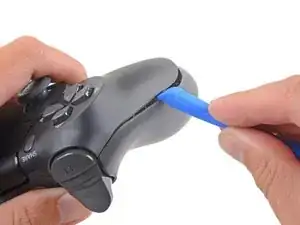
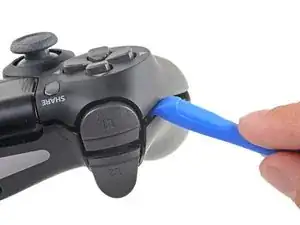
    • Verwende das Öffnungswerkzeug, um die Gehäuseteile voneinander zu trennen, indem du die Clips rund um den Rand des Controllers löst.

    I've written a guide to help others find and unlatch these clips

    Wichtiger Schritt zum Öffnen des DualShock 4 CUH-ZCT2

    Richard -

  4. omi15NXRmqNu43A2
    omi15NXRmqNu43A2
    UitmPy1NEmiWWRpI
    • Hebe das hintere Gehäuseteil direkt vom Controller weg.

    • Entferne das Gehäuseteil noch nicht ganz, es ist noch mit einem Flachbandkabel am Controller angeschlossen.

  5. Ro5UWfFl1lrsvuAV
    Ro5UWfFl1lrsvuAV
    GAGBgDPAAaZIEyLA
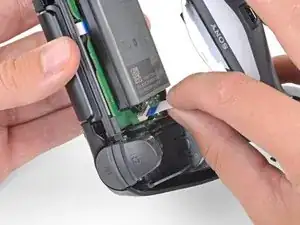
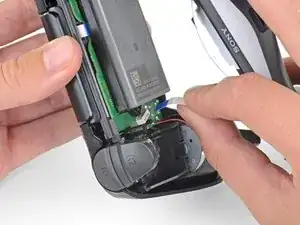
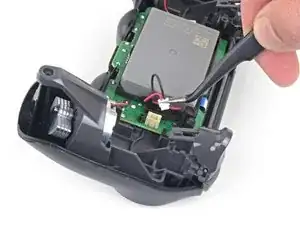
    • Ziehe das Flachbandkabel mit den Fingern sehr vorsichtig und gerade aus seinem Anschluss auf der Hauptplatine heraus.

    • Die Zuglasche an diesem Kabel ist so klein, dass du sie nicht mit den Fingern oder einer Pinzette fassen kannst. Du musst stattdessen am Kabel selbst ziehen. Normalerweise solltest du immer die Zuglaschen benutzen.

    • Fasse beim Zusammenbau das Kabel an der blauen Zuglasche und drücke es behutsam gerade in den Anschluss hinein. Drücke eher an der blauen Zuglasche als am Kabel selbst.

    I'm struggling getting the ribbon to connect back in. Why might that be?

    David Clair II -

  6. gAeBRrGRp3oB33SQ
    gAeBRrGRp3oB33SQ
    wyOFnJNqvMs1Z6PE
    • Ziehe den Akkustecker mit einer Pinzette gerade nach oben von der Hauptplatine ab.

  7. Et6VrMDFC1dgCoud
    Et6VrMDFC1dgCoud
    DvVy2hjpPLto5MpJ
    • Entferne den Akku.

Abschluss

Um dein Gerät wieder zusammenzusetzen, folge den Schritten in umgekehrter Reihenfolge.

Entsorge deinen Elektromüll sachgerecht.

Die Reparatur verlief nicht wie geplant? In unserem Forum findest du Hilfe bei der Fehlersuche.

Sam Omiotek

Mitglied seit: 25/02/19

87355 Reputation

6 Kommentare

For this DualShock 4 CHU-ZCT2U Battery Replacement, shouldn’t the battery model be JDM-040 and not JDM-030 for this controller. I ordered the battery listed but the connector was too large. So I believe this needs to be edited to match accordingly to avoid confusion and incorrect orders. Thanks!

Tom Nguyen -

Good catch! I just pulled apart the ZCT1U and ZCT2U models and you are right. I will fix this in the guide. Thank you!

Sam Omiotek -

Can perhaps someone tell me what exact connector does the original battery use ?

MCQ -

Just bought and the connector does not fit for the newer gen controllers. Dissapointing

Bukayo Saka -

Is there a conclusion to this? I force charged two batteries from two controllers (which died within the same day) in a known good controller (which has the larger battery connector which can accommodate the smaller ones) each for about three hours (~470mA/h) until they each showed a measured 4ish volts dry test. Once plugged back in neither worked either with the ps button or usb physical connect but funny each will “share” by holding the PS+Share button for a while, idk how to have it actually pair with my station any more. Even after using the reset button on the back. Haaaalp :). I’ll likely figure it out before someone responds to this but for the sake of anyone who can’t troubleshoot please post any answer if you have one, kThanksXO

Apple AT -

I purchased the recommended JDM-040 replacement battery for my CUH-ZCT2U controller (before reading these comments) and it does NOT work as a replacement. The connector is wrong, and the pin holes are too small.

Regarding those asking if the JDM-030 battery works, the connector is also wrong. I can confirm, though, that the JDM-030 is the correct replacement battery for the CUH-ZCT1U controller.

CTri -