Einleitung

Folge dieser Anleitung, um die Joystick-Kappen eines Sony Dualshock 4 CHU-ZCT2U PlayStation-Controllers zu wechseln.

  1. tUikjiOGBaxcOEkP
    tUikjiOGBaxcOEkP
    TmnKQyKCNFSJTcJc
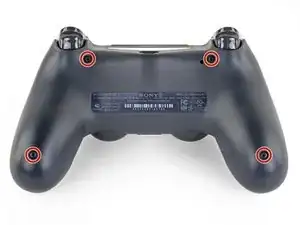
    • Entferne die vier 6,4 mm langen Kreuzschlitzschrauben, mit denen das hintere Gehäuseteil befestigt ist.

    A driver size recommendation would be nice. I tried several and found that a size 2.5 Phillips worked nicely

    Justin Vander Ziel -

  2. w1bkfQZMxAAHtQgX
    w1bkfQZMxAAHtQgX
    plRPM3kHcVdnHKKr
    • Die Gehäuseteile werden von vier empfindlichen Kunststoffclips zusammengehalten. Die Stellen, wo sie sind, kannst du in dieser Anleitung besser sehen.

    • Die Clips halten die Teile an der Naht zusammen. Wenn sie kaputt gehen, funktioniert der Controller trotzdem noch.

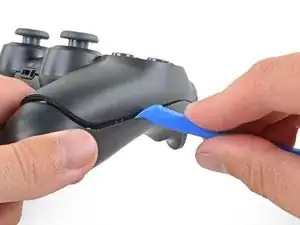
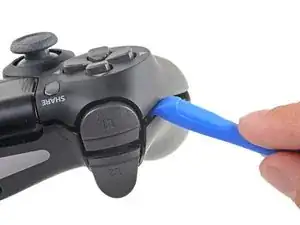
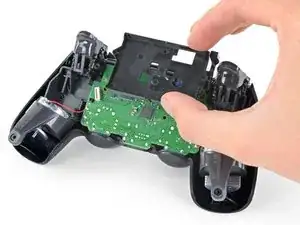
    • Setze das Öffnungswerkzeug in die Naht zwischen den beiden Gehäuseteilen ein, fange damit an den Außenseiten der Griffe an.

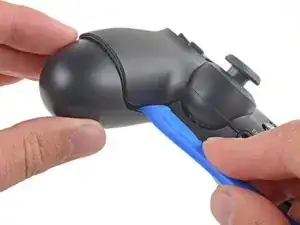
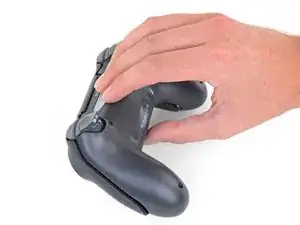
    • Heble die beiden Gehäuseteile vorsichtig auseinander, bis sie sich teilweise voneinander gelöst haben.

    easy, but quite brute way of opening the rear panel without the opening tool: https://www.youtube.com/watch?v=wYybiBBL...

    watch the opening from the back part only, then return here.

    christianviali -

    That worked but a couple clips broke in the process. Beware for people trying this method.

    Bryan Remely -

    There are 4 tab clips total, 2 at the top corners (very easy to break) and 2 at the bottom near the ports. The screws will keep it together even if they do break but be careful if you don’t want to break them.

    Fungi -

    I've written a guide to help others find the clips and unlatch them.

    Wichtiger Schritt zum Öffnen des DualShock 4 CUH-ZCT2

    Richard -

    Hi Richard,

    Thanks for writing this up! I'm going to link your guide into the step.

    Arthur Shi -

  3. DIJIOhITDeiAwtRH
    DIJIOhITDeiAwtRH
    NF4xVXtPZufVHicc
    QeIjsGkBIonmDXX1
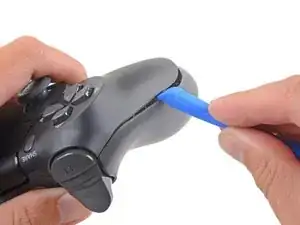
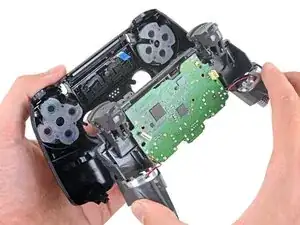
    • Verwende das Öffnungswerkzeug, um die Gehäuseteile voneinander zu trennen, indem du die Clips rund um den Rand des Controllers löst.

    I've written a guide to help others find and unlatch these clips

    Wichtiger Schritt zum Öffnen des DualShock 4 CUH-ZCT2

    Richard -

  4. omi15NXRmqNu43A2
    omi15NXRmqNu43A2
    UitmPy1NEmiWWRpI
    • Hebe das hintere Gehäuseteil direkt vom Controller weg.

    • Entferne das Gehäuseteil noch nicht ganz, es ist noch mit einem Flachbandkabel am Controller angeschlossen.

  5. Ro5UWfFl1lrsvuAV
    Ro5UWfFl1lrsvuAV
    GAGBgDPAAaZIEyLA
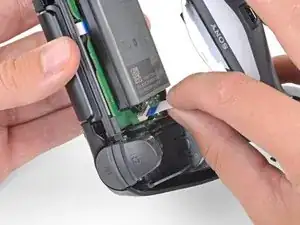
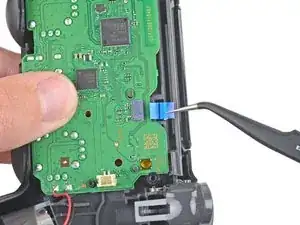
    • Ziehe das Flachbandkabel mit den Fingern sehr vorsichtig und gerade aus seinem Anschluss auf der Hauptplatine heraus.

    • Die Zuglasche an diesem Kabel ist so klein, dass du sie nicht mit den Fingern oder einer Pinzette fassen kannst. Du musst stattdessen am Kabel selbst ziehen. Normalerweise solltest du immer die Zuglaschen benutzen.

    • Fasse beim Zusammenbau das Kabel an der blauen Zuglasche und drücke es behutsam gerade in den Anschluss hinein. Drücke eher an der blauen Zuglasche als am Kabel selbst.

    I'm struggling getting the ribbon to connect back in. Why might that be?

    David Clair II -

  6. gAeBRrGRp3oB33SQ
    gAeBRrGRp3oB33SQ
    wyOFnJNqvMs1Z6PE
    • Ziehe den Akkustecker mit einer Pinzette gerade nach oben von der Hauptplatine ab.

  7. Et6VrMDFC1dgCoud
    Et6VrMDFC1dgCoud
    DvVy2hjpPLto5MpJ
    • Entferne den Akku.

  8. fNArtGIpQMUbw1aA
    fNArtGIpQMUbw1aA
    kjVVGyjaeiSEiGA2
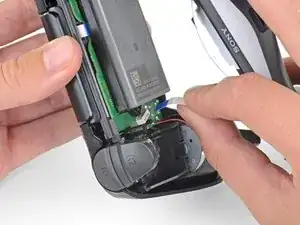
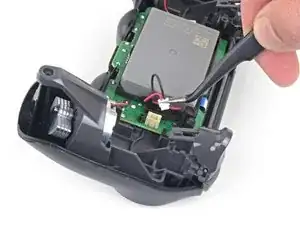
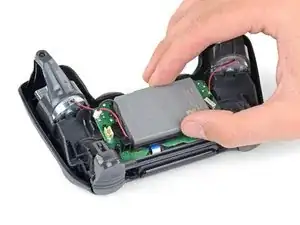
    • Entferne die 6,4 mm lange Kreuzschlitzschraube, mit der die Halterung des Akkus befestigt ist.

  9. GxUeUk2mHcR1WJkk
    GxUeUk2mHcR1WJkk
    YPaZ64KmGwZJQQE5
    • Entferne die Halterung des Akkus.

  10. ZQZ2yG1uoM1ZVAkL
    ZQZ2yG1uoM1ZVAkL
    xJjggX6iUlsDJ5HE
    • Trenne das Flachbandkabel zum Touchpad mit einer Pinzette ab.

    • Ziehe das Kabel an seiner blauen Zuglasche gerade aus seinem Anschluss auf der Hauptplatine heraus. Ziehe nicht am Kabel selbst.

    My tweezers stabbed the cable,yikes!

    jat xe mo -

    i cant plug the cable back in :)

    Antoniomastro10 -

    Can you plug the cable back in?

    LeBron James -

  11. dymEv3V3fkYCdlmT
    dymEv3V3fkYCdlmT
    Yp6uUubkgCxbCQN4
    • Löse die Hauptplatine und den Mittelrahmen vom vorderen Gehäuseteil ab.

    If you’re having trouble separating those part, this might be because of the blue pull tab. Make sure the pull tab is pushed through the hole to free the motherboard and the midframe assembly from the front panel.

    Philippe Morin -

  12. JQGbxxBjcVNXWPZA
    JQGbxxBjcVNXWPZA
    DM4T2wkeJRbrbRuB
    • Ziehe die Kappe des rechten Joysticks gerade vom Joystickmodul ab, um sie zu entfernen.

  13. r6G1P5qJSUU2gnLn
    r6G1P5qJSUU2gnLn
    JDU55jbkEQuqbLJR
    • Ziehe die Kappe des linken Joysticks gerade vom Joystickmodul ab, um sie zu entfernen.

  14. FkUFvgAIxNcykaZc
    FkUFvgAIxNcykaZc
    Jt3LPxMaxVAJUUOu
    • Achte beim Zusammenbau darauf, dass die neuen Joystick-Kappen passend auf den Schäften der Joystickmodule ausgerichtet sind, bevor du sie festdrückst.

Abschluss

Um dein Gerät wieder zusammenzubauen, folge den obigen Schritten in umgekehrter Reihenfolge.

Hat die Reparatur nicht ganz geklappt? In unserem Forum findest du Hilfe bei der Fehlersuche.

Sam Omiotek

Mitglied seit: 25/02/19

87355 Reputation

2 Kommentare

Are you able to replace the actual joystick with a diffrent one or are we only able to switch out covers?

Grant seward -

this is a good point, i was wondering this as well

Kyeler W -