Einleitung

Diese Anleitung zeigt dir, wie du das häufige Problem mit Zeilen/Balken auf dem Display reparieren kannst.

  1. RGmrtMWJ22OpxZFE
    RGmrtMWJ22OpxZFE
    tNtPdItZdLZBTNWp
    NcYqWKSBrD24DMaP
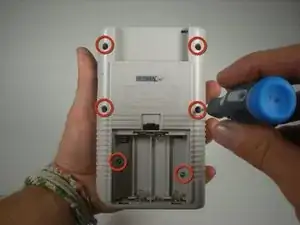
    • Entferne sechs Tri-Point Schrauben (eventuell auch Kreuzschlitzschrauben) und nimm das Rückgehäuse ab.

    • Beachte: die letzten beiden Schrauben befinden sich im Batteriefach.

  2. 5XsrOwwGJqbDjQ4n
    5XsrOwwGJqbDjQ4n
    IdJxrHITpNEKj6Q4
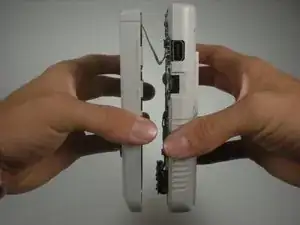
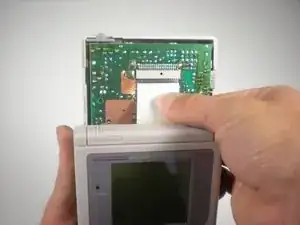
    • Hebe vorsichtig die obere Hälfte des Systems ab. Sei vorsichtig, denn eine Flachbandkabel verbindet noch die beiden Hälften des Geräts.

    • Löse das Flachbandkabel ab.

  3. VLdVw2kJEhanXVEY
    VLdVw2kJEhanXVEY
    FAfgnq5ODr43ZnYd
    TmpLEijPNdKvLHKE
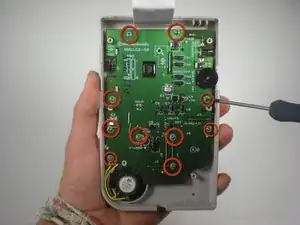
    • Drehe die Schrauben heraus, mit denen die Platine an der Vorderseite befestigt ist.

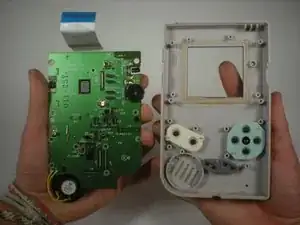
    • Entferne die Platine vom Gehäuse.

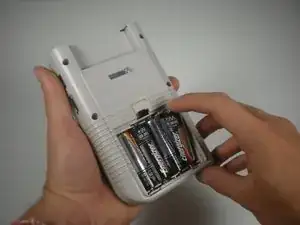
    • Setze die Batterien wieder in das Battereiefach ein, damit du den Bildschirm während der Reparatur testen kannst.

    • Schließe die Platine mit dem Flachbandkabel wieder am Rückgehäuse an.

  4. DyUTe2WEwug3gJvn
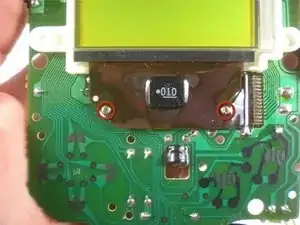
    • Bewege den Schieber für den Kontrast an der linken Seite ganz nach oben. Nimm deinen Lötkolben und bewege ihn vorsichtig am Flachbandkabel unterhalb des Bildschirms vor und zurück.

    • Achte darauf, dass du nicht den Bildschirm berührst!

    • Beachte: Möglicherweise ist das Flachbandkabel mit einem Gummistreifen bedeckt.

    one picture should show where to exactly put the soldering iron.

    Helmut Kohli -

    The picture does not completely match the description.

    Helmut Kohli -

    it would be handy to know what temperature to set for the soldering iron

    Vincenzo -

    You should set it to 450, according to another repair demonstration.

    Bossman207 -

    There are two screws indicated but not mentioned and there is no ribbon cable in sight, unless it's behind that brown plastic cover looking thing. I have to assume I'm to remove the indicated screws and would see a ribbon cable behind it and under the screen? Otherwise, maybe you run the iron in between the two screws and the brown thing is somehow the cable? This is the most I've ever been puzzled by one of these guides. I'd just hope when I got to this part I'll be able to determine what's being said.

    Bossman207 -

    https://www.youtube.com/watch?v=-OEXhxoT... shows the repair and includes additional details about the area to place the iron.

    The red circled screws have no part of this step.

    You need to remove the rubber strip you see in the picture that's below and along the bottom of the screen.
    Set iron to 450
    Run iron along areas that coincide with the problem lines.
    Replace rubber strip when done.

    Bossman207 -

    • Am Anfang wirst du Pixelzeilen an- und wieder ausgehen sehen. Bewege deinen Lötkolben solange vor und zurück, bis der Bildschirm komplett schwarz ist.

Abschluss

Um dein Gerät wieder zusammenzusetzen, folge den Schritten in umgekehrter Reihenfolge.

Mitchell

Mitglied seit: 03/04/16

191 Reputation

2 Kommentare

Hi, this is the second time I attempt this fix, the first time it worked perfectly. The problem is that with this second machine there's a couple of pixel lines that have not tickled back to black even though I have been patiently going over them for quite some time (2 rounds of 10-15 min) is there anything else that I could try or should I just go on over the same area until I see something happen? Thanks in advance

Jose Saura -

Use this guide linked below understand where to place the iron under the screen. Step 4 doesn't seem to contain the proper images or details of this step here well enough.

https://www.youtube.com/watch?v=-OEXhxoT...

Bossman207 -