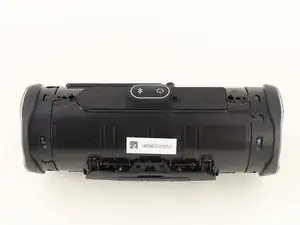
Einleitung

Zum Betrieb des Lautsprechers ist ein Akku unverzichtbar, außerdem wird er benötigt, um dein Smartphone an der externen Ladebuchse zu laden. Wenn die Akkulaufzeit nachlässt, solltest du den Akku tauschen. Diese Anleitung zeigt dir, wie das geht.

  1. iy4ZsdmNfCUZWppV
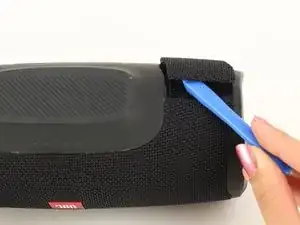
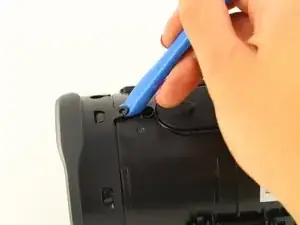
    • Drehe den Lautsprecher herum und setze das Öffnungswerkzeug in den Spalt an der Lautsprecherabdeckung ein.

    • Heble von dir weg hin zur Rückseite des Lautsprechers, bis sich die Raste löst.

    • Wiederhole das Ganze für die Raste an der anderen Seite.

    ich schaffe es nur auf der einen seite. Auf der anderen ist die abdeckung viel zu fest dran ? was kann ich machen ?

    George Ziakos -

  2. qcdfWg2RwDmqqrS4
    qcdfWg2RwDmqqrS4
    OSiMomuVET6RbRjO
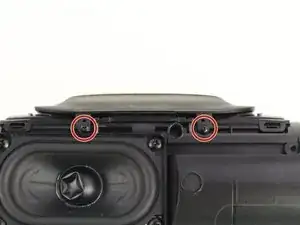
    • Entferne die beiden 8 mm Kreuzschlitzschrauben #0 von der anderen Kante der Lautsprecherabdeckung.

    You have to remove the 8 mm screws before you try and Prius the other side. They are attached, and will break

    Noah Werthaiser -

  3. AaICjsZMZMcQpxEv
    • Ziehe die beiden Seiten der Lautsprecherabdeckung auseinander.

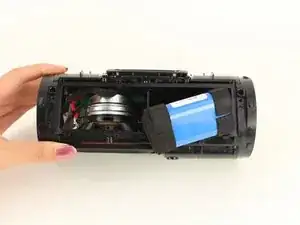
    • Hebe die Abdeckung vom Lautsprecher ab.

  4. dnPklEXxejOwZDWQ
    dnPklEXxejOwZDWQ
    3nIY5ZbkomWaGoYa
    • Hebe mit einem Öffnungswerkzeug die Lasche oben am Lautsprecher an, so dass sich der Strahler von den Rasten löst.

    • Wiederhole das Ganze für die anderen Laschen um den Strahler herum, um ihn vom Rahmen abzulösen.

    There is absolutely no reason to remove the passive radiators if you want to replace the speaker only!

    Just cut to step 6.

    Also the difficulty level is way too high. I found it very easy to disassemble the unit.

    Paul Decaro -

  5. ScVYJYlPFPHlNiVg
    ScVYJYlPFPHlNiVg
    krPLel6bEf5bV2i4
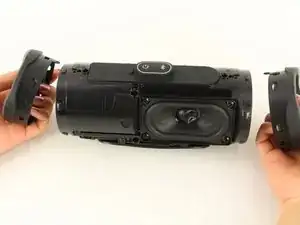
    • Drücke den Strahler vom Rahmen des Gerätes weg.

    • Wiederhole das Ganze auf der anderen Seite.

    • Die passiven Basstrahler verhindern, dass Feuchtigkeit ins Innere des Gerätes gelangen kann. Mehrfaches Ablösen der Strahler kann die Wasserfestigkeit beeinträchtigen.

  6. g6dApGFivHhDHTBP
    g6dApGFivHhDHTBP
    cFdb2ZbkJsDUjInR
    • Entferne die beiden Kreuzschlitzschrauben #0 von der Vorderseite der Anschlussabdeckung.

  7. gCSJcJxt2bUd6TiF
    • Schiebe die Abdeckung behutsam zurück aus den Rasten heraus.

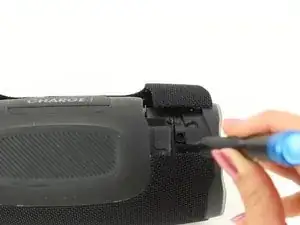
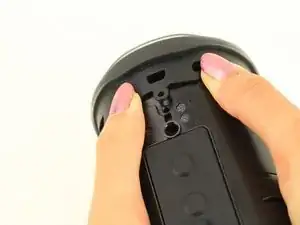
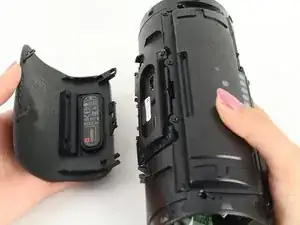
    • Entferne die Anschlussabdeckung.

    This charge 4 is different from the one I have

    NOVA JINX -

  8. fNUNgl1KQwFaaB3J
    fNUNgl1KQwFaaB3J
    iXIIcwHiZwZU4HgH
    suShOsyLNQrsKE6s
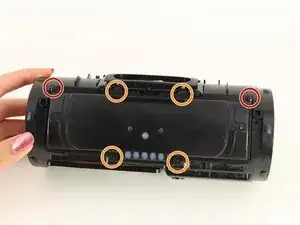
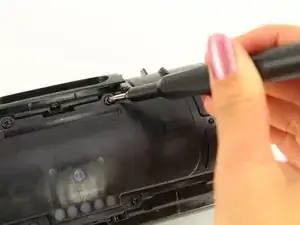
    • Entferne die beiden 6 mm Kreuzschlitzschrauben #0.

    • Entferne die vier 8 mm Kreuzschlitzschrauben #0.

  9. iErngJAbTMjou4ol
    • Hebe die Akkuabdeckung ab.

  10. 5kisSbmGw4iqJNYj
    5kisSbmGw4iqJNYj
    kBRSCaGfAZmmKPqE
    22V2adpRYAd5EDZX
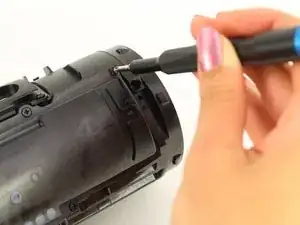
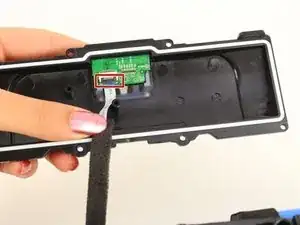
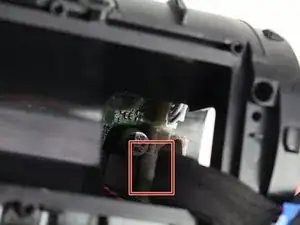
    • Entferne das Stück Klebeband um an den ZIF-Verbinder des weißen Flachbandkabels zu gelangen.

    • Klappe mit der Spudgerspitze oder dem Fingernagel den schwarzen Sicherungsbügel des ZIF-Verbinders hoch und löse das Kabel ab.

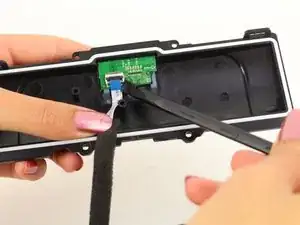
    • Entferne das weiße Flachbandkabel von der Akkuabdeckung und lege die Abdeckung zur Seite.

    Don't remove this white ribbon cable from the circuit board, it's almost impossible to plug it back. Instead of removing the cable, just remove the circuit board which is glued loosely to the plate. If you can get to the battery itself, you don't have to remove the circuit board neither.

    Htluu -

  11. gtuWRG5ktLrLt4qx
    gtuWRG5ktLrLt4qx
    XnBMWSGIbyyvTUf2
    • Ziehe vorsichtig am Akku und löse ihn so aus seinem Anschluss.

  12. 1O2EKtgocL2qrKrG
    1O2EKtgocL2qrKrG
    r2ntcMhuqEFQZYFH
    rAF3ZUrjVSTMmGhG
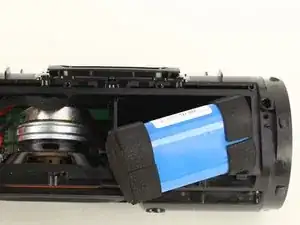
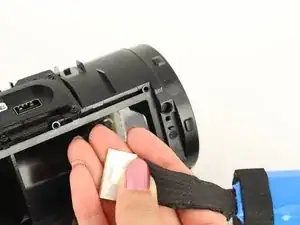
    • Ziehe den Akku weit genug heraus um an den Akkuanschluss zu gelangen.

    • Drücke die weiße Lasche nach unten und ziehe behutsam den Akkustecker ab.

    手順を見てバッテリー交換したんですが、じゅうでんしてもランプが五つ点灯しません。なぜですか?

    junichi -

    外した全てのコネクタは確実に装着できていますか?今一度、確認してみてください。

    Midori Doi -

Abschluss

Um dein Gerät wieder zusammenbauen, folge den Schritten in umgekehrter Reihenfolge.

Sydney Seto

Mitglied seit: 24/01/19

867 Reputation

16 Kommentare

Where do you buy a battery for a jbl Charge 4 ??

Matt hempel -

Probably just cut open the blue foil around the batteries and replace them by re-soldering the electronics onto new 18650 batteries.

correct me if I’m wrong here.

Brendon Reijnders -

If you know how to handle them and have experience with soldering them that's a yes if not those batteries are really dangerous if you don't know how to do it correctly.

Hart80 -

Where in the !&&* do i get a battery for a bluetooth speaker. What happened to the jbl charge 4 that it even goes out???

Shani Sanders -

My JBL charge 4 battery dead too. 9nly uses it for three months

osborne buhere -

How is the battery 6 pins? Any idea what the middle 2 wires do? The outer ones seems +and - 3.7v if the cells are in parallel. Can anyone shine a light on the configuration/wiring of the cells?

chrisgraafmans -

Middle connections are scl sda serial connections. For communication from battery board to main board.

Matt C -

Does the battery come charged already?

Cristian Martinez -

After replacement mine turns on and right off again any ideas

Adam Ramsey -

Did you ever solve this? Thinking of replacing a battery in my 4, but saw a few Reddit posts saying they had similar issues- new battery didn’t allow power up. One person put their original battery back in, and speaker worked, but old battery only.

Paul Clark -

I’m in the same boat. Replaced battery and speaker turns on then off. Doesn’t seem to be taking a charge.

Marc Hanselman -

You have to be an expert electronics technician to replace a battery! My JBL Charge 4 lasted one (1) battery charge cycle! Now I gotta go back to vocational school for a year to be able to listen to it for what, one more charge cycle???? Besides that Walmart won't exchange it because it was the 92nd day from the purchase date. WHAT A FREAKING JOKE!

Lee Ford -

I Have the same Problem after ! Turn it on - turn off within 5 sec. works fine with the original Battery. Any1 who solve that ?

Bernd P -

I think there are just 3 18350 2600mah cells in parallel, I would just keep the genuine BMS and only raplace the cells. Good soldering iron and some serious skills are required.

Lukas Malinowski -

My jbl charge 4 has heat problems and doesn't charge. The port and plug in the usb c get very hot and no charge what so ever. Will replacing the battery solve this issue. Plz help.

Andrew Robertson -

I bought JBL Charge 4 in 2019/01. In 2025/04, its battery is to be replaced.

Not that bad!

Ярослав Демченко -