
Einleitung
Diese Anleitung zeigt, wie ein defektes Display im Kindle 3 ausgetauscht wird.
Ersatzteile
-
-
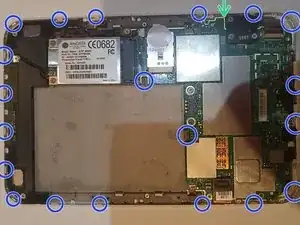
Lege das Gerät mit der Unterseite nach oben. Setze ein Hebelwerkzeug zwischen die beiden Gehäuseteile ein.
-
Schiebe das Werkzeug rund um die Kanten herum, bis alle achtzehn Clips gelöst sind. Setze das Werkzeug nicht zu tief ein, damit keine Bauteile im Inneren beschädigt werden. Die Clips befinden sich sowieso nur an der Außenkante. Beachte, dass der Clip an der Einschalttaste besonders groß und kräftig ist.
-
Ziehe die Rückseite ab. Die beiden letzten Clips in der Mitte sind überraschend schwer zu lösen. Sie zeigen beide in die gleiche Richtung, ziehe nicht einfach nach oben. Schiebe stattdessen die Abdeckung ein wenig zur Oberkante des Gerätes hin, bis sie sich lösen.
-
-
-
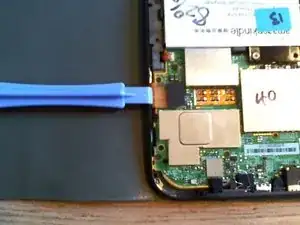
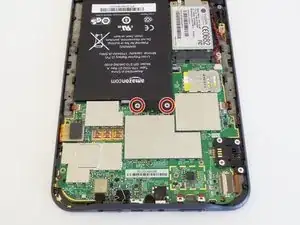
Entferne die beiden silbernen 4 mm Kreuzschlitzschrauben, mit denen der Akkustecker befestigt ist.
-
Lege die Schrauben zur Seite, damit sie keinen Kurzschluss verursachen können.
-
-
-
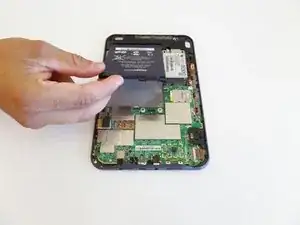
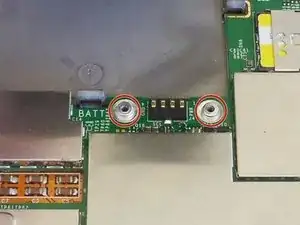
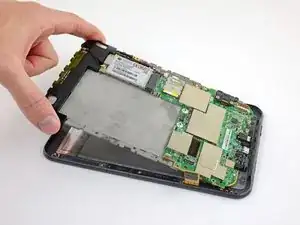
Hebe den Akku aus dem Akkufach, fange an dem durch die Schrauben gesicherten Ende an.
-
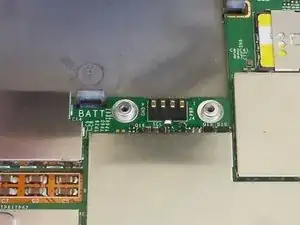
Achte auf die beiden unregelmäßig geformten silbernen Unterlegscheiben unter dem Akkustecker (Bild 2). Sie sind wichtig, damit die elektrischen Kontakte beim Festziehen der Schrauben gut passen.
-
-
-
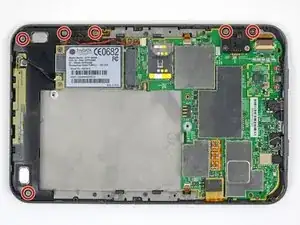
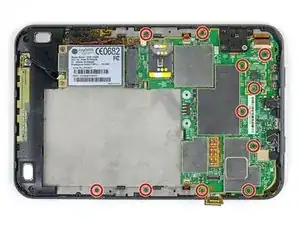
Hebe die Hauptplatinen-Mittelrahmen-Baugruppe an der Oberkante hoch, ziehe sie von der Unterkante weg und entferne sie.
-
-
-
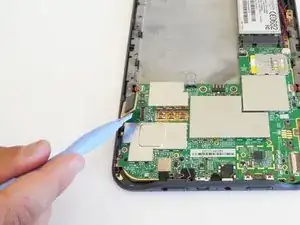
Entferne das beschädigte Display aus dem Gehäuse.
-
Drücke vorsichtig von außen nach innen. Passe auf, dass der Rahmen nicht bricht.
-

Um dein Gerät wieder zusammenzubauen, folge den Schritten in umgekehrter Reihenfolge.
37 Kommentare
I did it!
But it worked only the third time I opened the kindle, the first and second time the screen stayed frozen with some horizontal lines, the third time I only unlatched and latched all the ribbon cables and...voila! it worked!
Thank you, Im VERY happy!
Hi!!where have you buy the screen??? I've broken my today, and I doesn't want to buy another e-book reader yet!!
Thank you
Awesome Guide!!!
Ebay or this place has them.
http://www.powerbookmedic.com/Amazon-Kin...
The screw diagrams for grey and silver sets were very helpful!
note: There 2 or 3 odd cup-shaped washers that differ between versions. 2 go under the batter screws to keep height/pressure constant, on may be under a screw for the modem/RF module.
Yes! I did it! Kindle works properly! Many tnx!!!
Ah, I put it on in the wrong order, then figured out that starting at the bottom works best. I did the bottom, top and corners and then the sides, because I already had the top done.
kwood -
BE VERY CAREFUL HERE!! 15mm below the "next page" button was directly where the flex cable was. And it is an extremely fragile cable, even for flex cables. Which means I, of course, tore right through it without knowing until I got the cover off. So don't do that. Start 15mm above the lower corner, if anything, or start on the opposite side. Starting on the side with a single-point-of-failure is a really risky choice. The opposite side has basically nothing up against the edge, so you're free to poke it.
The other thing that isn't stated here is that the flex cable is inherently tied into the screen. Which means that if you, like me, damage that cable, the entire screen now broken and needs replacing. And if you, like me, was just trying to replace the battery or the motherboard, now it just makes sense to replace the entire device, both environmentally and financially. Whomp whomp.
bhurwitz -
As is, the guide sets you up SPECIFICALLY to DAMAGE THE SCREEN by prying into its very delicate ribbon cable.
A Kenny -
Apart from the buttons, are there any other specific places where we shouldn't pry, because it would damage something?
okojoijohoij -
There are clips a several centimeters from the edge of the Kindle across from the page-turning buttons. Undoing these clips was the most difficult part of opening the back of the Kindle. Be careful and take your time here.
It's a good idea to start on at the left page-turning button to help minimize risk of damage to the flex cable.
John Thoreson -
I've submitted an edit clearing up where to start the pry tool. Please folks, if you encounter something like this don't hesitate to remove bad information! With the contradictory instructions here I ended up starting on the left and piercing the cable like so many before me, which is very frustrating.
Jakob C -
Die Anleitung sollte in diesem Punkt wirklich überarbeitet werden. Das ist die absolut gefährlichste Stelle, das Gerät zu öffnen. So habe ich das Flex-Kabel eines funktionierenden Displays zerstört. Ich schreibe dies auf Deutsch und bitte darum, die englischen Erläuterungen zu lesen, wo man besser öffnet.
Kajetan Hinner -
I submitted an edit adding that the corners are another good place to start (it's how I just opened mine with no trouble) and moved the ribbon cable warning up to make sure people see it.
Neal Sofge -
Regarding two last (central) clips, it helps to know they both are facing the same way and after releasing the outer clips you can slide the back cover slightly towards the top of device to release them.
Konrad Grzegorzewicz -