Einleitung

Macht dein Akku Probleme und muss ersetzt werden? Dann bist du hier genau richtig. Zum Glück ist der Akku beim Kindle der 7. Generation das am einfachsten auszutauschende Bauteil. Folge dieser Anleitung und dein Kindle ist im Nu wieder einsatzbereit.

Beachte: die Anleitung gilt für den Standard Kindle der 7. Generation. Das ist nicht der gleiche wie der Kindle Paperwhite 7. Generation oder der Kindle Voyage 2014!

  1. U224BwRqPPQoxqEx
    U224BwRqPPQoxqEx
    AwlpEvUCxIOEMKTj
    • Schalte deinen Kindle aus, bevor du mit dem Auseinanderbauen beginnst.

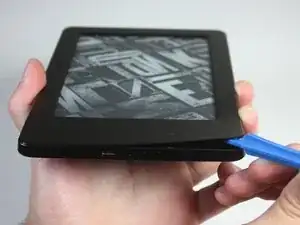
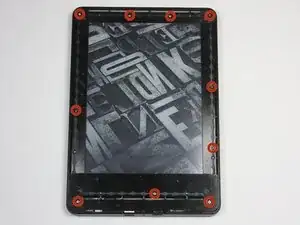
    • Benutze das blaue Kunststoff-Öffnungswerkzeug an jeder Ecke, um die Frontabdeckung zu lösen und vom Klebstoff zu trennen.

    • Fahre mit dem Werkzeug an den Fugen entlang, um die Frontabdeckung abzuhebeln.

    i had a battery that wouldn't even last a full day in the end. by accident i let the battery fall below 10% charge and when turned on it only showed the battery icon. I fully charged it and now i am having no problems with it. what i think happened is it reset the batteries memory and that was the problem. worth trying anyway before buying a new battery.

    soupamanx -

    I have no idea if my kindle is off. Holding in the button for a minute does nothing.

    Manfred Knorr -

  2. tIMKotWQsDZPImRJ
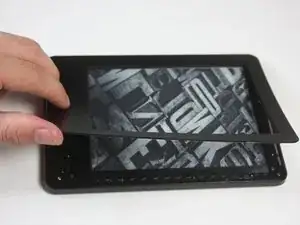
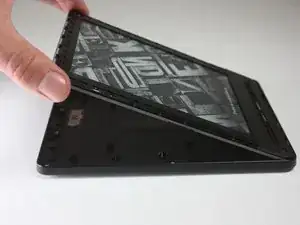
    • Ziehe die Frontabdeckung ab, um sie vom Kindle zu entfernen.

    • Wenn die Frontabdeckung zum ersten Mal entfernt wird, ist möglicherweise ein erheblicher Kraftaufwand nötig, um die Verklebung zu lösen.

    • Um eine Beschädigung der Frontabdeckung zu vermeiden, ziehe sie von den Ecken zur Mitte des Kindle hin ab.

    • Falls du die Frontabdeckung austauschst, kann beim Wiederzusammenbau zusätzlicher Klebstoff erforderlich sein.

    What is the adhesive you are using resecure the screen? Would Tesa 61395 Tape work (4mm) or would this create protrusion?

    Camble Scott -

    Did that option work for you? I'm about to try and change my battery and don't have any idea on what backup adhesive to have

    Lagroth -

  3. DSrvV1cL3BKDbRYS
    DSrvV1cL3BKDbRYS
    N5hIl4JWJ6REHBDs
    • Entferne die zehn 5,0 mm T5 Torx-Schrauben.

    • Eine magnetische Arbeitsmatte kann dir dabei helfen, den Überblick über deine Schrauben zu behalten.

    You will break the newer vision of kindle just like this. there is a peg that connect the top center of the screen to the back case. Remove the black double sided tape in the center and push this peg back .

    Kyle Darnell -

    If you see black double sided tape at the top of your Kindle, as the commenter above did, you are on the wrong model—have a look here to see if this is your model: Kindle Paperwhite 3 Bildschirm/Touch Panel austauschen

    Lipsmeyer -

    My device has a mix of silver 5 mm and black 4 mm screws. The 4 mm screws are the one in the middle of the left side and the 3 on the right side.

    Foxrok -

  4. kMq4PUsvd141fy2l
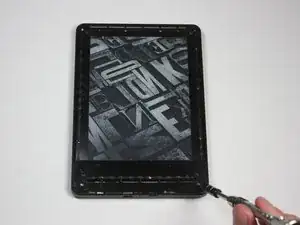
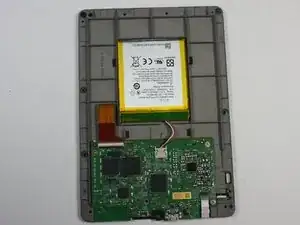
    • Löse das Innenteil von der Rückabdeckung, indem du gleichmäßig an den Ecken und Kanten entlangarbeitest.

    • Das Display wird von vielen Clips an der Rückabdeckung gehalten. Es ist zwar Kraft erforderlich, um die Rückabdeckung zu entfernen, aber du solltest nie das Gefühl haben, dass der Kindle dabei kaputtgehen könnte.

    後の手順5の画像で確認できる、バッテリーの周り4か所が主なクリップ箇所です。

    hi.kinta -

    補足:バックパネル交換ガイドを読んでいる場合は手順5以降がないので、上記の画像を確認したい場合はマザーボード交換ガイドの手順5などを参照して下さい。

    Servause -

  5. PT55VNoIFN1IjWAL
    • Drehe den Kindle um, sodass der Akku und die Hauptplatine zum Vorschein kommen.

  6. 5Y35BjcSfA26YLdW
    5Y35BjcSfA26YLdW
    EAHFRMOaDwNSZHwm
    • Drücke mit der stumpfen Pinzette die Enden des Sicherungsclips zusammen, mit dem das Akkukabel an der Hauptplatine befestigt ist.

    • Ziehe das Kabel vorsichtig vom Hauptplatinen-Anschluss ab.

  7. tjVLggJOmUWVWYTt
    tjVLggJOmUWVWYTt
    JIpoCXjXPBThPTnP
    34IFpunMy5K5wCgT
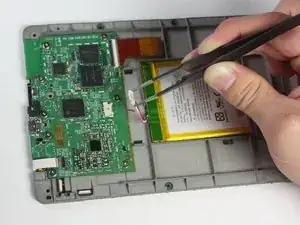
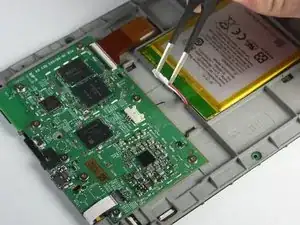
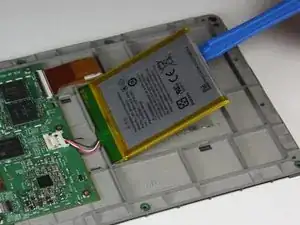
    • Heble den Akku mit dem Kunststoff-Öffnungswerkzeug von der Rückseite des Displays ab.

    • Lege den Akku beiseite.

    • Der Akku ist stark verklebt, daher könnte dies etwas mehr Kraft erfordern. Das dritte Bild zeigt, dass dadurch der Akku stark verformt werden kann.

    • Entsorge beim Akkutausch den beschädigten Akku auf sichere Weise und benutze geeigneten Klebstoff zur Fixierung des neuen Akkus.

Abschluss

Um dein Gerät wieder zusammenzubauen, folge diesen Anweisungen in umgekehrter Reihenfolge.

Abby Roulier

Mitglied seit: 08/02/15

1059 Reputation

23 Kommentare

Where can I purchase the battery?

Boon -

Fairly easy to do. Saves a lot of money compared to buying a whole new Kindle :) Thank you for this! A note: I've never seen batteries as...soft as these. Take care when using the removal tool. I could be easy to puncture the battery which could cause a big mess and possibly injury.

Joshua -

My old battery got seriously deformed during removal, but didn't puncture or tear. I added a picture to the guide, so that hopefully the next person is not as alarmed as I was :)

Nathan T -

Where do I get a new battery from please?

Tracy Armstrong -

The link to buy a replacement battery on amazon is dead. Ideas on an alternate source?

Yagoth -

You can get the batteries on Ebay.

Mike Rayner -

This looks more like an 8th gen battery replacement. The 7th gen battery has screws that hold it in place.

Jeff G -

This guide is for a regular 7th Gen Kindle. Do you perhaps have a Paperwhite or Voyage? Those aren't the same. This guide worked perfectly for my standard 7th Gen Kindle.

Nathan T -

Does replacing the battery reset the Kindle 7 to factory defaults?

Howard Marshall -

No. I just replaced my battery, and it booted with my settings and content.

stefanhubbard -

I have a 7'th gen kindle paperwhite, and inside the screws look nothing like the pictures here! :(

1. There are way more screws, but none of them a torx.

2. The battery is screwed down, and is in a hard black plastic package

3. the main board is edge-to-egde, and with 3 ribbon connectors goring around the sides

4. main board has 4 metal housings hiding all the chips

Jeppe Rishede Thomsen -

Thanks for this! But as others have said, this doesn't look like my 7th generation Kindle Paperwhite (I'm in the UK – I guess it’s possible there might be regional differences?).

But the principle is just the same. Be prepared for 11 crosshead screws instead of ten Torx. The nice thing about the 7th gen is that the battery is in a rigid carrier held down by three screws instead of glue. I’m impressed with the repairability of this Kindle, and the build quality too.

Charles Butcher -

Comment savoir si la batterie est à remplacer ? merci

Gilles Morysse -

You could have mentioned that this is not a Kindle Voyage 7th Generation! Your instructions have had me trying to prise the back off one of those when it just needs the top panel removing and 4 screws undoing. Thanks to ifu##it.com, I have ruined a Kindle. Thanks very much, I won't be ordering any more tools from you!

Tony Winter -

Hello @tonywinter47915

i understand that your situation is really unsettling. The Kindle and the Kindle Voyage are completely different devices, even if they are both Kindles and they are both black. It is absolutely unsatisfying, I understand that, but you cannot blame iFixit for buying the wrong sparepart or using a wrong guide.

If you still need to contact the support, feel free to contact them at support@ifixit.com

In case you need some more support fixing your Kindle Voyage, we have some guides to fix issues with it: Kindle Voyage

BenZ78 -

Be careful when separating the bezel. It is glued. Make sure that you separate it gently from the body but also from the screen.. Bear in mind that if you do it too quickly, it can tear off the edges of the thin layer that covers the entire screen. Lessons learned, unfortunately.

Tom J. -

"i understand that your situation is really unsettling. The Kindle and the Kindle Voyage are completely different devices, even if they are both Kindles and they are both black. It is absolutely unsatisfying, I understand that, but you cannot blame iFixit for buying the wrong sparepart or using a wrong guide."
Don't you think that adding a clarification to the Kindle 7 guides that it is not the Kindle 7 Voyage would be more helpful than telling me they are both Kindles and both black?

Tony Winter -

What is the type of adhesive used?

DyOB -

Carful around the power switch & the micro USB port I think I have killed my ability to connect & recharge my paperwhite :/

GeekonaBike -

the battery is super fragile, even more so than other internal Li-Po batteries. I punctured mine during removal as the adhesive is so strong, even after covering it with Isopropyl alcohol.

Matthew Stevenson -

FYI, these instructions are as advertised. They are not for a Kindle Voyage 7th Generation, nor are they for a Kindle Paperwhite 7th Generation. This looks to be instructions for a Kindle (basic) 7th generation.

waltanthony -

In the pictures, the battery appears to have a short cable (that I assume is an integral part of the battery) ending with a connector, which plugs into a receptacle on the mobo two or three centimetres away. All the images I'm seeing on eBay for Paperwhite 7th Gen have a 3-contact connection strip directly on the battery case, no cable. What's going on?

Cogit8r -

58-000083 search the battery with this code in ebay

Heber -