Einleitung

Diese Anleitung wurde von iFixit-Mitarbeiter:innen verfasst und ist keine offizielle Reparaturanleitung von Google. Hier erfährst du mehr über unsere Qualitätsstandards.

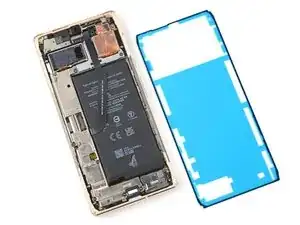
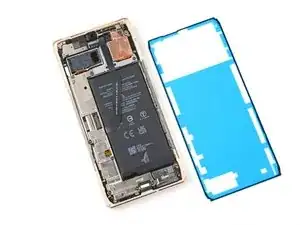
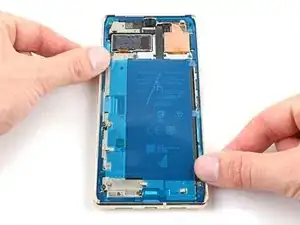
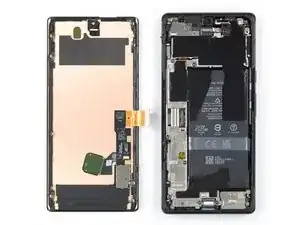
Diese Anleitung zeigt, wie die Klebestreifen im Google Pixel 6 Pro nach einer Reparatur ersetzt werden können. Bevor du die neuen Klebestreifen anbringst, musst du das Display entfernen. Falls du das noch nicht getan hast, dann benutze diese Anleitung.

  1. vOxGqvEMRQ4VxmVE
    vOxGqvEMRQ4VxmVE
    H3VXXfHJQ2j5VmXO
    Sh1fh1DuW3EPBsRV
    • Reste vom Kleber und Verunreinigungen verhindern, dass das Display gut festklebt.

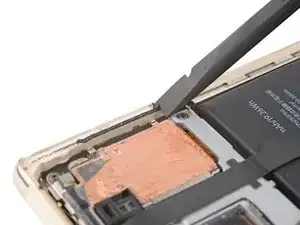
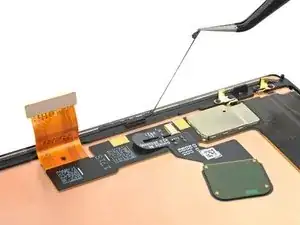
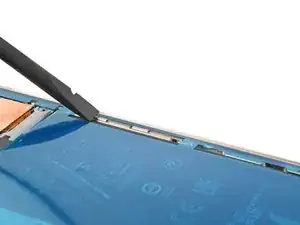
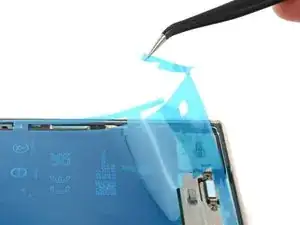
    • Schabe mit dem flachen Ende des Spudgers soviel von den Kleberresten wie möglich ab.

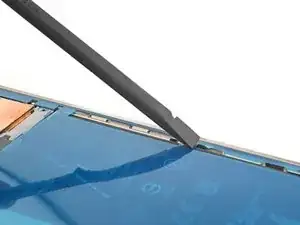
    • Ziehe noch verbliebene Kleberreste mit den Fingern oder einer Pinzette ab.

    • Achte darauf, dass du den Akku nicht mit der Pinzette anstichst, aus einem beschädigten Akku können gefährliche Chemikalien austreten oder er kann in Brand geraten.

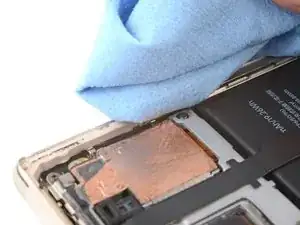
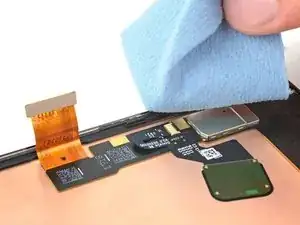
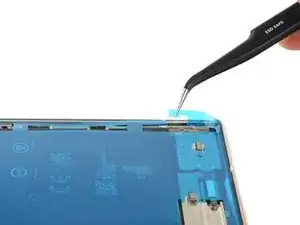
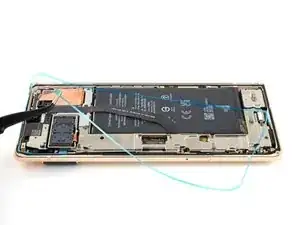
    • Reinige den Rahmen ringsum mit etwas hochkonzentriertem Isopropylakohol (mindestens 90%ig) und einem fusselfreien Mikrofaser-Reinigungstuch.

  2. 1KPZMaVpogCR1isd
    1KPZMaVpogCR1isd
    UBdKYT1BBpsgTPn6
    cSyW3ftigSvRr2KG
    • Wenn du dein Display wiederverwenden willst, dann reinige es in der gleichen Art und Weise wie den Rahmen.

  3. BfekWMJqs6b31KjV
    BfekWMJqs6b31KjV
    VPVwycMBJRvgIyGr
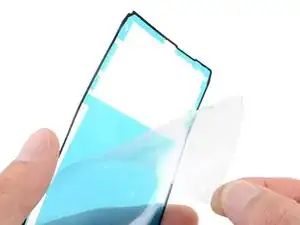
    • Bevor du die neuen Klebestreifen befestigst, lege sie zunächst über dem Rahmen aus, um die richtige Position zu finden.

    • Schaue nach besonderen Orientierungspunkten, wie die Frontkamera, dem oberen Lautsprecher und Einschnitten an den Ecken.

  4. MiXBkRA63MxLtbrg
    • Fasse die Zuglasche oben an und ziehe die durchsichtige Schutzfolie ab.

  5. FZBNDkfJZnWWWuKg
    FZBNDkfJZnWWWuKg
    DTWrEko3ZqQPqukg
    asaRWLlQNnMWUjIB
    • Sei bei diesem Schritt sehr vorsichtig. Der Kleber haftet sehr gut, wenn er einmal festgeklebt ist, lässt er sich nicht mehr verschieben. Ein falsch befestigter Klebesteifen dichtet nicht mehr gut ab.

    • Fange an der Unterkante mit dem Auflegen des Klebestreifens an. Korregiere fortwährend beim weiteren Festkleben.

    • Orientiere dich an den Ausschnitten in der unteren linken Ecke, unteren rechten Ecke und für den oberen Lautsprecher, um den Klebestreifen korrekt auszurichten.

  6. VcKEaNSNUFlOLMaQ
    VcKEaNSNUFlOLMaQ
    MuY4AJ4mlpRdfWIK
    6TBaHUgYWZAmPavV
    • Drücke den Klebestreifen mit dem Spudger oder deinem Finger rundum am Rahmen fest.

  7. KPSErArInFUVsU2O
    KPSErArInFUVsU2O
    HFBPlWwU2THM2ipC
    l6g2DxmfXIA2EBfD
    • Fasse die Lasche unten rechts am Rahmen und ziehe die große Schutzfolie ab.

    • Darunter befindet sich eine weitere kleine Schutzfolie. Entferne diese noch nicht.

  8. MfmGyTSAcajP6siM
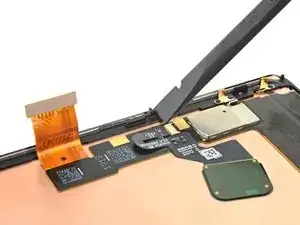
    • Überprüfe die Öffnung für die Frontkamera und den Ausschnitt für den Sensor im Ersatzdisplay. Wenn noch Schutzfolien aufgeklebt sind, dann entferne sie.

    why dont you show the method to connect the cable? This is the most important part. I cant seem to be able to connect. I dont hear or feel a click

    Rome Gabe -

    I missed this step and don't have a front facing camera now. Whoops!

    Kyle -

    VERY IMPORTANT: Remove the protective film on the camera hole. I breezed through this step too fast, thinking it was referring to the blue film that was elsewhere on the protective screen. Now my selfie cam is blacked out for the time being.

    eliasp02 -

    Ich bin zu schnell vorgegangen und habe übersehen, dass auf der Aussparung der Selfie Kamera offenbar noch eine Folie war. Die Frontkamera liefert jetzt nur noch Schwarzbild. Das sollte besser und deutlicher in der Anleitung gekennzeichnet werden!

    Daniel Vogelsberg -

  9. 4E66NsxrJkTHoLAX
    • Gehe zur Anleitung für dein Smartphone zurück und baue es weiter zusammen.

    • Vergiss nicht die Halterung des Displaykabels zu befestigen.

    • Wenn das Display fertig ist, dann mache mit dieser Anleitung weiter und klebe das Smartphone ganz zu.

  10. q6VeQFQYXhMQ1NZu
    q6VeQFQYXhMQ1NZu
    NItaUExClEPpbfP6
    foKIGvLolJlxnvHQ
    • Fasse die Lasche oben links am Rahmen und ziehe die Schutzfolie rund um den Rand ab.

    • Achte darauf, dass du nur die Schutzfolie und nicht den Klebestreifen abziehst.

    Where does it mention to remove the sticker from the front camera? Also, a photo of this with highlight around the area would be super helpful...

    alberte -

    Hi! In this process, there isn't a liner over the front-facing camera or its recess in the screen. This process only demonstrates how to apply the adhesive which secures the border of the screen to the frame. If you are following this guide, using this part, then bullet 6 of step 11 provides a reminder to check the recess in your replacement screen. It appears that our part doesn't come with the front camera liner, which may be why the original author didn't include a picture of the liner. Your part may differ slightly.

    Clay Eickemeyer -

  11. 14UobuNNkVdYqCZ6
    14UobuNNkVdYqCZ6
    4jHVlV1XCxsxUFba
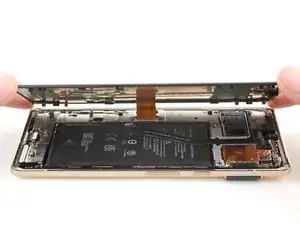
    • Drehe das Display um und lege es auf den Rahmen.

    • Drücke das Display um den Rand herum fest.

    What do you think about using t8000 or b7000 glue? I am concerned that the water resistance will not be very good with this OEM glue. I have it and it doesn't look very thick. You know how the screen sort of snaps into place without adhesive? Well mine does not snap in one corner and lifts up about a 32nd of an inch. I worry the adhesive sticker will not work on this spot.

    Michael Carton -

    It sounds like either one of the clips isn't engaging near the corner you mentioned, or the frame is slightly bent. After you replace the adhesive and reinstall the screen, compress the phone with a lot of force for an extended period of time. As I mentioned in my other comment, official screen installations require something in the ballpark of 80 psi for 30 seconds to properly seat the adhesive. For best results, find a way to evenly compress your phone with a strong force. Be careful not to distribute an uneven amount of force to the raised rear camera mesa. Doing this will better allow the glue or adhesive to settle. In the end, don't trust the water resistance to be as good as original.

    Clay Eickemeyer -

    why is there no advice on connecting the cable? I wish I checked instructions before purchasing, I didn't realise how little detail they give you.

    Lee Luderman -

    Tips on pressing it all back together? I've followed everything here, but am having trouble closing it up by "pressing gently." Even firm pressing is not connecting the clips.

    Andi -

  12. PXPk1i62abp2a6vB
    PXPk1i62abp2a6vB
    OClGoqfkGI1Kq4iJ
    Qt1CPpJDaVSRibvQ
    • Damit der Displaykleber besser am Rahmen haftet, muss er gleichmäßig angedrückt werden. Die Kameraleiste muss dabei berücksichtigt werden.

    • Wenn du Display-Schraubklemmen hast, kannst du die Kameraleiste aussparen. Bringe die Klemmen am Rand des Gerätes an..Screen Vise Clamps 6-Pack

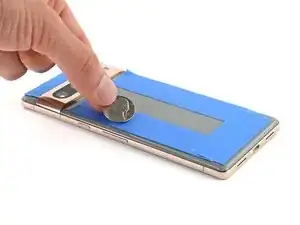
    • Schütze das Rückseitenglas am Rand mit Klebeband, so dass es keine Kratzer bekommt.

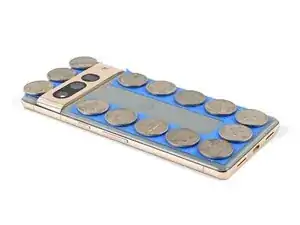
    • Platziere Münzen oder ähnlich dicke Gegenstände an den Rändern des Rückseitenglases. Achte darauf, dass sie mindestens genauso dick wie die Kameraleiste sind.

    • Lege einen Stapel von Büchern oder andere schwere Gegenstände auf das Smartphone. Lasse sie dort mindestens eine halbe Stunde lang liegen, am Besten über Nacht.

    How long should the phone be clamped down until the adhesive is considered properly cured?

    eliasp02 -

Clay Eickemeyer

Mitglied seit: 19/09/22

85412 Reputation

8 Kommentare

will the phone have the same water resistance rating after this? Assume proper adhesive placement? ALso, what about b7000 glue? Any comment on using that?

Michael Carton -

Your phone will lose its official IP rating after reapplying any adhesive. The official double sided adhesive technically requires a large amount of force (somewhere in the ballpark of 80 psi) to bond as well as the phone was originally sold with. Without the equipment to do this, its difficult to predict how well your individual repair will hold up against water. A mobile-device-specific glue will work in the same fashion. I encourage you to seal the phone however you feel most comfortable. If you try glue instead of the official adhesive, make sure to be extremely precise about how much and where you apply the glue, since it's messy and your only barrier against the elements. Good luck!

Clay Eickemeyer -

Thanks!!! I can use a book with a weight on it, of an amount calculated to exert 80psi on the screen. By eyeballing it at a coffee shop, looks like 20lbs. Do you think that I should calculate this ONLY around the perimeter, or do you apply pressure evenly on the whole screen?

Michael Carton -

As a disclaimer: be extra sure the raised rear camera mesa doesn't create uneven force. If it does, the pressure may crack the rear case or lead to an improper seal of the screen. But, yes, calculate the area around the perimeter, since the screen isn't designed to support that weight in only the center.

Clay Eickemeyer -

Hello! I am going to be following this guide soon and I noticed that the alcohol recommended is Isopropyl at 90%. I only have Ethyl at 80%. Is this bad? Is the difference so big that I shouldn't use it? I really need to fix this phone soon and I'm scared of damaging it.

Fox Man -

Hi Fox Man,

Sorry for the late response. If you haven't already done the repair, then this info might be helpful. We recommend 91% isopropyl alcohol for any places that might contact electrical components. 91% or greater evaporates quickly and thoroughly enough so that there isn't any residue left to bridge a connection on circuitry. If you need to use a lower concentration IPA, then be more careful not to let it spill onto any electrical components, and give it more time to dry before connecting the battery.

Clay Eickemeyer -

Can't use fingerprint sensor. Tells me to go to g.co/pixel/fingerprintunlock. Try to do it, immediately get "fingerprint setup timed out"

Michael “Kazimierz” Rojek -

It's hard to say for certain what the issue is. There is discussion on various forums and posts, such as this one, that might be of help.

Clay Eickemeyer -