Einleitung

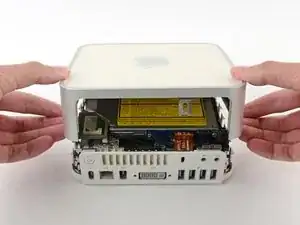
Entferne das obere Gehäuse, um an die Komponenten im Inneren deines Minis zu kommen.

Werkzeuge

  1. sLBEp1SWeQaGvAGF
    sLBEp1SWeQaGvAGF
    qiWAxhbPbXwslECg
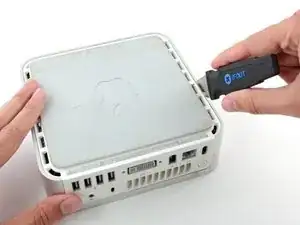
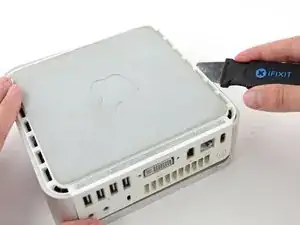
    • Schalte deinen Mac Mini aus, trenne alle Kabel und drehe ihn um.

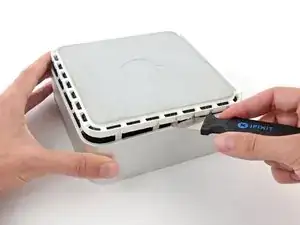
    • Führe den Jimmy in den Spalt zwischen dem oberen Aluminiumgehäuse und dem unteren Kunststoffgehäuse ein.

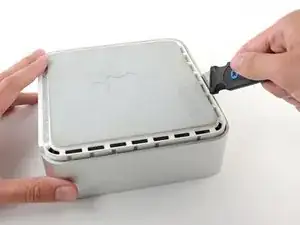
    • Der Jimmy sollte nach ungefähr 9,5 mm stoppen.

    A spackle knife makes these steps go much faster.

    jouniseppanen -

    A double sided letter opener or a thin non-serrated butter knife will suffice.

    To prenent cosmetic blemishes, place a matchbook cover or similar thin cardboard on the outer perimeter under the “jimmy”.

    Mike -

    Despite mentioning recommended tools at the top I think it’s really worthwhile making a point about narrow Philips screwdrivers at this point before people start putting the case apart.

    Matt D -

  2. kah5J3ZqepQRAYLs
    kah5J3ZqepQRAYLs
    TjNLADvgUc3u65EC
    E1GivJlcjLIm1AjR
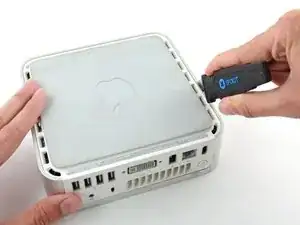
    • Biege den Jimmy vorsichtig nach außen, um den Spalt ein wenig weiterzu öffnen, und hebe das untere Gehäuse ein wenig an.

    • Am unteren Gehäuse befinden sich mehrere Kunststoffclips, die in eine Nut am oberen Aluminiumgehäuse passen. Dein Ziel ist es, sie mit dem Jimmy so weit nach innen zu drücken, dass sie sich aus der Nut lösen, während du vorsichtig das untere Gehäuse abziehst.

    Patience is your best friend.

    Do not insert “jimmy in too far. Marking a line from tip upwards on the tool will prevent too far insertion, possibly breaking tabs or damaging internal components.

    To prevent the cover closing back up, small strips of matchbook cover (os equivalent) can be inserted about half inch hold prevent closure.

    Mike -

    I think it needs to be made more clear that what you want to be doing is applying upward pressure on the back I/O panel with your HAND while pressing the clips with the jimmy, sort of like tensioning a lock and then setting individual tumblers. (Yeah, I watch LockPickingLawyer.)

    The pictures appear to show trying to lift the lower housing using the jimmy, similar to how I've seen people doing things like prying with a putty knife or screwdriver... and that plastic is only going to get more brittle over time.

    If you apply the upward pressure with your hand via the back panel and then work your way around the outside edge clip-by-clip, then it's much easier to be gentle with the jimmy because your only goal is to press on each clip enough to release it. All the rest of the force comes from, say, a finger hooked into the edge of the Ethernet port and a thumb pressing on the edge of the top cover.

    ssokolow -

  3. IkyV51XbYAOx1scN
    IkyV51XbYAOx1scN
    yEIBOXiZXylOkfa3
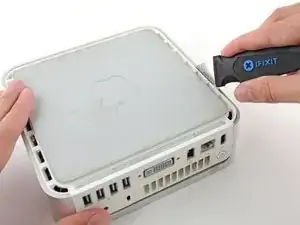
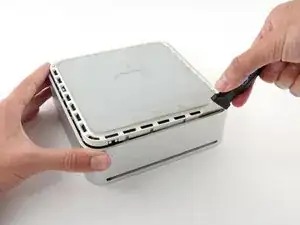
    • Wenn du die erste Seite gelöst hast, drehe den Mac Mini und beginne, an der Vorderkante zu hebeln.

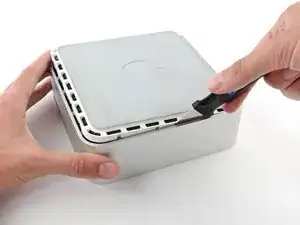
    • Biege mit der gleichen Hebelbewegung die Clips nach innen und hebe das untere Gehäuse aus dem oberen Gehäuse heraus.

  4. ALLVbaEmIiRDx3ye
    ALLVbaEmIiRDx3ye
    tIQp3aqsF2IIZtPb
    • Möglicherweise musst du den Jimmy an der Kante entlang bewegen, um alle Clips zu lPosen. Sei geduldig und arbeite dich schrittweise vor.

  5. Tjq4XQhQltwaf41J
    Tjq4XQhQltwaf41J
    cN1LgUGSLjcbAtOp
    • Arbeite dich um das Gerät herum, um die Clips an der letzten Seite zu lösen.

  6. mkOHVknKjJGtqOlZ
    mkOHVknKjJGtqOlZ
    aHVZOjTkBWLtHRns
    • Drehe den Mac Mini wieder auf die Vorderseite und hebe das obere Gehäuse vom unterem Gehäuse ab.

    Before reassembly, make sure no wires are sticking out.

    Line up top cover carefully. Gently press down on top cover until top and bottom fully seated.

    CAUTION! DO NOT PRESS TOO HARD ON THE COVER TO PREVENT CRACKING THE PLASTIC TOP.

    GO EASY.

    Mike -

    Re: reassembly, I found it gentler to use the jimmy to lightly press the plastic clips in a little bit to get them past catching on the frame with minimal force.

    ssokolow -

Abschluss

Um dein Gerät wieder zusammenzusetzen, folge diesen Schritten in umgekehrter Reinfolge.

Andrew Optimus Goldheart

Mitglied seit: 17/10/09

509891 Reputation

0 Kommentare