Einleitung
Diese Anleitung zeigt, wie der rechte Lautsprecher im MacBook Air von Ende 2018 ausgetauscht werden kann. Er befindet sich auf der Seite mit der Kopfhörerbuchse.
-
-
Wenn dein MacBook unter BigSur v11.1 oder einer späteren Version läuft, lässt sich AutoBoot möglicherweise nicht deaktivieren. Arbeite zuerst normal weiter, trenne aber den Akku sofort ab, wenn du ins Innere des Gerätes hinein gekommen bist.
-
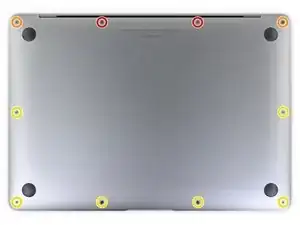
Entferne mit einem P5-Pentalobe-Schraubenzieher folgende Schrauben:
-
Zwei 7,9 mm Schrauben
-
Zwei 7,1 mm Schrauben
-
Sechs 2,6 mm Schrauben
-
-
-
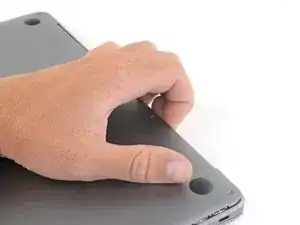
Zwänge deine Finger zwischen das Display und das Gehäuseunterteil und ziehe nach oben, so dass sich das Gehäuseunterteil vom Air ablöst.
-
Entferne das Gehäuseunterteil.
-
-
-
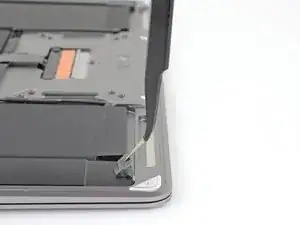
Ziehe den Aufkleber soweit vom Akkustecker zurück, dass der darunterliegende Stecker sichtbar wird.
-
-
-
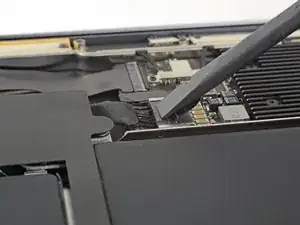
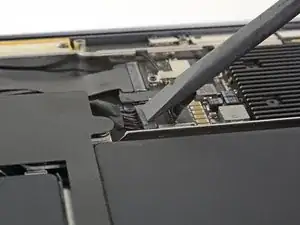
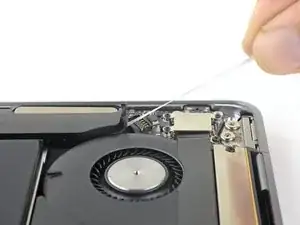
Schiebe den Akkustecker mit einem Spudger parallel zum Logic Board aus seinem Anschluss auf dem Logic Board heraus.
-
-
-
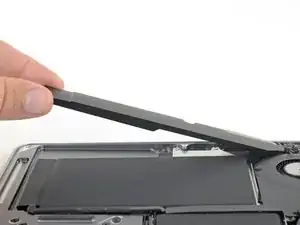
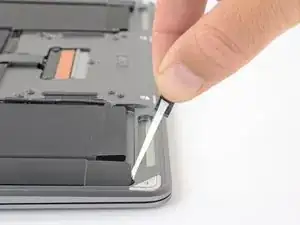
Nimm eine Pinzette und hebe die schwarze Zuglasche des Lautsprechers unten am rechten Lautsprecher soweit an, dass du sie mit deinen Fingern greifen kannst.
-
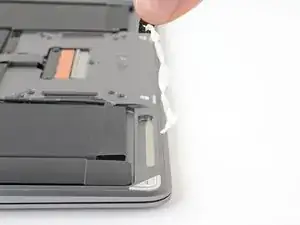
Fasse die Zuglasche an und ziehe sie langsam und behutsam unter dem rechten Lautsprecher hervor.
-
Wenn der Streifen reißt, dann lasse ihn so wie er ist und gehe zum nächsten Schritt über.
-
-
-
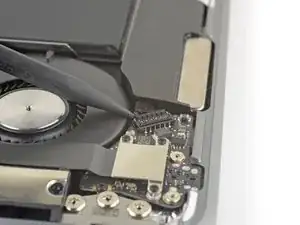
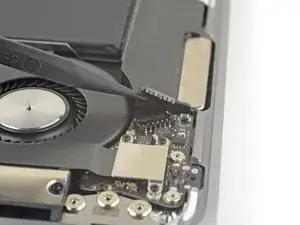
Schiebe die Spudgerspitze unter das Kabel zum rechten Lautsprecher und heble senkrecht nach oben, so dass der Lautsprecher abgetrennt wird.
-
-
-
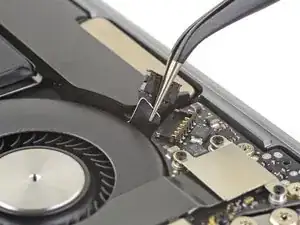
Hebe die schwarze Zuglasche des Lautsprechers oben am rechten Lautsprecher soweit an, dass du sie mit deinen Fingern greifen kannst.
-
Fasse die Zuglasche an und ziehe sie langsam und behutsam unter dem rechten Lautsprecher hervor.
-
Erwärme den Lautsprecher, damit der Kleber darunter weich wird.
-
Schiebe vorsichtig einen Spudger oder ein Plektrum unter den Lautsprecher und trenne den Kleber auf.
-


Vergleiche dein Ersatzteil mit dem Originalteil — möglicherweise musst du fehlende Bauteile übertragen oder Schutzfolien vom Neuteil abziehen, bevor du es einbauen kannst.
Um dein Gerät wieder zusammenbauen, folge den Schritten in umgekehrter Reihenfolge.
Entsorge deinen Elektromüll fachgerecht.
Hat die Reparatur doch nicht den richtigen Erfolg gebracht? Frage in unserem Antworten-Forum nach Hilfe.

If the first thing you do is disconnect the battery, is it really an issue if you don’t (or can’t) disable auto-boot?
maccentric -
I agree, why disable Auto-Boot when the lid is closed and the battery is disconnected immediately? – I've never had an issue since 2016 when the feature was introduced.
stevebsiegel -
On my machine, the longest two screws were in the corners, while the other two long screws were in the middle. Perhaps previous service in the past had them replaced into the wrong place? In any case, the longest screws do seem to fit in either place. I guess 0.8mm is not very much of a difference. Seems like poor design if they could have used one size of screw.
johann beda -
Just did one, and it also had longest screws in the corners.
maccentric -
Just did another, and the long ones were in the middle. Definitely poor design and quality control.
maccentric -