Einleitung

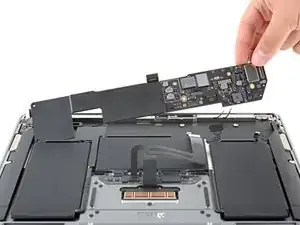
Diese Anleitung zeigt, wie das Logic Boarde im MacBook Air (M1) von Ende 2020 ausgetauscht werden kann.

Nach dem Austausch des Logic Boards funktioniert Touch ID nicht mehr. Der originale Touch ID Sensor ist ab Werk mit dem Logic Board gekoppelt. Ohne Apples proprietäre Kalibrierung funktioniert ein Touch ID Sensor nicht in einem anderen MacBook - selbst wenn es ein original Apple Ersatzteil ist.

Wenn du weiterhin Touch ID Funktionalität haben willst, musst du einen gekoppelten Touch ID Sensor mit austauschen.

  1. VPEGroiLj2rq1TsX
    • Bevor du anfängst, solltest du die Auto Boot Funktion deaktivieren. Auto Boot schaltet deinen Mac beim Aufklappen ein und kann während des Öffnungsvorgangs versehentlich ausgelöst werden. Benutze diese Anleitung oder folgende verkürzten nachfolgenden Anweisungen um Autoboot auszuschalten.

    • Wenn dein MacBook unter BigSur v11.1 oder einer späteren Version läuft, lässt sich AutoBoot möglicherweise nicht stilllegen. Arbeite zuerst normal weiter, trenne aber den Akku sofort ab, wenn du ins Innere des Gerätes hinein gekommen bist.

    • Schalte dein MacBook vollständig aus und ziehe den Stecker aus der Steckdose, bevor du anfängst. Schließe das Display und drehe den Laptop um.

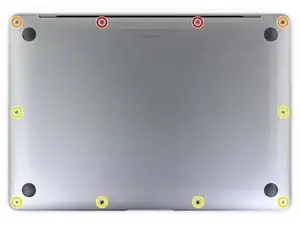
    • Entferne folgende P5 Schrauben:

    • Zwei 7,9 mm Schrauben

    • Zwei 7,3 mm Schrauben

    • Sechs 2,6 mm Schrauben

    • Halte während der gesamten Reparatur deine Schrauben gut geordnet und achte darauf, dass jede Schraube an ihren Ursprungsort zurück kommt.

    ESD safe mat, plugged into ground, with a wrist strap, also grounded, are the best best to protect the logic board.

    Robin Ray -

    Re-Assembly Tip: Before putting the screws back in, snap the lower case on and test to make sure the MacBook powers up. When I first re-assembled, I became very nervous I did something wrong because it would not power on. It turns out I just needed to plug the laptop into a power source for it to power up (despite having a good charge before disassembly). It was the perfect way to test the new USB-C ports!

    Austin -

    Big points to this one, especially for mentioning needing to plug the laptop in. The bottom case needs to be screwed in and laptop needs to be plugged in before it will boot.

    Bayden Yazalina -

    Wiha 4PL driver for these screws.

    Greg Worrel -

    Printing out all the images from this Ifixit guide prior to starting and using duct tape help me keep track of screws.

    raju midjdeya -

    This Guide has a high chance of not working if an aftermarket display is used as MAC serialization was introduced post ~2023. Likely you will need an original MAC screen replacement and to serialize the display for it to work.

    Tron Computers -

  2. JM2r2fTloLj1HGHv
    JM2r2fTloLj1HGHv
    qWKL1OR1c1CmZJKh
    qfGXhnWu5SInbUHj
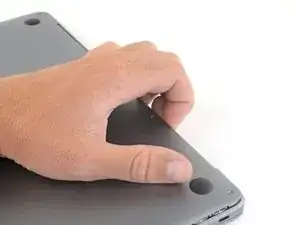
    • Zwänge deine Finger zwischen das Display und das Gehäuseunterteil und ziehe nach oben, so dass sich das Gehäuseunterteil vom Air ablöst.

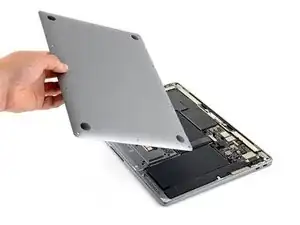
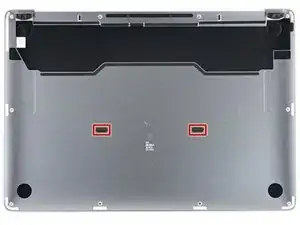
    • Entferne das untere Gehäuse.

    • So wird das untere Gehäuse wieder eingebaut:

    • Setze es passend auf und drücke fest darauf, damit die beiden darunter versteckten Rasten einschnappen. Du solltest das hören und spüren können.

    Los tornillos se ruedan fácilmente :(

    Mishelle Cerón -

  3. NWhygZ3NuFfSLrCC
    NWhygZ3NuFfSLrCC
    kRYFRljHKcJHQMni
    VevmEYadgKPXgXRH
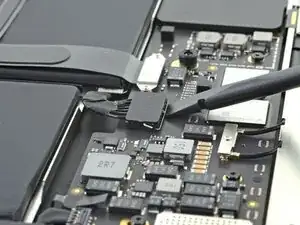
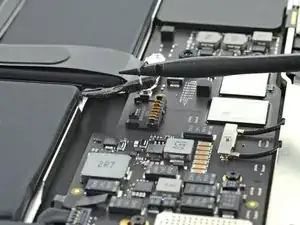
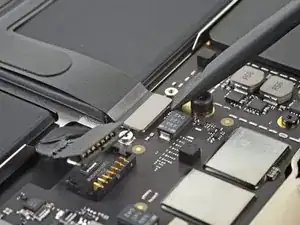
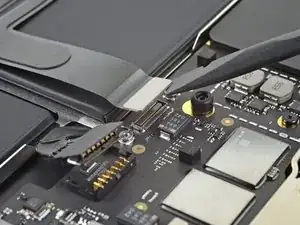
    • Heble den metallenen Sicherungsbügel am Akkustecker mit dem flachen Ende des Spudgers hoch und entriegelt den Akkustecker.

    • Achte darauf, dass der Sicherungsbügel nicht mehr in die Lasche der Verriegelung eingreift, bevor du den Akkustecker heraushebst. Der metallene Sicherungsbügel sollte sich leicht öffnen lassen.

    • Ziehe den Sicherungsbügel senkrecht nach oben, damit der Akkustecker aus seinem Anschluss auf dem Logic Board herauskommt.

    • Drücke den Stecker beim Zusammenbau gerade in seinen Anschluss hinein und achte darauf, dass er bündig im Anschluss sitzt.

    • Drücke, falls nötig, zuerst die hintere Seite mit den Kabeln fest, dann die vordere Seite des Steckers.

    Reassembly: I had difficulty going straight down. The connector has some angled edges that made it difficult. Instead, I slotted the wire side in first, then rocked it forward towards the hinge into position.

    Sean K -

    If having difficulty in flipping the bar up, place the machine vertical and not that there is a small “locking nib” that the bar has to clear. You may have to give the bar honest persuasion to clear the nib.

    Harry Dulcamara -

    The bar can lock backwards making it very hard to even see let alone move. Great care is needed to shift it. I had to use two thumbnails, one on each side, then once flipped forward it takes more push than I expected to clip it in place. Ensure the plug is fully seated first !

    Simon Anthony -

    As others commented, it can be hard to click the battery connector back into place. First make sure the bar is not underneath the connector. Then, turning the computer so the connector pins are facing you (LCD hinge end closer to you) can also make it easier to position the connector on top and then click it into place.

    madmaxmedia -

    Some replacement batteries have a retainer bar that differs from OEM batteries. I had to swap the retainer bar to properly secure it under the "locking nib" to ensure it didn't release on its own (before it could freely swing).

    Anthony Collier -

  4. dGnRXaRRqFQArXTH
    • Drehe die drei,1,4 mm Torx T3 Schrauben heraus, mit denen die Abdeckung des Steckers zur Audioplatine befestigt ist.

    • Wenn sich das T3-Bit doch etwas zu klein anfühlt, dann versuche es mit einem T4.

  5. Zps1CHByUbwOhOFc
    • Entferne die Abdeckung am Stecker der Audioplatine.

  6. HkXVFSm5vbGKNTrP
    HkXVFSm5vbGKNTrP
    S1d1S2PqoHHD3syr
    • Heble den Stecker der Audioplatine mit dem flachen Ende des Spudgers hoch und trenne ihn von der Platine ab.

    There is the smaller connector that’s not being mentioned. It’s the closest one to the hinges.It’s also part of the smaller audio board.

    Macrepair SF -

    Lamajr, that small connector is for the Touch ID button and disconnecting it isn't necessary for removing the logic board only. If you're removing the audio board itself, steps for disconnecting that small cable can be found here. Happy fixing!

    Carsten Frauenheim -

  7. M1Ptn1pnFGgyZQBv
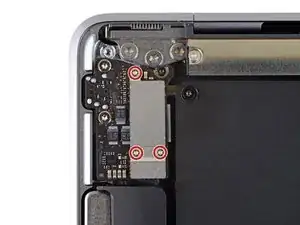
    • Entferne die beiden 1,4 mm Torx T3 Schrauben, mit denen die Abdeckung am Stecker der USB-C-Platine befestigt ist.

  8. vgQe52m4VYFCwIBj
    • Entferne die Abdeckung am Stecker der USB-C-Platine.

  9. F15YYKQDTPYb2ojL
    F15YYKQDTPYb2ojL
    SILErONNDJDjtVwU
    • Heble den Stecker am USB-C-Kabel mit dem flachen Ende des Spudgers hoch und löse ihn aus seinem Anschluss auf dem Logic Board heraus.

  10. glc25GbatSZFAFrd
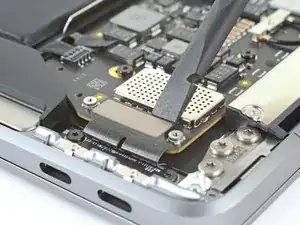
    • Entferne die 1,4 mm Torx T3 Schraube, mit der die Abdeckung des Antennenkabels befestigt ist.

    T4 It’s best to use here!

    Macrepair SF -

  11. tquBq4uLAXokZkHI
    • Entferne die Abdeckung des Antennenkabels.

  12. 1ydKAoyuTiPGVtbZ
    1ydKAoyuTiPGVtbZ
    hLBl4MqoHmWXnkYZ
    kPuLWZJhTfFcDViA
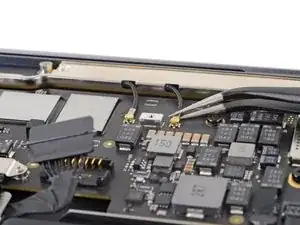
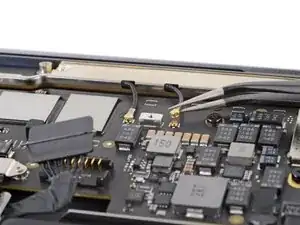
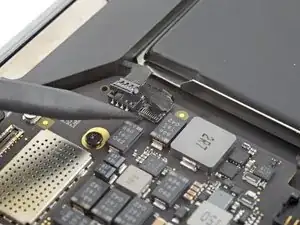
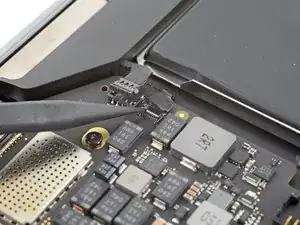
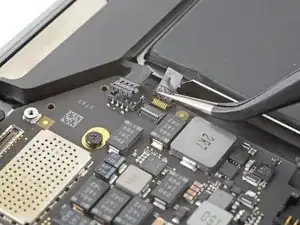
    • Fasse den Antennenstecker nahe am Anschluss mit einer Pinzette an.

    • Ziehe gerade nach oben und löse ihn ab.

    • Wiederhole das Gleiche für das zweite Kabel.

  13. GtAQXAOOp3YaXltM
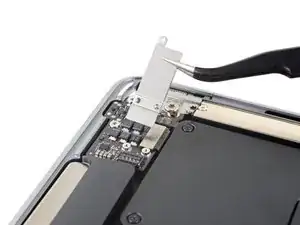
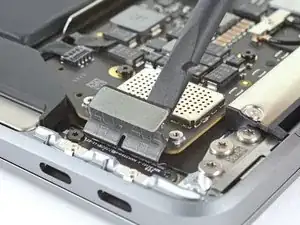
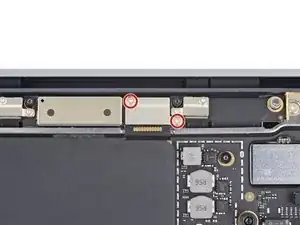
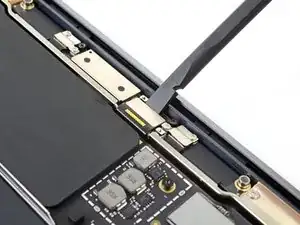
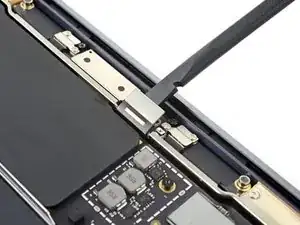
    • Entferne die beiden 1,5 mm Torx T3 Schrauben, mit denen die Abdeckung des Displaykabelsteckers befestigt ist.

  14. ueagvpcG5bnTLvbo
    • Entferne die Abdeckung des Displaykabelsteckers.

  15. jQJNxg5GqULgR5lE
    jQJNxg5GqULgR5lE
    m5Ycq6H3TOqPIg3M
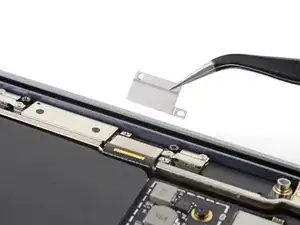
    • Heble den Displaykabelstecker mit dem flachen Ende des Spudgers hoch und löse ihn aus seinem Anschluss auf der Antennenplatine heraus.

  16. txmhJy3WYLAYAUwr
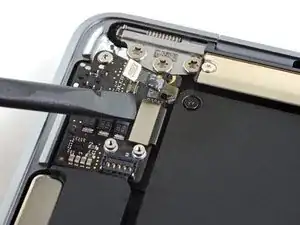
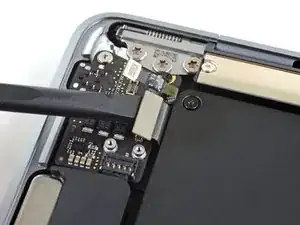
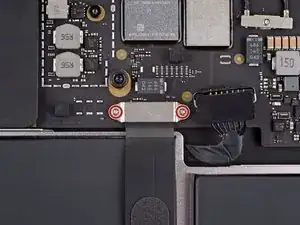
    • Entferne die beiden 1,4 mm Torx T3 Schrauben, mit denen die Abdeckung des Trackpadkabels befestigt ist.

  17. BqD53ZwJcdYtjJYZ
    • Entferne die Abdeckung des Trackpadkabels.

  18. MopCFMlX4Gj2w212
    MopCFMlX4Gj2w212
    6osmiMmkeBDaC5e1
    • Heble den Stecker des Trackpadkabels mit dem flachen Ende des Spudgers hoch und löse ihn aus seinem Anschluss heraus.

  19. ZZgOPJ43V1O1DvGV
    ZZgOPJ43V1O1DvGV
    3hBLuwt4QNddVXyB
    UPTPyQqcwIyYPeLu
    • Der linke Lautsprecher befindet sich an der - von dir gesehen - rechten Seite an deinem MacBook, da es mit der Unterseite nach oben liegt.

    • Schiebe die Spudgerspitze unter das Kabel zum linken Lautsprecher und heble senkrecht nach oben, so dass es vom Logic Board abgetrennt wird.

    Note that the perspective has shifted here and we're looking from the opposite direction than the rest of the guide.

    maccentric -

  20. mHaPiOd4TyivIkXf
    mHaPiOd4TyivIkXf
    vSWZZCDcXtoDyQhf
    imkoMfE1EnTAtLh2
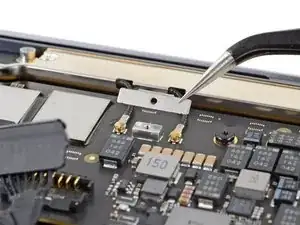
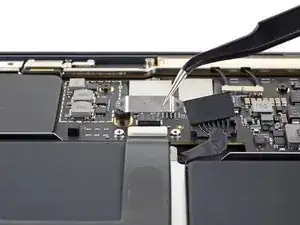
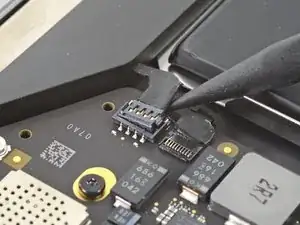
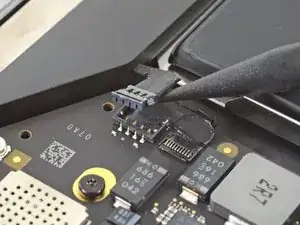
    • Der Stecker am Mikrofonkabel ist mit einem Klebeband bedeckt. Ziehe es mit einer Pinzette zurück.

    • Klappe den kleinen Sicherungsbügel am ZIF Verbinder des Mikrofonkabels mit der Spudgerspitze hoch.

    • Schiebe das Mikrofonkabel aus dem Anschluss heraus.

    • Fasse das Kabel, wenn möglich, am Klebeband an, nicht am Kabel selbst.

  21. sNiN46SslArKMyuR
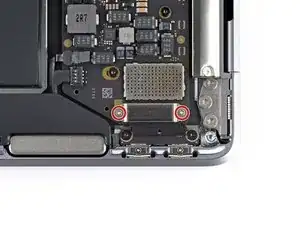
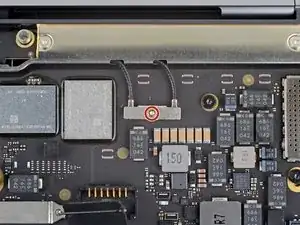
    • Drehe die sechs Torx T5 Schrauben heraus, mit denen das Logic Board am oberen Gehäuse befestigt ist:

    • Drei 3,5 mm Schrauben

    • Eine gepolsterte 6 mm Schraube

    • Zwei 3,4 mm Schrauben
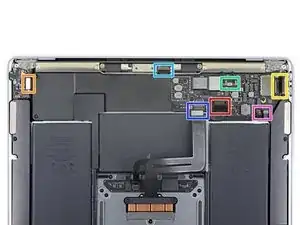
  22. t6aiVAvOWGA1eKnm
    • Entferne das Logic Board.

  23. vYTIknUIIwUsDi1r
    • Achte beim Einbau des Logic Boards darauf, dass keine Kabel unter dem Logic Board eingeschlossen werden, wenn du es nach unten ablegst. Überprüfe sorgfältig folgende sieben Kabel:

    • Akkukabel

    • Kabel zur Audioplatine

    • Kabel zur USB-C-Platine

    • Kabel zur Antennenleiste

    • Displaykabel

    • Trackpadkabel

    • Kabel zum linken Lautsprecher und zum Mikrofon

    I’m having an issue getting the last logic board screw out. Any tips?

    Chris Higgins -

    Which one did you get to last? What kind of issue are you having?

    maccentric -

    I’m trying to reassemble but having a hard time reconnecting the microphone and trackpad cables. What should I do?

    Winona GT -

    The trackpad cable is pretty straightforward, you just have to make sure it's aligned properly and press it down into the connector. The mic cable is a bit trickier if you've not dealt with this type of socket. The cable goes underneath the connector and the you have to pull it in as far as it will go. It's best to take a good look before you pull it out to see how far it needs to go into the connector (I believe this is a type of ZIF [zero insertion force} but it can take a decent amount of force at times, enough to break that little strip of plastic they give you to pull it into place).

    maccentric -

    Looking for the wifi component?

    Jens Erik Bech -

    It's part of the logic board, there's no replaceable component (sadly).

    maccentric -

    Looking for the sleep sensor, where can i find it?

    István -

Abschluss

Vergleiche dein Ersatzteil mit dem Originalteil — möglicherweise musst du fehlende Bauteile übertragen oder Schutzfolien vom Neuteil abziehen, bevor du es einbauen kannst.

Um dein Gerät wieder zusammenbauen, folge den Schritten in umgekehrter Reihenfolge.

Es kann sein, dass das Laptop sich nach der Reparatur nicht gleich anschalten lässt. Schließe es dann erst an das Netzteil an.

Entsorge deinen Elektromüll fachgerecht.

Hat die Reparatur doch nicht den richtigen Erfolg gebracht? In unserem Forum findest du Hilfe bei der Fehlersuche.

Carsten Frauenheim

Mitglied seit: 10/03/20

144841 Reputation

16 Kommentare

Thank you

How do we access the data on a board that is not working due to corrosion ? We have been informed that the SSD is integrated in the board so until same is working we cannot access the data.

Kiran Meettook Esq -

There used to be a data port on the board that needs a very special piece of equipment to access. You'd need to send it to data recovery, open your wallet very wide, and keep your fingers crossed. It looks like that port no longer exists? Your data is probably gone, but Apple saved you a lot of money on recovery services!

maccentric -

Looking for the WiFi component?

Jens Erik Bech -

The WiFi card on this laptop is built into the logic board.

Aydan -

alguien sabe si existe un adaptador para este tipo placa logica a sdd para?

madrigal26 -

A strange question

Would you start a MacBook Air WITHOUT a battery, powering the board directly as if it were a desktop? 🤔

Does anyone know what voltage the battery cables provide?

Thank you.

Alquimista -

It should power on without the battery connected. The voltage should be 20v.

maccentric -

Kann man wo die einzelnen Bauteile (ICs.,,) des Logic Boards kaufen?
Ich möchte mein Logic Board reparieren statt tauschen.

Gerald Söllinger -

Is it possible to buy somewhere the parts of the logic board? I would like to repair my logic board, instead of replacing it.

Gerald Söllinger -

I do not recommend trying to do that, as it requires micro-soldering, and not even many experienced micro-solderers would not do this. Just get a new logic board, it's much unless you want to risk destroying the whole board, and then paying even more for a new one. In the end, that costs more money.

hellonearth311 -

ok si je ne change pas id touche celui-ci ne fonctionne pas ... mais il sert de bouton d,allumage aussi , celui-ci fonctionne t'il comme on/off

Gedfr -

Bonjour @gedfr Oui, les fonctions "basiques" du bouton restent. Veuillez cependant toujours vérifier auprès du vendeur de la pièce quelles sont les fonctions garanties.

Claire Miesch -

Se puede reemplazar el ssd por uno de mayor capacidad? tengo 256 por defecto y quiero llevarla a 1Tb o 1Tb gracias!

Francis Castillo -

Hey, after opening it with this tutorial to replace the thermal paste, it will not turn on.... I tried without battery and only the original power brick and cable, then only with battery, then with both, but nothing works. As if it does not have ANY power now. Any suggestions? The type-c did not make "snap" when connecting unlike the other lego style connectors tho. Could it be the issue?

gpimic -

lol after realining the type-c connector and it finally made the "snap" sound. After that I connected the battery, the type-c power brick and now it works! I thought I bent some pins or something ...

gpimic -

Thank you so much, you saved my MacBook! These tutorials are really well explained!

Leticia Palfi -