Einleitung

Diese Anleitung zeigt, wie die USB-C-Platine im MacBook Air von Anfang 2020 ausgetauscht werden kann.

  1. 4a1VSQBgdQXAZah2
    • Bevor du anfängst, solltest du die Auto Boot Function deines Macs deaktivieren. Auto Boot schaltet deinen Mac ein, wenn du ihn aufklappst, und das kann versehentlich beim Zerlegen passieren. Benutze diese Anleitung, um Auto Boot.zu deaktivieren.

    • Wenn dein MacBook unter BigSur v11.1 oder einer späteren Version läuft, lässt sich AutoBoot möglicherweise nicht deaktivieren. Arbeite zuerst normal weiter, trenne aber den Akku sofort ab, wenn du ins Innere des Gerätes hinein gekommen bist.

    • Schalte dein MacBook Air vollständig aus und ziehe den Stecker aus der Steckdose, bevor du anfängst. Schließe das Display und lege den Laptop mit der Unterseite nach oben.

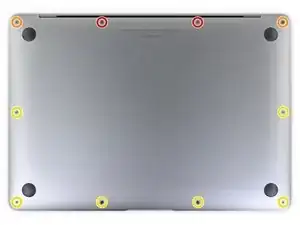
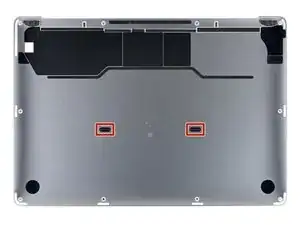
    • Entferne folgende Pentalobe P5-Schrauben

    • Zwei 7,9 mm Schrauben

    • Zwei 7,1 mm Schrauben

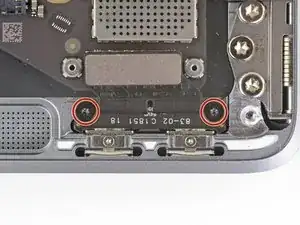
    • Sechs 2,6 mm Schrauben

    • Halte während der gesamten Reparatur die Schrauben gut geordnet und achte darauf, dass jede Schraube an ihren alten Platz zurück kommt, damit dein MacBook keinen Schaden nimmt.

    P5 is also a PL4 (so confusing) - i like the wiha 26764 thanks to @mayer for this post. P5 pentalobe and 1.2 pentalobe screwdriver

    greg -

  2. 4Kra6VLGEa3eGmd6
    4Kra6VLGEa3eGmd6
    n2KBoBfiUOZCO63H
    t3JGRsWcjgyPKFRl
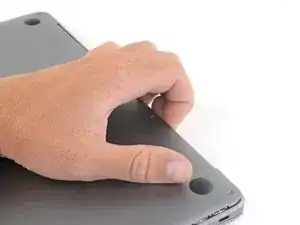
    • Zwänge deine Finger zwischen das Display und das Gehäuseunterteil und ziehe nach oben, so dass sich das Gehäuseunterteil vom Air ablöst.

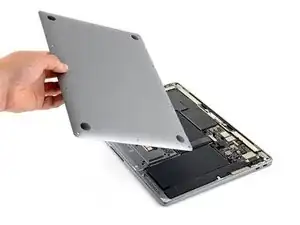
    • Entferne das Gehäuseunterteil.

    • So wird es wieder befestigt:

    • Richte es genau aus und drücke es fest, bis die versteckten Rasten darunter einschnappen. Du solltest es fühlen und hören.

    When reassembling, the “snaps” are in the middle of the laptop (from top to bottom), and just to the left and right of center. I assumed it was near the hinge so it took a bit for me to hear the snaps.

    Laurie McCall -

    Laurie, the two clips are outlined in the third photo of step two. Hope this helps—happy fixing!

    Carsten Frauenheim -

    What tool kit should I use for this?

    Lucas Lee -

    the second picture is m1 air right?

    the antenna cable position does not match later picture

    Paul -

  3. xVJrmDjjKX3L1VEp
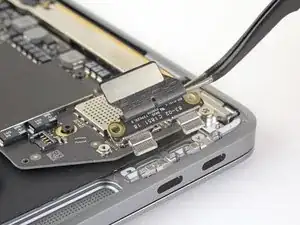
    • Ziehe den Aufkleber soweit vom Akkustecker zurück, dass der darunterliegende Stecker sichtbar wird.

    This image is incorrect correct for the A2179 EMC 3302 model, also doesn’t match the next image in this guide

    Steven Friar -

    There is other guide for the model you reffer to, I was using that one until i realize it was different, this is the one you are looking for: MacBook Air 13" Retina Late 2020 (M1)

    Marco Rojas -

    I initially thought the image was incorrect, but I was just looking for the connector in the wrong place. This picture IS correct for the A2179 EMC 3302. Note that the connector is on the left side of the heat sink (the black thing with parallel ridges in the picture and on the computer), and the connector wires gather together towards the left the side of the computer, not the back. Note that "left side" assumes the Air is upside-down, with the hinge on the side farthest away from you (I'm not doing the "right speaker is on the left side because it's upside-down" thing that iFixit does in step 5).

    Bryan Gillson -

    How do you find out if you have a Retina Late or Retina Early model?

    Inji E -

  4. NZT3TL4hoGyeLE6L
    NZT3TL4hoGyeLE6L
    XZ2jGZmJoO1c5OHn
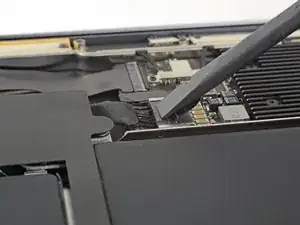
    • Schiebe den Akkustecker mit einem Spudger parallel zum Logic Board aus seinem Anschluss auf dem Logic Board heraus.

    It’s stuck can’t get it out

    Jeansceem Jeansceem -

    Me too. It’s really stuck in there. Not sure if I should attempt the usb c port replacement if I can’t disconnect the battery.

    Steve -

    Einfach abwechselnd links und rechts den Stecker langsam rausschieben. So wie abgebildet ist es tatsächlich schwierig.

    Jörg Oehme -

  5. mFkWuHRWX4lCYrIR
    mFkWuHRWX4lCYrIR
    OYUKQpI44b2Mtta2
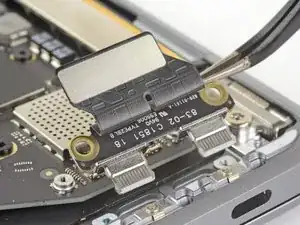
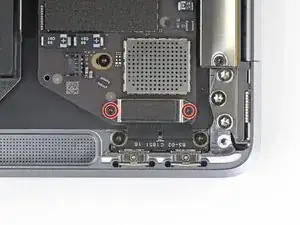
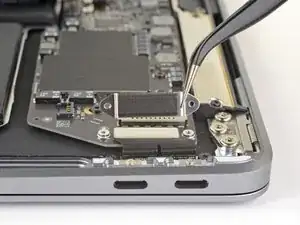
    • Entferne die beiden 1,4 mm Torx T3 Schrauben, mit denen die Abdeckung des USB-C-Steckers befestigt ist.

    • Entferne die Abdeckung des USB-C-Steckers.

  6. nWJOMgBddrWXcvKu
    nWJOMgBddrWXcvKu
    LVuNUVDiwo6mFUrN
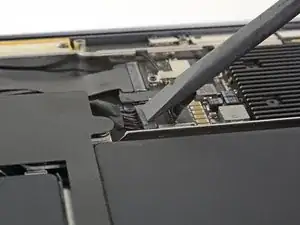
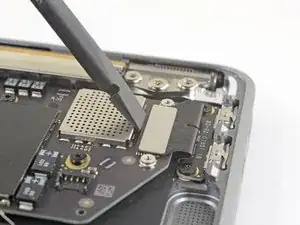
    • Heble den Stecker am USB-C-Kabel mit dem flachen Ende des Spudgers aus dem Anschluss auf dem Logic Board nach oben.

    • Um Druckstecker, so wie diesen hier, wieder anzuschließen, musst du ihn erst sorgfältig ausrichten, dann auf einer Seite andrücken, bis er einrastet. Wiederhole dann für die andere Seite. Drücke nicht in der Mitte. Wenn der Stecker nicht richtig ausgerichtet ist, können die Kontakte verbogen und dauerhaft beschädigt werden.

  7. nWSrOmgwCth1eriO
    • Entferne die beiden 2,9 mm Torx T4 Schrauben, mit denen die USB-C-Platine befestigt ist.

  8. LuKXqmpTdPCMFUIq
    • Entferne die USB-C-Platine mit einer Pinzette.

    On the Early 2020 model at least, you will almost certainly have to loosen the logic board before you can do this step. This involves disconnecting the left speaker, and removing the two rightmost logic board screws. On the 2018 and 2019 models, this seems not to be necessary. If you have an early 2020 model and are trying these steps, don't force the USB-C connector out - loosen the logic board first. You don't have to remove it all the way.

    matt -

Abschluss

Vergleiche dein Ersatzteil mit dem Originalteil. Du musst vielleicht fehlende Teile vom alten auf das neue Teil übertragen oder Schutzfolien vom Neuteil abziehen, bevor du es einbauen kannst.

Um dein Gerät wieder zusammenzusetzen, folge den Schritten in umgekehrterReihenfolge.

Entsorge deinen Elektromüll fachgerecht.

Die Reparatur hat nicht den gewünschten Erfolg gebracht? In unserem Forum findest du Hilfe bei der Fehlersuche.

Carsten Frauenheim

Mitglied seit: 10/03/20

144841 Reputation

4 Kommentare

Great guide and easy repair! My MacBook Air thought it was perpetually plugged in and would only charge from one of the USB C ports, this repair fixed it! I had a little scare when rebooting after the the fix, I either wasn’t pressing the power/touch ID button long enough or resetting the SMC (left shift, control, option, and power buttons) and holding the buttons until it booted worked. Not sure which did it.

Tyler -

Thanks a lot, the repair guide was perfect ! It really took me 5mn.

My usb-c connector got corroded after I accidentally pulled some water on my computer. As by Tyler’s comment, my MBA was only working from one single port anymore and showed to be perpetually connected and in charge. I got the spare chip from AliExpress for 10€. Apple would have charged me for 400€…

Lastly, when booting for the 1st time after doing the repair, pressing the power button didn’t work and my MBA stayed off. I had to plug it to the charger and it then booted seamlessly.

Thanks again !

Faabio -

Wish i could change out my USB port on my 2014 MacAir to USB-C

Shaun M. -

The same experience as Fabio. The repair was simple and straight-forward and the machine wouldn't boot from the battery the first time. Once plugged into the charger it booted just fine and has booted off the battery as normal ever since.

Fixed my 1 dead USB port problem with very little hassle/cost. Just be prepared for the bowel clenching moment when it won't boot from the battery the first time.

Cary -