Einleitung

Diese Anleitung zeigt, wie der linke Lautsprecher im MacBook Air 13" (Anfang 2020) getauscht werden kann.

  1. 4a1VSQBgdQXAZah2
    • Bevor du anfängst, solltest du die Auto Boot Function deines Macs deaktivieren. Auto Boot schaltet deinen Mac ein, wenn du ihn aufklappst, und das kann versehentlich beim Zerlegen passieren. Benutze diese Anleitung, um Auto Boot.zu deaktivieren.

    • Wenn dein MacBook unter BigSur v11.1 oder einer späteren Version läuft, lässt sich AutoBoot möglicherweise nicht deaktivieren. Arbeite zuerst normal weiter, trenne aber den Akku sofort ab, wenn du ins Innere des Gerätes hinein gekommen bist.

    • Schalte dein MacBook Air vollständig aus und ziehe den Stecker aus der Steckdose, bevor du anfängst. Schließe das Display und lege den Laptop mit der Unterseite nach oben.

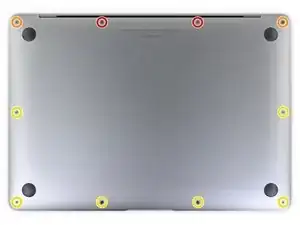
    • Entferne folgende Pentalobe P5-Schrauben

    • Zwei 7,9 mm Schrauben

    • Zwei 7,1 mm Schrauben

    • Sechs 2,6 mm Schrauben

    • Halte während der gesamten Reparatur die Schrauben gut geordnet und achte darauf, dass jede Schraube an ihren alten Platz zurück kommt, damit dein MacBook keinen Schaden nimmt.

    P5 is also a PL4 (so confusing) - i like the wiha 26764 thanks to @mayer for this post. P5 pentalobe and 1.2 pentalobe screwdriver

    greg -

  2. 4Kra6VLGEa3eGmd6
    4Kra6VLGEa3eGmd6
    n2KBoBfiUOZCO63H
    t3JGRsWcjgyPKFRl
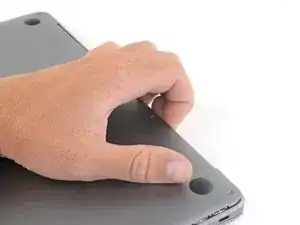
    • Zwänge deine Finger zwischen das Display und das Gehäuseunterteil und ziehe nach oben, so dass sich das Gehäuseunterteil vom Air ablöst.

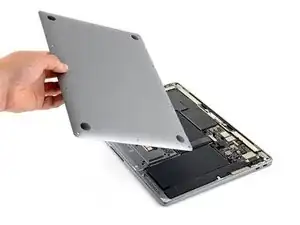
    • Entferne das Gehäuseunterteil.

    • So wird es wieder befestigt:

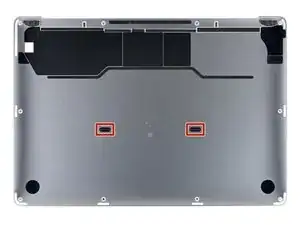
    • Richte es genau aus und drücke es fest, bis die versteckten Rasten darunter einschnappen. Du solltest es fühlen und hören.

    When reassembling, the “snaps” are in the middle of the laptop (from top to bottom), and just to the left and right of center. I assumed it was near the hinge so it took a bit for me to hear the snaps.

    Laurie McCall -

    Laurie, the two clips are outlined in the third photo of step two. Hope this helps—happy fixing!

    Carsten Frauenheim -

    What tool kit should I use for this?

    Lucas Lee -

    the second picture is m1 air right?

    the antenna cable position does not match later picture

    Paul -

  3. xVJrmDjjKX3L1VEp
    • Ziehe den Aufkleber soweit vom Akkustecker zurück, dass der darunterliegende Stecker sichtbar wird.

    This image is incorrect correct for the A2179 EMC 3302 model, also doesn’t match the next image in this guide

    Steven Friar -

    There is other guide for the model you reffer to, I was using that one until i realize it was different, this is the one you are looking for: MacBook Air 13" Retina Late 2020 (M1)

    Marco Rojas -

    I initially thought the image was incorrect, but I was just looking for the connector in the wrong place. This picture IS correct for the A2179 EMC 3302. Note that the connector is on the left side of the heat sink (the black thing with parallel ridges in the picture and on the computer), and the connector wires gather together towards the left the side of the computer, not the back. Note that "left side" assumes the Air is upside-down, with the hinge on the side farthest away from you (I'm not doing the "right speaker is on the left side because it's upside-down" thing that iFixit does in step 5).

    Bryan Gillson -

    How do you find out if you have a Retina Late or Retina Early model?

    Inji E -

  4. NZT3TL4hoGyeLE6L
    NZT3TL4hoGyeLE6L
    XZ2jGZmJoO1c5OHn
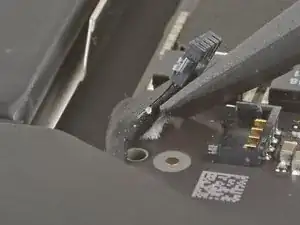
    • Schiebe den Akkustecker mit einem Spudger parallel zum Logic Board aus seinem Anschluss auf dem Logic Board heraus.

    It’s stuck can’t get it out

    Jeansceem Jeansceem -

    Me too. It’s really stuck in there. Not sure if I should attempt the usb c port replacement if I can’t disconnect the battery.

    Steve -

    Einfach abwechselnd links und rechts den Stecker langsam rausschieben. So wie abgebildet ist es tatsächlich schwierig.

    Jörg Oehme -

  5. EwtYIa1xOQM1Jo5M
    EwtYIa1xOQM1Jo5M
    pyCnYgUUpiGIGEaI
    jVOpYDlleQvpeJLy
    • Der linke Lautsprecher befindet sich von dir gesehen rechts am MacBook, da du ihn ja mit der Unterseite nach oben vor dir liegen hast.

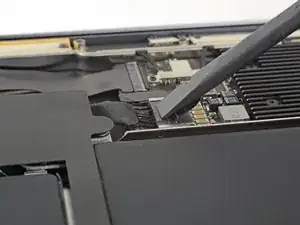
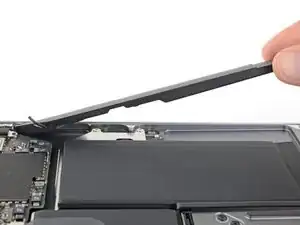
    • Schiebe die Spudgerspitze unter das Kabel zum linken Lautsprecher und heble senkrecht nach oben, so dass der Lautsprecher vom Logic Board abgetrennt wird.

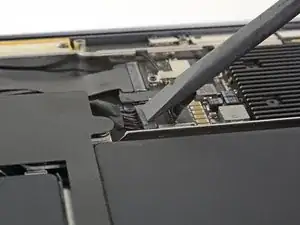
    • Wenn der Stecker gelöst ist, dann schiebe das flache Ende des Spudgers unter das Kabel und trenne es aus der Klebeverbindung zum Logic Board ab.

  6. eqOvRkPaVZMqXN3j
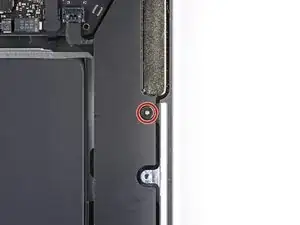
    • Entferne die 4,2 mm Torx T3 Schraube, mit der der linke Lautsprecher am Gehäuse befestigt ist.

    El tornillo es un Torx T3

    Israel Adame -

    This seems to be a T4 screw

    Alex Carlson -

  7. L3GxWZBZUXlMbhck
    L3GxWZBZUXlMbhck
    jCxXOXarScxNAjMP
    XgGBOElANKu2ylOZ
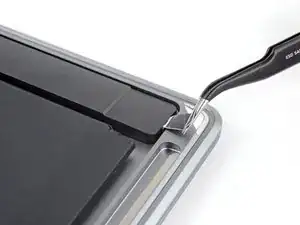
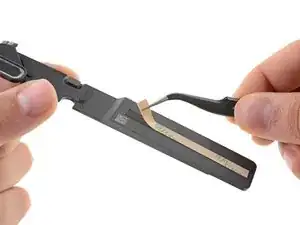
    • Benutze eine Pinzette, um die schwarze Zuglasche des elastischen Klebebands am Lautsprecher soweit abzulösen, dass du sie mit deinen Fingern greifen kannst.

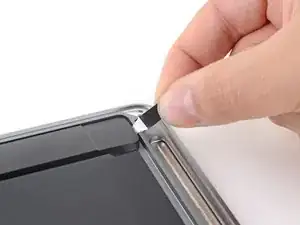
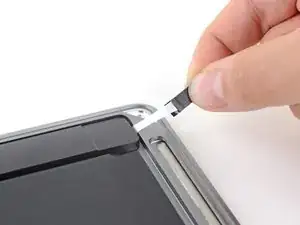
    • Fasse die Zuglasche an und ziehe den Klebestreifen langsam und behutsam unter dem Lautsprecher hervor.

    • Ziehe die Zuglasche und den Klebestreifen so parallel wie möglich zum Laptop. Achte darauf, dass er nicht am Inneren des Laptops schabt.

    • Ziehe so lange am Klebestreifen, bis er ganz unter dem Lautsprecher herausgekommen ist.

    • Wenn der Streifen reißt, oder der erste schon gerissen ist, dann benutze einen erwärmten iOpener oder ein Heißluftgebläse, um das Ablösen des Klebers zu erleichtern:

    • Erwärme den Lautsprecher, damit der Kleber darunter weich wird.

    • Schiebe vorsichtig einen Spudger oder ein Plektrum unter den Lautsprecher und trenne den Kleber auf.

    TIP: Don't keep pulling from the tab like they show in the picture. The adhesive WILL break, and you'll need to do some serious spudging to get the speakers to disengage from the adhesive.

    Instead, start pulling with the tab but stop pulling as soon as it stretches about an inch (2.5cm). Then, grab the white adhesive part close to the speaker and SLOWLY stretch about another inch (so now you have 1 inch stretched from the speaker and another inch dangling past the spot you're holding. Adjust your grip again, back to the speaker side (so you now have 2" dangling) and SLOWLY pull again. Keep doing this, going only an inch before grabbing close to the speaker again. Like the instructions say, go horizontally (parallel to your table) as much as you can.

    Eventually the adhesive will break, but this should get as much off as possible so it's easier to pry off the speaker the rest of the way.

    Bryan Gillson -

  8. UN6fMZXqYxbfRIrt
    UN6fMZXqYxbfRIrt
    SoPFfYBtQTVkpv3i
    • Entferne den linken Lautsprecher.

    • Überprüfe beim Zusammenbau zuerst, ob der Lautsprecher funktioniert, dann befestige einen Ersatzklebestreifen auf seiner Unterseite, bevor du ihn wieder festklebst.

    I didn't order the Tesa tape. Instead I used 3M Command Strips I had left over from some outdoor hanging hooks. I cut them down to the right size (for the speakers and the batteries) and left a little tab hanging out in case I need to do this process again. For those that aren't familiar, Command Strips also "stretch removable" like the original adhesive in the MacBook. They're designed for hanging things without leaving a mark on the walls (no, I have no relation to 3M - but more people probably have these in a junk drawer somewhere than have double-sided tape).

    Yes, the Command Strips are a little thicker than the original adhesive but the back still went on the MacBook just fine.

    Bryan Gillson -

Abschluss

Vergleiche dein Ersatzteil mit dem Originalteil — möglicherweise musst du fehlende Bauteile übertragen oder Schutzfolien vom Neuteil abziehen, bevor du es einbauen kannst.

Um dein Gerät wieder zusammenzubauen, folge den Schritten in umgekehrter Reihenfolge.

Entsorge deinen Elektromüll fachgerecht.

Hat die Reparatur doch nicht den richtigen Erfolg gebracht? Frage in unserem Forum nach Hilfe.

Carsten Frauenheim

Mitglied seit: 10/03/20

144841 Reputation

Ein Kommentar

What can be done in a case where the pins, specifically the connectors on the board, were damaged, but the speaker is fully functional? Is there any alternative to repair it?

Alex -