Einleitung
Hier wird der Austausch einer defekten AirPort/Bluetooth Karte gezeigt.
-
-
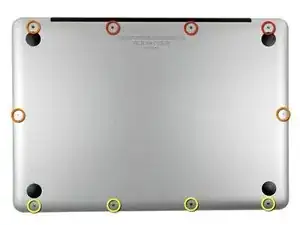
Entferne die folgenden zehn Schrauben:
-
Drei 14,4 mm Kreuzschlitz #00 Schrauben
-
Drei 3,5 mm Kreuzschlitz #00 Schrauben
-
Vier 3,5 mm Kreuzschlitz #00 Ansatzschrauben
-
-
-
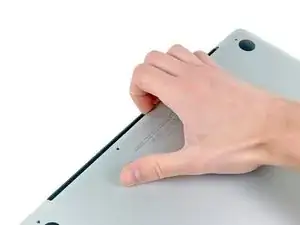
Löse mit den Fingern in der Nähe vom Ventilator die Gehäuse-Unterseite vom Hauptteil des Gehäuses.
-
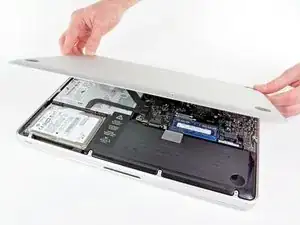
Entferne die Gehäuse-Unterseite.
-
-
-
Löse mit der Kante eines Spudgers den Akkuanschluss nach oben, weg vom Sockel auf dem Logic Board.
-
-
-
Biege das Akkukabel vorsichtig weg vom Sockel des Logic Boards, damit es sich nicht aus Versehen beim Arbeiten wieder verbindet.
-
-
-
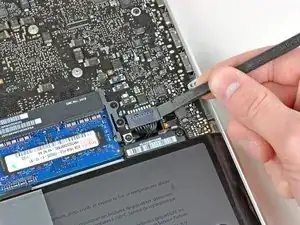
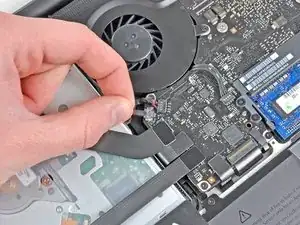
Hebe den Verbinder zum Airport/Bluetooth Kabel mit dem flachen Ende des Spudgers aus seinem Sockel auf dem Logic Board.
-
-
-
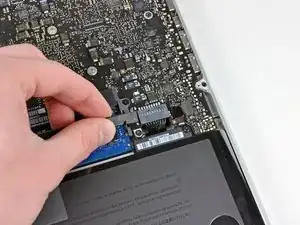
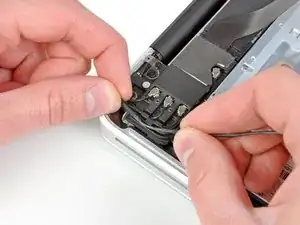
Schiebe das Flachbandkabel von Airport/Bluetooth vorsichtig aus dem Weg und löse das Kamerakabel von der Klebeverbindung mit der es am Subwoofer und der Halteklammer angebracht ist.
-
Fädle das Kamerakabel aus dem Bügel in der Halteklammer von AirPort/Bluetooth.
-
-
-
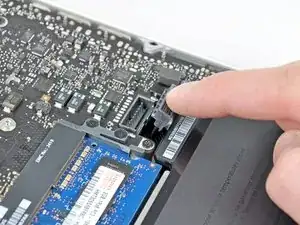
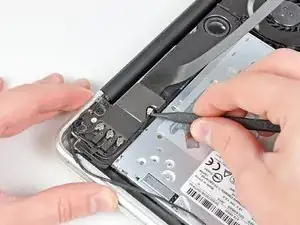
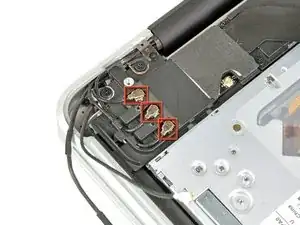
Hebele den Antennenverbinder, der am nächsten zum Logic Board ist, aus seinem Sockel auf der Airport/Bluetooth Platine hoch.
-
Fädle das Antennenkabel aus dem Bügel in der Halteklammer von AirPort/Bluetooth.
-
-
-
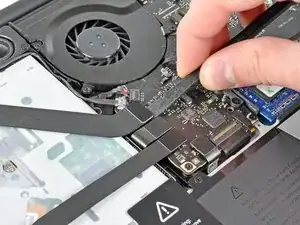
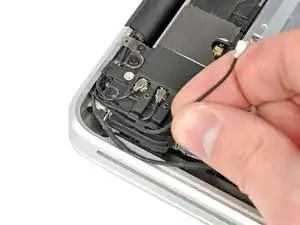
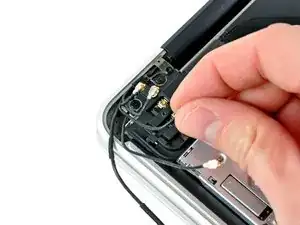
Löse mit der eben beschriebenen Methode die restlichen drei Antennenverbinder.
-
Fädle ihre Kabel aus den Ausschnitten in der Halteklammer von AirPort /Bluetooth
-
-
-
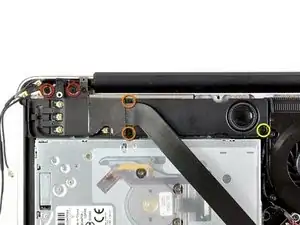
Entferne folgende fünf Kreuzschlitzschrauben:
-
Zwei 10,3 mm Schrauben
-
Zwei 3,1 mm Schrauben
-
Eine 5mm Schraube
-
-
-
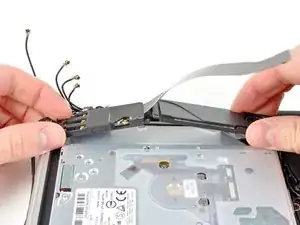
Hebe die Airport /Bluetooth-Einheit und den Subwoofer in der Seitenmitte beim optischen Laufwerk hoch bis sie sich voneinander lösen.
-
-
-
Entferne die AirPort/Bluetooth-Einheit. Achte dabei auf den empfindlichen Antennenkontakt in der Nähe der Gehäuseecke.
-
-
-
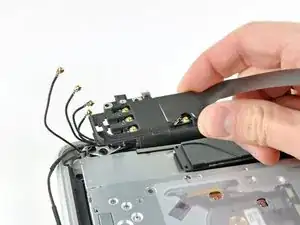
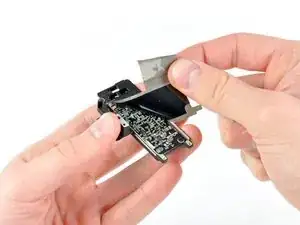
Löse das Stück EMI Band ab, welches auf den Stecker des AirPort/Bluetooth Kabels geklebt ist.
-
-
-
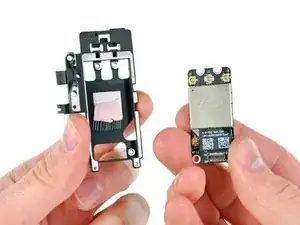
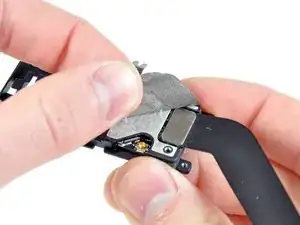
Hebe den Stecker am AirPort/Bluetooth Kabel mit der Spudgerspitze aus seinem Sockel auf der AirPort/Bluetooth Karte.
-
Entferne das AirPort/Bluetooth Kabel.
-
-
-
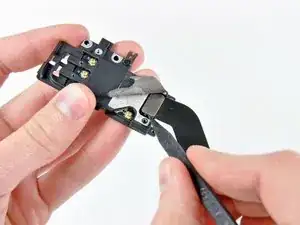
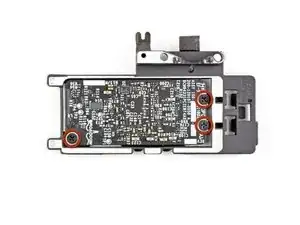
Löse weiterhin das EMI Band von der Unterseite der Halterung der AirPort/Bluetooth Karte ab und entferne es von der Einheit.
-
-
-
Entferne die drei 3 mm Kreuzschlitzschrauben, welche die AirPort/Bluetooth Karte an ihrer Halterung befestigen.
-

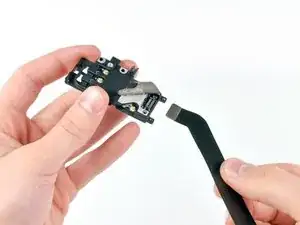

Um dein Gerät wieder zusammenzusetzen, folge den Schritten in umgekehrter Reihenfolge.

2 Kommentare
Hallo,
Ist das quasi Plug & Play oder muss man hier im Nachhinein noch etwas machen? Ich habe ein MacBook Pro Late 2011 und habe bereits Ventura oben (mit Open Core Legacy Patcher). Das Continuity Activation Tool läuft bei mir nämlich nicht unter Ventura. Das habe ich schon versucht.
Hallo David, ja, normalerweise ist das schon einfach Plug & Play. Aber: ich kann dir nicht sagen, ob das auch der Fall ist, wenn du eine offiziell nicht mehr unterstützte macOS Version gepatcht hast. Und wenn ich deine Frage richtig verstehe, willst du dein MacBook mit einer neueren Karte ausrüsten, damit Continuity funktioniert? Ob diese Karte überhaupt funktioniert, kann ich dir nicht beantworten.
How much weight can I save by removing the optical drive?
gunes314 -
You can save a lot of weight if lets say your installing a solid state drive or putting in a second hard drive but if you know that you use the CD/DVD disc drive a lot then you might just want to leave the drive alone.
Marshall WahlstromHelgren -
Tip: Use one of those weekday pill holders to have a cheep way to store screws you remove and each day of the week can be for different sizes or parts. It has been handy to have (much less expensive than the magnetic mat.
Robert Wacker -
Hello, where can I buy the screws I need in case I lose one of them?
taylornya -
iFixit sells a kit: MacBook Pro Unibody Lower Case Screw Set
Darrell Johnson -
I have one stripped screw... How opening without drill it?! Any suggestions please?
rodrigosady -
I also stripped a couple screws. I wasn’t able to open it up without drilling. After drilling the heads and removing the cover it was easy to hacksaw the tip and unscrew with a standard driver.
Michael Wilkens -
We have a guide for that!
Wie man eine rundgedrehte Schraube entfernt
Sam Omiotek -
My top tip - make sure you buy good quality Phillips screwdrivers and a magnetic holder. Cheap screwdrivers won’t get the screws undone safely. Without a magnetic holder you have no chance of getting the tiny crews in and out safely.
jeremyyoung -
A good Phillips 00 is your friend here. Also, when reinserting the screws, gently start anticlockwise and you wil feel a click at the start of the thread. This tells you you’re in the right place and less likely to cross-thread through force in the wrong place.
Iain Boyd -
I feel like these are 000 screws. Amazon sales describe them as such and my 000 screwdriver fits better
cam2000deluxe -
Before ordering a new Trackpad remove the existing battery and try clicking the Trackpad. If it clicks OK with the battery out the source of problem is likely a swollen battery, which should to be replaced even if it still works to some degree. From the side of the battery you will likely see the soft part of the battery bulging beyond the hard case.
Patrick Langvardt -
That’s absolutely correct as I can testify. With the battery removed I also adjusted the T6 set screw that adjusts the sensitivity of the trackpad click, evidently someone had cranked mine down tighter than the factory setting.
Gary Register -
Le quatrième paragraphe dans les instructions en français n’est pas correct : ce ne sont pas les 2 petites vis, mais les 7 petites vis qui sont inclinées. Et les 3 grandes sont bien verticales.
Degeorges -
Bonjour ! Merci de votre observation. J’ai corrigé la traduction. iFixit étant un wiki, n’hésitez pas à modifiez si vous remarquez une erreur :) Encore merci de votre attention et à bientôt !
Claire Miesch -
Tip: if you have a magnetic screw mat or similar, lay the macbook over the mat to make sure it catches any screws that may decide to fall of and hide under your table
Moritz -
Funny, it's not her hands that are doing the close ups. :)
Cinemated Man -
What's the difference between the shouldered and non shouldered screws? They look exactly the same to me.
MLNLRD -
the shouldered screws have a space where the threading stops and the head of the screw begins. i don't think the newer screw kits include them. i've lost most of my shouldered screws but the non shouldered screws will work, too. you just need to adjust everything carefully because a shouldered screw will stick out of the case instead of fitting flush if it's in a non-shouldered hole.
postjosh -
There are bateries labeled as "A1322" but marked as "High Performance" and rated 76.56WH/11.6V. Also sold as replacement for the MacBook Pro 13" mid 2012 Model A1278. Does the different rating, in particular the voltage, is compatible? Does it really provides some extra "performance" in any actual way?
Thanks
locutus -
does anyone know where to buy the shouldered 3.5mm screws? it looks like the current kit has substituted the non-shouldered version of the screw.
postjosh -
here's a comparison picture:
shouldered vs non-shouldered
postjosh -
My screws were in a slightly different configuration -- my macbook has never been opened before so I'm not sure why my screws were different from the diagram here. Anyways, the three long screws were in the same position, then, clockwise from the right-middle screw, with s = shouldered and r = regular, I had: s, s, r, s, r, r, s.
Spencer Pennington -