Einleitung

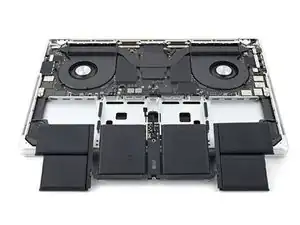
Diese Anleitung zeigt, wie der Akku im MacBook Pro (16 Zoll, 2021) ausgetauscht werden kann.

Der Akku ist bei diesem MacBook mit elastischen Klebestreifen befestigt. Einige der Streifen sind unter dem Trackpad versteckt, du musst es deswegen zuerst ausbauen.

Entlade zur Sicherheit den Akku auf unter 25%, bevor du das MacBook öffnest. Du reduzierst dadurch die Gefahr eines Brandschadens während der Reparatur, falls der Akku versehentlich beschädigt worden ist. Wenn der Akku aufgebläht ist, musst du geeignet Vorsichtsmaßnahmen treffen.

Um die Reparatur abzuschließen, benötigst du neue Ersatzklebestreifen.

  1. sAvCLYXqUkq3CpsT
    sAvCLYXqUkq3CpsT
    dYQhaLBJXSRTTctb
    • Schalte dein MacBook Pro komplett aus und ziehe den Stecker, bevor du mit der Reparatur beginnst. Klappe das Display zu und lege den Laptop mit dem Boden nach oben hin.

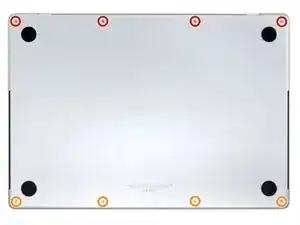
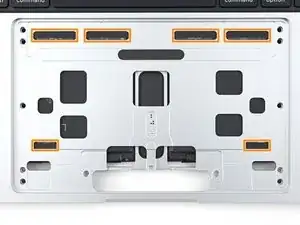
    • Entferne acht Pentalobe P5 Schrauben, mit denen das Gehäuseunterteil befestigt ist:

    • Vier 9,1 mm Schrauben

    • Vier 5 mm Schrauben

    • Halte die Schrauben während der Reparatur gut geordnet und achte darauf, dass jede wieder an ihren ursprünglichen Platz zurück kommt, sonst kann das Gerät beschädigt werden.

  2. XaNohnCmRnh2nZpJ
    XaNohnCmRnh2nZpJ
    vL2whH15EFx1twZH
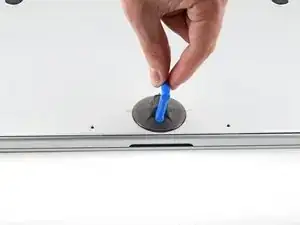
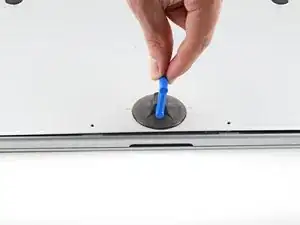
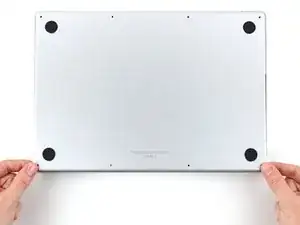
    • Drücke einen Saugheber nahe an der Vorderkante des Gehäuseunterteils zwischen den beiden Schraubenlöchern fest.

    • Ziehe den Saugheber hoch, bis ein schmaler Spalt unter dem Gehäuseunterteil entstanden ist.

  3. gKFYYs2sw4AKQjyZ
    gKFYYs2sw4AKQjyZ
    H4KsmKKCORb6oQgS
    XipK6OFYbtmB2HXx
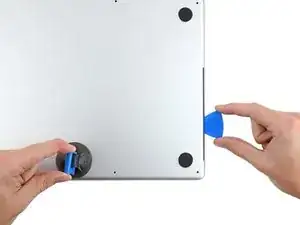
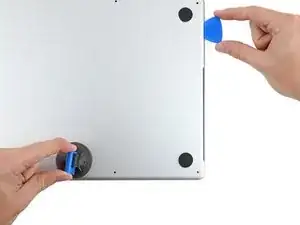
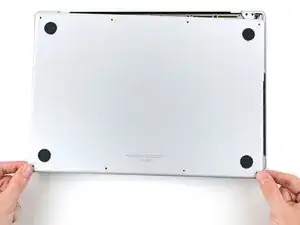
    • Setze ein Plektrum in den eben entstandenen Spalt ein.

    • Schiebe das Plektrum um die nächste Ecke herum und dann an der Seite des MacBook Pro halb nach oben.

    • Dadurch wird die erste der versteckten Rasten gelöst, mit denen das Gehäuseunterteil befestigt ist. Du solltest es hören und spüren.

  4. D6bdEaUShxT3UVIG
    D6bdEaUShxT3UVIG
    MUSM2IsQWQnMyLTY
    PVitYNF6oBIbr23x
    • Nimm ein Plektrum und wiederhole den vorherigen Schritt für die andere Seite.

    Terrifying, don't be afraid, give it a good pull, the description above is exactly right.

    Scott -

  5. jhQl23lkLmdIajyL
    jhQl23lkLmdIajyL
    5Biq1bJPZBQJR6co
    SosOCOgOT4DGPusW
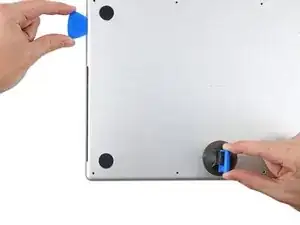
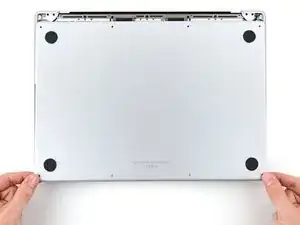
    • Ziehe das Gehäuseunterteil fest zur Vorderkante des MacBooks hin (also weg von den Scharnieren), bis es herausgleitet und sich die letzte Raste löst.

    • Ziehe erst an der einen, dann der anderen Ecke.

    • Ziehe waagrecht, nicht nach oben.

    • Wahrscheinlich musst du recht kräftig ziehen.

  6. Opome2xEF244Sbik
    Opome2xEF244Sbik
    Zhm2CbuWmJyMyRHI
    NZBNkwTekFWxsHvu
    • Entferne das Gehäuseunterteil.

    • So wird das Gehäuseunterteil wieder eingebaut:

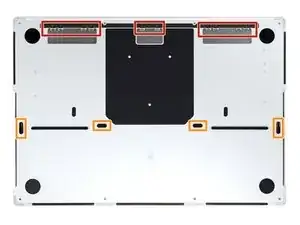
    • Richte es so aus, dass die Rasten zum Einschieben nahe bei den Scharnieren passen. Drücke das Gehäuseunterteil nach unten und schiebe es zu den Scharnieren hin. Wenn die Rasten einschnappen, sollte es sich nicht mehr weiter schieben lassen.

    • Wenn die Rasten zum Einschieben gut sitzen, dann drücke das Gehäuseunterteil fest nach unten, bis die vier verdeckten Rasten einschnappen. Du solltest das hören und spüren.

  7. LLefRtZMZ3sxFYAq
    LLefRtZMZ3sxFYAq
    ASjTh2lGvC5ljHUc
    6dswNWn4yXoaF6nr
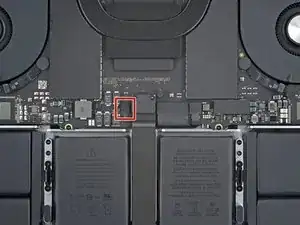
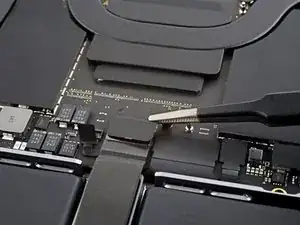
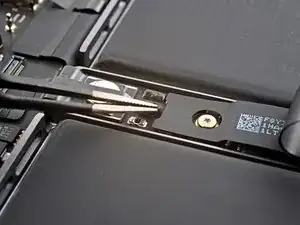
    • Wenn der Stecker am Datenkabel der Akkuplatine auf dem Logic Board mit einem Klebeband überklebt ist, dann ziehe es ab.

    This photograph does not match my 2021 Macbook Pro. Fortunately the differences do not impact the removal operation.⏎
    There is a different arrangement and number and type of chips to the left of the image.

    One square grey thing nad five rectangular black things ...
    Mine does not have the rows of test points above the track pad cable.

    Simon Anthony -

  8. FQOeUAMampuhHfcv
    FQOeUAMampuhHfcv
    u1JNemMNxIRwXdgQ
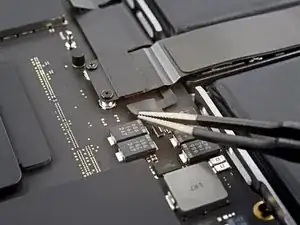
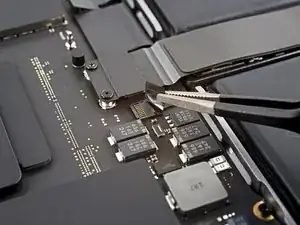
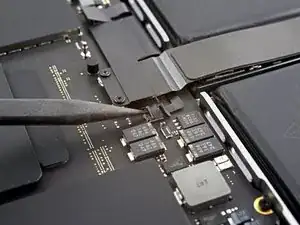
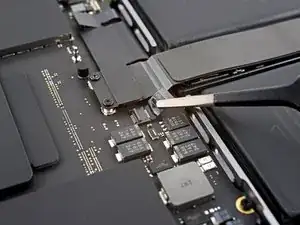
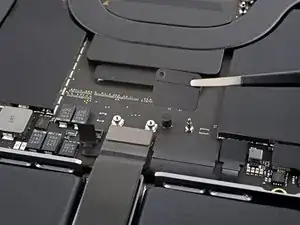
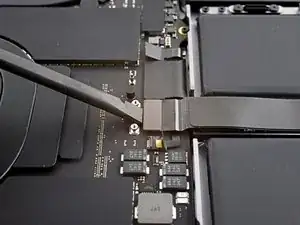
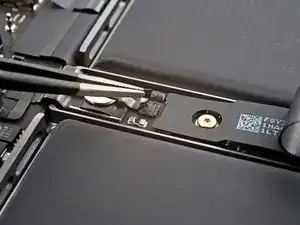
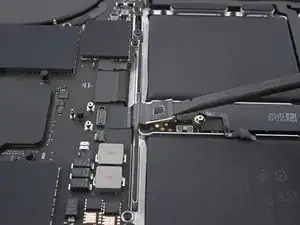
    • Klappe den Sicherungsbügel am ZIF-Anschluss des Datenkabels zur Akkuplatine vorsichtig mit dem Spudger hoch.

    This photograph does not match my 2021 Macbook Pro. Fortunately the differences do not impact the removal operation.⏎
    There is a different arrangement and number and type of chips to the left of the image.

    One square grey thing nad five rectangular black things ...
    Mine does not have the rows of test points above the track pad cable.

    Simon Anthony -

  9. rWcLXdfLoUAAyt1U
    rWcLXdfLoUAAyt1U
    QOTQylMDMkoi6FHG
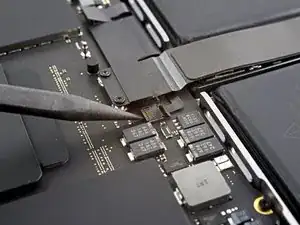
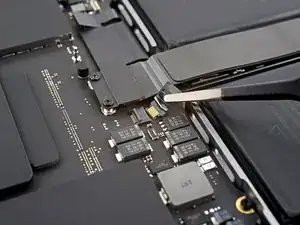
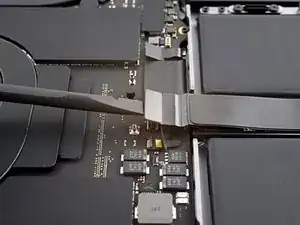
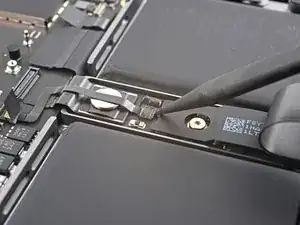
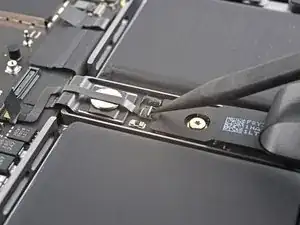
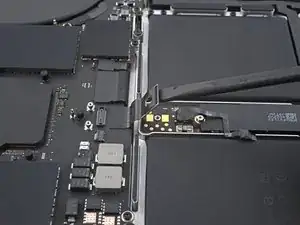
    • Schiebe das Datenkabel zur Akkuplatine aus seinem Anschluss auf dem Logic Board heraus und trenne es ab.

  10. nJWDpHdBT5p4Fl1P
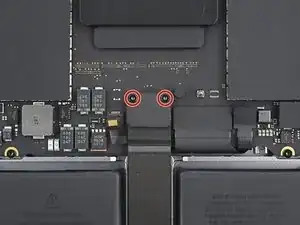
    • Entferne die beiden 2,1 mm langen Torx T3 Schrauben, mit denen die Halterung des Trackpadkabels am Logic Board befestigt ist.

    Das sind T4 Schrauben bei mir

    Ralf Schäfer -

    This photograph does not match my 2021 Macbook Pro. Fortunately the differences do not impact the removal operation.⏎
    There is a different arrangement and number and type of chips to the left of the image.

    One square grey thing nad five rectangular black things ...
    Mine does not have the rows of test points above the track pad cable.

    Simon Anthony -

  11. TDLlTPDWBqrZMSdE
    TDLlTPDWBqrZMSdE
    wDrsl5nnA1K31knG
    • Entferne die Halterung des Trackpadkabels mit den Fingern oder einer Pinzette.

    This photograph does not match my 2021 Macbook Pro. Fortunately the differences do not impact the removal operation.⏎
    There is a different arrangement and number and type of chips to the left of the image.

    One square grey thing nad five rectangular black things ...
    Mine does not have the rows of test points above the track pad cable.

    Simon Anthony -

  12. RcTGakJu5YZwLSCQ
    RcTGakJu5YZwLSCQ
    elqdt4ScLTAtGDQO
    • Heble den Druckstecker am Trackpadkabel mit dem flachen Ende des Spudgers hoch und trenne ihn vom Logic Board ab.

    • Um Druckstecker (Press-fit-), so wie diesen hier, wieder anzuschließen, musst du ihn erst sorgfältig ausrichten und dann auf einr Seite andrücken, bis er einrastet. Wiederhole dann an der anderen Seite. Drücke nicht in der Mitte. Wenn der Stecker nicht richtig sitzt, können die Kontakte verbogen und dauerhaft beschädigt werden.

    This photograph does not match my 2021 Macbook Pro. Fortunately the differences do not impact the removal operation.⏎
    There is a different arrangement and number and type of chips to the top/left of the red circle.

    One square grey thing nad five rectangular black things ...
    Mine does not have the rows of test points to the left of the track pad cable.

    Simon Anthony -

  13. sYAtIqlcTEYxokrn
    sYAtIqlcTEYxokrn
    yy5FwLmYLN5hmmVh
    • Das Trackpadkabel ist leicht mit dem Rahmen verklebt.

    • Ziehe das Trackpadkabel vom Gerät ab, achte darauf, dass der Kleber abgelöst ist.

    This photograph does not match my 2021 Macbook Pro. Fortunately the differences do not impact the removal operation.⏎
    There is a different arrangement and number and type of chips to the top/left of the red circle.

    One square grey thing nad five rectangular black things ...
    Mine does not have the rows of test points to the left of the track pad cable.

    Simon Anthony -

  14. sspXELRZt1xWGUlS
    sspXELRZt1xWGUlS
    FTLGaItLAMAfeYrB
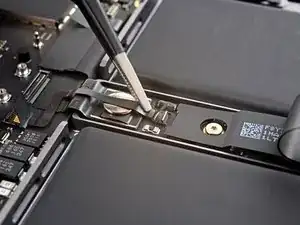
    • Wenn der Stecker am Datenkabel der Akkuplatine unter der großen Flachkopfschraube mit einem Klebeband überklebt ist, dann ziehe es ab.

  15. GDuYjnNH5iYGtRvW
    GDuYjnNH5iYGtRvW
    DrMamQumljVB3anV
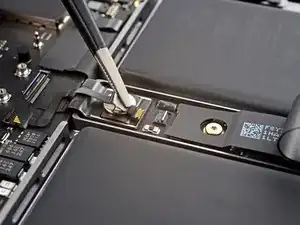
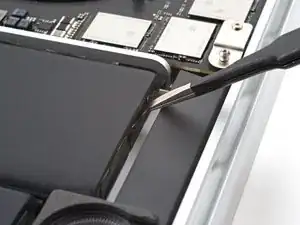
    • Heble den Sicherungsbügel am ZIF-Anschluss des Datenkabels der Akkuplatine mit einem Spudger hoch.

  16. NfpQXfGHLNltvL2i
    NfpQXfGHLNltvL2i
    gV4U1VA1gQWNHEyR
    • Schiebe das Datenkabel der Akkuplatine aus seinem Anschluss auf der Akkuplatine heraus und trenne es ab.

    This is SO small - I used a very fine guitar pick to get it to release, none of my tools were small enough.

    Scott -

  17. VONenjYIZcfg1ioj
    VONenjYIZcfg1ioj
    NcSXpygTI6GDcqGk
    • Das Datenkabel zur Akkuplatine ist leicht mit dem Gerät verklebt.

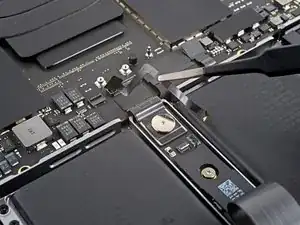
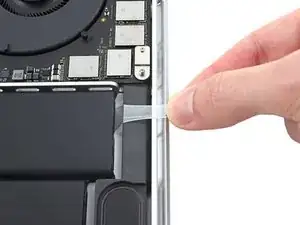
    • Schiebe eine stumpfe Pinzette zum Auftrennen des Klebers unter dem Kabel entlang.

    • Entferne das Datenkabel der Akkuplatine.

    This photograph does not match my 2021 Macbook Pro. Fortunately the differences do not impact the removal operation.⏎
    There is a different arrangement and number and type of chips to the left of the tweezers.

    One square grey thing nad five rectangular black things ...

    Simon Anthony -

  18. OkqL5dxBAJeXCSFx
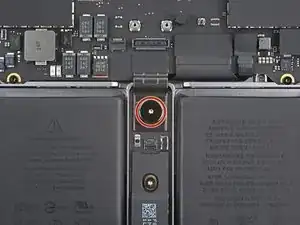
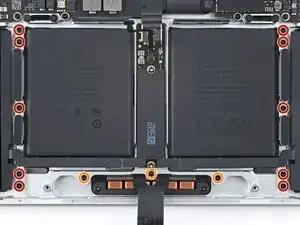
    • Entferne die 3,9 mm Flachkopfschraube, die den Akkustecker befestigt, mit einem Torx T5 Schraubendreher.

    This photograph does not match my 2021 Macbook Pro. Fortunately the differences do not impact the removal operation.
    There is a different arrangement and number and type of chips to the top/left of the red circle.

    One square grey thing nad five rectangular black things ...

    Simon Anthony -

  19. hvVm3YJcO2MRuHkK
    hvVm3YJcO2MRuHkK
    rFVOELLuBj2ZHQDt
    • Hebe den Akkustecker mit einem Spudger hoch und trenne ihn ab.

    • Hebe den Stecker soweit hoch, dass er während der Reparatur abgetrennt bleibt. Wenn er sich versehentlich wieder verbindet, könnte dein MacBook Pro beschädigt werden.

    is it possible to buy/replace this battery power connector? I broke mine on the logic board side and they are impossible to find. Ofc apple want $900 because the laptop is "modified" after replacing the keyboard :|

    Thenon -

    The previous image did not match my Macbook Pro, this one does.
    Two square grey things, three rectangular smaller black things. :-)

    Simon Anthony -

  20. oJUoDrPuAB5hWBTi
    oJUoDrPuAB5hWBTi
    3YDOpBnb1NBS2Qaa
    • Entferne die dreizehn Torx T5 Schrauben, mit denen die Trackpadeinheit befestigt ist:

    • Zehn 5 mm lange Schrauben

    • Drei 5,8 mm lange Schrauben

    • Die Schrauben sehen alle gleich aus, vermische sie nicht.

    • Wenn du beim Zusammenbau etwas blaue Schraubensicherung an die Schrauben gibst, werden sie sich nicht mehr so leicht über die Zeit lösen.

    • Lasse die Schrauben am Anfang noch ziemlich lose. Prüfe erst, ob das Trackpad gut sitzt und ziehe dann die Schrauben fest.

  21. 2fAlyWwWARDSyGdI
    2fAlyWwWARDSyGdI
    R2ReZsRkNgmHUVMu
    TSe6CWwHatyO4hV3
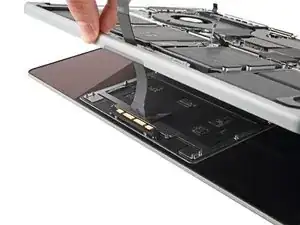
    • Klappe das Display ein wenig auf, lasse aber das MacBook weiterhin mit dem Boden nach oben liegen. Die Trackpadeinheit sollte sich lösen und flach auf dem Display liegen bleiben.

    • Achte beim Entfernen der Trackpadeinheit auf die neun kleinen Metallunterlegscheiben, die auf den Schraubenpfosten liegen. (Sie können leicht abfallen und davonfliegen. Verliere sie nicht).

    • Führe sorgfältig das Flachbandkabel zum Trackpad durch seine Öffnung im Rahmen.

  22. djYKbqh2ddAhARri
    • Entferne die Trackpadeinheit.

  23. 22QkvfvvsQ1cPsIn
    22QkvfvvsQ1cPsIn
    nOICHMUTNumRwT5j
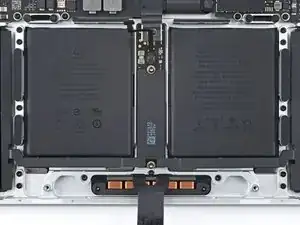
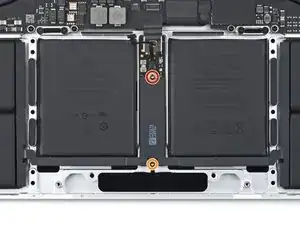
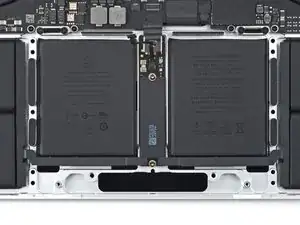
    • Entferne die beiden Torx T5 Schrauben, mit denen die Akkuplatine befestigt ist:

    • Eine 4,4 mm Schraube

    • Eine 3,8 mm Schraube

  24. cysI6ymOch1eujSP
    cysI6ymOch1eujSP
    UOkmkapvFjAlrowA
    • Der Akku ist mit insgesamt 14 elastischen Klebestreifen am Rahmen befestigt.

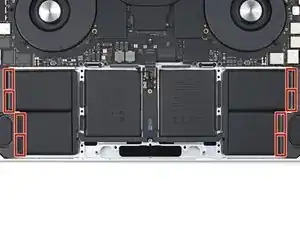
    • Acht dieser Klebestreifen sind von der Unterkante des Gerätes aus erreichbar.

    • Sechs weitere Klebestreifen sind von der Stelle, wo das Trackpad ist, zugänglich.

  25. x63IqmCIabaIQMXq
    • Fasse die schwarzen Zuglaschen an den elastischen Klebestreifen mit einer Pinzette oder den Fingern.

  26. 3OiVsYNPDFjXRHQQ
    • Ziehe den Klebestreifen in einem flachen Winkel fest und gleichmäßig heraus. Lasse ihm genug Zeit, so dass er sich unter dem Akku ausdehnen und lösen kann.

    • Wenn der Klebestreifen abreißen sollte, dann versuche ihn mit den Fingern oder einer stumpfen Pinzette zu fassen. Ziehe ihn dann weiter heraus. Heble aber nicht unter dem Akku.

    • Wiederhole diesen Vorgang für alle vierzehn Klebestreifen.

  27. Ts1Z2bG3bWA6pJyO
    Ts1Z2bG3bWA6pJyO
    ETvUuONDCMDqHVgh
    • Die nächsten beiden Schritte sind nur notwendig, wenn du nicht alle elastischen Klebestreifen herausziehen konntest.

    • Verbiege den Akku nicht und stich ihn nicht an. Er könnte gefährliche Chemikalien verlieren oder in Brand geraten. Wenn er sich nicht leicht ablösen lässt, dann tröpfle noch mehr Isopropylalkohol ein und versuche es nochmals.

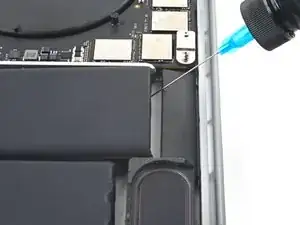
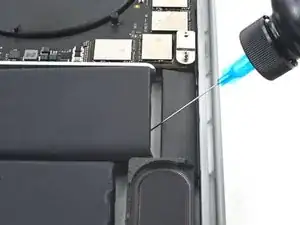
    • Tröpfle ein paar Tropfen hochkonzentrierten Isopropylalkohol (mindestens 90%ig) an den betreffenden Stellen in den Spalt am Akku.

    • Achte darauf, dass kein Isopropylalkohol an die Lautsprecher gerät, sie könnten sich vom Rahmen ablösen.

    • Lasse den Alkohol zwei Minuten lang einwirken, damit der Kleber weich wird.

  28. nUiLoaQOgVnVfJF6
    nUiLoaQOgVnVfJF6
    jtXebbMBEdfMkpZQ
    ADfUvGSHXCAkvvXF
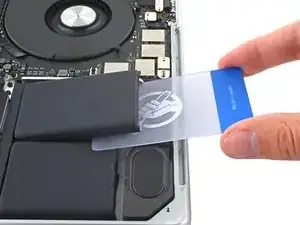
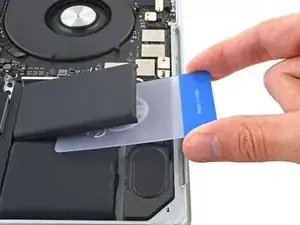
    • Setze eine Kunststoffkarte zwischen Akku und Rahmen ein.

    • Heble mit der Karte nach oben und trenne gleichzeitig die Klebeverbindung zum Rahmen auf.

  29. gCbgOh4MiSeNrHyS
    gCbgOh4MiSeNrHyS
    nOjvXQBhmqFLPq5R
    TmDelUWE2PnmwawZ
    • Schiebe den Akku aus dem Rahmen heraus und entferne ihn.

Abschluss

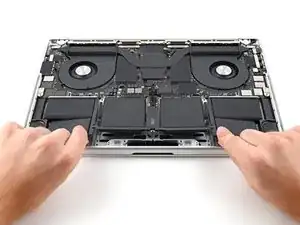
Um dein Gerät wieder zusammenzubauen, folge den Schritten in umgekehrter Reihenfolge.

Damit der neue Akku optimale Leistung bringt, solltest du ihn nach dem Austausch neu kalibrieren.

Vergleiche das Ersatzteil mit dem Originalteil. Möglicherweise musst du fehlende Bauteile übertragen oder Schutzfolien vom Neuteil abziehen, bevor du es einbauen kannst.

Hat die Reparatur nicht den gewünschten Erfolg gebracht? Versuche einige grundsätzliche Lösungen oder frage in unserem MacBook Pro 16" 2021 Forum nach Hilfe.

Alex Diaz-Kokaisl

Mitglied seit: 16/01/22

168562 Reputation

16 Kommentare

This is what I search for! Such a great guide!

Sehun Park -

Where can I purchase a new battery for my MacBook Pro 16" 2021 laptop?

Mr. T -

Hi there!

Unfortunately, we are not currently selling MacBook Pro 16" 2021 batteries. We are hoping to sell them sometime soon. You may want to consider checking with other retailers or online sources for the specific battery you need.

Alex Diaz-Kokaisl -

Has anyone figured out where we can purchase new replacement batteries for this computer (MacBook Pro 16" 2021 Model # MK193LL/A)?

David -

Why does step 22 talk about installing a new trackpad? That part left me confused.

Tad Garza -

Hi Ted!

Great question...and I don't have a great answer in return. So, I have changed the step accordingly!

Alex Diaz-Kokaisl -

Where can I buy a new battery for my MacBook Pro m1 16 2021?

main Use -

Months of searching..finally have an answer to my own question having found a battery on my own.

This one fits my Macbook Pro M1 2021 16" model.
https://www.amazon.com/Battery-Replaceme...

David -

Hello, I have received shaking after completing all the steps. Is there an adhesive applyer?

MathematicalError -

Where are the replacement adhesive pull strips? It's odd they are not part of the iFixit kit.

Bruce Abbott -

The kit I received had adhesive already on the back of the battery. It made it easy to place battery in laptop and press down to secure it.

Arne Stokstad -

Der Austausch der Battery brachte mir überraschend nichts, bei eingeschaltetem Bildschirm (ohne Tätigkeit) entladete sich die Batterie in kürzester Zeit. Zufällig sah ich aber beim Verkäufer, dass die meisten Käufer auch ein neues Ladegerät mitbestellten: nun habe ich ein Zweifel, ob man nicht etwa genauso ein neues Ladegerät braucht, um die Batterie "richtig" aufzuladen? Finde ich auch seltsam, dass hier im iFixit darüber nichts gesagt wird.........2)meine Frage ist auch, ob man eine Neu- "Kalibrierung" nach der Installation machen muss?

3.) bei der Neuinstallation der SSD NVMe Speicher wird das Volumen erst gar nicht erkannt, "Time Machine" mit Backup ist leer......wo könnte ich eine Anleitung für die Installation bekommen? MacBook Air (13-inch, Early 2015)

Prozessor 1,6 GHz Dual-Core Intel Core i5

Speicher 8 GB 1600 MHz DDR3

Pi Kl -

I completed this replacement using the battery and tools from iFixit for $150. The replacement process worked well, and my comments for others is to be careful when taking old battery out not to damage the screen. I had to pry the battery out of the case and noticed that I was lucky I didn’t damage the screen when doing this. You can’t see under the battery when you’re prying it, and there are places you could damage screen if you pried in the wrong spot.

The other comment is that my laptop wouldn’t recognize the new battery once I installed it. Perhaps there was something else wrong with my laptop. I paid $850 for Apple do the replacement. The Apple repair site has instructions https://support.apple.com/en-us/100585 Apple sells only the battery, keyboard and top case as one unit for $615 plus $88 credit if you return your parts so about $530.

Arne Stokstad -

This looks like one of the most unpleasant mac repairs since I cracked open a PowerMac 6500. How difficult/frustrating is the stretch adhesive?

Robert Schmid -

It'd be frustrating if I'd cracked my screen so be careful of that. The adhesive didn't release with the rubbing alcohol so I just had to pry and pull hard on the battery to get it out. It wasn't pretty, but I didn't care that I was wrecking the battery I was removing. The new battery had the adhesive already applied to it, so it was easy to install.

Arne Stokstad -

It'd be frustrating if I'd cracked my screen so be careful of that. The adhesive didn't release with the rubbing alcohol so I just had to pry and pull hard on the battery to get it out. It wasn't pretty, but I didn't care that I was wrecking the battery I was removing. The new battery had the adhesive already applied to it, so it was easy to install

Arne Stokstad -