Einleitung

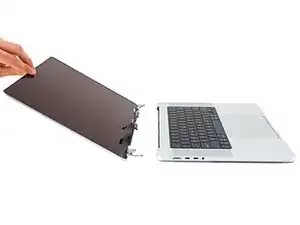
Diese Anleitung zeigt, wie das Display im MacBook Pro (16 Zoll, 2021) ausgetauscht werden kann.

Entlade zur Sicherheit den Akku auf unter 25%, bevor du das MacBook öffnest. Du reduzierst dadurch die Gefahr eines Brandschadens während der Reparatur, falls der Akku versehentlich beschädigt worden ist. Wenn der Akku aufgebläht ist, musst du geeignet Vorsichtsmaßnahmen treffen.

Hinweis: Nach dem Austausch des Displays funktioniert True Tone nicht mehr.

  1. sAvCLYXqUkq3CpsT
    sAvCLYXqUkq3CpsT
    dYQhaLBJXSRTTctb
    • Schalte dein MacBook Pro komplett aus und ziehe den Stecker, bevor du mit der Reparatur beginnst. Klappe das Display zu und lege den Laptop mit dem Boden nach oben hin.

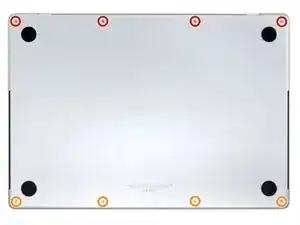
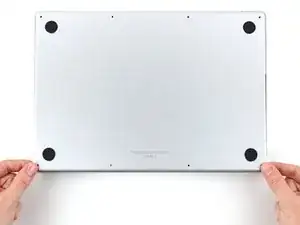
    • Entferne acht Pentalobe P5 Schrauben, mit denen das Gehäuseunterteil befestigt ist:

    • Vier 9,1 mm Schrauben

    • Vier 5 mm Schrauben

    • Halte die Schrauben während der Reparatur gut geordnet und achte darauf, dass jede wieder an ihren ursprünglichen Platz zurück kommt, sonst kann das Gerät beschädigt werden.

  2. XaNohnCmRnh2nZpJ
    XaNohnCmRnh2nZpJ
    vL2whH15EFx1twZH
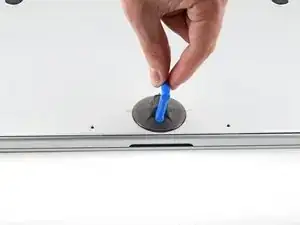
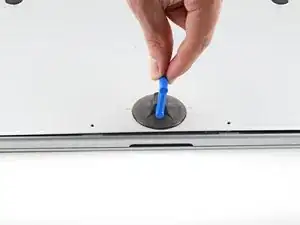
    • Drücke einen Saugheber nahe an der Vorderkante des Gehäuseunterteils zwischen den beiden Schraubenlöchern fest.

    • Ziehe den Saugheber hoch, bis ein schmaler Spalt unter dem Gehäuseunterteil entstanden ist.

  3. gKFYYs2sw4AKQjyZ
    gKFYYs2sw4AKQjyZ
    H4KsmKKCORb6oQgS
    XipK6OFYbtmB2HXx
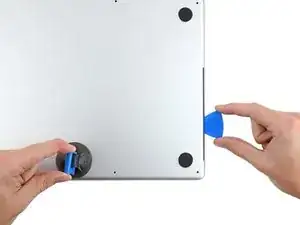
    • Setze ein Plektrum in den eben entstandenen Spalt ein.

    • Schiebe das Plektrum um die nächste Ecke herum und dann an der Seite des MacBook Pro halb nach oben.

    • Dadurch wird die erste der versteckten Rasten gelöst, mit denen das Gehäuseunterteil befestigt ist. Du solltest es hören und spüren.

  4. D6bdEaUShxT3UVIG
    D6bdEaUShxT3UVIG
    MUSM2IsQWQnMyLTY
    PVitYNF6oBIbr23x
    • Nimm ein Plektrum und wiederhole den vorherigen Schritt für die andere Seite.

    Terrifying, don't be afraid, give it a good pull, the description above is exactly right.

    Scott -

  5. jhQl23lkLmdIajyL
    jhQl23lkLmdIajyL
    5Biq1bJPZBQJR6co
    SosOCOgOT4DGPusW
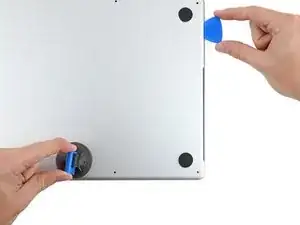
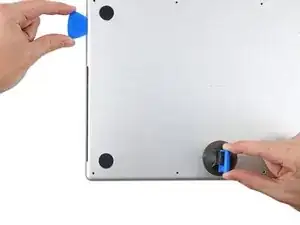
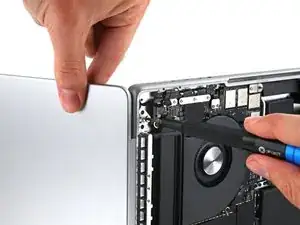
    • Ziehe das Gehäuseunterteil fest zur Vorderkante des MacBooks hin (also weg von den Scharnieren), bis es herausgleitet und sich die letzte Raste löst.

    • Ziehe erst an der einen, dann der anderen Ecke.

    • Ziehe waagrecht, nicht nach oben.

    • Wahrscheinlich musst du recht kräftig ziehen.

  6. Opome2xEF244Sbik
    Opome2xEF244Sbik
    Zhm2CbuWmJyMyRHI
    NZBNkwTekFWxsHvu
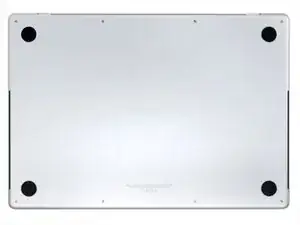
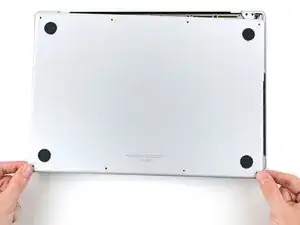
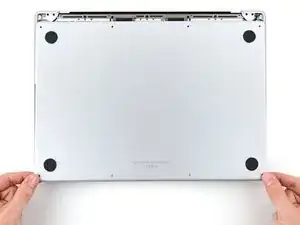
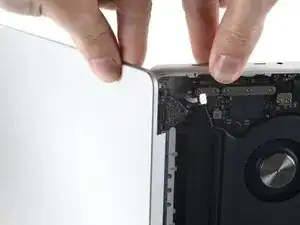
    • Entferne das Gehäuseunterteil.

    • So wird das Gehäuseunterteil wieder eingebaut:

    • Richte es so aus, dass die Rasten zum Einschieben nahe bei den Scharnieren passen. Drücke das Gehäuseunterteil nach unten und schiebe es zu den Scharnieren hin. Wenn die Rasten einschnappen, sollte es sich nicht mehr weiter schieben lassen.

    • Wenn die Rasten zum Einschieben gut sitzen, dann drücke das Gehäuseunterteil fest nach unten, bis die vier verdeckten Rasten einschnappen. Du solltest das hören und spüren.

  7. LLefRtZMZ3sxFYAq
    LLefRtZMZ3sxFYAq
    ASjTh2lGvC5ljHUc
    6dswNWn4yXoaF6nr
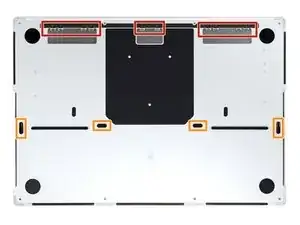
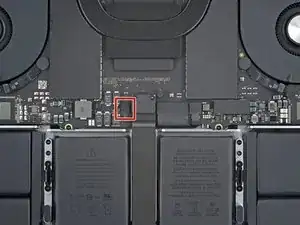
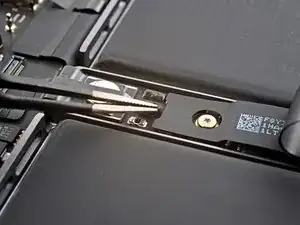
    • Wenn der Stecker am Datenkabel der Akkuplatine auf dem Logic Board mit einem Klebeband überklebt ist, dann ziehe es ab.

    This photograph does not match my 2021 Macbook Pro. Fortunately the differences do not impact the removal operation.⏎
    There is a different arrangement and number and type of chips to the left of the image.

    One square grey thing nad five rectangular black things ...
    Mine does not have the rows of test points above the track pad cable.

    Simon Anthony -

  8. FQOeUAMampuhHfcv
    FQOeUAMampuhHfcv
    u1JNemMNxIRwXdgQ
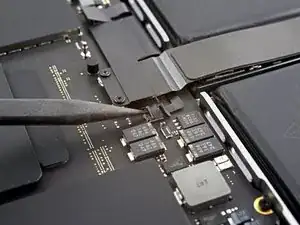
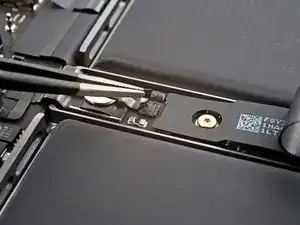
    • Klappe den Sicherungsbügel am ZIF-Anschluss des Datenkabels zur Akkuplatine vorsichtig mit dem Spudger hoch.

    This photograph does not match my 2021 Macbook Pro. Fortunately the differences do not impact the removal operation.⏎
    There is a different arrangement and number and type of chips to the left of the image.

    One square grey thing nad five rectangular black things ...
    Mine does not have the rows of test points above the track pad cable.

    Simon Anthony -

  9. rWcLXdfLoUAAyt1U
    rWcLXdfLoUAAyt1U
    QOTQylMDMkoi6FHG
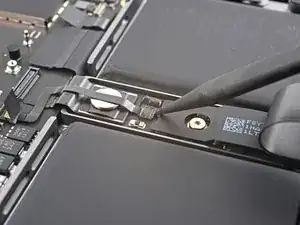
    • Schiebe das Datenkabel zur Akkuplatine aus seinem Anschluss auf dem Logic Board heraus und trenne es ab.

  10. nJWDpHdBT5p4Fl1P
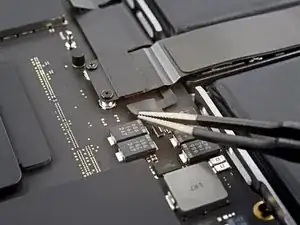
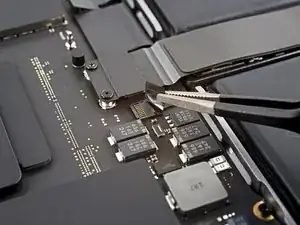
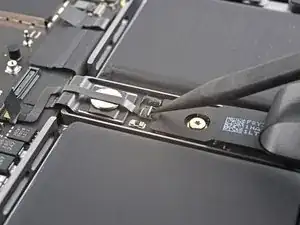
    • Entferne die beiden 2,1 mm langen Torx T3 Schrauben, mit denen die Halterung des Trackpadkabels am Logic Board befestigt ist.

    Das sind T4 Schrauben bei mir

    Ralf Schäfer -

    This photograph does not match my 2021 Macbook Pro. Fortunately the differences do not impact the removal operation.⏎
    There is a different arrangement and number and type of chips to the left of the image.

    One square grey thing nad five rectangular black things ...
    Mine does not have the rows of test points above the track pad cable.

    Simon Anthony -

  11. TDLlTPDWBqrZMSdE
    TDLlTPDWBqrZMSdE
    wDrsl5nnA1K31knG
    • Entferne die Halterung des Trackpadkabels mit den Fingern oder einer Pinzette.

    This photograph does not match my 2021 Macbook Pro. Fortunately the differences do not impact the removal operation.⏎
    There is a different arrangement and number and type of chips to the left of the image.

    One square grey thing nad five rectangular black things ...
    Mine does not have the rows of test points above the track pad cable.

    Simon Anthony -

  12. RcTGakJu5YZwLSCQ
    RcTGakJu5YZwLSCQ
    elqdt4ScLTAtGDQO
    • Heble den Druckstecker am Trackpadkabel mit dem flachen Ende des Spudgers hoch und trenne ihn vom Logic Board ab.

    • Um Druckstecker (Press-fit-), so wie diesen hier, wieder anzuschließen, musst du ihn erst sorgfältig ausrichten und dann auf einr Seite andrücken, bis er einrastet. Wiederhole dann an der anderen Seite. Drücke nicht in der Mitte. Wenn der Stecker nicht richtig sitzt, können die Kontakte verbogen und dauerhaft beschädigt werden.

    This photograph does not match my 2021 Macbook Pro. Fortunately the differences do not impact the removal operation.⏎
    There is a different arrangement and number and type of chips to the top/left of the red circle.

    One square grey thing nad five rectangular black things ...
    Mine does not have the rows of test points to the left of the track pad cable.

    Simon Anthony -

  13. sYAtIqlcTEYxokrn
    sYAtIqlcTEYxokrn
    yy5FwLmYLN5hmmVh
    • Das Trackpadkabel ist leicht mit dem Rahmen verklebt.

    • Ziehe das Trackpadkabel vom Gerät ab, achte darauf, dass der Kleber abgelöst ist.

    This photograph does not match my 2021 Macbook Pro. Fortunately the differences do not impact the removal operation.⏎
    There is a different arrangement and number and type of chips to the top/left of the red circle.

    One square grey thing nad five rectangular black things ...
    Mine does not have the rows of test points to the left of the track pad cable.

    Simon Anthony -

  14. sspXELRZt1xWGUlS
    sspXELRZt1xWGUlS
    FTLGaItLAMAfeYrB
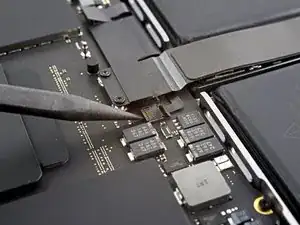
    • Wenn der Stecker am Datenkabel der Akkuplatine unter der großen Flachkopfschraube mit einem Klebeband überklebt ist, dann ziehe es ab.

  15. GDuYjnNH5iYGtRvW
    GDuYjnNH5iYGtRvW
    DrMamQumljVB3anV
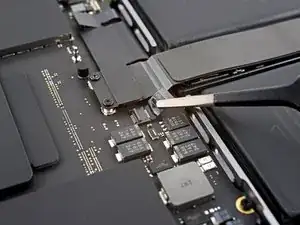
    • Heble den Sicherungsbügel am ZIF-Anschluss des Datenkabels der Akkuplatine mit einem Spudger hoch.

  16. NfpQXfGHLNltvL2i
    NfpQXfGHLNltvL2i
    gV4U1VA1gQWNHEyR
    • Schiebe das Datenkabel der Akkuplatine aus seinem Anschluss auf der Akkuplatine heraus und trenne es ab.

    This is SO small - I used a very fine guitar pick to get it to release, none of my tools were small enough.

    Scott -

  17. VONenjYIZcfg1ioj
    VONenjYIZcfg1ioj
    NcSXpygTI6GDcqGk
    • Das Datenkabel zur Akkuplatine ist leicht mit dem Gerät verklebt.

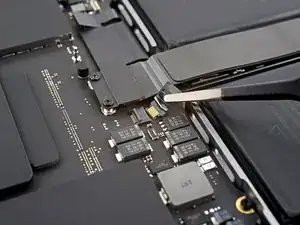
    • Schiebe eine stumpfe Pinzette zum Auftrennen des Klebers unter dem Kabel entlang.

    • Entferne das Datenkabel der Akkuplatine.

    This photograph does not match my 2021 Macbook Pro. Fortunately the differences do not impact the removal operation.⏎
    There is a different arrangement and number and type of chips to the left of the tweezers.

    One square grey thing nad five rectangular black things ...

    Simon Anthony -

  18. OkqL5dxBAJeXCSFx
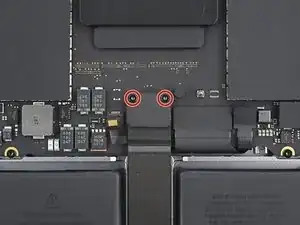
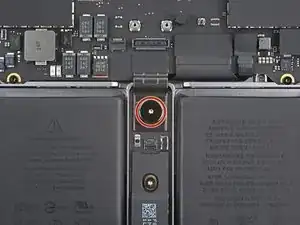
    • Entferne die 3,9 mm Flachkopfschraube, die den Akkustecker befestigt, mit einem Torx T5 Schraubendreher.

    This photograph does not match my 2021 Macbook Pro. Fortunately the differences do not impact the removal operation.
    There is a different arrangement and number and type of chips to the top/left of the red circle.

    One square grey thing nad five rectangular black things ...

    Simon Anthony -

  19. hvVm3YJcO2MRuHkK
    hvVm3YJcO2MRuHkK
    rFVOELLuBj2ZHQDt
    • Hebe den Akkustecker mit einem Spudger hoch und trenne ihn ab.

    • Hebe den Stecker soweit hoch, dass er während der Reparatur abgetrennt bleibt. Wenn er sich versehentlich wieder verbindet, könnte dein MacBook Pro beschädigt werden.

    is it possible to buy/replace this battery power connector? I broke mine on the logic board side and they are impossible to find. Ofc apple want $900 because the laptop is "modified" after replacing the keyboard :|

    Thenon -

    The previous image did not match my Macbook Pro, this one does.
    Two square grey things, three rectangular smaller black things. :-)

    Simon Anthony -

  20. qHXHOPIA3Nm5Z4Mx
    qHXHOPIA3Nm5Z4Mx
    RX1B6llNG3REKEGx
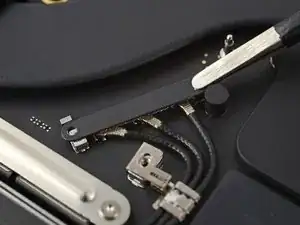
    • Entferne die drei 2,1 mm Torx T3 Schrauben, mit denen die Abdeckung der Antennenleiste-Leiterplatte und des Koaxialkabels am Rahmen befestigt ist.

  21. NISpyifFwBadkYRn
    NISpyifFwBadkYRn
    wAKrsORhDY21Sbuf
    • Entferne die Abdeckung über den Koaxialkabeln der Antennenleiste mit einer Pinzette oder deinen Fingern.

  22. QsvVGWDNUgWL2tAm
    QsvVGWDNUgWL2tAm
    kc1Tm3DP5RFVIoGJ
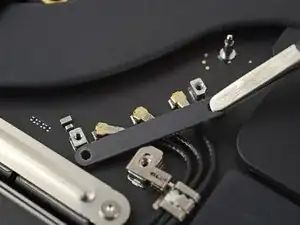
    • Heble das Koaxialkabel zur Antennenleiste mit der Spudgerspitze hoch und trenne es ab.

    • Wiederhole bei den anderen beiden Kabeln.

    • Beim Zusammenbau kann es knifflig werden, die Kabel wieder anzuschließen. Halte die Stecker einzeln nacheinander über ihre Anschlüsse und drücke sie mit dem flachen Ende des Spudgers nach unten. Die Stecker sollten dann einrasten.

  23. QG5nkErfOYmMPwfP
    QG5nkErfOYmMPwfP
    FYJGYThTWbXy3HOF
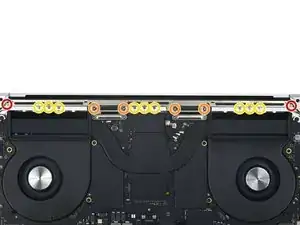
    • Entferne die sechs Torx T5 Schrauben, mit denen die Antennenleiste am Rahmen befestigt ist:

    • Zwei 7,5 mm Schrauben

    • Vier 3,0 mm Schrauben

    • Entferne die neun 1,5 mm P2 Pentalobe Schrauben, mit denen die Antennenleiste am Rahmen befestigt ist.

    • Die Köpfe dieser Schrauben können leicht rundgedreht werden. Drücke beim Lösen der Schrauben gleichmäßig nach unten und arbeite langsam.

    You should update all your guides that include these instructions. At least in my 2021 16" MBP, the screws described here as P2 Pentalobe ARE NOT P2 Pentalobe. P2 tools strip out the heads on these. Per the Apple manual, the actual drive type is 1 IPR. Wera makes one.

    felix4567 -

    On my 2021 16" the P2 worked great for these screws. No stripping. I'm sorry that happened to yours, Felix! Seems there might be some variants in the screws used.

    Quantum Mechanic -

    I had also P2 and T5.

    Klares -

  24. 4KXaRPXBXyemFIae
    4KXaRPXBXyemFIae
    QlWUGmx6FDGauRxp
    • Setze die Spudgerspitze zwischen die Antennenleiste und den Rahmen ein.

    • Heble mit dem Spudger, bis sich die Antennenleiste vom Rahmen löst.

  25. ewF6AEhufwb53IHS
    ewF6AEhufwb53IHS
    6QKNeMlitQ3K54vC
    • Ziehe die Antennenleiste gerade nach oben aus dem Rahmen heraus und entferne sie.

  26. HmnoNBvWLm6tZEqB
    HmnoNBvWLm6tZEqB
    DTUULHJ3jgM2KHKx
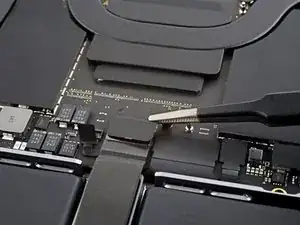
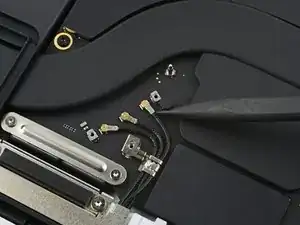
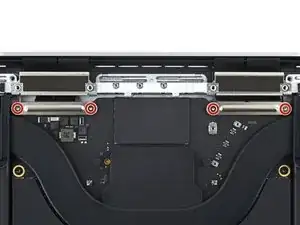
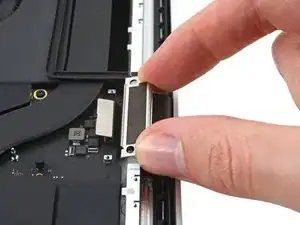
    • Entferne die vier 2,1 mm Torx T3 Schrauben, mit denen die Abdeckungen des Displaykabels befestigt sind.

    Hi there, the display cover screws use a T3 Torx not a T5

    Brandon McCulloch -

    Right you are Brandon! Thank you for the comment, and I have changed the guide accordingly.

    Alex Diaz-Kokaisl -

  27. AlZTNpXrnKCED5cP
    AlZTNpXrnKCED5cP
    rEaeYwEYMRDd3KUS
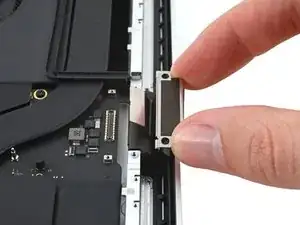
    • Entferne die beiden Abdeckungen des Displaykabels mit einer Pinzette oder deinen Fingern vom Logic Board.

  28. iGLZDr6x3fcOoSdA
    iGLZDr6x3fcOoSdA
    QoKvLDMrNMfIrIjR
    WRVYbhNYbW4N1jEx
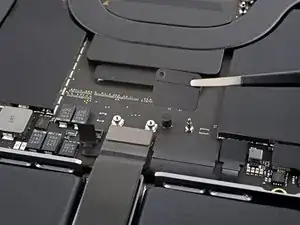
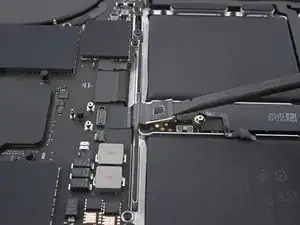
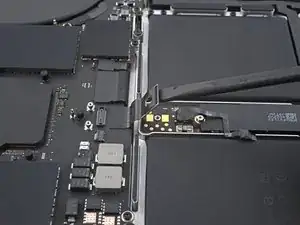
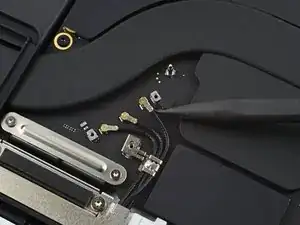
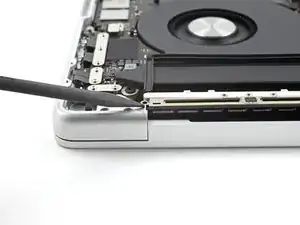
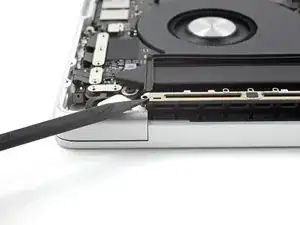
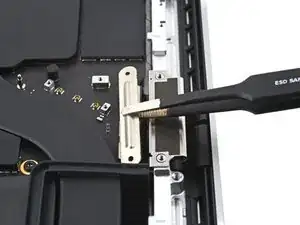
    • Heble die ganz rechts liegenden Druckstecker am Displaykabel mit dem flachen Ende des Spudgers hoch und trenne sie vom Logic Board ab.

  29. nd1ANiturmExTbJ6
    nd1ANiturmExTbJ6
    awfFUOcBChlpEAOu
    • Wiederhole den vorherigen Schritt für den ganz links liegenden Druckstecker.

    This is not the same Mac as the pic above this one...???

    macmanaspen -

    When replacing, these are hard to connect while the cable brackets are attached, because the ribbons were too stiff. I skipped Step 30, did Step 29-26, then replaced the brackets.

    HeatherG -

  30. 2JGRJb6FneQSFHud
    2JGRJb6FneQSFHud
    jMWdk4YGXDWhnDp2
    6aOry1sKEFLy4DTS
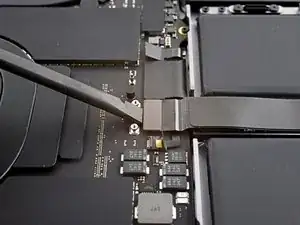
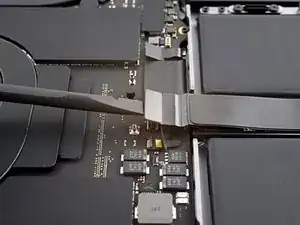
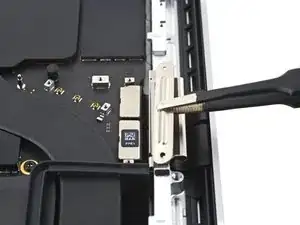
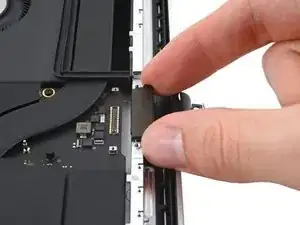
    • Ziehe den Halter des Displaykabels hinten hoch, so dass sich seine Rasten am Rahmen lösen.

    • Entferne den Displaykabelhalter.

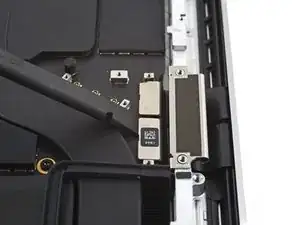
    • Wiederhole diesen Vorgang am anderen Displaykabelhalter.

    Replacement screen might not come with these brackets, so be sure to save them from the original.

    HeatherG -

  31. KULnxFpPK6DEIgVB
    KULnxFpPK6DEIgVB
    CfYwnYmB6nnGr3vp
    • Wenn die beiden Puffer mit den Haltern herausgekommen sind, kannst du diesen Schritt überspringen.

    • Hebe die beiden Puffer am Displaykabel gerade nach oben aus dem Rahmen und entferne sie.

  32. nU4vyumR2oRPuaCS
    nU4vyumR2oRPuaCS
    OTeZrglWMhtG3yqe
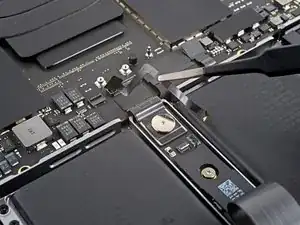
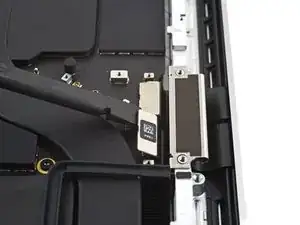
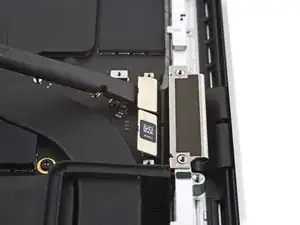
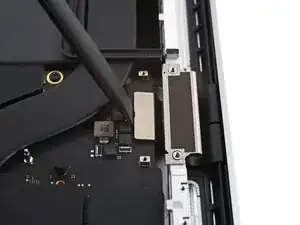
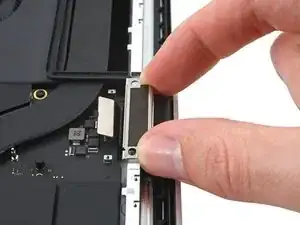
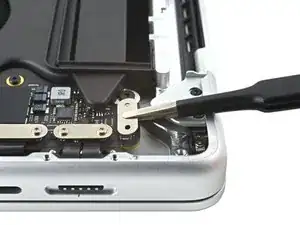
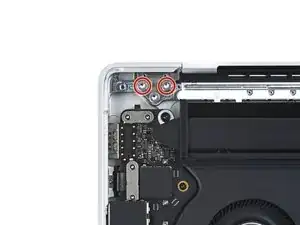
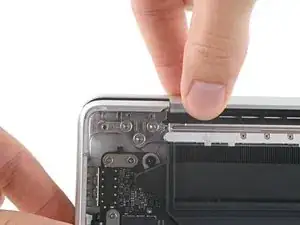
    • Entferne die beiden 2,1 mm Torx T3 Schrauben, mit denen die Abdeckung des Öffnungswinkelsensors nahe beim rechten Scharnier befestigt ist.

  33. ySdYkAvPTeNpnfUy
    • Entferne die Abdeckung des Öffnungswinkelsensors mit der Pinzette oder deinen Fingern.

  34. 3KVZiV1tnfFGagno
    3KVZiV1tnfFGagno
    YmxKBWWb6rwTKWQD
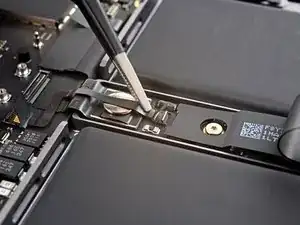
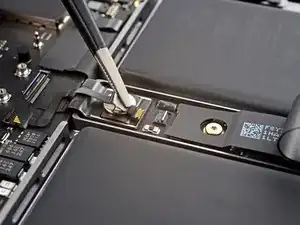
    • Heble den Druckstecker des Öffnungswinkelsensors mit dem flachen Ende des Spudgers hoch und trenne ihn ab.

  35. OO3WXlt5bvYI5LRs
    OO3WXlt5bvYI5LRs
    VjwDUR4V23D2ROXd
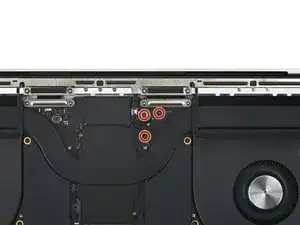
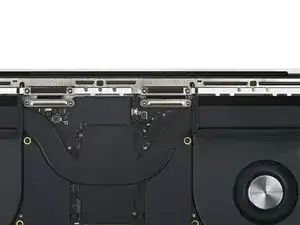
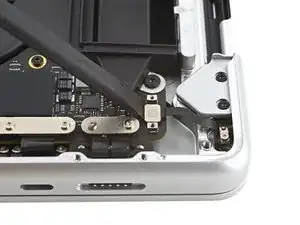
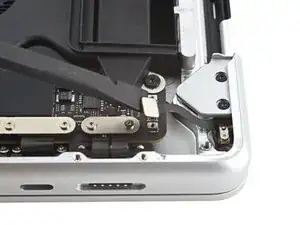
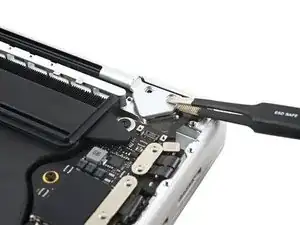
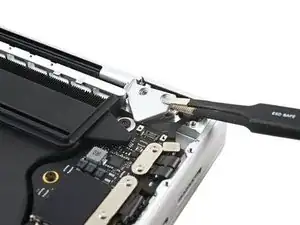
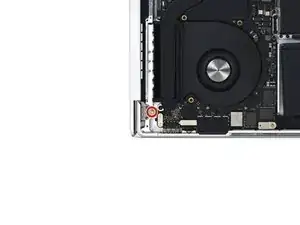
    • Entferne die vier 2,5 mm Torx T5 Schrauben, mit denen die Scharnierabdeckungen befestigt sind. (Zwei auf jeder Seite)

    What is the part number for these four screws?

    maxwelljconnelly -

  36. RYfHBwuYeqCM2Aj4
    RYfHBwuYeqCM2Aj4
    CTPX1AQVV1gyMGpW
    KanI5vuSACUnAJNa
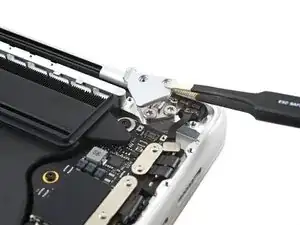
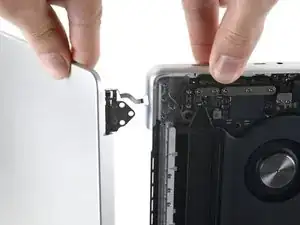
    • Ziehe die Scharnierabdeckungen mit einer Pinzette horizontal vom Scharnier weg und trenne sie vom Rahmen ab.

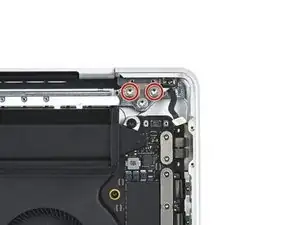
    • Entferne die Scharnierabdeckungen.

  37. bKaPYeeyPjlAWn5J
    bKaPYeeyPjlAWn5J
    1u3ZBfElVSVxdEMX
    • Entferne die beiden 6,4 mm Torx T8 Schrauben von jedem Scharnier. (Also insgesamt vier)

    • An jedem Scharnier befindet sich eine dritte Schraube, die du zunächst noch nicht lösen solltest.

    Both this guide and Apple's official repair manual state that these are T8 Torx screws... I found the T8 to bee too small for this, and instead used a T9, which fit perfectly.

    Nuka Kola -

    These screws were in very tight. The dinky driver that came with the replacement screen was insufficient. I had to use a more substantial bit driver. T8 worked fine for getting them loose. Then used the T9 that came with the replacement to get them all the way out.

    HeatherG -

    Mine was also T9 and you should also lose a little bit the 3rd screw on every side.

    Klares -

    I used the “TR9” in the iFixit kit

    kevin -

  38. dAHYNPOxARHeWpRs
    dAHYNPOxARHeWpRs
    KA556FCTuJc5Vrn3
    • Wenn das Display weiter verwendet werden soll, dann öffe es und bringe auf dem Glas über jedem Scharnier ein Stück Klebeband an. Dadurch wird das Glas vor Kratzern im nächsten Schritt geschützt

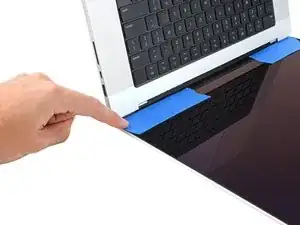
    • Klappe das Display ganz auf und lege das MacBook auf einer Seite ab.

    This should be step 1. A whole lot easier to put the tape on before taking the back off and undoing all the screws.

    HeatherG -

  39. WV6SC2Is3ihfYAjI
    WV6SC2Is3ihfYAjI
    jkdL6IpciW4K3UJW
    wdeMKDnFV6lABHjG
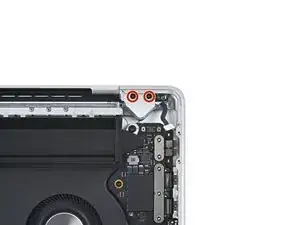
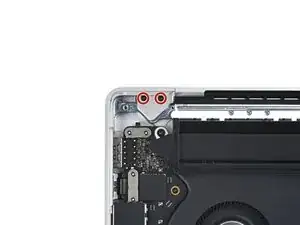
    • Entferne die beiden restlichen 6,4 mm Torx T8 Schrauben. (Eine an jedem Scharnier)

    • Entferne die obere Schraube als Letzte, wobei du beide Hälften des MacBooks Pro mit einer Hand festhältst. Sie dürfen sich nicht trennen und plötzlich auseinander fallen.

    Both this guide and Apple's official repair manual state that these are T8 Torx screws... I found the T8 to bee too small for this, and instead used a T9, which fit perfectly.

    Nuka Kola -

    Also, loosen both screws (but not remove) before opening the lid, since they are installed tightly.

    kevin -

  40. IMM3limP1GumvBZL
    IMM3limP1GumvBZL
    BQdVBNrR4fkQScab
    IJo2ODH3HDDxHkxP
    • Fasse das Display und das Gehäuse des MacBook Pro fest an. Jede der Hälften kann bei diesem Schritt unerwartet hinfallen.

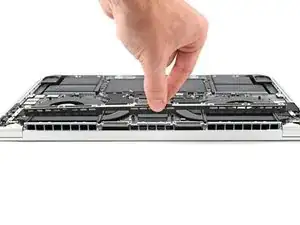
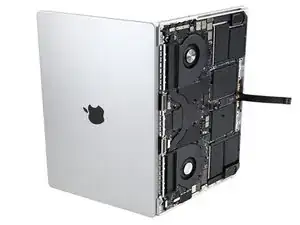
    • Drücke die beiden Hälften des MacBook Pro zusammen, so dass sich die Scharniere aus ihren Vertiefungen im Gehäuse herausheben.

    • Drücke das Gehäuse des MacBook Pro weg von dir und gleichzeitig das Display hin zu dir, so dass sich die Teile voneinander lösen.

    Ich fand es deutlich leichter, das Gerät mit der Tastatur auf den Tisch zu legen, das Display an der Tischkante herunterragen zu lassen und die Display Oberkante mit den Oberschenkeln zu stabilisieren.

    Klares -

  41. FNnhxexVSBfitTmr
    • Entferne das Display.

  42. FEbGVqhmIuaBH3ZW
    FEbGVqhmIuaBH3ZW
    U4PtkM5gVmCSPkYb
    • Drehe beim Zusammenbau zuerst die Scharnierschrauben ein, aber ziehe sie noch nicht fest. Richte das Display aus, bis es genau in der Mitte sitzt und bündig mit den Seiten abschließt. Ziehe dann die Schrauben fest.

    • Wenn das Display beim Öffnen klickt oder knackt, dann löse die Scharnierschrauben und korrigiere seinen Sitz. Achte darauf, dass das Display nicht zu weit vorne ist, sonst könnte es beim Öffnen oder Schließen das Gehäuse berühren.

    • Wenn du willst, kannst du etwas blaue Schraubensicherung an die Gewinde der Schrauben geben, damit sie sich nicht mehr so leicht lösen können.

    The track pad cable bracket screws take a T4 not a T3, and the 6 main hinge screws take a T9 not a T8.

    Will Patterson -

    Beim Zusammenbau daran denken, die Display Kabel zuerst auf die Innenseite zu führen

    Klares -

Abschluss

Um dein Gerät wieder zusammenzubauen, folge den Schritten in umgekehrter Reihenfolge.

Vergleiche das Ersatzteil mit dem Originalteil. Möglicherweise musst du fehlende Bauteile übertragen oder Schutzfolien vom Neuteil abziehen, bevor du es einbauen kannst.

Hat die Reparatur nicht ganz geklappt? Versuche einige grundsätzliche Lösungen oder frage in unserem MacBook Pro 16" 2021 Forum nach Hilfe.

Alex Diaz-Kokaisl

Mitglied seit: 16/01/22

168562 Reputation

11 Kommentare

Will I lose True Tone functionality even though I use an original Apple screen that has True Tone for the repair?

drgenius2003 -

If you don't break the entire lcd, but only some part of it, the True Tone will still there. I have mine fixed because of the liquid damage. I only replace the LCD, not the fullset with the case. I have some locals to help me fixed it for me. So I don't know the details how they repair my macbook.

They gave me 2 options,

first told me that I will lose true tone feature if I replace it with the fullset lcd,

the 2nd option, If I replace the LCD only, the true tone still there because they can move the "ic" to the lcd replacement. But the disadvantage for the 2nd option that I will got some defect on my screen not much and not really visible if I don't really look at it. Please note that this options is possible because I didn't break the entire lcd.

I chose the 2nd option and it's work. The defect caused by my liquid damage is not really visible

ghiffari -

I had purchased my part from Apple directly, so when I was doing the system configuration at the end, they asked for my order number and my serial number, which I assume were used on their end to mark parts as genuine and restore TrueTone. If you purchased your part from apple and have the order number, then restoring TrueTone should not be a problem. If you got a part from elsewhere, then I don't how the service people on Apple's end would identify it to be able to mark it as genuine in their system, and to associate it with your machine. Perhaps you can contact them and ask..

Nuka Kola -

I hope this has a video demonstration too

wedzmer.munjilul -

In case you are not aware: you can get a genuine replacement screen directly from Apple. This machine is one of the first to be a part of their new repair program. If you get the screen from them, you will not lose the TrueTone functionality! After completing the repair, you will have to contact heir online support, who will guide you through system configuration steps to mark installed parts as genuine, thereby restoring TrueTone. You will also be able to send in your old screen to get some money back. Cheers!

Nuka Kola -

I successfully did the repair with a used Screen unit that was pulled from another MacBook. I don’t see any issues with True Tone or the blurred behavior of the screen. Still I am facing an ALS001 error which relates to the ambient light sensor. This causes the fan to run on high speed. But the sensor seems to work… at least it is adjusting brightness of screen and keyboard backlight. Any ideas how to fix this?

Andreas -

The new display screen cables have no brackets. How to remove them from the old display cables? It seems glued on the cables firmly and hard to pull off.

Yale Craig -

Buongiorno, ho letto che un chip T1 riconosce il monitor di concorrenza ed impedisce l avvio. E' Possibile?

matteo barsacchi -

I got a used lid assembly from laptopscreen because iFixit was out of stock, but I used this guide and it was spot on.

Just for awareness though: the screen I received had a different lid position sensor on it than the original screen for this computer. The connector on both sensors was the same, but the bends in the flat cable didn't allow it to line up to the main board connector properly. It wasn't difficult to swap the position sensor from the original screen. There's one P2x1.5mm screw attaching it to the side of the hinge and it comes off. So, if you're thinking of doing this replacement, don't be too eager to dispose of that old screen.

Laptopscreen listed the lid assembly as fitting both A2485 and A2780 models, and I installed it on an A2485.

info890 -

I just replaced my cracked screen with a pre owned one, on the new screen there was no screen angle sensor, I moved it from the old screen to new, will this work or does it still need calibration from Apple.

I have now had the laptop on charge for about 30 min and it does not startup, the screen seems to work now as it displays a battery symbol showing low battery (red) and a lightning symbol suggesting it is taking charge but it does not start; could it be I did not get the battery datat cable connected properly

Peter Falk -

An update, I had not connected the battery data cable properly redid and now it works

Peter Falk -