Einleitung

Diese Anleitung zeigt, wie die Antennenleiste im MacBook Pro 1 Zoll, 2021 ausgetauscht werden kann.

Entlade zur Sicherheit den Akku auf unter 25%, bevor du das MacBook öffnest. Du reduzierst dadurch die Gefahr eines Brandschadens während der Reparatur, falls der Akku versehentlich beschädigt worden ist. Wenn der Akku aufgebläht ist, musst du geeignet Vorsichtsmaßnahmen treffen.

  1. sAvCLYXqUkq3CpsT
    sAvCLYXqUkq3CpsT
    dYQhaLBJXSRTTctb
    • Schalte dein MacBook Pro komplett aus und ziehe den Stecker, bevor du mit der Reparatur beginnst. Klappe das Display zu und lege den Laptop mit dem Boden nach oben hin.

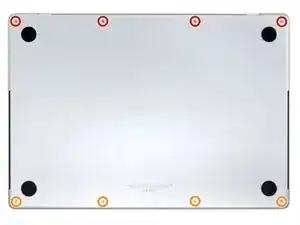
    • Entferne acht Pentalobe P5 Schrauben, mit denen das Gehäuseunterteil befestigt ist:

    • Vier 9,1 mm Schrauben

    • Vier 5 mm Schrauben

    • Halte die Schrauben während der Reparatur gut geordnet und achte darauf, dass jede wieder an ihren ursprünglichen Platz zurück kommt, sonst kann das Gerät beschädigt werden.

  2. XaNohnCmRnh2nZpJ
    XaNohnCmRnh2nZpJ
    vL2whH15EFx1twZH
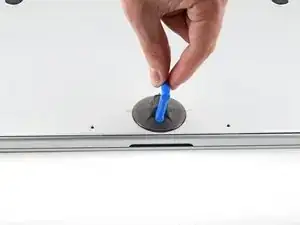
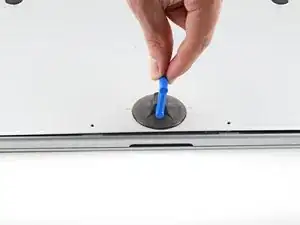
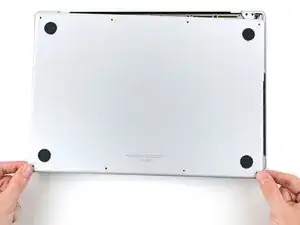
    • Drücke einen Saugheber nahe an der Vorderkante des Gehäuseunterteils zwischen den beiden Schraubenlöchern fest.

    • Ziehe den Saugheber hoch, bis ein schmaler Spalt unter dem Gehäuseunterteil entstanden ist.

  3. gKFYYs2sw4AKQjyZ
    gKFYYs2sw4AKQjyZ
    H4KsmKKCORb6oQgS
    XipK6OFYbtmB2HXx
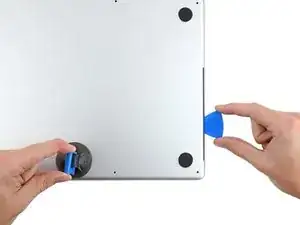
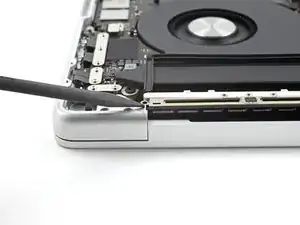
    • Setze ein Plektrum in den eben entstandenen Spalt ein.

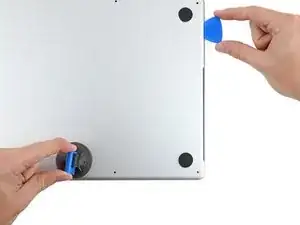
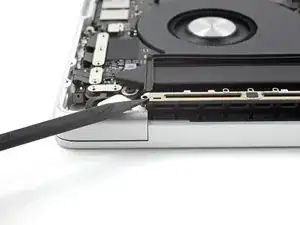
    • Schiebe das Plektrum um die nächste Ecke herum und dann an der Seite des MacBook Pro halb nach oben.

    • Dadurch wird die erste der versteckten Rasten gelöst, mit denen das Gehäuseunterteil befestigt ist. Du solltest es hören und spüren.

  4. D6bdEaUShxT3UVIG
    D6bdEaUShxT3UVIG
    MUSM2IsQWQnMyLTY
    PVitYNF6oBIbr23x
    • Nimm ein Plektrum und wiederhole den vorherigen Schritt für die andere Seite.

    Terrifying, don't be afraid, give it a good pull, the description above is exactly right.

    Scott -

  5. jhQl23lkLmdIajyL
    jhQl23lkLmdIajyL
    5Biq1bJPZBQJR6co
    SosOCOgOT4DGPusW
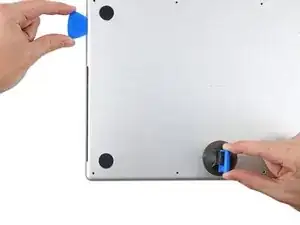
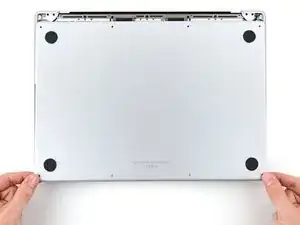
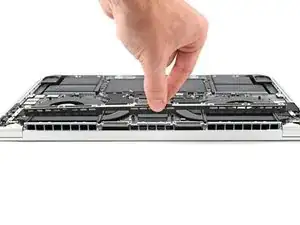
    • Ziehe das Gehäuseunterteil fest zur Vorderkante des MacBooks hin (also weg von den Scharnieren), bis es herausgleitet und sich die letzte Raste löst.

    • Ziehe erst an der einen, dann der anderen Ecke.

    • Ziehe waagrecht, nicht nach oben.

    • Wahrscheinlich musst du recht kräftig ziehen.

  6. Opome2xEF244Sbik
    Opome2xEF244Sbik
    Zhm2CbuWmJyMyRHI
    NZBNkwTekFWxsHvu
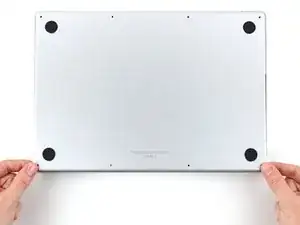
    • Entferne das Gehäuseunterteil.

    • So wird das Gehäuseunterteil wieder eingebaut:

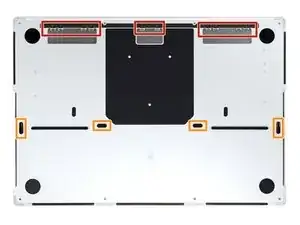
    • Richte es so aus, dass die Rasten zum Einschieben nahe bei den Scharnieren passen. Drücke das Gehäuseunterteil nach unten und schiebe es zu den Scharnieren hin. Wenn die Rasten einschnappen, sollte es sich nicht mehr weiter schieben lassen.

    • Wenn die Rasten zum Einschieben gut sitzen, dann drücke das Gehäuseunterteil fest nach unten, bis die vier verdeckten Rasten einschnappen. Du solltest das hören und spüren.

  7. LLefRtZMZ3sxFYAq
    LLefRtZMZ3sxFYAq
    ASjTh2lGvC5ljHUc
    6dswNWn4yXoaF6nr
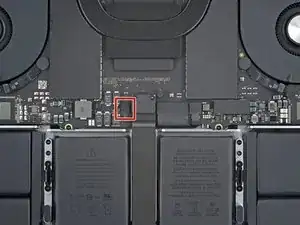
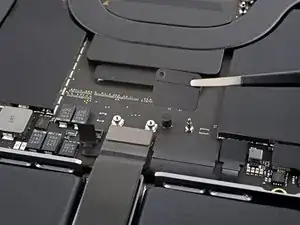
    • Wenn der Stecker am Datenkabel der Akkuplatine auf dem Logic Board mit einem Klebeband überklebt ist, dann ziehe es ab.

    This photograph does not match my 2021 Macbook Pro. Fortunately the differences do not impact the removal operation.⏎
    There is a different arrangement and number and type of chips to the left of the image.

    One square grey thing nad five rectangular black things ...
    Mine does not have the rows of test points above the track pad cable.

    Simon Anthony -

  8. FQOeUAMampuhHfcv
    FQOeUAMampuhHfcv
    u1JNemMNxIRwXdgQ
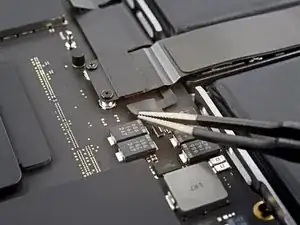
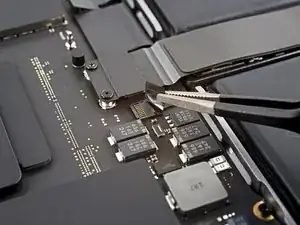
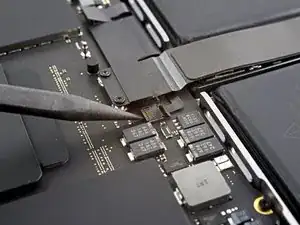
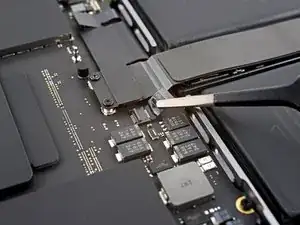
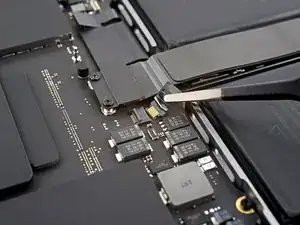
    • Klappe den Sicherungsbügel am ZIF-Anschluss des Datenkabels zur Akkuplatine vorsichtig mit dem Spudger hoch.

    This photograph does not match my 2021 Macbook Pro. Fortunately the differences do not impact the removal operation.⏎
    There is a different arrangement and number and type of chips to the left of the image.

    One square grey thing nad five rectangular black things ...
    Mine does not have the rows of test points above the track pad cable.

    Simon Anthony -

  9. rWcLXdfLoUAAyt1U
    rWcLXdfLoUAAyt1U
    QOTQylMDMkoi6FHG
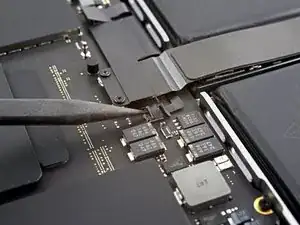
    • Schiebe das Datenkabel zur Akkuplatine aus seinem Anschluss auf dem Logic Board heraus und trenne es ab.

  10. nJWDpHdBT5p4Fl1P
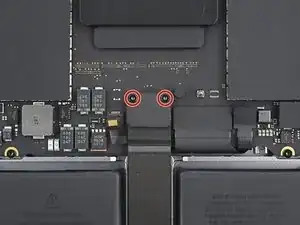
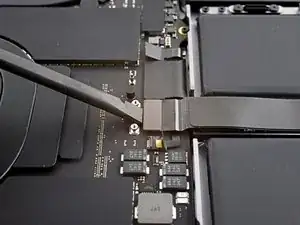
    • Entferne die beiden 2,1 mm langen Torx T3 Schrauben, mit denen die Halterung des Trackpadkabels am Logic Board befestigt ist.

    Das sind T4 Schrauben bei mir

    Ralf Schäfer -

    This photograph does not match my 2021 Macbook Pro. Fortunately the differences do not impact the removal operation.⏎
    There is a different arrangement and number and type of chips to the left of the image.

    One square grey thing nad five rectangular black things ...
    Mine does not have the rows of test points above the track pad cable.

    Simon Anthony -

  11. TDLlTPDWBqrZMSdE
    TDLlTPDWBqrZMSdE
    wDrsl5nnA1K31knG
    • Entferne die Halterung des Trackpadkabels mit den Fingern oder einer Pinzette.

    This photograph does not match my 2021 Macbook Pro. Fortunately the differences do not impact the removal operation.⏎
    There is a different arrangement and number and type of chips to the left of the image.

    One square grey thing nad five rectangular black things ...
    Mine does not have the rows of test points above the track pad cable.

    Simon Anthony -

  12. RcTGakJu5YZwLSCQ
    RcTGakJu5YZwLSCQ
    elqdt4ScLTAtGDQO
    • Heble den Druckstecker am Trackpadkabel mit dem flachen Ende des Spudgers hoch und trenne ihn vom Logic Board ab.

    • Um Druckstecker (Press-fit-), so wie diesen hier, wieder anzuschließen, musst du ihn erst sorgfältig ausrichten und dann auf einr Seite andrücken, bis er einrastet. Wiederhole dann an der anderen Seite. Drücke nicht in der Mitte. Wenn der Stecker nicht richtig sitzt, können die Kontakte verbogen und dauerhaft beschädigt werden.

    This photograph does not match my 2021 Macbook Pro. Fortunately the differences do not impact the removal operation.⏎
    There is a different arrangement and number and type of chips to the top/left of the red circle.

    One square grey thing nad five rectangular black things ...
    Mine does not have the rows of test points to the left of the track pad cable.

    Simon Anthony -

  13. sYAtIqlcTEYxokrn
    sYAtIqlcTEYxokrn
    yy5FwLmYLN5hmmVh
    • Das Trackpadkabel ist leicht mit dem Rahmen verklebt.

    • Ziehe das Trackpadkabel vom Gerät ab, achte darauf, dass der Kleber abgelöst ist.

    This photograph does not match my 2021 Macbook Pro. Fortunately the differences do not impact the removal operation.⏎
    There is a different arrangement and number and type of chips to the top/left of the red circle.

    One square grey thing nad five rectangular black things ...
    Mine does not have the rows of test points to the left of the track pad cable.

    Simon Anthony -

  14. sspXELRZt1xWGUlS
    sspXELRZt1xWGUlS
    FTLGaItLAMAfeYrB
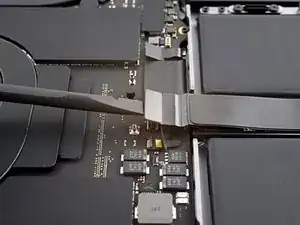
    • Wenn der Stecker am Datenkabel der Akkuplatine unter der großen Flachkopfschraube mit einem Klebeband überklebt ist, dann ziehe es ab.

  15. GDuYjnNH5iYGtRvW
    GDuYjnNH5iYGtRvW
    DrMamQumljVB3anV
    • Heble den Sicherungsbügel am ZIF-Anschluss des Datenkabels der Akkuplatine mit einem Spudger hoch.

  16. NfpQXfGHLNltvL2i
    NfpQXfGHLNltvL2i
    gV4U1VA1gQWNHEyR
    • Schiebe das Datenkabel der Akkuplatine aus seinem Anschluss auf der Akkuplatine heraus und trenne es ab.

    This is SO small - I used a very fine guitar pick to get it to release, none of my tools were small enough.

    Scott -

  17. VONenjYIZcfg1ioj
    VONenjYIZcfg1ioj
    NcSXpygTI6GDcqGk
    • Das Datenkabel zur Akkuplatine ist leicht mit dem Gerät verklebt.

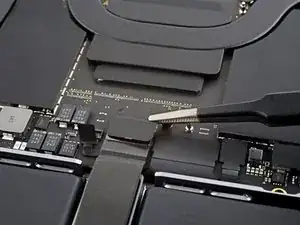
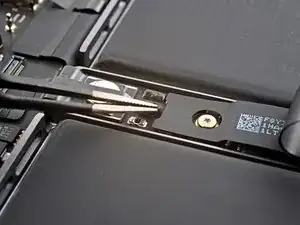
    • Schiebe eine stumpfe Pinzette zum Auftrennen des Klebers unter dem Kabel entlang.

    • Entferne das Datenkabel der Akkuplatine.

    This photograph does not match my 2021 Macbook Pro. Fortunately the differences do not impact the removal operation.⏎
    There is a different arrangement and number and type of chips to the left of the tweezers.

    One square grey thing nad five rectangular black things ...

    Simon Anthony -

  18. OkqL5dxBAJeXCSFx
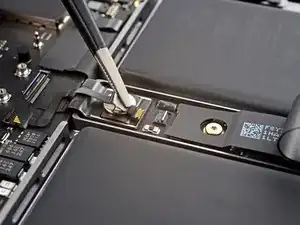
    • Entferne die 3,9 mm Flachkopfschraube, die den Akkustecker befestigt, mit einem Torx T5 Schraubendreher.

    This photograph does not match my 2021 Macbook Pro. Fortunately the differences do not impact the removal operation.
    There is a different arrangement and number and type of chips to the top/left of the red circle.

    One square grey thing nad five rectangular black things ...

    Simon Anthony -

  19. hvVm3YJcO2MRuHkK
    hvVm3YJcO2MRuHkK
    rFVOELLuBj2ZHQDt
    • Hebe den Akkustecker mit einem Spudger hoch und trenne ihn ab.

    • Hebe den Stecker soweit hoch, dass er während der Reparatur abgetrennt bleibt. Wenn er sich versehentlich wieder verbindet, könnte dein MacBook Pro beschädigt werden.

    is it possible to buy/replace this battery power connector? I broke mine on the logic board side and they are impossible to find. Ofc apple want $900 because the laptop is "modified" after replacing the keyboard :|

    Thenon -

    The previous image did not match my Macbook Pro, this one does.
    Two square grey things, three rectangular smaller black things. :-)

    Simon Anthony -

  20. qHXHOPIA3Nm5Z4Mx
    qHXHOPIA3Nm5Z4Mx
    RX1B6llNG3REKEGx
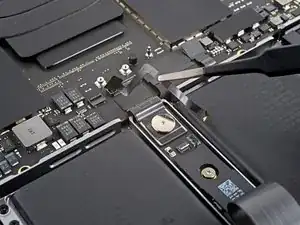
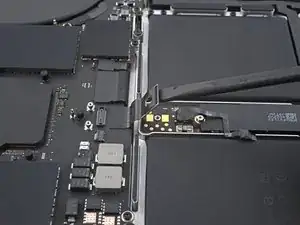
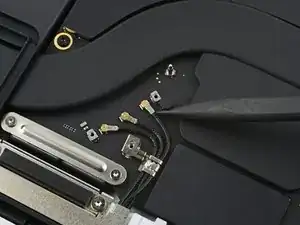
    • Entferne die drei 2,1 mm Torx T3 Schrauben, mit denen die Abdeckung der Antennenleiste-Leiterplatte und des Koaxialkabels am Rahmen befestigt ist.

  21. NISpyifFwBadkYRn
    NISpyifFwBadkYRn
    wAKrsORhDY21Sbuf
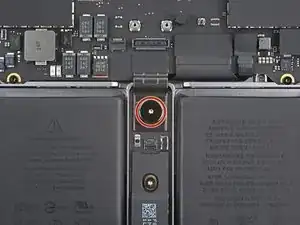
    • Entferne die Abdeckung über den Koaxialkabeln der Antennenleiste mit einer Pinzette oder deinen Fingern.

  22. QsvVGWDNUgWL2tAm
    QsvVGWDNUgWL2tAm
    kc1Tm3DP5RFVIoGJ
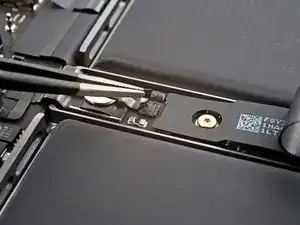
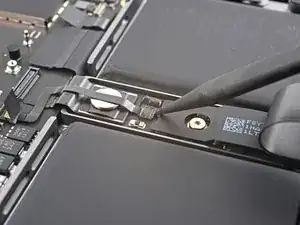
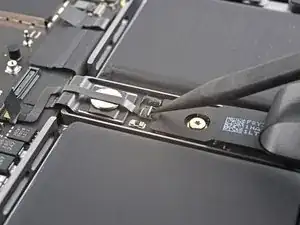
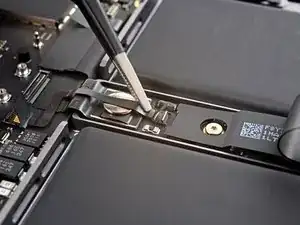
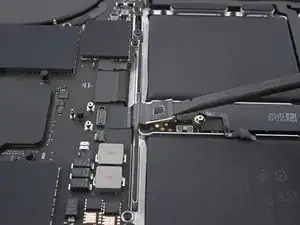
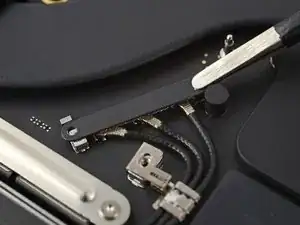
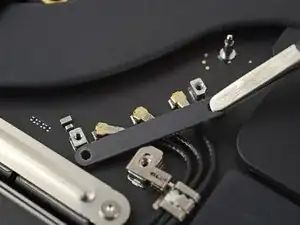
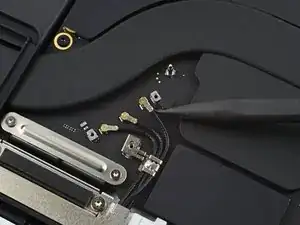
    • Heble das Koaxialkabel zur Antennenleiste mit der Spudgerspitze hoch und trenne es ab.

    • Wiederhole bei den anderen beiden Kabeln.

    • Beim Zusammenbau kann es knifflig werden, die Kabel wieder anzuschließen. Halte die Stecker einzeln nacheinander über ihre Anschlüsse und drücke sie mit dem flachen Ende des Spudgers nach unten. Die Stecker sollten dann einrasten.

  23. QG5nkErfOYmMPwfP
    QG5nkErfOYmMPwfP
    FYJGYThTWbXy3HOF
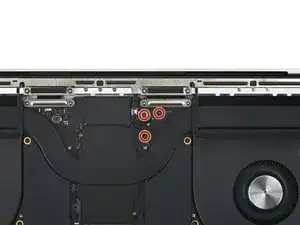
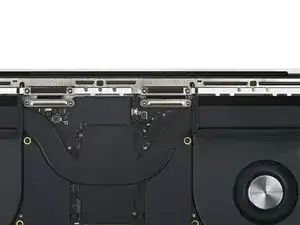
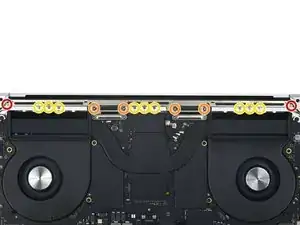
    • Entferne die sechs Torx T5 Schrauben, mit denen die Antennenleiste am Rahmen befestigt ist:

    • Zwei 7,5 mm Schrauben

    • Vier 3,0 mm Schrauben

    • Entferne die neun 1,5 mm P2 Pentalobe Schrauben, mit denen die Antennenleiste am Rahmen befestigt ist.

    • Die Köpfe dieser Schrauben können leicht rundgedreht werden. Drücke beim Lösen der Schrauben gleichmäßig nach unten und arbeite langsam.

    You should update all your guides that include these instructions. At least in my 2021 16" MBP, the screws described here as P2 Pentalobe ARE NOT P2 Pentalobe. P2 tools strip out the heads on these. Per the Apple manual, the actual drive type is 1 IPR. Wera makes one.

    felix4567 -

    On my 2021 16" the P2 worked great for these screws. No stripping. I'm sorry that happened to yours, Felix! Seems there might be some variants in the screws used.

    Quantum Mechanic -

    I had also P2 and T5.

    Klares -

  24. 4KXaRPXBXyemFIae
    4KXaRPXBXyemFIae
    QlWUGmx6FDGauRxp
    • Setze die Spudgerspitze zwischen die Antennenleiste und den Rahmen ein.

    • Heble mit dem Spudger, bis sich die Antennenleiste vom Rahmen löst.

  25. ewF6AEhufwb53IHS
    ewF6AEhufwb53IHS
    6QKNeMlitQ3K54vC
    • Ziehe die Antennenleiste gerade nach oben aus dem Rahmen heraus und entferne sie.

Abschluss

Vergleiche das Ersatzteil mit dem Originalteil. Möglicherweise musst du fehlende Bauteile übertragen oder Schutzfolien vom Neuteil abziehen.

Um dein Gerät wieder zusammenzubauen, folge den Schritten dieser Anleitung in umgekehrter Reihenfolge.

Entsorge deinen Elektromüll fachgerecht.

Lief die Reparatur nicht wie geplant? Probiere zunächst einige grundsätzliche Lösungen oder frage in unserem MacBook Pro 16" 2021 Forum nach Hilfe bei der Fehlersuche.

Alex Diaz-Kokaisl

Mitglied seit: 16/01/22

168562 Reputation

2 Kommentare

Is there a source for the 9 tiny screws that hold down the antenna bar? Your guide describes them as 1.5mm P2 screws. The Apple manual calls them 1IPR (part number 923-06856). I've reached out to Apple and they don't sell them.

felix4567 -

The screws described as P2 Pentalobe in the antenna bar removal step ARE NOT P2 Pentalobe fasteners! P2 tools strip out the heads on these. Per the Apple manual, the actual drive type is 1 IPR. Wera makes one.

felix4567 -