Einleitung

  1. fL4HNo1lPsrDb1rO
    • Bevor du das Kamerakabel abtrennst, musst du zuerst eine kleine Plastikhalterung, die auf dem Logic Board befestigt ist, zur Seite schieben.

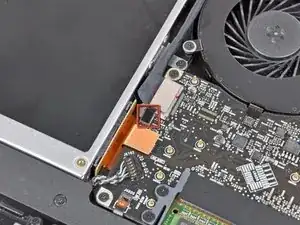
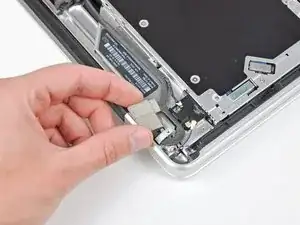
    • Verwende die Spitze eines Spudgers, um die kleine Kunststoffkabelhalterung von der Kamerakabelbuchse wegzudrücken, um genügend Spielraum zum Entfernen des Kamerakabels zu haben.

    This step does not apply to the A1297.

    Katherine Williams -

    Yes, as Katherine says, this does not seem to apply to the early 2011 model. The camera cable is instead attached to the logic board in the corner between the fan and the optical drive. You pull it out horiontally (and carefully, perhaps with help from the spudger tip at the "wings" on the end of the cable.

    Lami -

  2. xNVDxnvPenQ1WIjQ
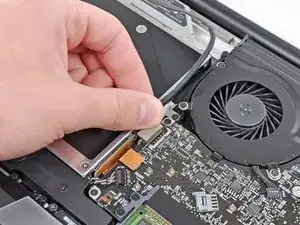
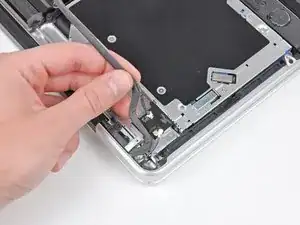
    • Ziehe das Kamerakabel in Richtung der Öffnung des optischen Laufwerks, um es vom Logic Board abzutrennen.

    • Der Anschluss des Kamerakabels ist sehr empfindlich. Übe keine Kraft nach oben auf diesen Anschluss aus, da er sonst vom Logic Board abbrechen könnte. Ziehe das Kamerakabel parallel zur Oberfläche des Logic Boards.

    • Bei den Modellen von Ende 2011 wird der Kamerastecker gerade nach unten in die Hauptplatine eingesteckt. Um diesen Stecker zu entfernen, hebe ihn vorsichtig gerade nach oben.

    My A1297 looks very different from this picture. The camera cable is not affixed with any plastic piece, it was a small blade connector that was at the top left corner of the mobo. It is removed by pulling it horizontally from the socket. It is my least favorite type of cable connection and the one most likely to be bent in the process (or the socket, be careful).

    maccentric -

    My mid2010 1297 was also different. Camera cable is per "step 7" here (http://www.shareyourrepair.com/2014/11/h...). Very very delicate.

    scottbernardis -

  3. 4yxJD4wJRo14Bh5s
    • Ziehe das Bluetooth-Kabel vorsichtig in Richtung der Lüfter, um es von der Bluetooth-Platine zu trennen.

    • Ziehe das Kabel parallel zur Oberfläche des optischen Laufwerks.

    Once again, this step, and the rest that follow regarding the bluetooth board, bears no resemblance to my A1297. Luckily, it looks like things have been made simpler. Remove the camera cable from it's socket, the bluetooth cable (flat, black, just shy of .5" wide), and the DVD cable from their sockets. Remove the screw from the top right side of the black plastic piece that holds the bluetooth board and all the skinny black cables. Remove the screw at the top of this piece that fastens to the hinge (look for the shiny metal). Then just lift that piece out of the way, remove the 3 screws holding the DVD in place, and you can pull the drive out (I just grab it by the orange cable and pull it out, but that's probably not the preferred method).

    maccentric -

    Again, also mid 2010 A1297, the large flat cable crosses the drive. Remove on logic board end by prying carefully "UP" away from the board. Step 8 here: (http://www.shareyourrepair.com/2014/11/h...)

    scottbernardis -

    I was switching the optical drive from my non-functioning 17" to my 15" (same early 2011 MBP) and I was confused, as the arrangement looked almost exactly like the arrangement in my 15" machine rather than what is pictured here. So one can follow the instructions for the 15" MBP here on iFixit instead if you don't recognise what you see!

    Lami -

  4. dykEom62YREuoSyW
    • Benutze das flache Ende eines Spudgers, um die dünne Kunststoffabdeckung von der Oberseite und den Seiten des Bluetooth-Platinengehäuses abzulösen.

    Is there any real need to remove these cables from the Bluetooth Board? Are you not able to simply conduct step 14 here instead, leaving cables in place, therefor not jeopardising integrity of the housing?

    Does the indicated Dual HDD housing replicate the holes found on the Optical Drive to allow this?

    Fletch Christian -

    mid 2010 A1297 again. Different configuration. I had a black plastic housing along this whole side. The large flat ribbon connects to it and I LEFT THE RIBBON IN PLACE on this housing. I removed 3 screws here to allow this black housing to be lifted off the drive and to the side, along with the camera line (held down by 3rd screw). When REPLACING this black housing after installation is complete, note there is a small tab on the disc slot side of the housing that needs to be inserted into a slot for correct placement. Then SKIP TO STEP 10 on this IFIXIT tutorial.

    scottbernardis -

    On the A1297, there is a 4” black bracket held by two screws. Remove those, a short and long one. The cable runs along the lower edge of the bracket and connects near the fan screw, near the optical drive connection. Remove that cable by print toward the optical drive in the direction of the cable, NOT UPWARDS.

    Katherine Williams -

  5. mMUpe3HjBQSGGtgh
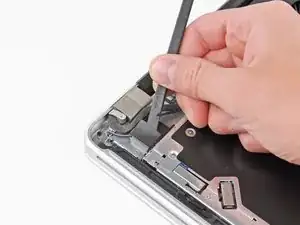
    • Benutze das flache Ende eines Spudgers, um den Bluetooth-Antennenstecker nach oben und aus seinem Anschluss auf der Bluetooth-Platine zu heben.

  6. 12YwqsCq22TxKYhC
    12YwqsCq22TxKYhC
    EmOuqEBZjJT6RmdS
    • Falls vorhanden, entferne das kleine Stück EMI-Schaumstoff in der Nähe der Bluetooth-Platine.

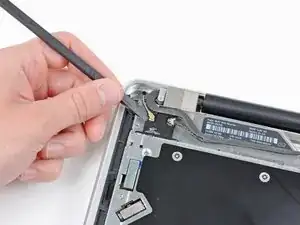
    • Führe das Kamerakabel aus dem Schlitz im Gehäuse der Bluetooth-Karte heraus.

  7. KqKruKOGSOMiKPtS
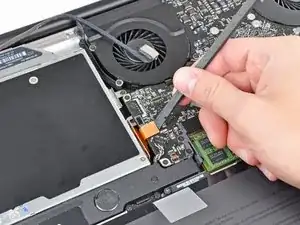
    • Heble den Stecker des optischen Laufwerks mit dem flachen Ende eines Spudgers nach oben und aus seinem Anschluss auf dem Logic Board heraus.

  8. GqN3KxB2rMQHLqCY
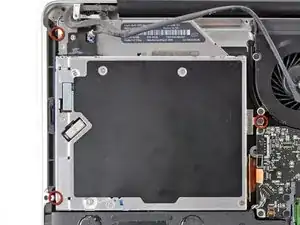
    • Entferne die drei 3,5 mm Kreuzschlitzschrauben, mit denen das optische Laufwerk am oberen Gehäuse befestigt ist.

    • Um die Schraube, die sich direkt neben dem Akku befindet, zu entfernen, kann es hilfreich sein, zunächst mit einem T6 Torx Schraubendreher die obere Gehäusehalterung direkt über dem Akku zu entfernen.

  9. NDUrggqg1qewMhDk
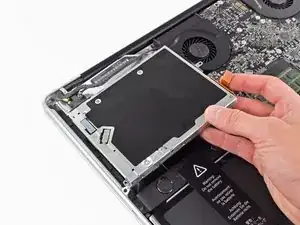
    • Entferne das optische Laufwerk aus dem oberen Gehäuse und achte dabei darauf, dass keine Kabel hängen bleiben.

Abschluss

Um dein Gerät wieder zusammenzubauen, folge den Schritten dieser Anleitung in umgekehrter Reihenfolge.

Andrew Bookholt

593241 Reputation

0 Kommentare