Einleitung
Benutze diese Anleitung, um das optische Laufwerk deines MacBook Pro zu ersetzen. Die Bluetooth-Platine und das Kabel des optischen Laufwerks sind nicht im Lieferumfang eines neuen optischen Laufwerks enthalten.
Werkzeuge
Ersatzteile
-
-
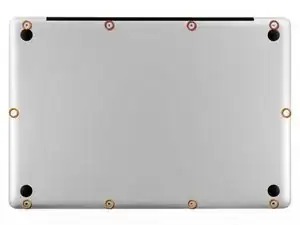
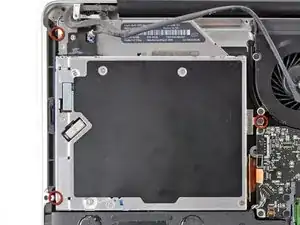
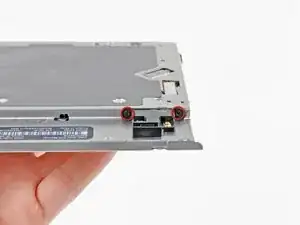
Entferne die folgenden 10 Schrauben, die das Gehäuseunterteil mit dem Deckel verbinden:
-
Drei 13.5 mm Kreuzschlitzschrauben
-
Sieben 3 mm Kreuzschlitzschrauben
-
-
-
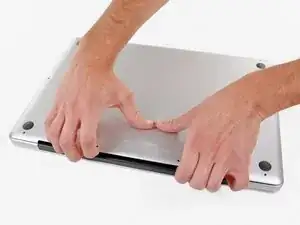
Zwänge deine Finger zwischen das Gehäuseunterteil und die Lüftungsschlitze und ziehe das Unterteil nach oben, um die Clips zu lösen, mit denen das Gehäuseunterteil am Deckel befestigt ist.
-
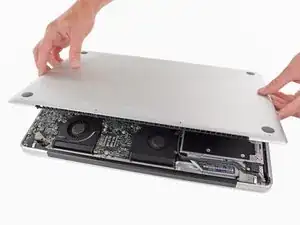
Entferne das Gehäuseunterteil.
-
-
-
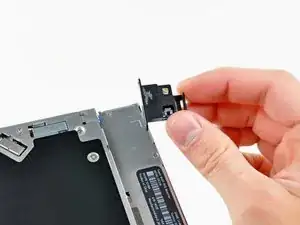
Falls vorhanden, ziehe die kleine Plastiklasche am Akkustecker gegen die Vorderkante des Geräts. Bei Modellen von Ende 2011 hat der Stecker keine Lasche und ist einfach direkt im Motherboard eingesteckt. In diesem Fall ziehe den Stecker gerade nach oben, um ihn zu entfernen.
-
-
-
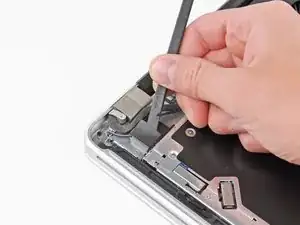
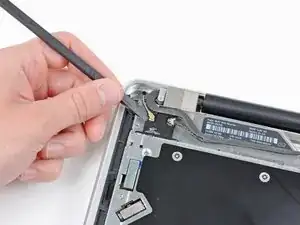
Verwende die Spitze eines Spudgers, um die kleine Kunststoffkabelhalterung von der Kamerakabelbuchse wegzudrücken, um genügend Spielraum zum Entfernen des Kamerakabels zu haben.
-
-
-
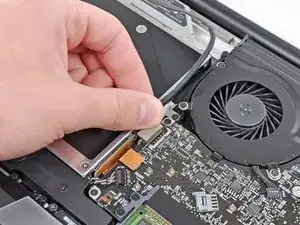
Ziehe das Kamerakabel in Richtung der Öffnung des optischen Laufwerks, um es vom Logic Board abzutrennen.
-
-
-
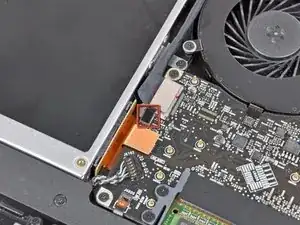
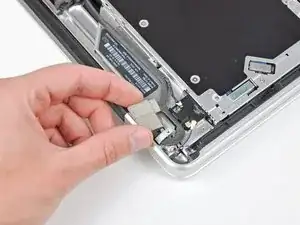
Ziehe das Bluetooth-Kabel vorsichtig in Richtung der Lüfter, um es von der Bluetooth-Platine zu trennen.
-
-
-
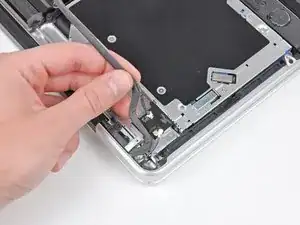
Benutze das flache Ende eines Spudgers, um die dünne Kunststoffabdeckung von der Oberseite und den Seiten des Bluetooth-Platinengehäuses abzulösen.
-
-
-
Benutze das flache Ende eines Spudgers, um den Bluetooth-Antennenstecker nach oben und aus seinem Anschluss auf der Bluetooth-Platine zu heben.
-
-
-
Falls vorhanden, entferne das kleine Stück EMI-Schaumstoff in der Nähe der Bluetooth-Platine.
-
Führe das Kamerakabel aus dem Schlitz im Gehäuse der Bluetooth-Karte heraus.
-
-
-
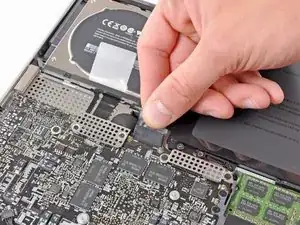
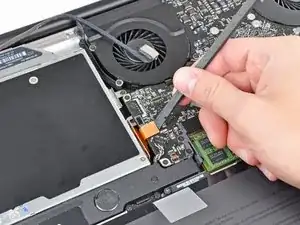
Heble den Stecker des optischen Laufwerks mit dem flachen Ende eines Spudgers nach oben und aus seinem Anschluss auf dem Logic Board heraus.
-
-
-
Entferne die drei 3,5 mm Kreuzschlitzschrauben, mit denen das optische Laufwerk am oberen Gehäuse befestigt ist.
-
-
-
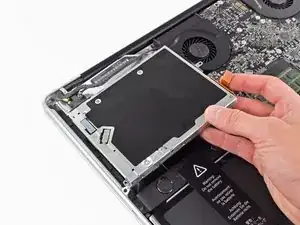
Entferne das optische Laufwerk aus dem oberen Gehäuse und achte dabei darauf, dass keine Kabel hängen bleiben.
-
-
-
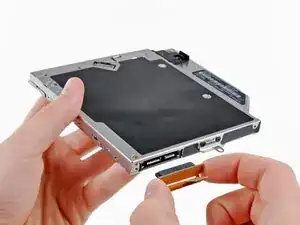
Fasse das Kabel des optischen Laufwerks am Stecker und ziehe es vom Gehäuse der Festplatte ab.
-
Entferne die beiden schwarzen Kreuzschlitzschrauben #0, mit denen die kleine Metallhalterung befestigt ist. Übertrage diese Halterung auf dein neues optisches Laufwerk oder Festplattengehäuse.
-
-
-
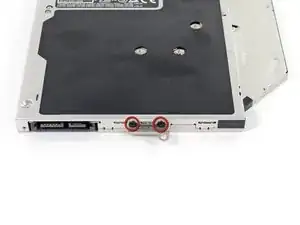
Entferne die zwei 2,2 mm Kreuzschlitzschrauben, mit denen die Bluetooth-Platine an der Seite des optischen Laufwerks befestigt ist.
-
-
-
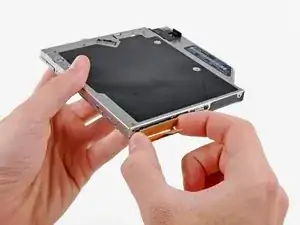
Entferne die Bluetooth-Platine aus dem optischen Laufwerk.
-
Übrig bleibt nun nur noch das optische Laufwerk.
-


Um dein Gerät wieder zusammenzubauen, folge den Schritten dieser Anleitung in umgekehrter Reihenfolge.

7 Kommentare
Not sure which Unibody model is pictured, but my Late 2011 17” looks entirely different from this one.
I’m attempting to replace the internal optical drive with optical bay hard drive enclosure on a Model A1297 MacBook Pro 17" Unibody, but the interior looks a lot different from this guide. Have you had any luck getting a correct guide for your model?
Great guide. Helped me to do it the first time without screwing anything else up in my Macbook Pro. Appreciate the hard work put into creating this site and hope it sticks around for a long time.
sardoggy -
Andrew/iFixit Team,
Do you know of any third-party blu-ray player/burner that can be used to replace the standard DVD Burner/Player? Thanks so much for any advise? All the best. - emil
I have installed a Matshita UJ167AM DVDRW/BDROM which is a direct replacement.
Working fine with MacGo Bluray player.
Haven’t got around to a Bluray burner yet, I just wanted to play bluray.
important to reassemble the "lower case" successfully: the threads of the seven 3mm phillips screws are drilled at an angle :-/
mysterioes -
Same issue with me. After reassembling my 13-inch and my 17-inch, one of the screws are sticking out ever so slightly. Very annoying, especially since I scratch whatever surface I'm on now.
Kyle Spadaro -
Very important note; this guide is NOT correct for the Macbook Pro 17" A1297 late '11.
The A1297 has an assembly adjacent to the optical drive, identifiable by 4 antenna connectors, 1 usb cable (with very small connector) and one PCI-e flat cable running across the optical drive.
I did not take pictures, but found one on the web. I'm very new to iFixit and have no idea yet on how to create a guide, but here's the picture showing the assembly on top (this pic only has 3 antenna wires, the A1297 has 4, but at least you'll know what to look for.
- carefully undo all connections and 2 screws
- remove the assembly and flip it over
- again carefully remove the shielding tape
- undo 3 tiny screws
- gently pry the airport card from the assembly (the flat cable will be a bit of a pain)
- reverse process with replacement card.
image can be found here:
https://dl.dropboxusercontent.com/u/2446...
Remon -
It helps if you mark the holes where the long screws go so you can easily find them when the time comes to button things up. Also, a little dish or custard cup to hold those tiny screws is essential.
Human -
3 x 13.5 mm screws are actually TWO different types! Return to EXACT SAME HOLES.
-I discovered this on my mid-2010, but from comments, sounds like it may affect other models as well
2 x 13.5 mm screws are pointed ends
1 x 13.5 mm screw is a FLAT end <- CORNER HOLE
These areTWO slightly different lengths, and must return to correct holes. If you put the flat end screw in the wrong hole, it will stick out slightly. If you put either of the pointed screws in the wrong hole, they will go in all the way, but will not catch threads, and will simply fall out when laptop is flipped back over.
scottbernardis -
I printed out the image above and taped each screw to the photo as I removed each one, just to make sure I put them in the right location.
Grace Morris -
This is a brilliant suggestion! I did this for all the steps that involved removing screws, numbered the sheets, and that made it very easy to put it all back together in reverse. Thanks!
Steve Adamczyk -
Be sure to use Loctite on the screws when re-attaching the bottom of the computer. The screws can and will fall out once they have been removed for repairs if you do not put Loctite on them when you reuse them. Otherwise, purchase new screws before repairing the computer as the new screws come with Loctite material on them. (I have personal experience with this problem.)
johnpartridge -
Be sure NOT to Buy this Battery from iFixit. I bought it from eustore.ifixit.com and the Condition of Battery is : Service Battery ,
from the &&^&^$^ first day.
Till today my battery Cycle Count is: 80.
I’ve tried everything as: Battery Calibration, resetting the SMC, PRAM, reinstalling the battery,
and Service Battery warning still there.
Just DO NOT BUY crappy, trash from here.
I have very bad experience.
Doruntin Koci -
Hi Doruntin,
we’re more than sorry to hear about your bad experience.
I’ll inform our customer service team who’ll reach out to you and offer either a replacement or reimbursement.
If ever you’d need assistance again, please feel free to directly write to eustore@ifixit.com, as comments are not regularly checked for service issues.
I’m confident that we’ll find the solution that suits you best!
Sandra Hiller -
PLEASE OBSERVE: The image of the left speaker used is NOT for a 2011 model. A 17inch MacBook Pro A1297 - LEFT SPEAKER + MICROPHONE - 2011 has IDENTIFYING NUMBER: Apple Part #:922-9821, 922-9822. And its COMPATIBILITY: 17 inch MacBook Pro Unibody A1297 - Early 2011 MC725LL/A 2.2 i7 - Early 2011 MC725LL/A 2.3 i7 - Late 2011 MD311LL/A 2.4 i7 - Late 2011 MD311LL/A 2.5 i7
kenneth krabat -