Einleitung
Kein Saft mehr? Tausche die MagSafe-Platine.
-
-
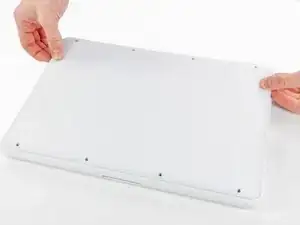
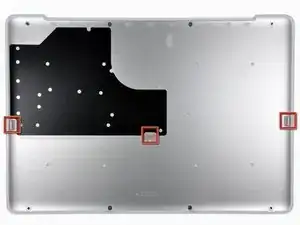
Hebe die untere Abdeckung vorsichtig in der Nähe der Lüftungsöffnung an.
-
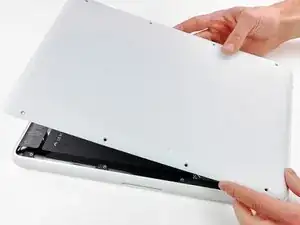
Öffne den Spalt weiter mit den Fingern, bis sich die Abdeckung von den verbleibenden Clips löst.
-
-
-
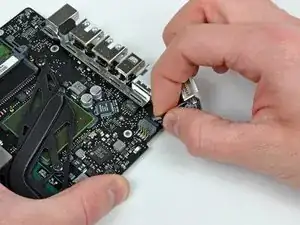
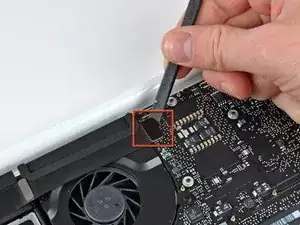
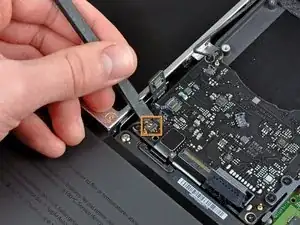
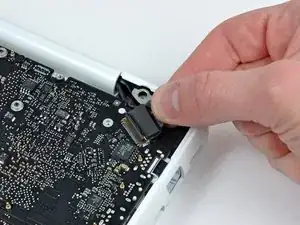
Hebe den Akkuanschluss mit dem flachen Ende des Spudgers aus seinem Sockel auf dem Logic Board.
-
-
-
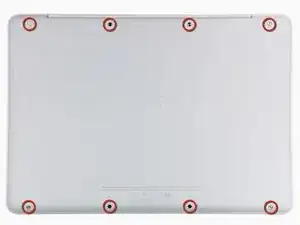
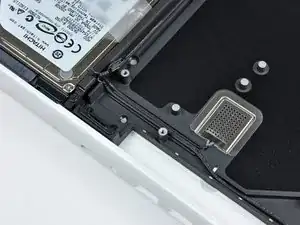
Entferne die folgenden Schrauben auf der Seite mit dem optischen Laufwerk am hinteren Lüftungsgitter:
-
Zwei 10 mm Torx T8 Schrauben
-
Zwei 5,2 mm Kreuzschlitzschrauben
-
-
-
Entferne folgende Schrauben von der Seite mit den Anschlüssen am hinteren Lüftungsgitter:
-
Zwei 10 mm Torx T8 Schrauben
-
Zwei 5,2 mm Kreuzschlitzschrauben
-
-
-
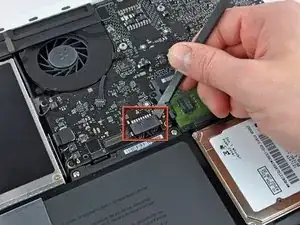
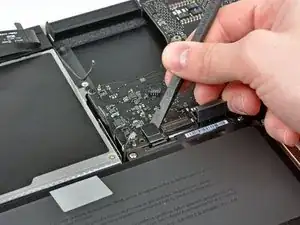
Benutze das flache Ende eines Spudgers, um das AirPort / Bluetooth-Flachbandkabel vom Logic Board abzulösen.
-
-
-
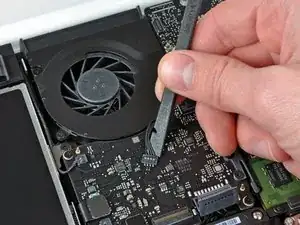
Heble den Lüfterstecker mit einem Spudger gerade nach oben ab und aus seinem Anschluss auf dem Logic Board heraus.
-
-
-
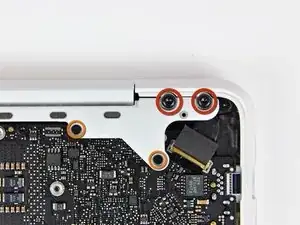
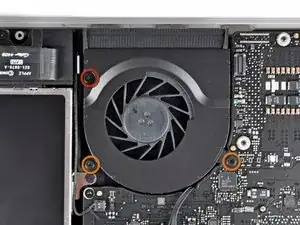
Entferne die folgenden drei Schrauben, mit denen der Lüfter am oberen Gehäuse befestigt ist:
-
Eine 7,1 mm Kreuzschlitzschraube
-
Zwei 5 mm Kreuzschlitzschraube
-
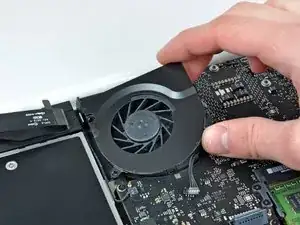
Hebe den Lüfter aus dem oberen Gehäuse.
-
-
-
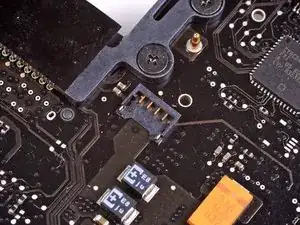
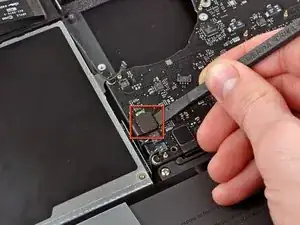
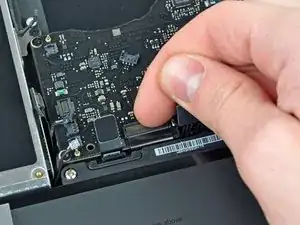
Löse den empfindlichen Stecker des rückwärtigen Lautsprechers vom Logic Board ab. Diese kleinen Stecker des rechten und linken Lautsprechers gehen leicht kaputt.
-
-
-
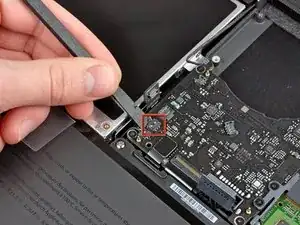
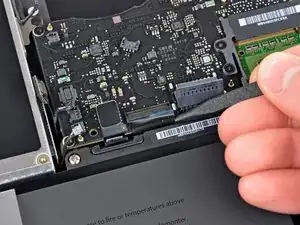
Benutze das flache Ende eines Spudgers, um den Stecker des optischen Laufwerks vom Logic Board abzulösen.
-
-
-
Benutze ein Spudger, um den Stecker des rechten Lautsprechers und den LED-Stecker für den Sleep-Modus vom Logic Board abzulösen.
-
-
-
Benutze das flache Ende eines Spudgers, um den Trackpad-Kabelstecker vom Logic Board abzulösen.
-
-
-
Klappe den Sicherungsbügel am ZIF-Anschluss des Tastatur-Flachbandkabels mit dem Fingernagel hoch.
-
Schiebe das Tastatur-Flachbandkabel mit der Spudgerspitze aus seinem Anschluss.
-
-
-
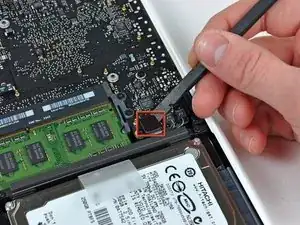
Benutze das flache Ende eines Spudgers, um den Stecker des Festplattenkabels vom Logic Board zu hebeln.
-
-
-
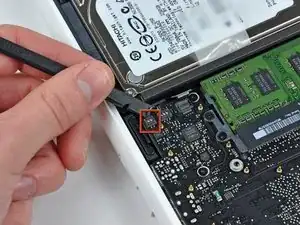
Benutze einen Spudger, um den linken Lautsprecherstecker und den Mikrofonstecker vom Logic Board zu hebeln.
-
-
-
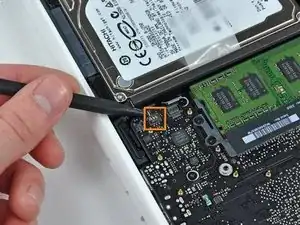
Fasse die Zuglasche aus Kunststoff, die an der Kabelverriegelung des Displays befestigt ist, und drehe sie in Richtung der DC-In-Seite des Computers.
-
-
-
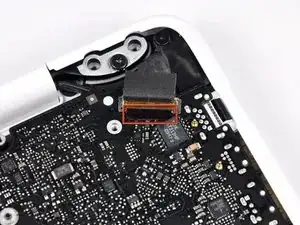
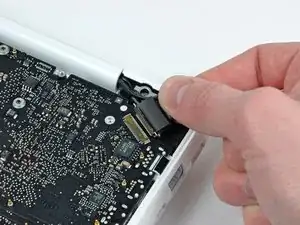
Ziehe den Stecker des Display-Datenkabels vorsichtig aus seinem Anschluss auf dem Logic Board heraus.
-
-
-
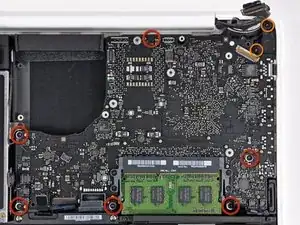
Entferne die sechs 4,1 bis 4,4 mm T6 Torx Schrauben, mit denen das Logic Board am Obergehäuse befestigt ist.
-
Entferne die beiden 4,1 bis 4,5 mm T6 Torx Schrauben, mit denen die MagSafe-Platine am Obergehäuse befestigt ist.
-
Bei einigen Modellen können dies Schrauben der Größe T7 sein. Achte darauf, dass du den Kopf nicht mit einem kleineren Bit beschädigst.
-
-
-
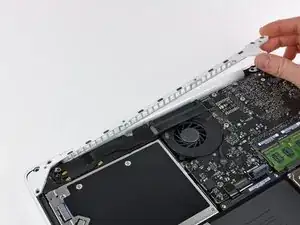
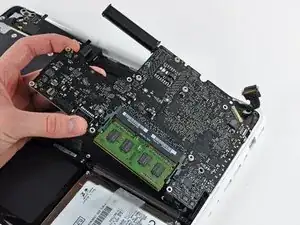
Hebe die Seite des Logic Boards, die den Anschlüssen gegenüberliegt, aus dem oberen Gehäuse heraus.
-
Drehe das Logic Board vom oberen Gehäuse weg, bis die Anschlüsse den Rand des oberen Gehäuses freigeben.
-
Ziehe das Logic Board und die MagSafe-Platine in einem Stück von der Kante des oberen Gehäuses weg.
-


Um dein Gerät wieder zusammenzubauen, folge den Schritten dieser Anleitung in umgekehrter Reihenfolge.

22 Kommentare
Excellent guide, very easy to follow, success!!!!
khoover -
I did it Success! Thank you very much!!!!
I had some problems after I reassemble all the parts, first the Macbook wasn't turn on, but I wait few seconds and it's turn on again. Second the key A on the keyboard not worked but I take off the ribbon cable of keyboard and put it on again and the keyboard worked normally.
This is my comment I hope that help someone.
Another excellent guide. Can be tedious. Good, bright lighting a must, and patience.
According to this page http://support.apple.com/kb/HT1651?viewl..., the 8 screws are not identical.
Can anybody tell me where each kind of screw is supposed to go?
Gregoire -
They are all 100% Identical. You were probably looking at a different model, or Apple has entered the wrong information... Hey, It happens...
Owen Davies -
The screws on the Late 2009 are identical. The blue lock compound might make tightening some require a little more effort.
svenaustx -
Can I replace it with a SATA 3 cable?
nm -
A1342 macbook does not have the right controller to support sata III
Owen Davies -
hi, i just got back from the apple store and they are really keen for me to upgrade to a new laptop since my battery is old and the screen is cracked, so glad i found ifixit i would love to upgrade this puppy! gonna make it a real sleeper! styler hall wrote about sticking 16 gb of ram in his a 1342 ? is this a simply mather of ordering 3 4gb sticks ?aslo i currently have 4 gb and would like to upgrade to 8 ( or indeed 16) does that mean i need to buy all new sticks or can i continue to use the old one and stick a new one next to it ?
thanks again mick van aar, perth western aus.
michelvanaar -
The A1342 will take up to 16 GB of RAM, however, there are only two RAM slots, so use two 8-GB RAM modules. Other World Computing (OWC) is a great reference source for info on exactly which RAM to use with which model; prices are usually much better on EBay though. Add an SSD from OWC and your machine will really scream!
I hope that helps!
gdesbrisay -
Gregoire is right. The 8 screws are absolutely NOT identical, I’m looking at them right now, weeowey weeowey.
John Guzman -
I just wanted to say that, in 2020, i used these instructions to replace the magsafe socket on my A1286, mid-2012, pre-Retina MacBook Pro. The internal layout is not quite the same but close enough for me to do the job. I skipped the steps of fully disconnecting the fans and speakers because of what others had said about breaking the sockets. it just meant I had to be extremely careful when lifting up the main board so that I did not tear and break the connections. I was able to disconnect the old magsafe socket with the board flat and in situ, but there was no where near enough room to be able to aline and press home the new par home. Reluctantly i had to lever up the board. This was difficult as there is a tapped post that holds a screw in the way close to where the USB sockets are, that prevented the board lifting up and out. I had to be quite forceful to manouevre the sockets out from the edge of the case.
Paul Burridge -
Gregoire的话确实没有问题,这八个小螺丝是五长三短,不是完全一致的
米酒喵qwq -