
Einleitung
Werkzeuge
-
-
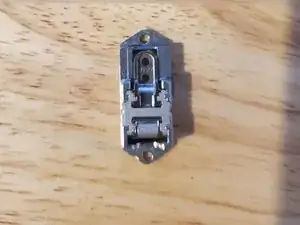
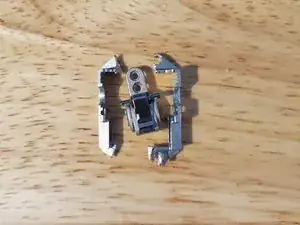
Entferne mit der Blechschere den Rahmen des Scharniers. Es sollten noch die Achse, der Gelenkmechanismus und die Platte mit den Schraubenlöchern übrig bleiben.
-
-
-
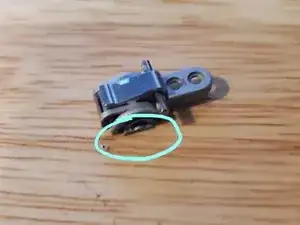
Nimm als Nächstes die Feile/Raspel und schleife die Kanten des Teils etwas ab. Diese Kante verhindert, dass sich der Bogen an der Seite in den Nuten des bereits im Computer installierten Rahmens bewegen kann.
-
-
-
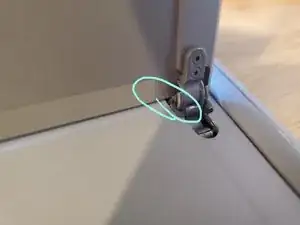
Setze nun das neue Scharnier zuerst mit der Achse in das Loch ein und verdrehe es, so dass die Achse richtig passt (du kannst das spüren) und der Bogen mit der Rundung überein stimmt.
-
Es kann etwas dauern, bis du genug von der Kante weg gefeilt hast, so dass alles komplett hineingeht.
-
-
-
Nun musst du beide Scharniere ausrichten, so dass der Aufsteller gerade steht und dann das neue Scharnier festschrauben.
-


Teste den Aufsteller.
6 Kommentare
Great John, it worked for me, this broken hinge had been annoying me for months and I am not super handy, thanks!
I am glad you found it helpful!
These instructions also helped me replace the left hinge on my Surface Pro (2017). Like some users, I utilize the kickstand to grip my Surface in tablet mode which may have contributed to the stress on these hinges. However, it was me 'forcing' the kickstand to nearly 180 degrees that 'broke the camels back'. After a few months of 'dealing with it', I got on-line to see if there's some solution to replace / repair this issue. I did locate quite a number of videos / threads utilizing some type of heat gun / pry tool to remove the screen before locating others showing this alternate method. The one item I did have to purchase was a T3 torx head to remove the kickstand. Leveraged a multi-tool i.e. leatherman, to snip the frame and then file down the 'side bits' of the hinge so it would 'fit/slide' into the track of the original frame installed on the device. Appreciate your time to share, save me some $'s and continue enjoying my Surface Pro (2017) w/ solid kickstand. :)
briteyz -
Literally perfect! Easy and quick, took like 10 minutes total. There's a great YouTube video that does something similar (youtu.be/HA2LtIwa9pU) but removes the new semi-circle bushing to use in the old hinge -- I prefer John's method of cutting the frame and replacing the whole hinge mechanism as it seems less fiddly, but the method of repair is the same, and the video has a bunch of great angles if you need some more clarification (the tab bit had me confused on first reading, but the video helped to clarify).
Also, the left/right hinge mechanism itself is seemingly generic (the frame is different but we're cutting it!), so don't worry about buying a left/right one -- just buy whichever is cheapest (on eBay they're different prices) and cut! The videos method could be good if you, let's say, have a black Surface but only can find silver hinges, as you'd only replace the bushing and NOT the whole hinge, if the colour mismatch would bother you.
All in all, great! Glad I can use it normally again. Cheers!
Kai -