Einleitung

Benutze diese Anleitung, um das Motherboard im Nexus 5X auszubauen.

Bei einigen Anleitungen ist der Akku bereits aus dem Handy ausgebaut. Du musst den Akku für diesen Vorgang nicht ausbauen.

Beim Wiederzusammenbau des Geräts brauchst du Austausch-Klebstoff, um die Komponenten wieder zu befestigen.

  1. hZuBjDNMirRpxDPW
    hZuBjDNMirRpxDPW
    JWDcUTTe2RHKb3Aw
    CyV6ZtdsOoQKFIlC
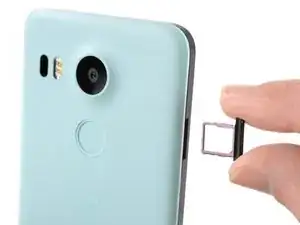
    • Setze ein Auswurfwerkzeug für SIM-Karten in das Loch im SIM-Kartenfach an der linken Kante des Telefons.

    • Drücke das Auswurfwerkzeug hinein, um das SIM-Kartenfach auszuwerfen.

    • Entferne das SIM-Kartenfach.

  2. ICCoMW16jfCrFbcn
    ICCoMW16jfCrFbcn
    sQxCgO3CGWjyHP2m
    MDAUADr5BeVSLDZl
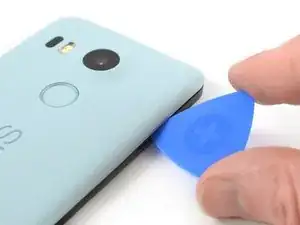
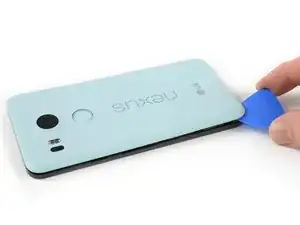
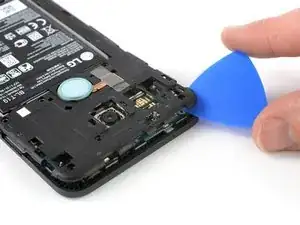
    • Setze ein Plektrum in die Öffnung des SIM-Karteneinschubs und verdrehe es zur Seite, um die erste Plastikklammer zu lösen, mit der die Rückabdeckung befestigt ist.

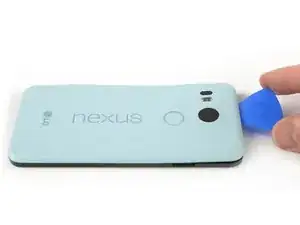
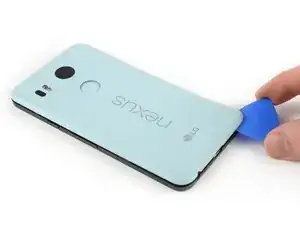
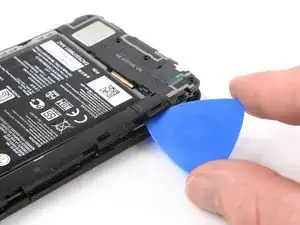
    • Schiebe das Öffnungswerkzeug um die Oberkante des Gerätes, um die Plastikklammer zu lösen, mit der die Rückabdeckung befestigt ist.

    A guitar pick is a good substitution for the plastic opening tool.

    Sam Sippe -

    Here’s a photo of the location of the 18 tabs that hold the back cover in place

    Steve -

    Twisting sideways didn’t do it for me, but sliding along the edge did. However, at first I didn’t realize that the pick was between the motherboard and midframe, rather than between midframe and back cover like it was supposed to. This led to breaking off a spring-loaded connector on the motherboard, connecting to an antenna (I guess) in the back cover. So far I haven’t noticed any reception issues, but I can’t say for sure.

    In essence: be careful to get the pick towards the back cover, and not “straight in” under the midframe.

    Hampus -

  3. afVYqSRSsfYK5iHi
    afVYqSRSsfYK5iHi
    pIWZAi2MnVlPLqqa
    WCXoRcGIOO46lSW1
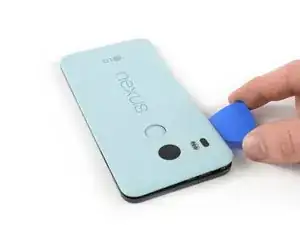
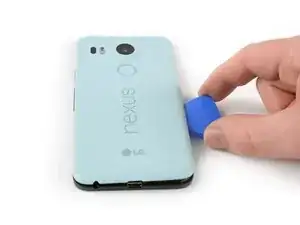
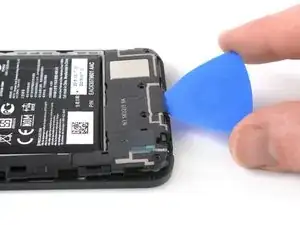
    • Schiebe das Plektrum um alle Seiten des Smartphones herum, um alle Klammern zu lösen, mit denen die Rückabdeckung befestigt ist.

  4. elaUMDhpoLaSyiLC
    elaUMDhpoLaSyiLC
    xC4oPmeXKWyCeJYD
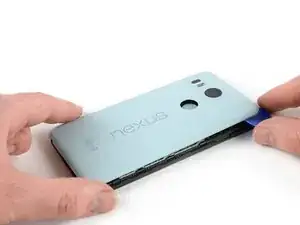
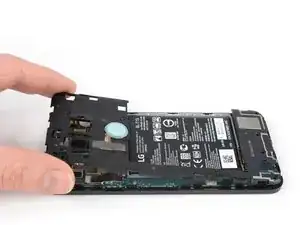
    • Kippe das Plektrum, um die Rückabdeckung ein wenig anzuheben.

    • Beim Fingerabdrucksensor befinden sich noch zwei weitere Plastikklammern. Löse sie, indem du die Rückabdeckung behutsam wegziehst.

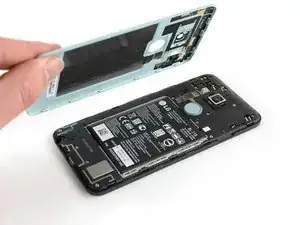
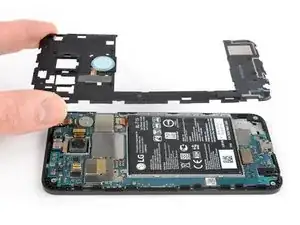
    • Entferne die Rückabdeckung.

  5. SLBb5Cl3QMGTDxxc
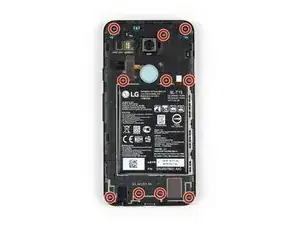
    • Entferne die zehn 3,6 mm Kreuzschlitzschrauben #000, mit denen der Mittelrahmen befestigt ist.

    Some models use a Y1 screw head.

    Kyle Wright -

  6. kbJbMKZvCYpi5Ym1
    kbJbMKZvCYpi5Ym1
    SBDl6Qt1OeRUcuOJ
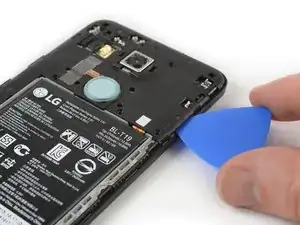
    • Setze ein Plektrum in den SIM-Karteneinschub ein. Drehe es zur Seite hin, damit sich die Kunststoffraste löst.

    The photo seems to show that the person is opening from the top, which is the opposite of your advice. So, just want to be clear.

    Robert Konigsberg -

    yes, open from bottom first... the pic above shows the finished product after reaching top of phone. I found it best to actually start close to the right of the usbC connector. Pushing inbetween the 2 tabs and up will release the shell.. then work clockwise.

    Chris Mayberry -

    Chris, your advice to start to the right of the usbC connector was excellent, thank you!

    Robert Konigsberg -

    I found that my middle panel was already broken at the narrowest part just to the left of the 2-D scan code on the battery, perhaps from some ham-fisted previous repair. This seems of little consequence, there do not seem to be any electrical connections running through this part.

    Wiley Sanders -

    After a long amount of prying, I discoved that, if used gently, a jimmy can really help get the plastic off

    Timothy Owens -

    I could not remove the cover with the opening tool but had success with the opening picks (the triangle parts). Just slide them under the cover and gently bend and twist the pick to release the cover from the locks. By the way: it’s perfectly normal for the bottom cover part to come loose from the top cover part. It’s designed that way (they interlock).

    Marco Miltenburg -

    Here’s a photo of the location of the 20 tabs that hold the middle assembly in place, and the pry angle needed.

    Steve -

    This is the scariest part but it is the same process of taking a bike tire off the rim: lift up one part of the cover then put a wedge under the lifted section to hold it up then continue around the frame lifting it up and holding it up with the blue picks. You’ll find that after you life the bottom you can wriggle free the rest by hand.

    The 10 screws came out quickly using the IFIXIT.com magnetic screwdriver.

    mcguinness.david -

  7. MPaVeGZ53Yant1bX
    MPaVeGZ53Yant1bX
    1EYFK4Jmr4ZkYCXc
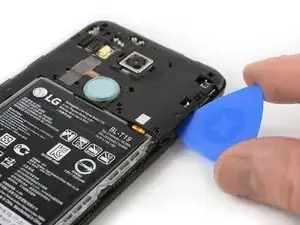
    • Schiebe das Plektrum weiter um den oberen Teil des Mittelrahmens, um die Plastikrasten zu lösen.

  8. UnqADRuHrCdSINRZ
    UnqADRuHrCdSINRZ
    LfjUs6JGfUqrEVjA
    • Öffne mit dem Plektrum die Plastikrasten an der langen Kante des Mittelrahmens und an der unteren Kante.

    • Stelle sicher, dass die Rasten an der langen Kante gelöst sind. Der Mittelrahmen kann hier leicht brechen, wenn die Rasten nicht richtig abgelöst sind.

  9. A65jPFCZQIiwZlZb
    A65jPFCZQIiwZlZb
    CLJTmiqEsupw21Yg
    • Stelle sicher, dass alle Rasten gelöst sind.

    • Entferne vorsichtig den Mittelrahmen.

  10. Ifqg6MTxcFQ6GQ2l
    Ifqg6MTxcFQ6GQ2l
    kgXBZmhgQmKKwHKW
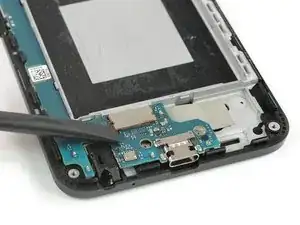
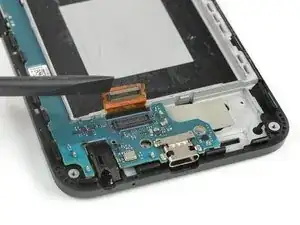
    • Verwende die Kante eines Spudgers, um das Akku-Kabel, welches sich unten rechts auf der Hauptplatine befindet, hochzuhebeln und zu trennen.

  11. axVqfYD2tec2WXJi
    • Erwärme einen iOpener und lege ihn zum Aufweichen des Klebers unter der Rückkamera 30 Sekunden lang über den oberen Teil des Smartphones.

  12. BCgJJxYea4AMXryY
    BCgJJxYea4AMXryY
    uTALNjGV5jgM2Pta
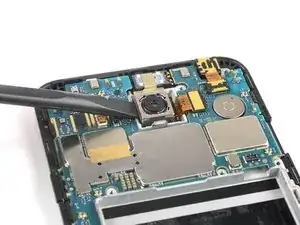
    • Setze das flache Ende des Spudgers unter die linke Seite der Rückkamera und heble sie behutsam hoch. Achte darauf, dass der Kleber darunter komplett gelöst ist.

  13. Q4WSU1CLq6G2ohJO
    Q4WSU1CLq6G2ohJO
    BoBefJarNxGS2uB1
    • Heble den Stecker am Displaykabel mit dem flachen Ende des Spudgers hoch.

  14. ELQpctHjOWCeMfBO
    ELQpctHjOWCeMfBO
    VJKB2euByKL26vqW
    lIZMZDbfm4XiVEVD
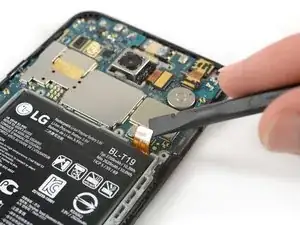
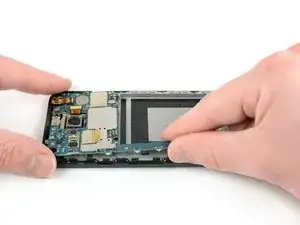
    • Fasse die Hauptplatine unten an und hebe sie vorsichtig hoch.

    • Die Hauptplatine ist in der Nähe der Rückkamera mit einer kleinen Kunststoffraste befestigt.

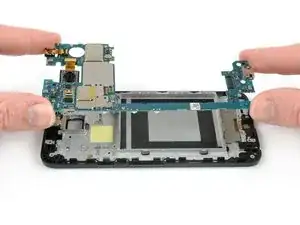
    • Ziehe die Hauptplatine behutsam zur Unterkante hin, so dass sie sich aus der Kunststoffraste nahe der Rückkamera löst.

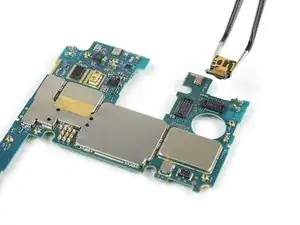
    • Hebe die Hauptplatine vorsichtig aus dem Rahmen heraus.

    • Vorsicht - die beiden Kameras sind immer noch an der Hauptplatine angeschlossen.

  15. qfeGKjQPJJinmbRV
    qfeGKjQPJJinmbRV
    AaOInUs55kSyjBVw
    TkZGkxVytofY3VNr
    • Führe die folgenden Schritte aus, wenn du die Front- und Rückkameras auf das neue Motherboard übertragen musst.

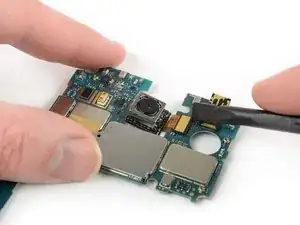
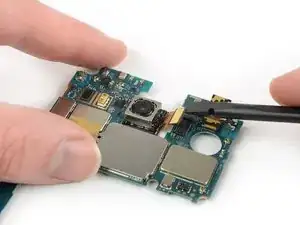
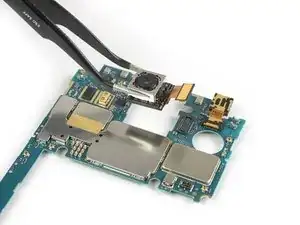
    • Benutze das flache Ende eines Spudgers, um den Stecker der Rückkamera vom Motherboard abzuhebeln.

    • Entferne die Rückkamera vorsichtig.

  16. 1NP3jo5E4FAVbG6H
    1NP3jo5E4FAVbG6H
    ZVsXLYsbUmDXDBfn
    LlLm1wVCoOcDaRCc
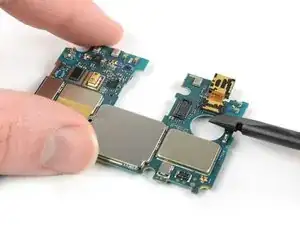
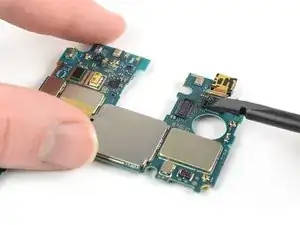
    • Verwende das flache Ende eines Spudgers, um den Stecker der Frontkamera vom Motherboard zu hebeln.

    • Entferne die Frontkamera vorsichtig.

Abschluss

Wenn möglich, schalte dein Handy ein und teste die Reparatur, bevor du neuen Kleber aufträgst und das Handy wieder verschließt.

Um dein Gerät wieder zusammenzubauen, befolge diese Anweisungen in umgekehrter Reihenfolge. Bringe beim Wiederzusammenbau bei Bedarf neuen Kleber an.

Hat die Reparatur nicht ganz geklappt? In unserem Forum findest du Hilfe bei der Fehlersuche.

Dominik Schnabelrauch

Mitglied seit: 23/11/16

235716 Reputation

40 Kommentare

Anyone with the bootloop problem has been successful on returning the 5X to life by replacing the motherboard?

Jago MF -

that's a stupid question. new motherboard means new operating system. maybe you should just use fastboot and flash stock firmware on your phone easy

Alek Kels -

where can I get a new motherboard at?????

Alek Kels -

in most 'google image boot' issues, it is a hardware issue, not software. besides, the phone will not allow a bootloader option.

Chris Mayberry -

yes …….and its the only way after bootloop

damneetsingh2000 -

yes…….and its the only way after bootloop

damneetsingh2000 -

same here! if anybody has luck fixing the bootloop problem by replacing the motherboard please let us know

joe -

hello, today my phone came out of service with bootloop problem . they changed the motherboard , now everything is good

Ioan Robicek -

Has the motherboard part been removed from the "Parts" section??? Not available for purchase anymore??? That would render this guide useless

Jago MF -

What do you mean by useless? Mobos from other suppliers require different take apart?

Emil Eriksson -

I had bootloops within the year of buying this phone but because the LG webpage RA system wasn't working I missed out by a couple days and they want to charge me $180 to repair the phone. They won't budge and I will never buy an LG again. Has anyone found replacement motherboards or fixed this phone?

Jacob Burger -

LG offered me free repair as long as there's no physical/cosmetic/liquid damage.

Warranty expired 20 days ago btw.

Riasat Abir -

my phone was 8 months out of warranty and they just fixed as if in warranty.

Tyson Washburn -

Hi Alek Kels - 12/23/2016 - "maybe you should just use fastboot and flash stock firmware on your phone easy"

How do I do this? I'm having the bootloop problem atm.

Thanks!

Sand.

Sando Kainth -

Don't worry about learning, because it is a hardware issue, not software. The phone will not boot proper past the fastboot.

Chris Mayberry -

It is probably a hardware problem. You can try redoing the software. It didn't work for me. You need to cook your phone. Sounds stupid right? But it works. One of the contacts for the ram or cpu is no longer good. Cooking it will melt the solder and fix it for at least a while. At least it worked for me.

I followed the instructions on a blog. Dev Alex - Oven fresh Nexus 5x.

Matt Johnson -

This is an age old fix for crappy solder points connecting to CPUs or GPUs (most notably in HP laptops). Disassemble the phone and heat the snapdragon chip with a heat gun for 10 seconds. The chip is beneath a metal shield that pops up with a flat screwdriver. I am working to complete this now.. .will let you know how it works.

Chris Mayberry -

..alot of work for a little action. Got the phone to boot after heating the CPU for 15sec, stayed on for 4 minutes before rebooting again. ~sigh~

Chris Mayberry -

Found this forum comment re the rebooting sequence fix...

"The LG G4, V10, and the Nexus 5X are all affected by the bonded flipchip substrate breaking off of the BGA package under the CPU, which usually manifests in bootlooping or screen corruption, and eventually a complete brick. It’s not solder related; the only way to fix it is by completely replacing the CPU package with one that isn’t defective. – FrankTheCat"

Chris Mayberry -

Flashing stock image doesn't work for everybody with the bootloop issue. In my​ case, I can reboot into bootloader and have already installed 3 different stock images successfully and am STILL getting stuck on bootloop. From what I've researched it does seem to be a hardware issue.

Thunor Odinson -

Hey my phone is continously restarting and a

Stucking at bootloop and sometimes it starts but gets restart

pranav g -

Trying the oven bake fix now, just started bootlooping. I'm not counting on it working for long, already ordered a pixel. Thanks for the great guide!

Stephen Moist -

Hi, I know is very complicated but, is it possible to get the data from old motherboard memory storage? any type of hack or something...

Manuel Ramirez -

put it in the freezer for about 20 mins

Tyson Washburn -

Where can i buy a new motherboard

Jochen -

How much it cost to replace motherboard of nexus 5x if it is not in warranty? and what is warranty period for newly replaced part?

Manisha Kulthe -

today i have gone to lg service center and they were askin for 12k rs. for mother board replacement but after bargaining they agreed at 6

damneetsingh2000 -

damneetsingh 2000 where is that service centre

uday -

I need a mother boad nexus 5x. From where can i get it

Nityananda Mondal -

Does anyone knows where I can buy the motherboard for my Nexus 5X.

Candy Beato -

Last day I’m using Facebook APPs suddenly phone are freeze with doesn’t work. When are phone restart display Appear in GOOGLE Logo then phone is OFF, that’s means bootloop problem. Now, I need a mother board LG Nexus 5X. Buy with from where can i get it.

Najmul -

STEP 4 photo, second window on the bottom of the phone from right, (between two red circles) there is little opening (there are few on phone) and there a little device looking as a spring or something. By replacing battery this thing felt off.

I was very careful not to damage anything, but still... so careful… Device looks like to be clued there, I would love to know what is it for, can someone help, please? it looks like a senzor or something

Zdenek Otcenasek -

do a websearch on repairing the nexus 5x bootloop… in the oven! I removed the shield from the side facing the screen, put flux all over especially the samsung chip, and baked it at 400F for 6.5 minutes - samsung chip side up, now the phone is working properly again, enough to backup all files. Eventually replacing samsung chip with new one will be necessary to get good solder contacts.

Shawn Foster -

Bootloop problem sorted!! Thanks OP

Robert Huddleston -

Dec 14, 2017:

Encompass Supply Chain Solutions is parts supplier for LG for the US East Coast time zone area.

Went to their parts web page for the Nexus 5x (LGH790) - https://lg.encompass.com/model/LGELGH790

Motherboard (refurbished) costs $270 and ships in 60 days.

mws3d -

Do you know if is it possible to change 16 Gb main board by 32 Gb mainboard?

Aymeric Golliaud -

hello damneetsingh 2000 ,where is that lg service centre.I also want to change my other board

uday -

i need to purchase the motherboard international

Jackson Makinda -

okay mr ifixit.

Jin Long Zheng -