Einleitung

  1. pya2ByPY3yFShbBb
    • Drücke beim Herausdrehen der Schrauben während der ersten zwei Umdrehungen (mit dem höchsten Drehmoment) den Schraubendreher sehr fest nach unten, bis die Schrauben gelöst sind. Wenn du das nicht tust, können die Schraubenköpfe beschädigt werden und du hast du Riesenprobleme, sie zu entfernen.

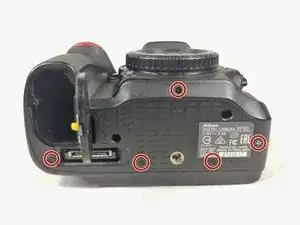
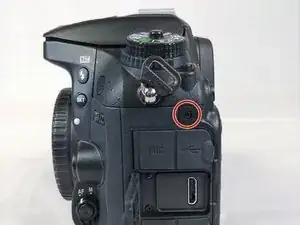
    • Entferne die fünf Schrauben an der Unterseite der Kamera mit einem JIS #000 Schraubendreher.

  2. kxJSNZycpJsO2bIe
    • Entferne die drei Schrauben unter der Batterieklappe und nimm die untere Abdeckung ab.

    There is an addition screw at the very top of the battery bay. If you don't remove this screw, you will damage the core body of the camera (Ask me how I know).

    Thomas Fons Revilla -

    Yes. There is another screw inside the battery bay. You save a lot of D7100 👍

    Tu -

  3. HJdsbtTj1leoNgYg
    • Entferne die 2 Schrauben im Inneren der Kamera an den hinteren Ecken.

  4. xIhuWZoKQYWphRsT
    • Öffne die HDMI-Klappe und entferne die beiden Schrauben.

  5. rEOFSU6rBJAZUsJF
    • Entferne die Schraube neben der Schlaufe des Kameragurts.

  6. PmdK2MktfDK2WBCv
    • Entferne die beiden Schrauben auf jeder Seite des Suchers.

    Only 1 screw on each side of viewfinder totaling 2 screws, 1 on the left and 1 on the right.

    Drew Creates -

  7. DpTaGEX5xRoQbeM4
    • Entferne die beiden Schrauben oberhalb und unterhalb der SD-Kartenklappe.

    becareful,might lose thread your screw.

    Yu Yu -

    the two screws under the car door turn very hard (D7200). I affixed a 25mm plastic (delrin) wheel on my JIS 00 + screwdriver for better torque. This worked.

    Bernard Delley -

    Step 7 might be skipped, if you just need to get at the LCD screen. This side panel with the car slits only supports the lower screw for the back panel in step 8. The back panel might lift off in step 10, without removing the side panel of step 7. If step 10 does not lift off, do step 7 preceding step 10.

    Bernard Delley -

    This step has 4 screws total. 2 above and 2 below. You throw off the screw count if you don't label each step correctly. Not a mistake but a bit of a play on words making a quick glance seem deceptive.

    Drew Creates -

  8. tQIRQtySkXxALeSj
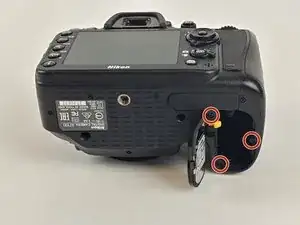
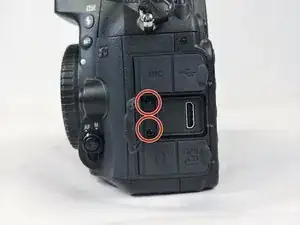
    • Ziehe die selbstklebende Lederabdeckung der Schrauben ab und entferne die beiden Schrauben darunter.

  9. YhhSLBNrxZ2WRyu5
    YhhSLBNrxZ2WRyu5
    uvPAqDocLXHZKXwn
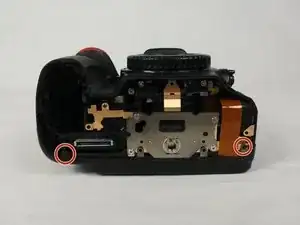
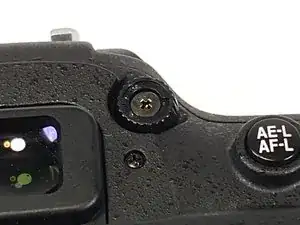
    • Entferne den Aufkleber für die Dioptrieneinstellung und die darunter befindliche Schraube.

    If you skipped step 7, you have to loosen the 4 step 7 screws by about 1mm to get the back panel off cleanly in the next step.

    Bernard Delley -

  10. 2y4g5XBfLyT1Y2bE
    • Löse die Rückwand der Kamera von der eigentlichen Kamera ab.

    • Achte darauf, dass keines der Flachbandkabel reißt.

  11. pMZJokwo2JY3DHbq
    • Trenne die LCD-Flachbandkabel und das Netzkabel vom Motherboard ab.

    Flip up the dark grey tab on the ribbon cable connector with your fingernail to release the clamp before removal. When reassembling ensure the cable is fully reinserted then push the tab back down to lock.

    Stephen Lipiec -

  12. tPpM1IocSfwUMHwi
    tPpM1IocSfwUMHwi
    qCY6auylwYGVmwss
    • Löse alle 16 Schrauben an der Rückwand der Kamera.

    This does not need to be done whatsoever for mode dial replacement. This is only needed if you are replacing the screen.

    Thomas Fons Revilla -

  13. ruFLetlUJgKrknoF
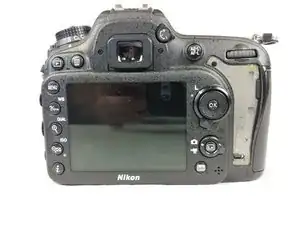
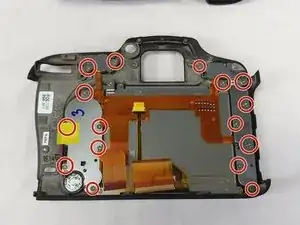
    • Löse dann die restlichen Schrauben, mit denen die Rückwand am LCD befestigt ist.

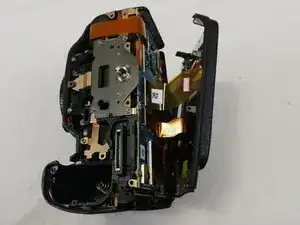
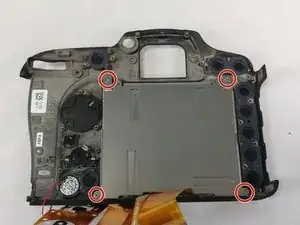
    • Nun kannst du einfach die Platte mit dem LCD entfernen.

    Are all the screws the same length / size ? Thanks

    trevee359 -

    Disassembling the D7200, the screen is glued to the frame but it can be carefully prised off using dentist’s hook, make sure you scrape of any old screen glass around the edge.

    a.brown.1 -

    When starting disassembly group each set of removed screws from each disassembly section and GROUP them, put an earbud cleaner or similar inbetween each group of screws to seperate them as you progress through the disassembly. Then you can work back in reverse when you have installed the new LCD screen. Remember to use a dust blower to remove flakes of the old LCD after installing the new LCD before starting to put the screws back.

    a.brown.1 -

    I used about 15 ziplocked bags to hold each step screws parts in. Having hard time removing's LCD glass from frame .

    John Burns Smiley -

    This does not need to be done whatsoever for mode dial replacement. This is only needed if you are replacing the screen.

    Thomas Fons Revilla -

Abschluss

Um dein Gerät wieder zusammenzubauen, befolge diese Anweisungen in umgekehrter Reihenfolge.

Wesley Eveld

Mitglied seit: 20/02/18

748 Reputation

9 Kommentare

I DID IT! A couple notes: 1) You don’t need to disconnect the ribbon cables from the body. I’m new to fine electronics repair like this and I didn’t want to mess around with more cables than necessary. 2) My body doesn’t have a plastic cover over the LCD (probably why it broke…) and as such I had to reallllly pry it off. 3) Learn how to reconnect ribbon cables - I had no idea.

Patrick O'Hare -

Are all screws the same size ?

trevee359 -

A couple of points. This is listed as a LCD display replacement. Says only said to buy tools… Need the LCD screen as well. No idea of cost or a link to buy same. Also, you do not show removing the screen and remounting. I appreciate all the instructions on screws, but do not feel this was complete. Thanks for your instructions to this point.

Carl Bryant II -

That’s very easy guide to understand. I hope to see a full guide for the Nikon D7200. thank you http://www.nikonbundle.com/nikon-d7200-b...

Deve Marko -

My replacement screen cost about £44 gbp pounds from China on Ebay. The main ribbon cable is released by flipping up the thin dark grey strip opposite the ribbon using a finger nail or plastic tool on the socket then you just gently pull the cable out, the thin cable is wee bit different, using a small screw driver or dentist tool just unclip and pull/push it down towards the thin ribbon cable then slide ribbon out. When all done clean the screen on the camera and fit a thin glass protector from JJC on ebay to give more protection.

a.brown.1 -

(D7200) My replacement screen cost about £44 gbp pounds from China on Ebay. The main ribbon cable is released by flipping up the thin dark grey strip opposite the ribbon using a finger nail or plastic tool on the socket then you just gently pull the cable out, the thin cable is wee bit different, using a small screw driver or dentist tool just unclip and pull/push it down towards the thin ribbon cable then slide ribbon out. When all done clean the screen on the camera and fit a thin glass protector from JJC on ebay to give more protection.

When disassembling, put the tiny screws into little groups with a separator., this will make it easier to reverse build, The power cable on the D7200 is only two ribbons - one thin one and a wide ribbon.

When removing the old screen it will be glued to the frame, use a dentists pick tool to carefully prise it out, then scrape any old left over glass out if any.

a.brown.1 -

Many thanks for a good clear guide! The only problem I had was reconnecting the ribbon cables. After a bit of research I found that you need to flip up the dark grey tabs on the ribbon cable connectors with your fingernail to release the clamps before removing the cables. When reassembling ensure the cables are fully reinserted then push the tabs back down to lock.

Stephen Lipiec -

what type glue holds the new screen in place.

John Burns Smiley -

Muy buena explicación yo tengo una Nikon d7500 y se quebró la pantalla espero que pronto puedan subir el mismo procedimiento para la d7500 muchas gracias por toda la información!

Tavo Contreras -