Einleitung

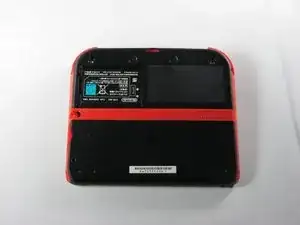
Auf der Hauptplatine befinden sich alle interen Stromkreise der Nintendo 2 DS. Zum Ausbau musst du sehr vorsichtig sein. Beschädige keine Schrauben, sie sind sehr schwer zu reparieren.

  1. wg4RTxdhgZNOVaab
    • Drehe die beiden unverlierbaren Kreuzschlitzschrauben am oberen Rückdeckel heraus.

    • Diese unverlierbaren Schrauben bleiben im Deckel hängen.

  2. cdb3AdyJTrNhIjrr
    cdb3AdyJTrNhIjrr
    okYxlIGDUBKBdGNP
    • Drehe den Deckel nach oben und nach außen um ihn zu entfernen.

  3. YA2mNvc2fLpeZ4NZ
    YA2mNvc2fLpeZ4NZ
    yjKMPFAO1SC1LncE
    HRaiAoWcVXEMByll
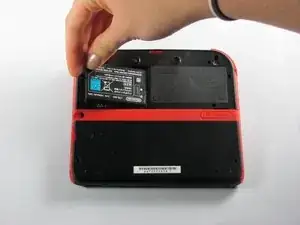
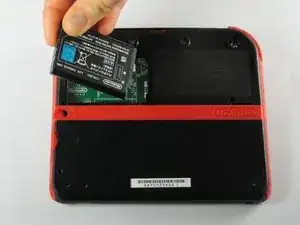
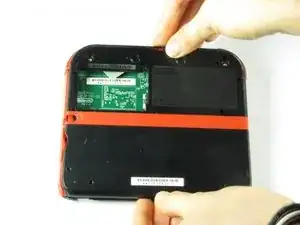
    • Entferne den Akku aus seinem Fach. Hebe ihn dazu an der Seite die direkt an der Außenkante liegt hoch.

  4. vkEjnCVvCfkcXpKn
    • Entferne die zehn Kreuzschlitzschrauben, mit denen die Rückabdeckung befestigt ist.

    Can't take off the screw top left next to the battery. What type of screwdriver do I use and where can I find some?

    Little Mac -

    I used a husky with changeable heads, you could probably find one on amazon

    Minecrafter Pig -

    These screws aren't Phillips, they're JIS, if you use a Phillips head you can and will strip the screws, please update this as it can cause more harm to people's systems than good if they get stripped.

    Sneakii -

    yep. i stripped my screws

    Persvicx -

    The screws are 6.2mm long

    Martin Samuelsson -

    god I thought it was because I was repairing a sibling's ds that had something spilled on it (idk maybe that they didn't clean it good when it happened) but continued to struggle even with screws that looked fine... wish I had checked the comments sooner :/ Please like the above, update this guide! It sucks knowing that someone like me is also gonna probably miss this. I didn't get super far but well. I already stripped down some which sucks either way. Ironically, I noticed that using a size slightly smaller gets the job done better. Ironic in that you'd normally avoid that because it's more likely to strip with small bits scrapping the inside. But if you are real careful it can hang on and twist. I'd recommend just getting the JIS but maybe this might work for some- I also want to emphasize SLIGHTLY smaller phillips.

    Alexandria.P -

  5. ona5d6XElywnV2F6
    • Die Rückabdeckung ist mit einem Flachbandkabel an der Hauptplatine verbunden. Entferne sie deswegen nicht zu weit vom Gerät.

    • Ziehe die Rückabdeckung vorsichtig vom Gerät weg nach oben.

    Y si se corta el cable que pasa?

    Laura Pernía López -

  6. fVKP4KxbkT6Fggne
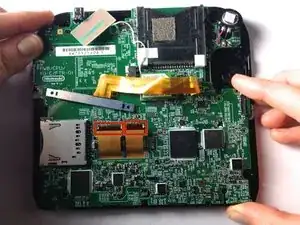
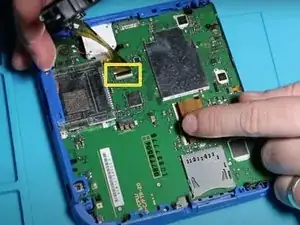
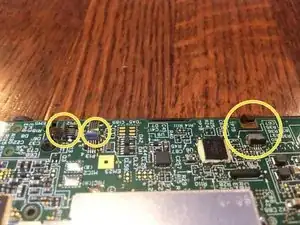
    • Klappe den Sicherungsbügel des Flachbandkabels mit dem Fingernagel oder dem flachen Ende des Spudgers hoch und ziehe das Kabel von der Hauptplatine ab.

    • Löse das Kabel aus dem Anschluss ab.

    • Nutze die Gelegenheit um gleich die rechte und linke Auslösetaste zu entfernen. Sie haben eine Feder und eine Achse, achte darauf diese Teile nicht zu beschädigen oder zu verlieren.

    You can also detach the cable from the motherboard safely by flipping up the connector on the motherboard. Just don't forget to reattach. Some will find this tedious but may save time if you know what you're doing with said connectors.

    Blackbeard -

    I agree, this is what the guide i followed said to do and since I was disconnecting all the other ribbon cables it made perfect sense to do it that way.

    Lin -

    pay attention: my 2ds dropped it's lens covers at this step

    Jos van Reenen -

    Likewise, I used a tiny drop of glue to put the lens back in place. Take care not to dirty the lens.

    Elliot West -

    The picture you have there has the camera lens ribbon installed upside down. The ribbon needs to be pointing down when you re-attach it not up.

    Rick Parrish -

    Agreed, ribbon cable looks upside down in picture

    Elliot West -

  7. hTml2euoIMtZJkd6
    hTml2euoIMtZJkd6
    OuYdgcEvDLpnQV5M
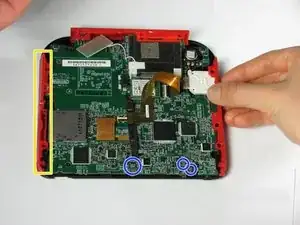
    • Fasse die Seitenleisten des Gehäuses mit den Fingern und ziehe nach außen, um sie zu entfernen.

    • Die Seitenleisten sollten sich mit wenig Kraftaufwand lösen lassen.

    • Ziehe die drei Flachbandkabel ab, bevor du weiterarbeitest. Im Bild sind sie schon entfernt.

    When reattaching during reassembly, take great care to ensure volume slider piece is correctly aligned with potentiometer tab on motherboard, otherwise volume control cannot be changed.

    Elliot West -

    The are two small metal pins in the bottom corners of the case, take care not to misplace them.

    Elliot West -

    The (3?) small ribbon cables on the bottom of the motherboard appear to already have been unplugged in this step. unplug them while unplugging the two large screen ribbon cables in step 10

    Lin -

    What are the three ribbon cable at the bottom are supposed to be. Pls

    Doom Guy447 -

    I have managed to remove the small ribbon cable in the centre but there are three others (the two shown here and then one by the joycon) that I need to unplug but I can't figure out how. The first one I did had the little black thing you slide away to release it but I can't figure out how to get the other three released

    Katie Bullock -

    I actually figured it out. for anyone else wondering, they grey centre piece can be lifted up like the black strip on regular sized ribbon cables

    Katie Bullock -

  8. 32gGatrJYXi2eqcW
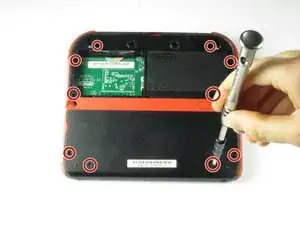
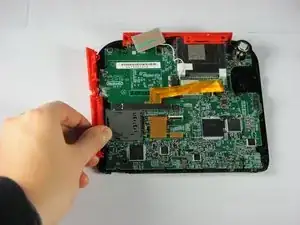
    • Entferne die zwölf messingfarbenen Kreuzschlitzschrauben, welche die Hauptplatine festhalten.

    • Sei dabei sehr vorsichtig und beschädige keine der Schrauben. Der Schraubenkopf ist leicht ausgefranzt, dann ist es unmöglich die Hauptplatine zu entfernen.

    • Das Schiebepad ist in diesem Bild nicht zu sehen. Keine Sorge, wir erklären das im nächsten Schritt.

    ...also in this step, the pictures show the analog stick disappearing without a step to remove its two silver screws.

    Roger -

    I was using a brand new 000 driver, and found that I needed to dull the tip of it in order to get a better grip on these tiny screws.

    marjames -

    I dont know if its just me but my gold mother board screws i had a few that just didnt fit right with a ph000. Maybe my screw driver is just garbage?

    Demon09 -

  9. drj5COHLRB5bNu4x
    drj5COHLRB5bNu4x
    a5TIRFcWDcCjkH4k
    QFD1osmhxQpPJTkF
    • Das obere Leiste kann entfernt werden, wenn die Hauptplatine losgeschraubt ist.

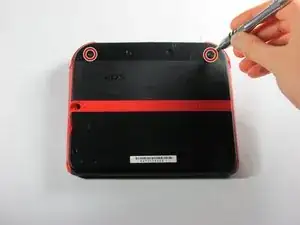
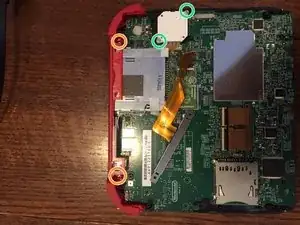
    • Zwei zusätzliche Schrauben sichern die obere Leiste. Drehe sie heraus, um diese Leiste ganz zu entfernen.

    • Zwei Schrauben befestigen die Montageplatte des Joysticks, sie müssen herausgedreht werden. (Achte auf das Flachbandkabel, es bleibt verbunden!)

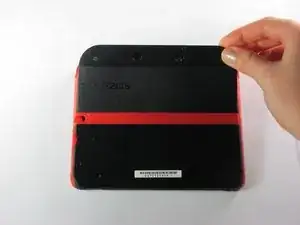
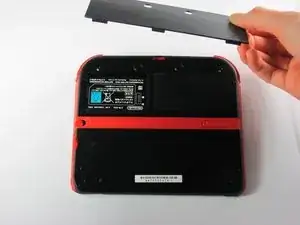
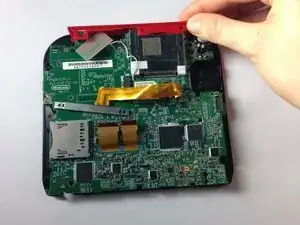
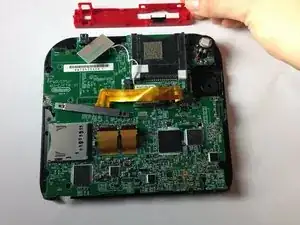
    • Fasse die obere Leiste mit deinen Fingern und ziehe sie vom Gerät weg.

    • Die obere Leiste sollte sich mit wenig Kraft leicht lösen lassen.

    There are two additional brass screws holding the top panel plastic on to the frame. They are 00 Philips and shorter than the ones securing the motherboard.

    Roger -

    When reassembling, take care to ensure all buttons, and rubber button pads are located correctly BEFORE securing the motherboard.

    Elliot West -

    Please double check what Elliot said. From experience: DON'T FORGET THE [SLEEP] SLIDER

    Phillipe Legenda -

  10. JKQgNplHbIPXEZdK
    JKQgNplHbIPXEZdK
    14GOAGZYrKXdPMfo
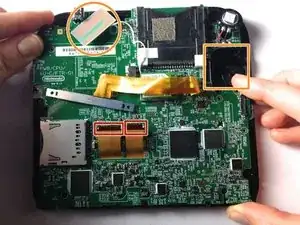
    • Löse die beiden Flachbandkabel, indem du die Klappstecker öffnest, die sie festhalten.

    • Hebe die rechteckige Platine oben weg und hebe das weiße Quadrat weg. Es handelt sich dabei um den Joystickmotor. (das braucht etwas Kraftaufwand). Beide bleiben mit der Hauptplatine verbunden.

    • Bei einigen Modellen musst du noch drei weitere kleine Flachbandkabel unten am Bildschirm lösen. Auch diese sind durch Klappstecker gesichert. SEI VORSICHTIG!

    • Fasse die Hauptplatine an den Seitenkanten an, hebe sie hoch und entferne sie.

    Don't forget to disconnect the two tiny ribbon cables on the bottom of the motherboard that attach to the microphone and home button.

    Roger -

    What happens if I can't get the ribbons to reattach? Is the board broke irreparably?

    Laurie Hutcherson -

    ...as well as the hidden 4-conductor ribbon cable on the upper right that connects to the analog stick.

    Roger -

    What about the top 2 wires

    briana1987be -

    Briana the 3 wires on bottom of board are covered under screen 2 step 10.

    goldenkenneth -

    y e e t y e e t m y d u d e s ! ! ! ! ! ! ! ! ! !!n ! ! ! ! ! ! ! ! ! !

    scoobert doobert -

    The replacement board that I’ve got has not got a grey plastic flip down ribbon cable retainer! How do I swap one from my old board?

    JoeStoner -

    The motherboard of my 2017(I think) 2DS is definitely laid out differently than in this guide, be careful.

    Matthew D. H. -

    Cosa succede se i connettori dei 3 piccoli cavi piatti si dovessero rompere??

    00 Jumpscare -

    How do I flip up the two ribbons ( need help desperately)

    Abbigail Brogden -

Abschluss

Um dein Gerät wieder zusammenzusetzen, folge den Schritten in umgekehrter Reihenfolge.

Fina Beauchamp

Mitglied seit: 12/01/15

3186 Reputation

13 Kommentare

o meu 2ds esta com um defeito que, quando eu aperto o botão de power ele liga e apos alguns segundo desliga e faz um pequeno barulho.

thiagopereira10000 -

Would a jis #000 screw driver work better? As i tried a ph +000 and the gold motherboard screws just dont fit right

Demon09 -

I have a question. After I replaced the mother board I have been having issues with it freezing after a couple mins running. Do you know why

briana1987be -

I have a similar problem. After I replaced mine it will not open any app, and it does not show the status bar. Does anyone know why?

Steve David -

Now that I've removed the motherboard, how do I fix it? The instructible is great as far as it goes, but it doesn't go far enough

Danielle Chester -

Fix what? You need to be more specific. I have to purchase a screen from China in order to fix mine.

goldenkenneth -

The SD slot of my 2DS is not functioning. Should I replace the complete motherboard?

Ingeborg -

I have a quarter inch metal pin left over. Don’t see it in any tutorials. Anyone know where it’s from?

Mikael Daugherty -

I have the same thing, It came out when I was removing the back panel. I believe it was located towards the bottom of the panel. I’m scouring forums to see where it goes. Found this on Youtube! https://www.youtube.com/watch?v=qjoPIt5K... looks like it is just a reinforcement pin for a lanyard in the bottom corners.

Kwag -

stripped all of my screws. Your screwdrivers suck $@$*. never buying again. &&^& you

Tony Son -

The picture of the camera piece being unscrewed shows it in the backwards position, which caused me some grief during reassembly.

jcryay -

where do i buy a motherboaRD

TheKnight Onix -

Depends on the country where you live. In Europe, some countries have apps (flesh market) where you will find used motherboards of Nintendo. (Wallapop, Vinted...)
For the rest of the world, you can try a l i e x p r e s s . c o m or similar.

Francisco Sánchez -