Einleitung

Zuerst musst du den Akku und den Rückendeckel entfernen. Dann gelangst du an den Joystick und kannst ihn reparieren oder reinigen.

  1. wg4RTxdhgZNOVaab
    • Drehe die beiden unverlierbaren Kreuzschlitzschrauben am oberen Rückdeckel heraus.

    • Diese unverlierbaren Schrauben bleiben im Deckel hängen.

  2. cdb3AdyJTrNhIjrr
    cdb3AdyJTrNhIjrr
    okYxlIGDUBKBdGNP
    • Drehe den Deckel nach oben und nach außen um ihn zu entfernen.

  3. YA2mNvc2fLpeZ4NZ
    YA2mNvc2fLpeZ4NZ
    yjKMPFAO1SC1LncE
    HRaiAoWcVXEMByll
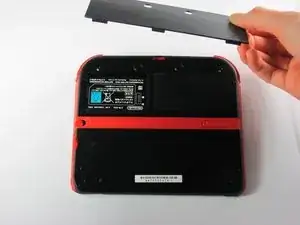
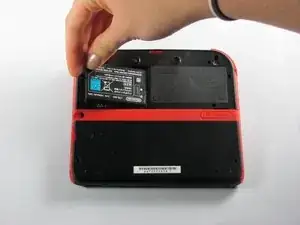
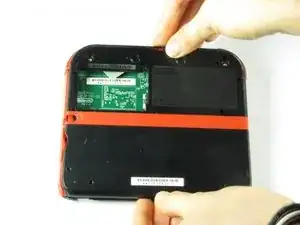
    • Entferne den Akku aus seinem Fach. Hebe ihn dazu an der Seite die direkt an der Außenkante liegt hoch.

  4. vkEjnCVvCfkcXpKn
    • Entferne die zehn Kreuzschlitzschrauben, mit denen die Rückabdeckung befestigt ist.

    Can't take off the screw top left next to the battery. What type of screwdriver do I use and where can I find some?

    Little Mac -

    I used a husky with changeable heads, you could probably find one on amazon

    Minecrafter Pig -

    These screws aren't Phillips, they're JIS, if you use a Phillips head you can and will strip the screws, please update this as it can cause more harm to people's systems than good if they get stripped.

    Sneakii -

    yep. i stripped my screws

    Persvicx -

    The screws are 6.2mm long

    Martin Samuelsson -

    god I thought it was because I was repairing a sibling's ds that had something spilled on it (idk maybe that they didn't clean it good when it happened) but continued to struggle even with screws that looked fine... wish I had checked the comments sooner :/ Please like the above, update this guide! It sucks knowing that someone like me is also gonna probably miss this. I didn't get super far but well. I already stripped down some which sucks either way. Ironically, I noticed that using a size slightly smaller gets the job done better. Ironic in that you'd normally avoid that because it's more likely to strip with small bits scrapping the inside. But if you are real careful it can hang on and twist. I'd recommend just getting the JIS but maybe this might work for some- I also want to emphasize SLIGHTLY smaller phillips.

    Alexandria.P -

  5. ona5d6XElywnV2F6
    • Die Rückabdeckung ist mit einem Flachbandkabel an der Hauptplatine verbunden. Entferne sie deswegen nicht zu weit vom Gerät.

    • Ziehe die Rückabdeckung vorsichtig vom Gerät weg nach oben.

    Y si se corta el cable que pasa?

    Laura Pernía López -

  6. fVKP4KxbkT6Fggne
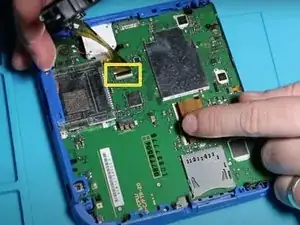
    • Klappe den Sicherungsbügel des Flachbandkabels mit dem Fingernagel oder dem flachen Ende des Spudgers hoch und ziehe das Kabel von der Hauptplatine ab.

    • Löse das Kabel aus dem Anschluss ab.

    • Nutze die Gelegenheit um gleich die rechte und linke Auslösetaste zu entfernen. Sie haben eine Feder und eine Achse, achte darauf diese Teile nicht zu beschädigen oder zu verlieren.

    You can also detach the cable from the motherboard safely by flipping up the connector on the motherboard. Just don't forget to reattach. Some will find this tedious but may save time if you know what you're doing with said connectors.

    Blackbeard -

    I agree, this is what the guide i followed said to do and since I was disconnecting all the other ribbon cables it made perfect sense to do it that way.

    Lin -

    pay attention: my 2ds dropped it's lens covers at this step

    Jos van Reenen -

    Likewise, I used a tiny drop of glue to put the lens back in place. Take care not to dirty the lens.

    Elliot West -

    The picture you have there has the camera lens ribbon installed upside down. The ribbon needs to be pointing down when you re-attach it not up.

    Rick Parrish -

    Agreed, ribbon cable looks upside down in picture

    Elliot West -

  7. OA3KY2vYVXvmDlIj
    OA3KY2vYVXvmDlIj
    xhqkQD6RicMmTXgP
    • Entferne die Auslösetaste in der rechten oberen Ecke , indem du sie nach oben und außen ziehst.

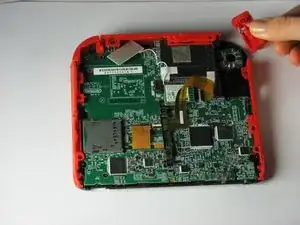
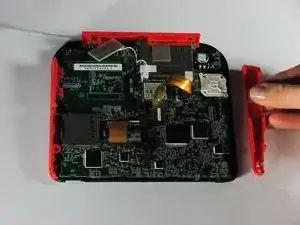
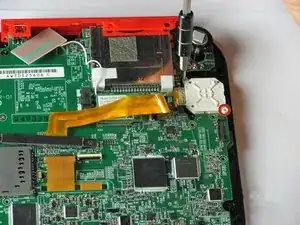
    • Entferne die rote Seitenleiste, indem du sie nach außen ziehst.

    I recommend not removing the right trigger. I didn’t find it necessary and I hard a hard time getting the spring lined up again.

    Tyler Schommer -

  8. VqvqpHxnUj2YUAOW
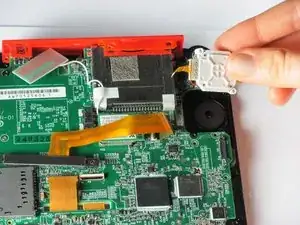
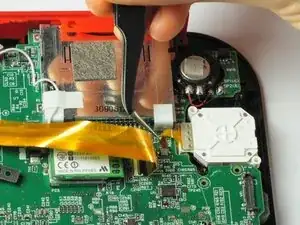
    • Öffne mit einem Spudger die graue Sicherungs am ZIF Verbinder des Flachbandkables zum Joystick. Heble an der Seite des STeckers gegenüber dem Kabel gerade von der Hauptplatine weg.

    • Lasse das Kabel vorsichtig gerade aus dem Anschluss herausgleiten.

  9. yxAc6pZGAtvbZiMg
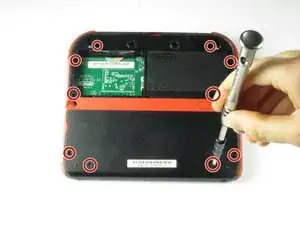
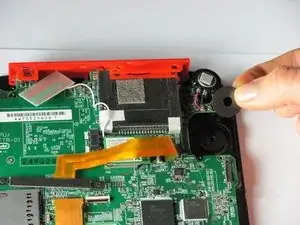
    • Entferne die beiden 7,8 mm langen Kreuzschlitzschrauben in den Ecken der weißen Joystickabdeckung.

    These screws are 7.8mm tall

    Martin Samuelsson -

  10. PAeyOJ6nwJPS2x1P
    PAeyOJ6nwJPS2x1P
    adcYyWtwuAunNC1v
    • Entferne die Joystickabdeckung. Sie sollte sich leicht lösen lassen.

    • Entferne die Unterlegscheibe unter der Joystickabdeckung.

    I completed the tutorial but my stick is now drifting by itself and I’m afraid to open it up again and try because the screws, it seems, are damaged from scratching it too much. It’s been like that for at least a year

    ImTHATGuy 500 -

Abschluss

Um dein Gerät wieder zusammen zu setzen, folge den Schritten in umgekehrter Reihenfolge.

Fina Beauchamp

Mitglied seit: 12/01/15

3186 Reputation

12 Kommentare

My ribbon cable is broke, Is there a way to fix it?Thanks.

Deez Smith -

When I put the circle pad back in, my 2DS thinks that I am holding up and right on it, when in reality it is in the neutral position. Please help.

CraftedGamer 1170 -

Use the calibrate option in system settings. Also make sure the cable is connected nicely.

Jilvenhong Dickinson -

Recalibrate it in system settings.

Artemy Matveev -

The guide fails to mention that the joystick ribbon cable is locked into the motherboard. You can use a spudger to lift the grey tab, leveraging upwards on the side opposite of the ribbon cable. The tab will pop up and should make getting the ribbon cable out (and back in) easier.

I followed this guide and ripped the ribbon cable while attempting to get it connected back to the system. If I had known the grey tab unlocks, I might not have ripped the cable by trying to force it back under the pins. My iFixit tweezers were also very sharp, and may have cut the ribbon cable. Would anyone be able to recommend something gentler for the ribbon cable?

Ryan G -

@ryango This looks like an oversight on the part of the guide author. I’ve updated the text with (hopefully) better instructions. Sorry it led to tearing your cable. :( That looks like a pretty standard ZIF connector, and once unlocked, it should disconnect and reconnect with minimal force. Personally when working with ribbon cables I prefer blunt-nose tweezers, but it sounds like your tweezers weren’t at fault here. Thanks for the heads-up, and better luck with your next repair.

Jeff Suovanen -

I replaced my analog stick, but it has the same problem, when i turn on the system, the cursor go crazy and then stops, i can move only left and right, no up and down with two different analog sticks…so, it’s not a analog problem, do u have any idea on how to fix it? thank you

Emiliano Tricase -

Try recalibrating it, I guess. After that, let me know how it is? I might find another possible solution.

INFJ Blog -

A bit nervous to try this, do I have to detach the ribbon cables?

INFJ Blog -

So mine doesn't have the gray tab. Any help with that?

jeff why not? -

I've found that a Phillips #000 Screwdriver works better.

Raymond Trinh -

Will iFixit be selling the parts for this repair ever again?

Noboru Garcia -