Einleitung

Tausche das untere LCD und die Action kann weitergehen.

  1. LIHVnXkBLxLAmFX2
    LIHVnXkBLxLAmFX2
    McyatAIFRiH6Rv4V
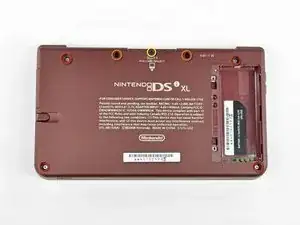
    • Der Akkufachdeckel ist mit zwei Kreuzschlitzschrauben am Game Boy befestigt. Drehe sie heraus.

    • Hebe den Akkufachdeckel ab.

    rust/white powder built up on a screw and can’t unscrew it

    Eco -

  2. hBMGuXT2UL1NcEKT
    • Hebe den Akku aus dem DSi XL.

  3. DRCcParl5UWTDqOO
    DRCcParl5UWTDqOO
    qXCWLlKGCyOoljVu
    oQRGOhTofiyOef4m
    • Heble die vier Gummiabdeckungen über den Schrauben mit einer Stecknadel hoch und löse sie ab.

  4. YcQNLo2uDR3P3KJC
    • Entferne folgende sieben Kreuzschlitzschrauben, mit denen das Gehäuseunterteil am restlichen DSi XL befestigt ist:

    • Vier silberne 5,3 mm lange Schrauben

    • Zwei schwarze 5,3 mm lange Schrauben

    • Eine schwarze 2,5 mm lange Schraube

  5. BIoYTWlcpQx4cZga
    BIoYTWlcpQx4cZga
    I3ZXKSQk1qDftZHn
    b2CwNLS1EvGSWnR1
    • Drehe den DSi XL herum und öffne das Display.

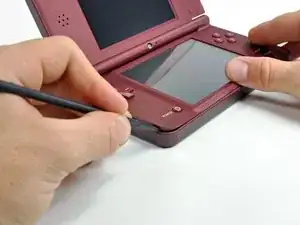
    • Setze einen Spudger in der unteren linken Ecke zwischen dem oberen und unteren Gehäuseteil des DSi ein.

    • Schiebe den Spudger an der Unterkante des oberen Gehäuseteils entlang und löse die Rasten, mit denen die Gehäuseteile verbunden sind.

  6. nvmvFhfB3IbyUrOD
    nvmvFhfB3IbyUrOD
    2wFkRA6UCXfYgxSC
    • Klappe das Display zu und drehe den DSi XL herum.

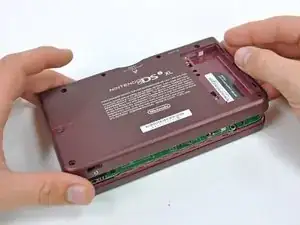
    • Hebe das Gehäuseunterteil an der Vorderkante hoch.

    • Klappe das Gehäuseunterteil vom DSi weg.

    • Das Gehäuseunterteil kann noch nicht ganz entfernt werden, es ist immer noch an der Hauptplatine angeschlossen.

  7. naXc3O2Ktm5rO2Tl
    naXc3O2Ktm5rO2Tl
    LOmEVuXMuOgKawjX
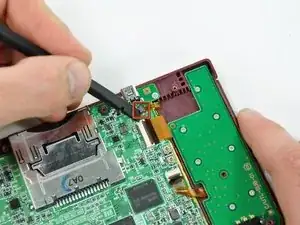
    • Heble den Stecker der SD-Karte/rechten Schultertaste mit einem Spudger aus seinem Anschluss heraus.

    • Heble den Stecker der Lautstärketaste/linken Schultertaste mit einem Spudger aus seinem Anschluss heraus.

  8. qciNW2dOo4PEbbfx
    qciNW2dOo4PEbbfx
    yUJPXjZRtt3IRaMN
    • Hebe die Wi-Fi Platine aus ihrem Anschluss auf der Hauptplatine heraus.

    • Entferne die Wi-Fi Platine noch nicht ganz. Sie ist noch durch das Antennenkabel mit der Hauptplatine verbunden.

  9. 33IPcDJ2Lje5wL1q
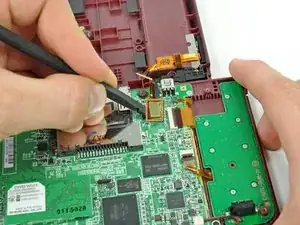
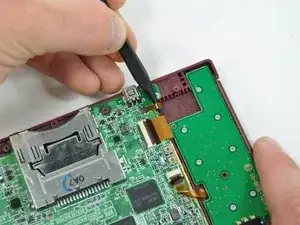
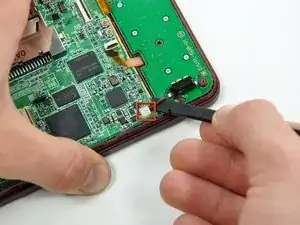
    • Heble das Antennenkabel mit einem Spudger aus seinem Anschluss auf der Unterseite der Hauptplatine ab.

    Can I use any other tool than a spudger?

    Noe -

  10. DJ3aECMoHqWrwWgx
    • Heble das Mikrofonkabel mit dem Spudger von der Hauptplatine ab.

    • Heble auf der Unterseite des Kabels.

    Note that the WiFi board has already been removed here! Including this extra step would be convenient here '-)

    Sjoerd Hulshof -

  11. GIjmrSM1o4Clk3WZ
    GIjmrSM1o4Clk3WZ
    dVBKk4rPaolikZho
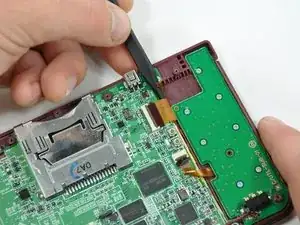
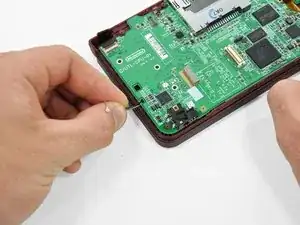
    • Klappe den Sicherungsbügel am ZIF-Anschluss des Kamerakabels mit dem flachen Ende des Spudgers hoch.

    • Ziehe das Kamerakabel mit der Spudgerspitze aus dem Anschluss heraus.

  12. jULSjpBoaQdNtVE4
    jULSjpBoaQdNtVE4
    KfuXRIrOR2HCDGi4
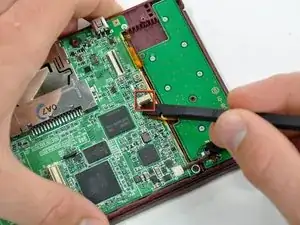
    • Klappe den Sicherungsbügel am ZIF-Anschluss des Touchscreenkabels mit dem flachen Ende des Spudgers hoch.

    • Ziehe das Touchscreenkkabel mit der Spudgerspitze aus dem Anschluss heraus.

  13. Itb5IDLLhYO625ut
    Itb5IDLLhYO625ut
    rcPvgusrkhpK4Roc
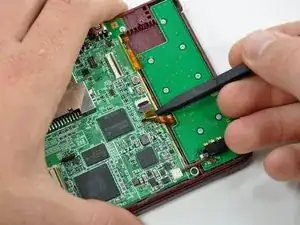
    • Klappe den Sicherungsbügel am ZIF-Anschluss des Kabels der Hintergrundbeleuchtung mit dem flachen Ende des Spudgers hoch.

    • Ziehe das Kabel der Hintergrundbeleuchtung mit der Spudgerspitze aus dem Anschluss heraus.

  14. ZfjtZBdkTOorxXsu
    ZfjtZBdkTOorxXsu
    ZMWuTQfrnRTEjkYU
    • Klappe den Sicherungsbügel am ZIF-Anschluss am Datenkabel des unteren Displays mit dem flachen Ende des Spudgers hoch.

    • Ziehe das Datenkabel des unteren Displays mit der Spudgerspitze aus dem Anschluss heraus.

    -This is where you can replace the charger port. i may change this comment later from May 21-June 5

    Artemy Matveev -

  15. IVS53wyRXhabZeMG
    IVS53wyRXhabZeMG
    u5DepNx2ReGZxKMq
    • Klappe den Sicherungsbügel am ZIF-Anschluss am Kabel zum Steuerkreuz/zur Einschalttaste mit dem flachen Ende des Spudgers hoch.

    • Ziehe das Kabel zum Steuerkreuz/zur Einschalttaste mit der Spudgerspitze aus dem Anschluss heraus.

  16. S6MyOrlhJq5J1jn3
    • Heble das Akkukabel mit dem flachen Ende des Spudgers aus seinem Anschluss auf der Hauptplatine nach oben.

    The battery connectors (socket) on the mother board are extremely fragile, so care should be taken to avoid breaking them.

    Other than this, the instructions given are precise and straighforward. I do agree with the other comments about step 20.

    Paulette Williams -

    Be careful with the battery cable, I ripped the entire socket off with little force.

    Joel Griggs -

  17. KRmwdgntnPUfXxPT
    • Entferne die fünf Kreuzschlitzschrauben, mit denen die Hauptplatine am Gehäuseoberteil befestigt ist:

    • Eine einzelne silberne 2,5 mm lange Schraube

    • Vier 3,7 mm lange schwarze Schrauben

    the battery connector was (for me) extremely hard to remove. I broke the socket completely off the board hand had to hard solder it directly back.

    Rohan Grant-Dawes -

    On Step 17, I only had the 3 black Philips screws on the left to remove.

    bfmackin -

  18. dT1iKAsnLJji6Jks
    • Führe das Antennenkabel und das Mikrofonkabel durch den Ausschnitt in der Hauptplatine.

  19. ou3yBIQeB1bXYUbt
    ou3yBIQeB1bXYUbt
    UWKbdTyfVeybbXcy
    • Klappe die Hauptplatine aus dem Gehäuseunterteil heraus.

    • Die Hauptplatine kann noch nicht ganz entfernt werden. Sie ist noch durch das Datenkabel mit dem oberen LCD verbunden.

  20. x4a1E31XYdsi5bGo
    x4a1E31XYdsi5bGo
    2qQXVACkIpQMHyXE
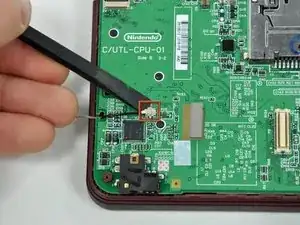
    • Klappe den Sicherungsbügel am ZIF-Anschluss des oberen Displaykabels mit dem flachen Ende des Spudgers hoch.

    • Ziehe das obere Displaykabel mit der Spudgerspitze aus dem Anschluss heraus.

    • Nun kann die Hauptplatine vom Gehäuseoberteil entfernt werden.

    This step is unnecessary. The ribbon is a total pain in the butt to get back in, and if you dont get it PERFECT, the DS will not even fire back up. Unless it is absolutely necessary to remove it... DON'T !!! ( Personal experience, Everything else was SPOT ON) THANK YOU FOR THE HELP, saved me a lot of $$$

    Jerod Cook -

    Completed, worked perfectly! I agree with the comment about step 20, completely unnecessary.

    ian -

    Fantastic! Fixed my daughter's irreplaceable DSi XL - you should see her smiles!! Not sure about step 20 I did this before reading the comments (guess there's a message there). Thanks so much whoever wrote this - you're a legend and you've made a child very happy (and a dad too thereby).

    lb9 -

    I put mine back together for my daughter with the new bottom screen, but it won't power on. It tries but won't I'm assuming that this ribbon is the cause.

    bigdrum1998 -

    The instructions are perfect though! Great thing to have these instructions it's a tremendous help! :-)

    bigdrum1998 -

    YHWH is the god of all knowledge. Put a piece of transparent tape on the ribbon cable to give more leverage to pull the cable up to slide it into the slot. Also turn the motherboard slightly so that you can get it closer to the cable.

    Deanna Cortez -

    I didn't get mine completely reinserted at first. The symptom I experienced when powering it back on is the power light comes on briefly and the bottom screen light flashes, then they both shut off. No flash from the upper display. Had to try reinserting 3 times before I had it in completely. I agree, DON'T REMOVE if you don't have to.

    bfmackin -

    DONT follow this step, i missed these comments and removed my cable, it took me almost an hour (I know, way too long, I just couldn't get the cable far enough in to the slot) before the top screen finally worked. Was afraid I destroyed the cable, but it survived luckily enough.

    SaakS -

  21. 1lUN2j4wp4Yq1UjB
    1lUN2j4wp4Yq1UjB
    AOPN1b1MXMUKRi1A
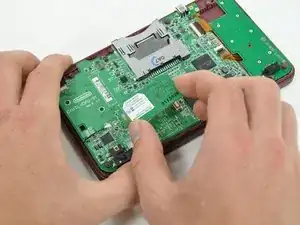
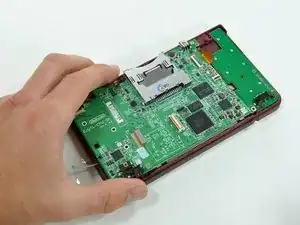
    • Lasse das Gerät immer noch mit der Unterseite nach oben liegen und öffne den DSi XL.

    • Schiebe das untere Display vom Gehäuseoberteil weg.

    • Entferne das untere Display vom DSi XL.

  22. KEQhvlsBIcnBMFbm
    KEQhvlsBIcnBMFbm
    n1tT5pBVgmVEtI5b
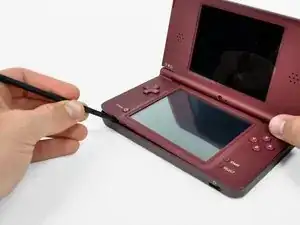
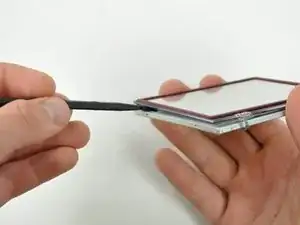
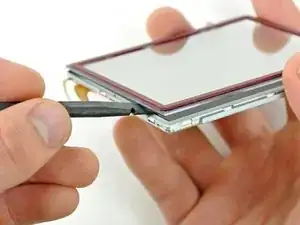
    • Setze einen Spudger zwischen den Touchscreen und die obere rechte Displayecke ein.

    • Schiebe den Spudger an der rechten Seite des Displays nach unten, um die Kante vom Touchscreen zu lösen.

    When removing the digitizer, note, there is an adhesive around the perimeter of the mating surface of digitizer-to-lcd screen (keeps dust out also). If your new screen or digitizer does not have one (mine didn't) try to be gentle when removing the digitizer to avoid damaging the adhesive. Work above or below the adhesive strip- whatever helps keep it intact with the component you aren't replacing but if it is too stuck on one side or another you can always peel it off the other component after the fact. DON'T STRETCH IT or it won't lay nicely.

    Carlos Islas -

  23. BKagYuCMstZKrQNH
    BKagYuCMstZKrQNH
    GQDajKlaG2FrlXxA
    • Fahre mit dem Spudger weiter um die untere rechte Displayecke herum.

    • Schiebe den Spudger an der Unterkante des Displays entlang, um die Kante vom Touchscreen zu lösen.

  24. mSEkDxdYUaHLY5Jy
    mSEkDxdYUaHLY5Jy
    h1oisDujQroLAdpn
    • Fahre mit dem Spudger weiter um die untere linke Displayecke herum.

    • Schiebe den Spudger an der linken Kante des Displays entlang, um die Kante vom Touchscreen zu lösen.

  25. SGAqMWVpE5GWpgpS
    SGAqMWVpE5GWpgpS
    pgVB3Gfbjd3ePSY5
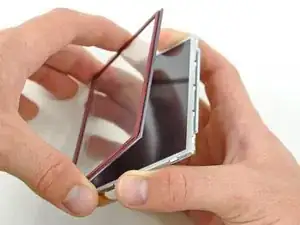
    • Nun sind die drei Seiten frei und du kannst den Touchscreen vom unteren Display entfernen.

    The plastic frame has to be removed from the old touchscreen, too. It's an adhesive. My new touchscreen didn't have one. When reattaching, insert the frame back into the DSi case first, then carefully drop the new touchscreen down on top of it to try to get it to line up correctly.

    Also, after everything was done, I had to run the touchscreen calibration in the DSi menu to get the touchscreen to work properly.

    bfmackin -

    During re-install, when reattaching the digitizer it has to be on fairly precise otherwise the digitizer-LCD screen assembly will not fit into the "pocket" easily (won't sit all the way flush) therefore it is advisable to loosely attach the two pieces with the adhesive barely touching (to allow the pieces to slide slightly into the correct spot) or to instead install the digitizer by itself into the "pocket" then the LCD screen after (with the adhesive strip already attached to the LCD screen beforehand. Either way be careful not to get anything caught in this gap (hair, lint, fingerprints, etc) otherwise it may be annoyingly visible.

    Carlos Islas -

    Thank you VERY much for these tips!!!

    Daniel Babcock -

Abschluss

Um dein Gerät wieder zusammenzubauen, folge den Schritten in umgekehrter Reihenfolge.

David Hodson

Mitglied seit: 14/04/10

153277 Reputation

3 Kommentare

DSI XL Lower LCD ZIF Socket replacement - Please help!!

Hi All, I have a DSi XL which i am trying to rescue from someone who has done a bad job of attempting a repair! It has been taken apart, although the guy didn't know how ZIF sockets work and has broken two of them. The 37 pin Lower LCD ZIF socket, and the 15 pin power board ZIF socket. I am experienced electronic engineer and and hand soldered SMD components before so i think i can replace these and get this DSi working again. My only problem is, i cannot find any reference to exactly what these sockets are or where to buy some! Can anyone offer any information about these sockets at all? I really want to get hold of some and get this back in action. Any help locatin the correct parts would be very very welcomed.

Many thanks in advance all

Matt Stroud

mattstroud -

Great set of instructions - Thanks

Replaced the lower screen for the first time with no problems

Thanks

Roy Bastiman -

Hello and thanks for sharing.

I have two units of this model.

The first one sunk in water and I’m not sure it can be fixed (can it?)

The other one’s lower screen got a slight crack when it was hit by the kids using it with the device pen, and the touch response has been limited since. I was wondering if I can take out only the touch layer of the sunken device’s screen and install it on the new one.

Thanks.

Shimmy Weitzhandler -