Einleitung

  1. Y4NSkMoD3Cuglj3h
    • Hebe den Stecker des Lüfters mit einer Pinzette aus seinem Sockel auf der Hauptplatine.

    • Passe auf, dass du mit der Pinzette nur am Stecker angreifst, nicht am Sockel auf der Hauptplatine.

  2. wqvDqwjeY6D6ttxA
    wqvDqwjeY6D6ttxA
    2JspZVMimi2pNhVT
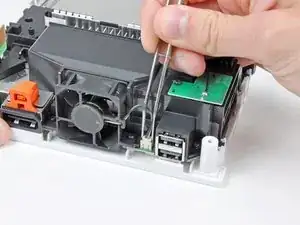
    • Entferne die beiden Schrauben, welche den Lüfter an der Lüfterhaube befestigen.

    • Entferne den Lüfter von der Wii.

    There may be a removable metal "comb" under the fan shroud, remove after removing the fan shroud when disassembling, and replace before inserting the fan shroud when reassembling: it is held in place with same screws as fan shroud.

    Gregory Salton -

  3. 3R6UEtmCmnUDglQK
    3R6UEtmCmnUDglQK
    suYtNLiM4IhZWyT2
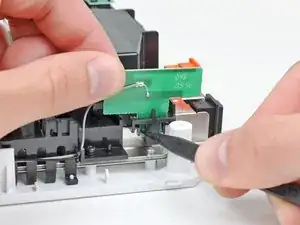
    • Drücke eine der schwarzen Plastikrasten an der Lüfterhaube vorsichtig mit der Spudgerspitze oder einem anderen spitzen Werkzeug weg von der WiFi Antennenplatine.

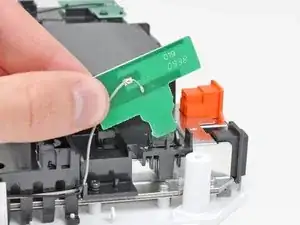
    • Hebe die Wi-Fi Antenne weg von der Lüfterhaube.

    I messed up the gray wire on the antenna part is it possible to solder it back on or do I have to replace it?

    DreadHeadNon -

    This is really just a simple antenna, soldering the wire back on is completely sufficient.

    It should contact both pads, on the middle and bottom trace.

    Zac -

  4. sEnLTVQulfqStjOq
    • Entferne die einzelne 10 mm Kreuzschlitzschraube, welche die zweite Wi-Fi Antenne oben auf der Lüfterhaube befestigt.

  5. COVLSiYFuxyZu5Sc
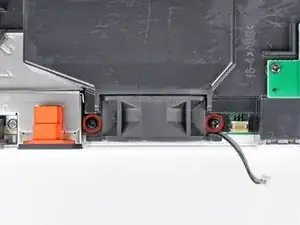
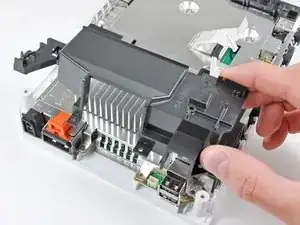
    • Entferne die beiden Klebestreifen, welche das Kabel zur zweiten Wi-Fi Antenne an der Kunststoffhalterung in der Nähe des Kühlkörpers befestigen.

    Some newer models may have the Wi-Fi antenna wires taped to the top of the plastic bracket instead of the front as pictured.

    Jabu -

  6. lPCRZMfYK4yJlrZ5
    • Fädle vorsichtig beide Antennenkabel aus dem Rahmen der Wii und lege sie zur Seite.

  7. TISNmeBuJQxQusHF
    TISNmeBuJQxQusHF
    C2EKxmndWHPkmLBT
    • Entferne die drei 10 mm Kreuzschlitzschrauben, welche die Lüfterhaube an der Wii befestigen.

    • Hebe die Lüfterhaube weg vom Kühlkörper und entferne sie von der Wii.

    Mine (RVL-CPU-01) Is probably The first revision, and mine had another EMI Shield Under the fan shroud. I’m Guessing that they removed it in later revisions. It just fits under the shroud normally. For Pics, here is a link. Images are there soon.

    https://sites.google.com/site/ninteardow...

    Lucas Hoekstra (Lucas9810) -

    One of these three screws (the one in the 5o'clock position) seems to always be tight and difficult to remove

    Will Moindrot -

  8. evvpEFWhrNQNvkUa
    evvpEFWhrNQNvkUa
    UYDrgOYGcQKKl2OV
    soMNExAXauR3ZPPG
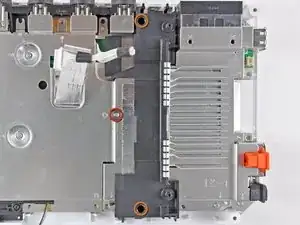
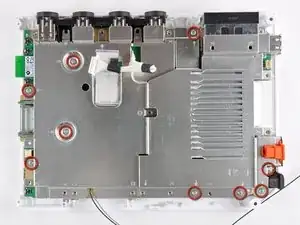
    • Entferne die folgenden sechs Kreuzschlitzschrauben, welche die EMI Kontaktfinger an der Bodenplatte festhalten:

    • Vier 7 mm Schrauben

    • Zwei 11,3 mm Schrauben

    • Entferne beide EMI Kontaktfingersätze von der Wii.

    Actually, at east for me, these “fingers” were beneath the motherboard cover, and the screws could be removed at the same time as the ones on step 33.

    shaitanpt -

    shaitanpt thanks for pointing this out! Mine were also beneath the motherboard cover, and the first set of "fingers" were actually two small brackets between the controller ports, rather than one long bracket over all of them.

    Cynthia -

  9. r1oFWvya22CJVFhY
    r1oFWvya22CJVFhY
    6P1nxLfWGRO1JwoC
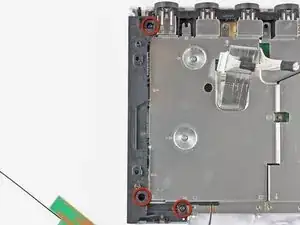
    • Entferne folgende drei Kreuzschlitzschrauben:

    • Eine 7 mm Schraube

    • Zwei 10 mm Schrauben

    • Hebe die Halterung aus der Wii.

    Be careful not to drop the 7 mm. I did and I spent 10 minutes trying to roll it and rattle it out from under the shroud, until I figured out that you can just remove the fan and shake it out of the bottom

    Curt Swalley -

  10. asbrrw63CRCVKIpt
    asbrrw63CRCVKIpt
    AGQcRXFIx2MkTnfI
    5DfaHnGZ5Qyoi4BK
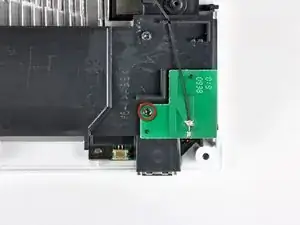
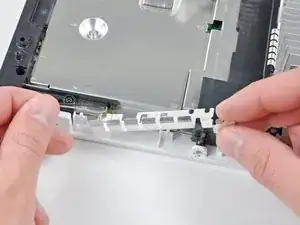
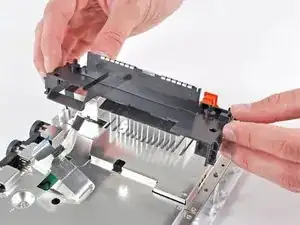
    • Entferne drei 10 mm Kreuzschlitzschrauben, welche die schwarze Halterung an der Bodenplatte nahe der Vorderseite der Wii befestigen.

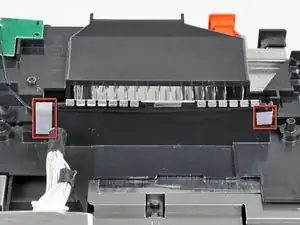
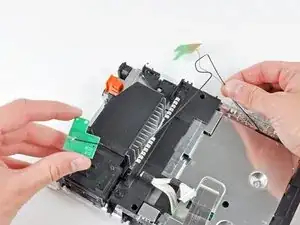
    • Hebe die Halterung leicht hoch und ziehe mit der anderen Hand die Halteklammer weg von der Stelle, an der die Wi-Fi Antennen durch die Abschirmung der Hauptplatine gehen.

    • Entferene die Halterung von der Wii.

    • In der schwarzen Kunststoffhalterung liegt lose eine kleine quadratische Mutter. Achte darauf, sie nicht zu verlieren.

    For reassembly: I believe the nut is for the CR2032 battery

    Jack Bailey -

  11. OIGxembVqWfSWddN
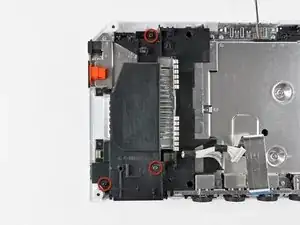
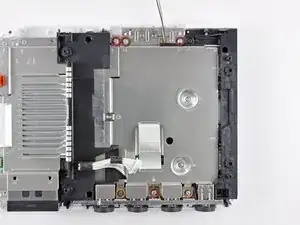
    • Entferne die restlichen neun 7 mm Kreuzschlitzschrauben, welche die Abdeckung der Hauptplatine an der Bodenplatte befestigen.

    I believe that's 10 screws

    Will Moindrot -

    Before you put this plate back on, you need to put the six metal comb looking thing underneath it

    Logie -

  12. bsLLYWppWnGQX2Ha
    • Hebe vorsichtig die Abdeckung der Hauptplatine hoch, achte dabei darauf, dass sich keine Kabel verfangen.

    • Bei manchen Modellen befindet sich ein Wärmeleitpad für den Drahtlos-Chip auf der Unterseite an der Abdeckung der Hauptplatine. Beim Zusammenbau musst du es ersetzen.

    There is a thermal pad on the WiFi chip as well! NB this because disassembling past this point requires you to also reapply a thermal pad to the WiFi chip.

    Jonatan Noponen -

    When reassembling, put the wifi fingers near the battery compartment beneath the motherboard cover before screwing the cover back on. Can someone add "thermal paste" to the items needed to the top of the guide?

    Gregory Salton -

Abschluss

Um dein Gerät wieder zusammenzusetzen, folge den Schritten in umgekehrter Reihenfolge.

Andrew Bookholt

593241 Reputation

0 Kommentare