Einleitung
Das Oculus Quest 2, auch Meta Quest 2 genannt, ist ein von Facebook (ehemals Oculus) entwickeltes VR-Headset und die zweite Iteration des ursprünglichen Quest. Das Quest 2 kann als eigenständiges Headset oder in Verbindung mit einem Computer betrieben werden, wenn es entweder über ein USB-Kabel oder Wi-Fi angeschlossen wird. Das Headset läuft mit einem Qualcomm XR2 und 6 GB RAM. Es bietet eine Auflösung von 1823 x 1920 pro Auge. Achte darauf, dass du alle Schrauben im Auge behältst, denn dieses Headset hat eine Menge davon.
Mehr Informationen zu den Steckern und ihren Anschlüssen findest du in der Anleitung: "Erkennen und Trennen von Kabelverbindungen".
Schritt-für-Schritt-Anleitungen findest du hier.
-
-
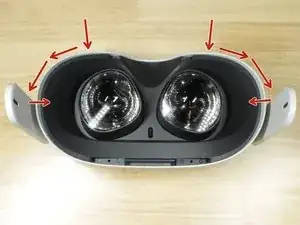
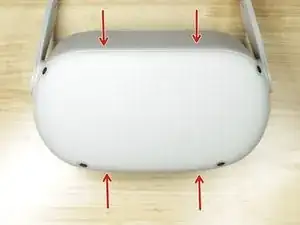
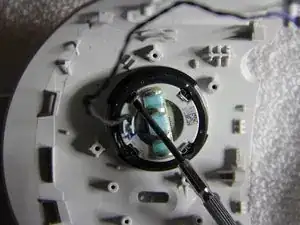
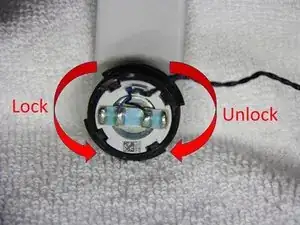
Setze nacheinander ein Plektrum auf jeder Seite in der Nähe der Nasenauflage ein, schiebe es zur Seite und heble hoch.
-
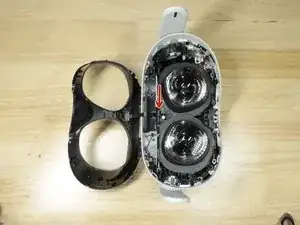
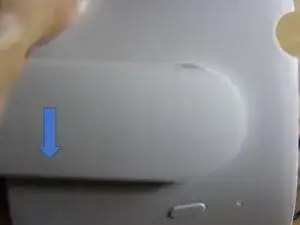
Wenn beide Seiten gelöst sind, dann hebe die Abdeckung vorsichtig heraus und klappe sie so, dass sie außerhalb des Headsets liegt.
-
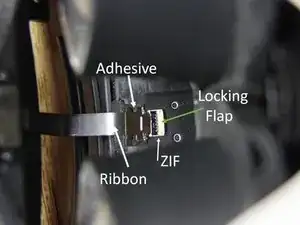
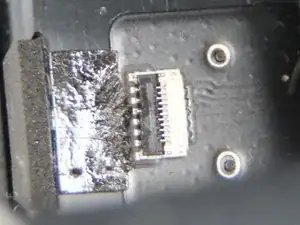
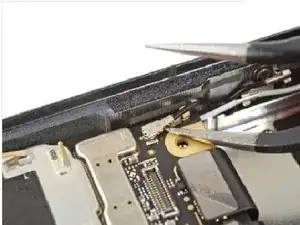
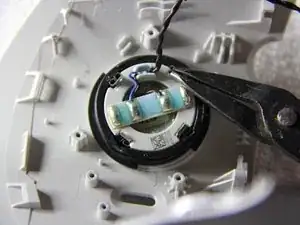
Löse die kleine schwarze Raste des ZIF-Verbinders und ziehe das Flachbandkabel ab.
-
-
-
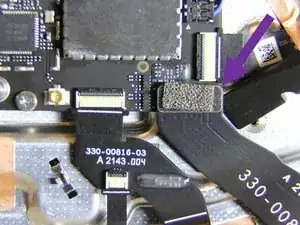
Das Flachbandkabel ist leicht am Headset festgeklebt und das Kabel ist mit einem ZIF-Anschluss verbunden. Schaue in Schritt 1 der Anleitung: "Erkennen und Trennen von Kabelverbindungen" für mehr Informationen.
-
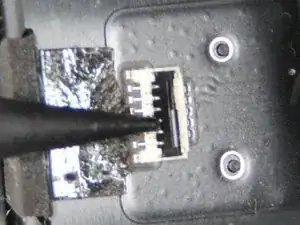
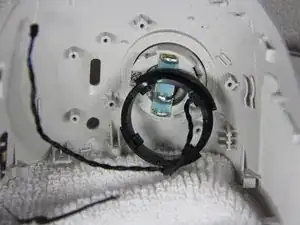
Klappe den Sicherungsbügel hoch und trenne das Kabel ab. Schaue dir Bild 2 und 3 an.
-
-
-
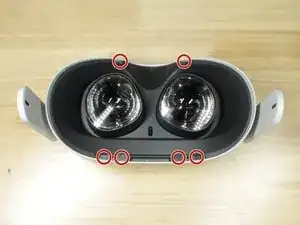
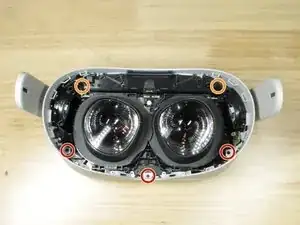
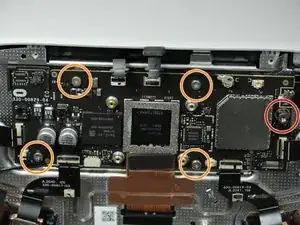
Um die Rasten zu lösen, muss an die vier Stellen ein Pick (Plektrum) eingesteckt werden.
-
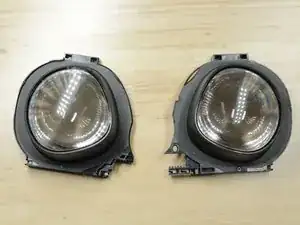
Entferne die vordere Abdeckung von der Oculus Quest 2.
-
-
-
Trenne die WiFi Antenne ab, wie in Schritt 5 dieser Anleitung beschrieben. Schiebe dazu ein dünnes ESD-sicheres Werkzeug oder Pinzette unter das metallene Ende des Steckers und hebe ihn von der Hauptplatine weg.
-
Entferne die Kreuzschlitzschraube #0
-
Entferne die beiden Kreuzschlitzschrauben #0
-
-
-
Trenne den Akku ab, wie in Schritt 4 der Anleitung beschrieben. Heble den Stecker mit dem Spudger gerade nach oben heraus.
-
Denke beim Zusammenbau daran, das Flachbandkabel zum Akku teilweise unter das Logic Board zu legen.
-
-
-
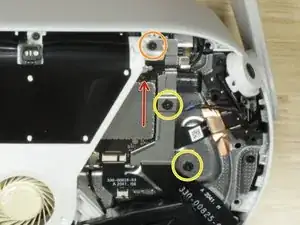
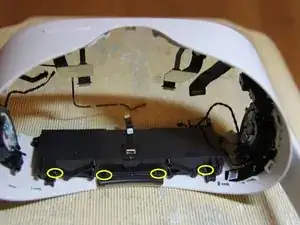
Entferne zwei Kreuzschlitzschrauben #0
-
Entferne vier Kreuzschlitzschrauben #0
-
Entferne zwei Kreuzschlitzschrauben #0 - diese sind länger als die anderen Schrauben
-
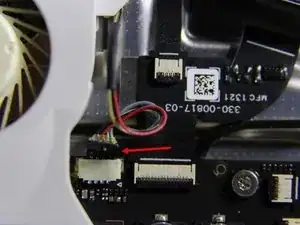
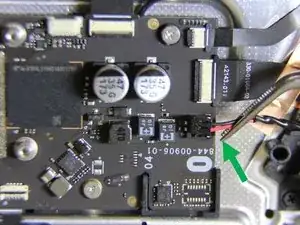
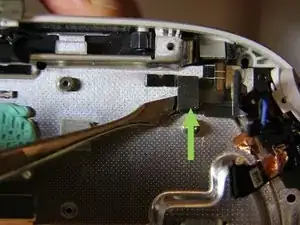
Der Pfeil zeigt zur Bluetooth-Antenne. Trenne sie ab, mit Hilfe der Anleitung, Schritt 5, Bild 2. Um den Stecker abzutrennen, musst du mit einem Spudger oder einer ESD-sicheren Pinzette unter das metallene Ende fahren und gerade nach oben hebeln.
-
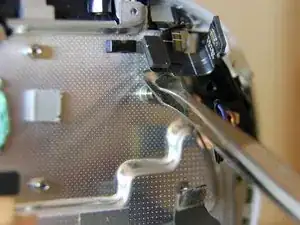
Bild 3 zeigt, wie die Antenne vom Headset gelöst wird.
-
-
-
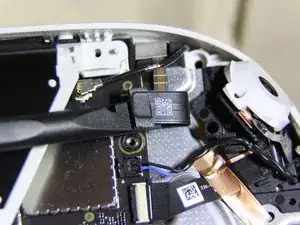
Ziehe den Stecker vom Lüfter.
-
Eine T2 Schraube
-
Eine Kreuzschlitzschraube #0
-
Entferne die vordere LED der Oculus Quest 2.
-
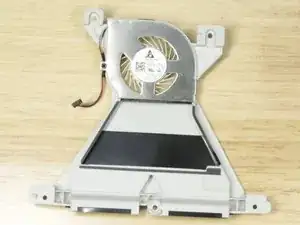
Entferne den Lüfter von der Oculus Quest 2
-
-
-
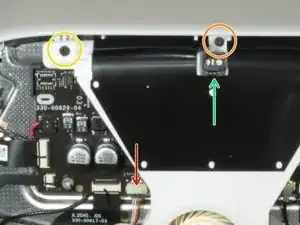
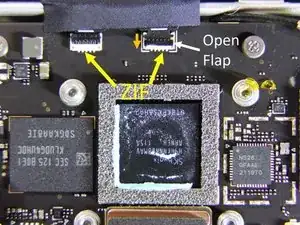
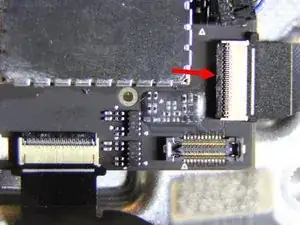
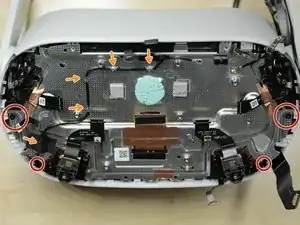
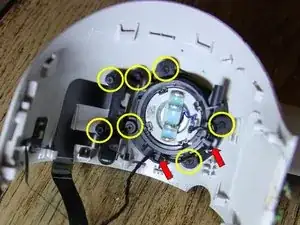
Oben an der Hauptplatine sind zwei ZIF-Anschlüsse. Der Sicherungsbügel am rechten Anschluss ist schon geöffnet. Er muss dazu in Richtung des orangenen Pfeils gedrückt werden.
-
Öffne die beiden ZIF-Anschlüsse und trenne die Kabel ab. Diese Kabel führen zu zur vorderen LED, zum IPD-Sensor und zum Nahrungssensor.
-
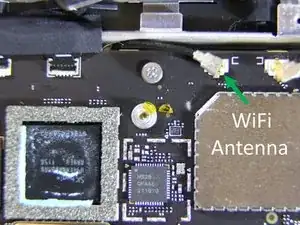
Trenne den seitlichen WiFi-Antennenanschluss ab. Siehe dazu Schritt 5 der Anleitung. Um das Kabel abzutrennen, musst du ein dünnes, ESD-sicheres Hebelwerkzeug unter das metallene Ende am Stecker schieben und gerade nach oben von der Platine abheben.
-
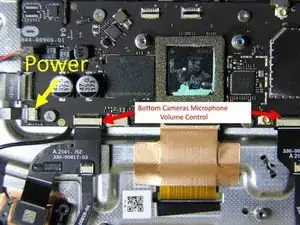
Trenne das Kabel zum USB-C-Anschlusse und zur Kopfhörerbuchse ab. Siehe Schritt 4 der Anleitung. Heble den Druckstecker mit einem Spudger gerade nach oben ab.
-
-
-
Die Lautsprecher sind mit zwei Kabeln an der Hauptplatine angeschlossen.
-
Ziehe die Kabel heraus und trenne die Lautsprecher ab.
-
-
-
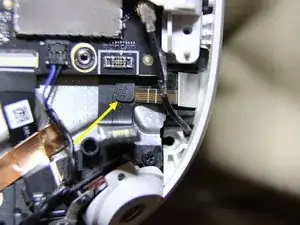
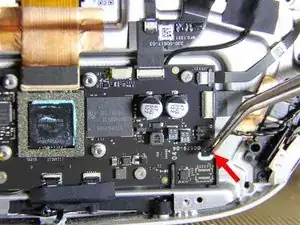
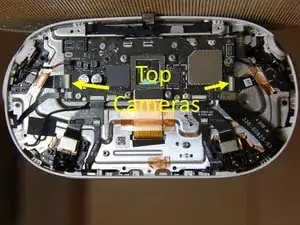
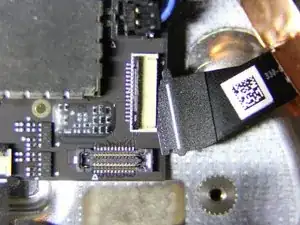
Trenne die ZIF-Verbinder für die oberen Kameras auf.
-
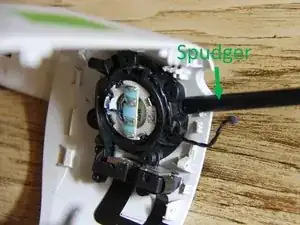
Der ZIF-Anschluss ist im zweiten Bild mit einem roten Pfeil markiert. Drücke den Sicherungsbügel mit einem Spudger hoch.
-
Wenn der Bügel offen ist, ziehe das Flachbandkabel heraus.
-
-
-
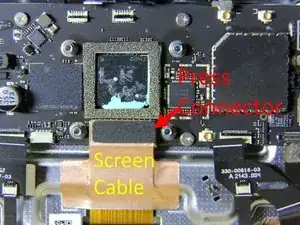
Das Displaykabel ist mit einem Druckstecker angeschlossen.
-
Heble den Druckstecker gerade nach oben und trenne ihn ab. Vergleiche mit Schritt 4 dieser Anleitung.
-
-
-
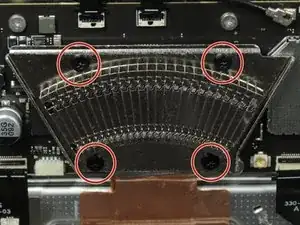
Entferne folgende Schrauben:.
-
Eine 3,5mm Sechskantschraube.
-
Vier Kreuzschlitzschrauben #0.
-
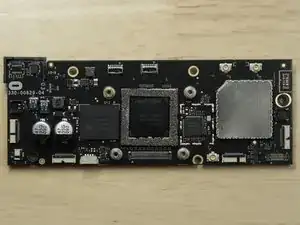
Entferne die Hauptplatine.
-
-
-
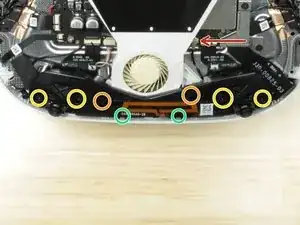
Entferne die vier Kreuzschlitzschrauben #0.
-
Fädle das seitliche WiFi Antennenkabel aus.
-
Der Mittelrahmen wird durch dieses Kabel vom Akku mit Strom versorgt. Das Kabel hat ein Metallpad an der Unterseite und ist am Mittelrahmen festgeklebt. Trenne das Metallpad auf der Unterseite des Steckers vom Mittelrahmen ab.
-
-
-
Der Akku ist mit zwei Kreuzschlitzschrauben #0 vorne am Gehäuse befestigt.
-
Der Akku ist mit vier Kreuzschlitzschrauben #0 hinten am Gehäuse befestigt.
-
-
-
Die Abdeckung des Akkugehäuses ist mit drei Torx T2 Schrauben befestigt. Entferne die drei Schrauben.
-
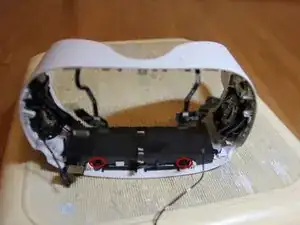
So sieht der Akku aus, wenn die Abdeckung entfernt ist.
-
-
-
Löse das Lautsprecherkabel vom Halter ab.
-
Entferne die sieben Kreuzschlitzschrauben #0 vom Halter und USB-Anschluss.
-
Stelle den Halter mit einem Spudger frei.
-
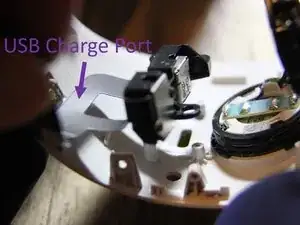
Löse den USB-Ladeanschluss und den Halter ab.
-
-
-
Kippe die Laschen an den Federn mit einem kleinen Schraubendreher nach oben.
-
Entferne die Federn mit einer Spitzzange.
-
-
-
Der Halter und der Lautsprecher werden durch das Headset geführt und mit dem Gummihaltering fixiert.
-
Laschen am Gummiring führen durch die Schlitze im Arm. Dies sind die Schlitze, die zuvor die Federn hielten. Der Ring wird gedreht, um den Halter zu ver- oder entriegeln.
-
-
-
Wenn du an dem Halter nahe bei der Einschalttaste arbeitest, musst du die Hand durch das Teil des Headsets führen, der normalerweise zum Gesicht hin zeigt. Greife den Haltering. Drücke dann den Halter in die auf dem zweiten Bild gezeigte Richtung.
-
Wenn du an dem Halter nahe beim USB-Anschluss arbeitest, musst du die Hand von vorne durch das Headset führen, um den Haltering zu greifen. Drücke dann den Halter in die auf dem dritten Bild gezeigte Richtung.
-
-
-
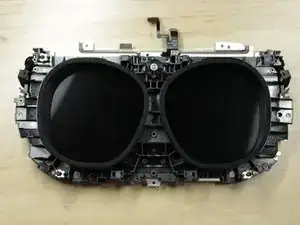
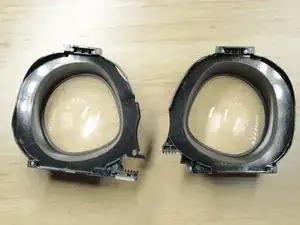
Die Linsen gleiten auf Schienen, die von kleinen Metalllaschen gehalten werden. Das Entfernen der Schienen legt den Bildschirm frei.
-


87 Kommentare
Thank you so much to me for making this guide. Helped me a lot!
It is worth emphasizing that this device has 2! WIFI antennas.
Anyone who wants to disconnect WIFI from their device must disconnect both.
Their connection to the motherboard, is right next to each other, but the right connection is immediately revealed while the left connection next to it is hidden under the black cover and requires a number of additional disassembly steps.
Alternatively, anyone who wants to disconnect WIFI from their device can disconnect the wires in the area where they connect to the antenna stickers on the right and left sides of the eyepieces of the glasses, thus saving all the disassembly of the front cover.
Thanks!! this really helped me, I have already customized mine with an official custom filter, but this will add an additional layer of Kashrus.
If you just need to replace a camera… it’s 14 screws. You need a T2 and a PH0 (not a P0…) Pretty easy once you get the front cover off and not covered here. It’s pretty easy to see what you do once you get in there though. Good luck!
PH0 and P0 are the same :)
Lylo -
Bravo pour ces informations. Un grand merci
It’s actually 6x T3 screws. A T2 driver is smaller than the groves of the T3 screws, will slip and strip.
Steven -
It may depend on your bit manufacturer. I used an ifixit T2.
Daniel Yoder -
What screw size are these? I need to replace one but I don't know what to search for
Michele Bright -
I have T2 on mine as well
weiwei.e.sun -
What if one of the screws strips? We are using a t3 and it got all screws out but one. Now we cannot get that last screw out
AliD -
Not much you can do except drill it out.
Kmic -
how would you go about drilling it out?
starrrayne -