Einleitung

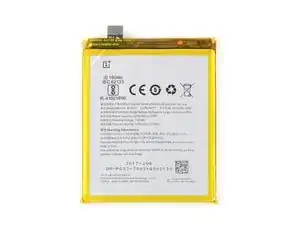
Nutze diese Anleitung, um einen aufgebrauchten oder defekten Akku in deinem OnePlus 5T zu auszutauschen.

Falls dein Akku aufgebläht ist, musst du entsprechende Vorsichtsmaßnahmen treffen.

Entlade zu deiner eigenen Sicherheit den Akku auf unter 25%, bevor du mit der Reparatur beginnst. Dadurch wird das Risiko verringert, dass sich der Akku entzündet oder explodiert, falls er während der Reparatur versehentlich beschädigt wird.

Du benötigst Ersatz-Klebestreifen, um die Komponenten beim Zusammenbau wieder mit dem Gerät zu verbinden.

  1. LxHSKiiRcjM1dTpR
    LxHSKiiRcjM1dTpR
    cw15dPAlaDVS2Uqj
    • Schalte dein Gerät aus, bevor du loslegst.

    • Entferne den SIM Einschub aus deinem OnePlus.

  2. ARneM6bQboVSGvf6
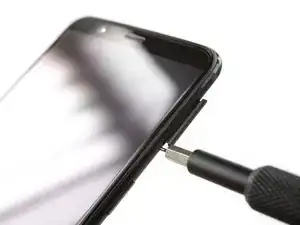
    • Entferne die zwei Torx T2 Schrauben (2,5 mm Länge).

    • Das OnePlus 5T verwendet nicht viel Klebstoff, um die Rückenabdeckung zu befestigen, allerdings sind die Klammern sehr stark und erfordern während des Öffnungsvorgangs einen gewissen Kraftaufwand.

    Could you clarify the statement “The OnePlus 5T doesn't use a lot of adhesive“? Do you mean that it uses adhesive, but only a little? Or do you mean that it doesn’t use any adhesive at all to secure the back, just the clamps?

    Avram Grumer -

    Hi Avram,

    there is a little bit of adhesive underneath the edges of the back cover, however it doesn’t require heating to soften it. In case the back cover doesn’t come of straight away it won’t help to apply an iOpener to further soften the adhesive but requires a little bit more force to open the plastic clamps.

    Dominik Schnabelrauch -

    i have tried t2 srewdrivers multiple times but they doesn’t seem work, could those be different screws?

    Mr Kono -

    I had the same problem. I tried a T1 screwdriver, that fit perfectly.

    That said, the 'tools' section of this repair doesn't mention any torx screwdriver. That should be updated to include the T2 (or T1, for me!) screwdriver.

    Akka -

    I purchased the entire kit to do my battery replacement and found the opening tool was not capable of opening my One Plus 5t phone. I tried the tool for at least 30 minutes and couldn’t even get it started. Luckily I had a set of “plastic tools” for removing door panels from cars while doing stereo work. These tools have nice sharp points and are much longer and thicker, providing much better grip and leverage. With these tools, I had the back off the phone in just a few minutes. All the rest of the process was easy to follow and everything worked out great.

    David Dery -

    I have all of the necessary parts/tools for replacement. Upon removing the two screws from the bottom, one came out no problem first try. The second bolt slipped andbis now completely stripped out. Any advice?

    Derek Basham -

  3. Wvq1Uels1ydD4gHO
    Wvq1Uels1ydD4gHO
    EsjxRGZy351XTSZT
    5NDh6rBZGUSlZZdL
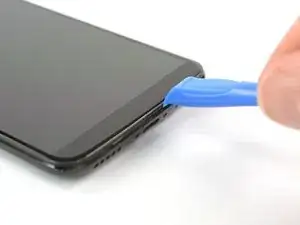
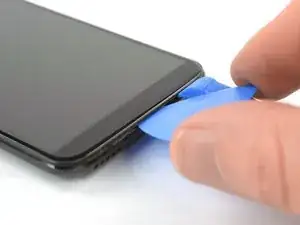
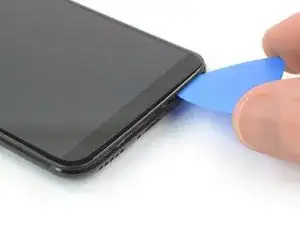
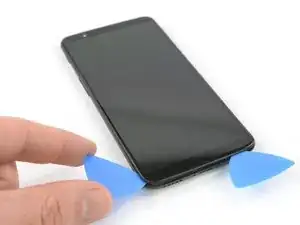
    • Setze ein Öffnungswerkzeug zwischen Display und Rückabdeckung an der Unterkante deines OnePlus ein.

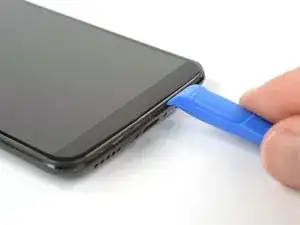
    • Verwende das Öffnungswerkzeug, um eine Lücke zwischen Rückabdeckung und Display zu erzeugen.

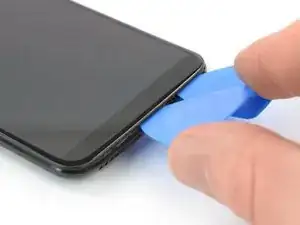
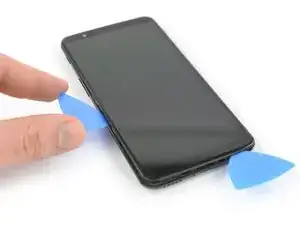
    • Setze nun ein Plektrum in den Spalt ein, den du gerade geöffnet hast.

    Don’t make the same mistake as i did and put the opening tool between the screen and glass rather than the screen and body. Make sure its the second line from the top where you insert your tool

    Hayden Rooney -

    This part is very difficult, i have been trying to open the phone up, still cannot.

    Taz -

    The easiest way to open the back cover, is by starting from the bottom right corner, try find a plastic tool that is slim enough to go through the display and back cover.

    Taz -

    I too had troubles with this step. I recommend having a look at the guide for opening up the back cover of the Oneplus 5 before proceeding. It has a lot of helpful images and the instructions go into far more detail than this one does.

    OnePlus 5 Rückabdeckung austauschen

    Erik vN -

    This step was the hardest step for me. I could only succeed with suction cup pliers and a metal pry tool, which unfortunately scratched the device’s edges a little.

    Haggai Eran -

    I found this hard. Look carefully and use a bright light. There are two small ridges. I worked ages on the top one which isn't actually a gap. You need to work on the bottom one of the two. I used a very small metal screw driver with a thin flat blade. I pushed this in to open the gap a fraction then put a plastic tool in the now slightly opened gap and worked it round.

    Duncan Putman -

    For opening up the device, OnePlus 5 Rückabdeckung austauschen that Iceblade02 mentions is excellent. The tools in the kit also correspond to it since the new kit that I received last week had no guitar picks and instead had the suction cup.

    Anirudh Ramanathan -

    Be sure you are getting below the screen's LOWER lip, as in the photo, as HaydenRooney mentions.

    Try to minimize flexing of the screen when you are wedging, the clamps (like snaps or tabs) will demand force and you want to avoid turning that into screen flex. There are several forum posts here about device working-but-dark after a repair. Too bad user input is rather folded away on ifixit, and few will see these.

    Professor Z -

  4. uGVHiIEDn6ZXv4AU
    uGVHiIEDn6ZXv4AU
    5FQouJJstYPBjhfc
    1GkhVTDislVhWL2J
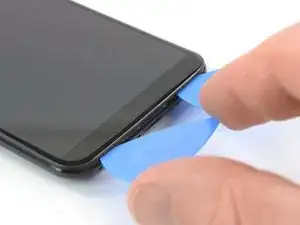
    • Schiebe das Plektrum zur rechten, unteren Ecke deines OnePlus.

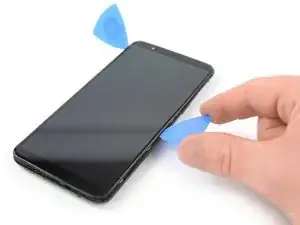
    • Setze ein zweites ¨Plektrum ein und schiebe es zur linken, unteren Ecke deines OnePlus.

  5. SGpZYRjercLcF1kD
    SGpZYRjercLcF1kD
    hDWgumDbhAII5RC2
    v6UHrvDAUFN4axMf
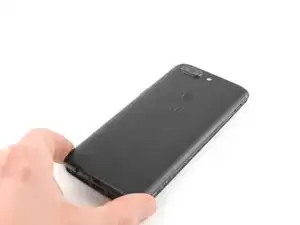
    • Schiebe das Plektrum um die untere linke Ecke herum und entlang der linken Kante des OnePlus nach oben und trenne so die Plastik-Klammern auf, mit denen die Rückabdeckung befestigt ist.

  6. EOVFtIPUeUWATCE2
    EOVFtIPUeUWATCE2
    My66WfLlkrWZtmTa
    XVdrfYDR4LOF3b5c
    • Schiebe das Plektrum um die untere rechte Ecke herum und entlang der rechten Kante des OnePlus nach oben und trenne so die Plastik-Klammern auf, mit denen die Rückabdeckung befestigt ist.

  7. 2WWFDdfylDZArCP3
    2WWFDdfylDZArCP3
    fQ5VpDSOAVyfdcF1
    vl6Yusv6DqyKEPyn
    • Versuche noch nicht, die Rückabdeckung komplett abzulösen. Die Flachbandkabel zum Fingerabdrucksensor, zum Akku / USB-C Port und zur Kopfhörerbuchse sind noch immer noch mit dem Motherboard verbunden.

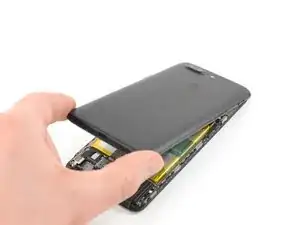
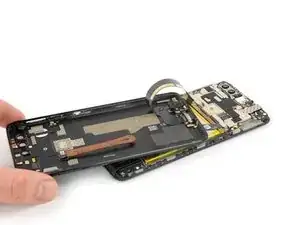
    • Drehe dein Gerät und hebe vorsichtig das untere Ende deiner Rückabdeckung an. Klappe sie vorsichtig nach links und halte sie so in einem 80°-Winkel.

  8. 1vqeLDjxS6hguE5r
    1vqeLDjxS6hguE5r
    NBYCODIFvIMf5MjR
    • Heble den Fingerabdruck-Kabel mit einem Spudger aus seinem Anschluss auf dem Motherboard.

  9. 6QaItEJdF5IifEVy
    6QaItEJdF5IifEVy
    LylHAFPItwWiVTJU
    LXMDDG3UPRUMkCvO
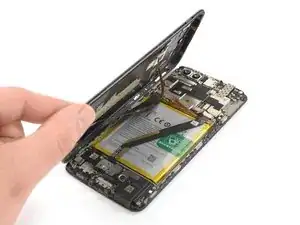
    • Drehe die Rückabdeckung um 180° und lege es so hin, dass ihre untere Kante auf der oberen Kante des Akkus aufliegt.

  10. ROi1WRDSSVb2UJDA
    ROi1WRDSSVb2UJDA
    vKwBpmUQsokoKi6D
    gpM4gOVAUoEdUygt
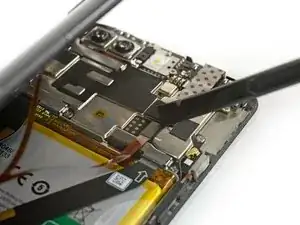
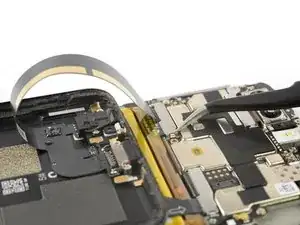
    • Verwende eine Pinzette, um die kleine metallene Abdeckung, die die Stecker für den Akku / USB-C Port und die Kopfhörerbuchse schützt, zu entfernen.

  11. ULkBQEMD2kiPwPqh
    ULkBQEMD2kiPwPqh
    xhaBK12Vd4EyIyQ4
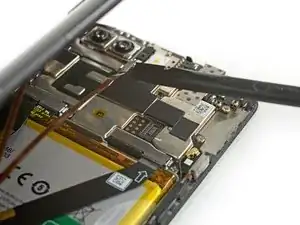
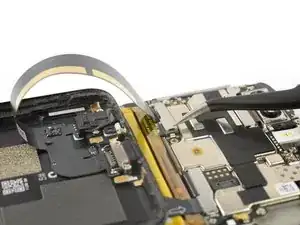
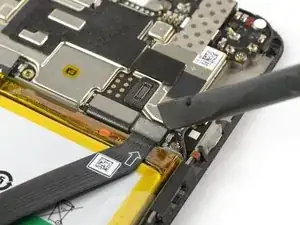
    • Löse mit einem Spudger den Stecker am Kabel für den Akku / USB-C Port und die Kopfhörerbuchse.

  12. XZ51MpYgIbIC5Yys
    XZ51MpYgIbIC5Yys
    EeOXNPsJYVhxN5w1
    • Entferne die Rückabdeckung.

  13. gBIlbZyL2MPVojvO
    gBIlbZyL2MPVojvO
    gFbQKWFGlQR3cVs6
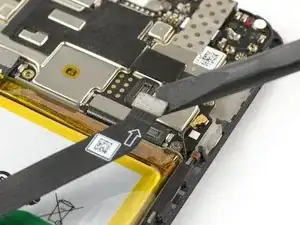
    • Heble mit Hilfe eines Spudgers den Stecker des Akku-Flachbandkabels hoch und löse ihn ab.

  14. RQL4RAltCNtMSQhB
    RQL4RAltCNtMSQhB
    NaHjn3wKAZyUoEOJ
    bZfyCeWofIBHCEZy
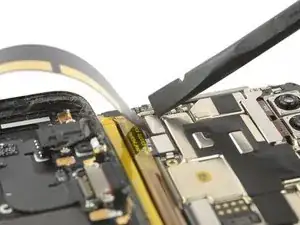
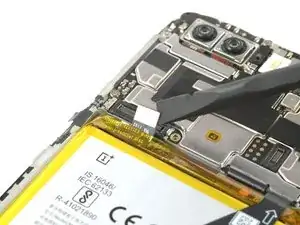
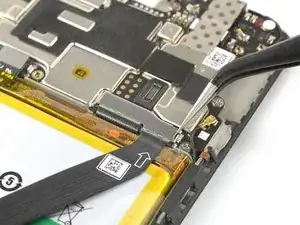
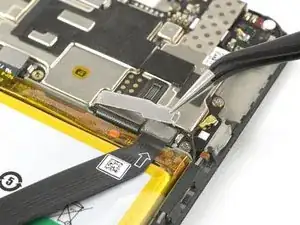
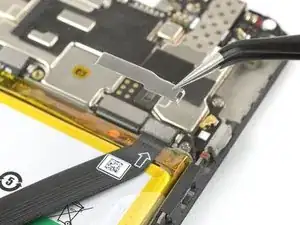
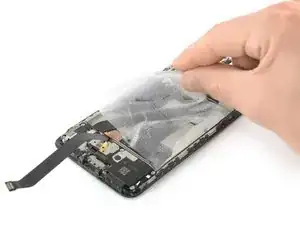
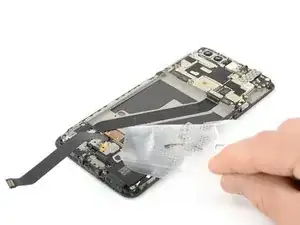
    • Hake die schmale Metallabschirmung über den Steckern am Haupt- und Verbindungs-Flachbandkabel mit einer Pinzette aus. Klappe sie wie ein Scharnier auf und entferne die Abschirmung.

    • Die Metallabschirmung ist leicht verklebt. Wenn sie sich nicht leicht lösen lässt, dann benutze einen erwärmten iOpener, um den Kleber darunter aufzuweichen.

    The main flex cable connector (step 16) came off with the metal shield and I was able to reapply without ever separating the two.

    Eric Smith -

  15. 33UckSDIreOmVjL3
    33UckSDIreOmVjL3
    kEAiEvjiqAlxhfdO
    • Heble das Haupt-Flachbandkabel mit einem Spudger hoch und trenne es ab.

  16. TdgRvmFBN65gQpAB
    TdgRvmFBN65gQpAB
    oMkFCcUSBB51QJiL
    • Biege das Hauptflachbandkabel zur Seite, um besseren Zugang zum Akku zu erhalten.

  17. cr2o3EArL5235BEQ
    cr2o3EArL5235BEQ
    ivhFJOOvxCVSuPDL
    • Entferne den grünen Klebestreifen vom Akku.

  18. ZE1XLcYIogKvAxnd
    ZE1XLcYIogKvAxnd
    FECmFnsZ4KBUTTrc
    PRFfbEAOCNIZ1UEa
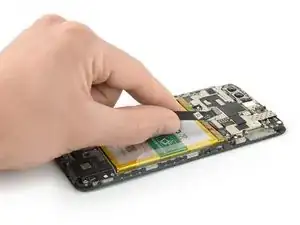
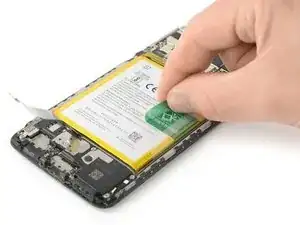
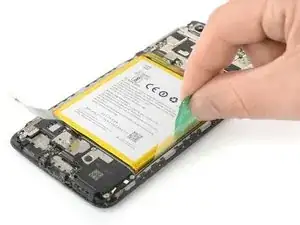
    • Hebe den Akku mit mit Hilfe des grünen Klebestreifens aus seiner Vertiefung.

    • Obwohl diese Art von Klebestreifen die Akku-Entnahme erleichtern soll, erfordert das Anheben möglicherweise etwas Kraftaufwand. Falls du Probleme beim Entfernen des Akkus hast, kannst du die Mitte des Displays mit einem iOpener erwärmen, um den Kleber darunter zu lösen.

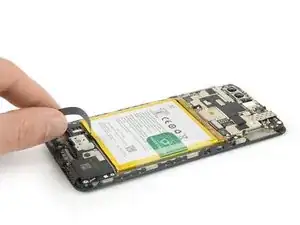
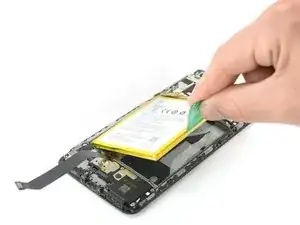
    • Klappe den Akku nach oben in eine aufrechte Position.

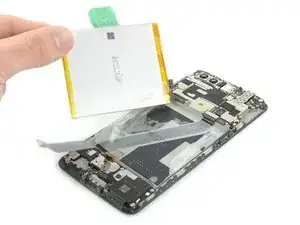
    • Löse den Akku vom verbleibenden Klebstoff.

    • Entferne den Akku.

    • Schließe den Akku während des Wiederzusammenbaus vorübergehend wieder an das Motherboard an, um die korrekte Ausrichtung zu erleichtern. Trenne den Akku nach dem Einsetzen wieder vom Motherboard.

  19. RKrZWXiSLBocBMVD
    RKrZWXiSLBocBMVD
    kFhVLbeLESqNiYOI
    • Ziehe die Klebefläche des Akkus vom Mittelteil ab.

    • Obwohl es nicht zwingend erforderlich ist, den Aufkleber zu entfernen, ist es sehr empfehlenswert, beim Einsetzen eines neuen Akkus einen neuen Aufkleber zu verwenden.

    How do you get a replacement for the battery adhesive sticker? It would be great if this could would have been included in the iFixit battery replacement kit (wasn't informed that it wasn't)

    Rik van den Reijen -

    Hi Rik,
    if you can't find replacement adhesive stickers in the internet you can use thin double sided adhesive tape to secure the new battery.

    Dominik Schnabelrauch -

    new battery too thick.

    I followed the guide and everything is very clear, a well done guide. the hooks are really sturdy and work well even after closing the phone.

    Unfortunately the new battery is 0.5mm thicker (4.7 mm instead of 4.2 mm) and I had to open the phone again to put the old one back.

    the screen was raised in the center and on the sides a crack was forming between the glass and the display, it is not advisable to leave the phone like this, it would certainly have worsened.

    Does anyone know how to recognize the dimensions from the battery codes? I wouldn't want to get a battery that's too big again.

    Corrado Corradini -

    For the ones worried by the comment above: The one I got from ifixit was 0.415mm in middle and 0.42 mm on the sides (Model: BLP637) so it had the right size.

    Nex -

    Please, can someone tell me what kind of adhesive I need to use to reattach the backcover?

    Laszlo Folgerts -

Abschluss

Folge den Anweisungen in der umgekehrten Reihenfolge, um das Gerät wieder zusammenzubauen. Trage gegebenenfalls neuen Klebstoff auf, nachdem du die betreffenden Bereiche mit Isopropylalkohol (>90%) gereinigt hast.

Kalibriere deinen neu eingebauten Akku, um eine optimale Leistung zu erzielen: Lade ihn auf 100 % auf, und lasse ihn mindestens zwei weitere Stunden lang laden. Verwende dein Gerät dann so lange, bis es sich aufgrund eines schwachen Akkus abschaltet. Lade dein Gerät anschließend ohne Unterbrechung auf 100% auf.

Entsorge deinen Elektromüll  fachgerecht.

Verlief die Reparatur nicht nach Plan? Schau in unser Forum und frage andere Reparatur-Profis nach Hilfe.

Dominik Schnabelrauch

Mitglied seit: 23/11/16

235740 Reputation

28 Kommentare

my flex cable is stuck to the top of the metal protector wtf

Audrion Bird -

My was stuck too, but with little bit of trying and patience, I was able to separate them by holding metal with pair of tweezers and gently prying it with very thin flat screwdriver bit.

Tomas Palider -

Any place to get the battery adhesive sticker in order to replace it?

Nothing Else -

I removed the adhesive sticker. Is it dangerous to use the phone without one?

E S -

Hi E S,

are you talking about the battery adhesive? If that is the case i can say - this sticker holds the battery in place and prevents it from moving around. If there is no sticker you might hear some noice when shaking the phone because the battery is moving. However it is unlikely that the battery disconnects because of that since the connector sits under a small metal shield. Depending on the phone movement theres a tiny chance that the battery or its cable deforms or gets damaged from moving around over time. It is not necessary to replace the adhesive with an original one, however i recommend using any double sided tape or similar rather than nothing.

Dominik Schnabelrauch -

Dominik, following up on that other comment, is there a particular suggested tape for the battery? The replacement battery kit on ifixit does have precut tesa tape but it’s not that large tape piece from your photo.

Toh Mah -

Hi Toh Mah,

the adhesive in the replacement battery kit is double sided pre cut tape which works fine when replacing the battery. There is no need to use adhesive tape as large as the original one, which is a pull tab. However thinking of the battery removal I advice not to overuse any adhesive tape when putting the battery back in place (as long it’s not the original one). The original tape makes future battery removals a bit easier. In case you replace it with any other adhesive tape (too much of it) a second battery replacement becomes more complicated because of the cables running underneath the battery. I recommend to use just enough of the tape to hold the battery in place and to apply it onto the mid frame where no cables are running. In this scenario every double sided tape will do the job. Sometimes the original tape is still sticky enough to reuse it.

Dominik Schnabelrauch -

Thanks for the answer. I’ll go with the simple solution then.

Toh Mah -

Hi Dominik,

Can I use a hair dryer on the screen to heat it up the adhesive if I don’t have access to the iOpener?

Lucas Cunha -

Hi Lucas,

a hair dryer will do the job. However take care not to overheat your phone. Heat to screen a little and check if you can remove the battery. If not, repeat the procedure.

Dominik Schnabelrauch -

Hi Dominik, i am in the process of replacing my battery but the backcover does not budge. I am using the same tools :-/

Do you have any tips?

thanks!

Karel Claes -

Good, helpful guide. After some frustration I managed to remove the case and old battery in preparation for fitting a new battery. All good.

Jim Norman -

Just went through the process and it was successful. Thanks for your guide, very helpful! The most stressful part was to open the screen without crashing the glass, but it was more resistant than I thought originally

Luis Enrique -

The #00 Phillips screw (2.8 mm long) in step 10 did not need to be removed.

Hosoe Shinji -

I can't get my cover back on. It seems the battery is slightly thicker than the original

Justin Gall -

I also had problems with this. I checked by eye and the two batteries had the same height. After taking it apart twice and try to put back the back cover many times I managed to click it in all the way. Keep trying!

Mód Márton -

I had a thicker battery, +0.5mm. it forced too much, I had to dismantle everything.

Corrado Corradini -

Worked flawlessly! Thank YOU! <3

João Gouveia -

Hi,

Anyone know what are the manufacturing dates of OP 5T batteries from ifixit?

I need to replace mine soon and don't want to get old batteries.

Thanks.

eziokiller47 -

I just replaced one for my 4+ year old 5T and Accubattery shows the health of the battery at 70% after 10 sessions. I'm quite disappointed since the original battery was ~ 75% health.

John Doe -

From the picture of the product, it is probably 2019.

Matthieu Hage -

If anyone still wonders about this, when I bought mine this week (January 2025) the battery was 6 months old.

Selvans -

The most tricky part for me was step 14. The upper main flex connector was stuck to the metal shield. As you can see in the photos of this guide, there's quite a lot of glue residue on top of this connector (looks like cooling paste). When I removed the shield, the connector was still stuck to it and also came off. I had to the blue opening tool to get them separated, and I almost tore the ribbon off the main flex connector.

Second most tricky part was step 5, removing the screen from the body. The clamps are very strong and after removing the screen you can see why, they are solid metal attached to the phone's frame. You can see the 4 grey lumps in step 6 on the side of the screen. So you don't have to worry about accidentally breaking one of the clips! Although, when you try to remove the screen, don't stick anything deep into the phone, you might scratch components.

[1/4]

Bartr -

Final tricky part was placing back the two metal shields, they luckily have a little bit of springiness to them so you could bend them and use a small pointy object to snap it back in place. But they don't seat very firm, you can wiggle them even though you've placed them back. You might want to try wiggling it with your finger(nail) a little bit before removing them the first time around (step 10 and 14) so you know what it should feel like when placing them back.

Oh and the battery was in there pretty firm as well. I used the 'guitar pick to lift the bottom right corner (with the QR code on it, step 17) and simultaneously lift the green pull tab. Eventually it popped out, no heat application was neccessary. Although, be careful of the main flex cable (step 16), you should fold it back or use some tape to hold it in place. Once the battery comes loose, it shoots from the phone with force and could tear the ribbon connector.

[2/4]

Bartr -

I was lucky enough that all the adhesive (step 19) was still on the battery so the phone was clean. I used the recommended Tesa 61395 tape that lets you peel strips of double-sided tape and place them on the new battery. I roughly copied the diagonal lines on the old battery so it would stick in the same places, and after placing the battery it seemed to seat pretty firmly into the phone.

Finally, I had this phone since Nov 28, 2017 and the phone had no dust or signs of liquid inside. I've used it in the rain many times and also I expected at least some dust to make it into the phone, but nothing! One note about this, there's a very thin black foam strip on the outer edge of the screen where it touches the back frame. You can see it pretty clear in photo 10 and 11. My phone definitely wasn't as dirty. Very impressed, hope the new battery helps last the device another year or two!

[3/4]

Bartr -

Ask me anything! Also, two more things about battery life. If I don't forget, I'll update my comment with how good the improvement is. Secondly, I spoke with another 5T owner who had it for roughly the same amount of years. He charged it only when it was running empty (<10%) and also don't keep it on the charger when it reaches 100%. His phone was still lasting a full day with the original battery, when I used mine for a couple hours of screen time, I had to charge it after diner if I wanted to make it through the night.

Excellent guide, and excellent phone! PS, this might not be the right place, but I'd love to hear anyone's experiences on custom ROMS like lineageOS.

[4/4]

Bartr -

Super... nouvelle batterie (oneplus 5t) installée assez rapidement grâce à l'excellent tuto.

À voir maintenant les performances !

djimel -

Great tutorial, works like a charm. The battery sold by ifixit works great too on my OnePlus 5T. In my case, the metal cover on the upper main Flex (step 14) was sticked to the flex so I just removed the metal cover and the flex at the same time. I would not recommend separating them. Also, the original battery was really hard to remove because of the adhesive and I had to bend it to remove it... a bit dangerous. Can't really scratch underneath either since there's a flex there, just be careful or use a heater.

Selvans -