
Einleitung
Diese Anleitung zeigt, wie der Akku eines Samsung Galaxy S10+ entfernt und ausgetauscht wird.
Der Akku ist sehr fest verklebt. Daher vereinfacht die Anwendung von hochkonzentriertem (über 90%igem) Isopropylalkohol den Ausbau des Akkus.
Wenn dein Akku aufgebläht ist, musst du entsprechende Vorsichtsmaßnahmen treffen. Vermeide es in diesem Fall, dein Smartphone zu erwärmen.
Entlade den Akku aus Sicherheitsgründen auf unter 25%, bevor du mit der Reparatur anfängst. Das reduziert das Risiko, dass sich der Akku entzündet oder explodiert, falls er versehentlich während der Reparatur beschädigt wird.
-
-
Ziehe das Ladegerät raus und schalte das Smartphone aus, bevor du anfängst.
-
Erhitze einen iOpener und lege ihn zwei Minuten lang auf die rechte Kante der Rückabdeckung.
-
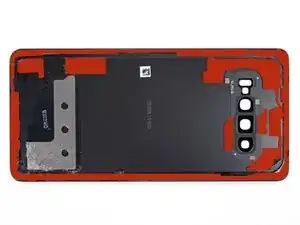
Schaue dir, während der Wartezeit, das Bild der entfernten Rückabdeckung an, um zu sehen, wo genau sich der Kleber befindet.
-
-
-
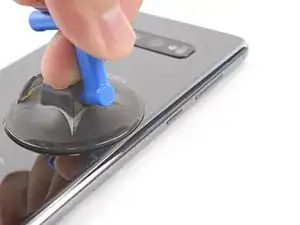
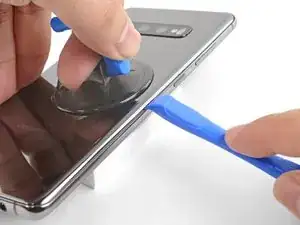
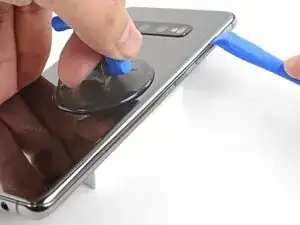
Setze einen Saugheber auf die Rückseite des Smartphones, und zwar so mittig auf die rechte Kante wie möglich (hier ist der Kleber am dünnsten).
-
Ziehe gleichmäßig und fest am Saugheber, um einen Spalt zwischen Rückabdeckung und Rahmen zu erzeugen.
-
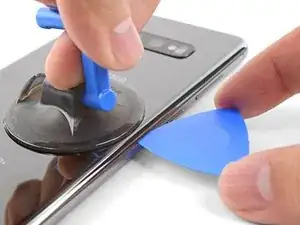
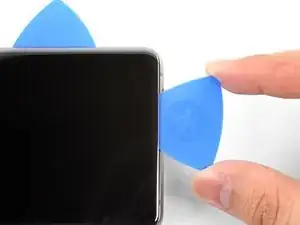
Setze die Spitze eines Plektrums in den Spalt.
-
Falls du Schwierigkeiten dabei hast, einen Spalt zu erzeugen, ist es am Besten, die Kante erneut zu erhitzen und es nochmal zu versuchen.
-
Du kannst auch ein paar Tropfen Isopropylalkohol auf die Fuge träufeln, um den Kleber etwas aufzuweichen.
-
-
-
Lege etwas unter die erwärmte rechte Kante des Smartphones, das etwa 13 mm (0,5") dick ist. So ist es einfacher, das Öffnungswerkzeug einzusetzen.
-
Halte die linke Kante des Smartphones mit deinen Fingern fest, sodass das Smartphone nicht abrutscht. Ziehe kräftig am Saugheber.
-
Drücke die Kante eines Öffnungswerkzeug in die Fuge zwischen Rückabdeckung und Rahmen.
-
Schiebe das Öffnungswerkzeug ein paar Mal an der Fuge hin und her.
-
-
-
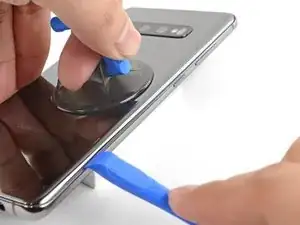
Schiebe das Plektrum an der Kante des Smartphones entlang und durchtrenne den Kleber.
-
Lasse ein Plektrum in der Fuge stecken, damit sich der Kleber nicht wieder verbindet.
-
-
-
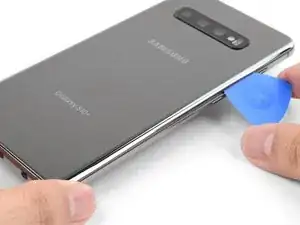
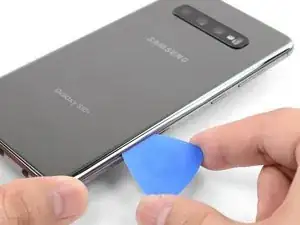
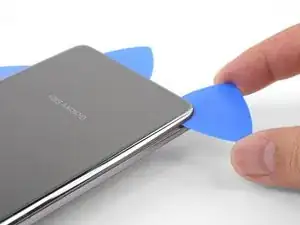
Setze ein Plektrum in die rechte Kante nahe der unteren rechten Ecke ein.
-
Schiebe das Plektrum vorsichtig um die Ecke herum. Schneide an der Unterkante entlang weiter und um die linke untere Ecke herum.
-
Lasse ein Plektrum stecken, damit sich der Kleber nicht wieder verbindet.
-
-
-
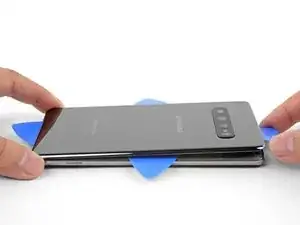
Wenn du dich um das ganze Smartphone herum gearbeitet hast, verdrehe ein Plektrum in einer der Ecken, um die Rückabdeckung vom Rahmen abzulösen.
-
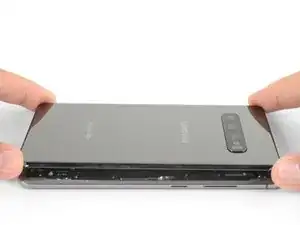
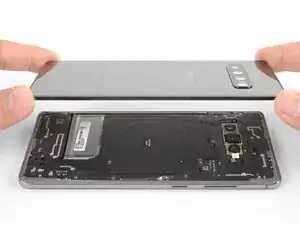
Hebe die Rückabdeckung langsam an. Benutze Plektren, um den restlichen Kleber zu durchtrennen.
-
Entferne die Rückabdeckung.
-
-
-
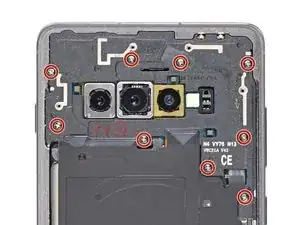
Entferne die neun 4 mm Kreuzschlitzschrauben, mit denen der obere Mittelrahmen am Smartphone befestigt ist.
-
-
-
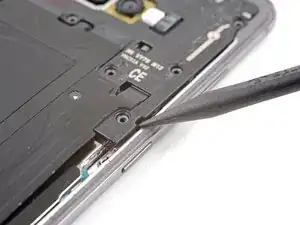
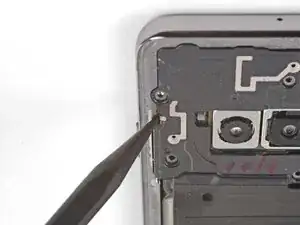
Setze die Spitze eines Spudgers in die Kerbe in der rechten Kante des Mittelrahmens in der Nähe der Bixby-Taste.
-
Heble nach oben, um den Mittelrahmen vom Smartphone abzulösen.
-
-
-
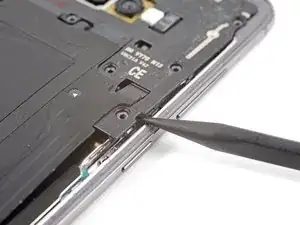
Setze die Spitze eines Spudgers in die Kerbe auf der linken Kante des Smartphones, nahe der Einschalttaste.
-
Heble nach oben, um den Mittelrahmen vom Smartphone abzulösen.
-
-
-
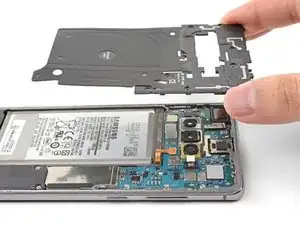
Hebe den Mittelrahmen an den oberen Ecken hoch und entferne ihn vom Smartphone.
-
Richte die Oberkante des Mittelrahmens mit den Smartphone aus und lege den Rahmen auf das Smartphone ab.
-
Drücke den Mittelrahmen mit den Fingern außen herum fest, damit die Klammern des Mittelrahmens wieder einrasten. Die Kanten sollten bündig mit der Kante des Smartphones abschließen.
-
-
-
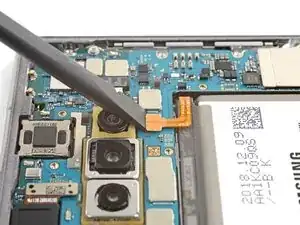
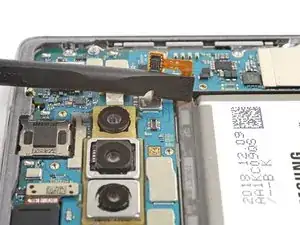
Setze das flache Ende eines Spudgers unter den Akkustecker, der unterhalb der Rückkamera mit dem Motherboard verbunden ist.
-
Heble den Stecker nach oben, um ihn aus seinem Anschluss zu lösen.
-
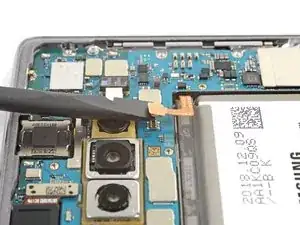
Schiebe das Flachbandkabel des Akkus vorsichtig vom Anschluss auf dem Motherboard weg, um einen versehentlichen Kontakt zu vermeiden.
-
-
-
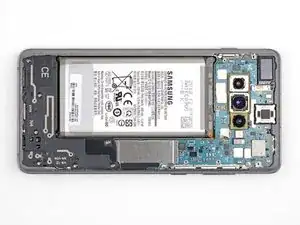
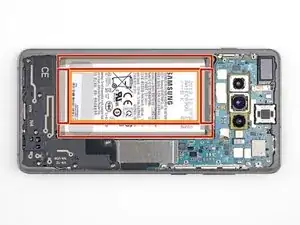
Der Akku ist sehr fest verklebt. Achte besonders auf folgende Bereiche:
-
Der Rahmen, wo der Akku sehr stark verklebt ist.
-
Ein Ausschnitt im Rahmen, unter dem sich die empfindliche offenliegende Displayeinheit befindet. Sei vorsichtig, wenn du in diesem Bereich hebelst, damit die Displayeinheit nicht beschädigt wird.
-
-
-
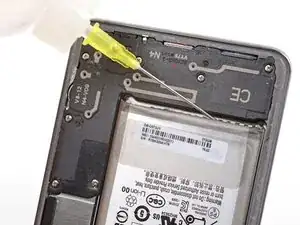
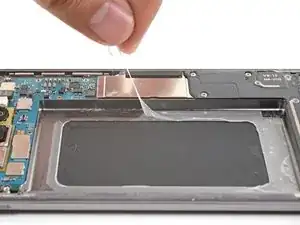
Hebe die Unterkante des Smartphones an und halte das Smartphone schräg.
-
Träufle 1 - 2 Tropfen Isopropylalkohol in den Spalt zwischen dem Akku und dem unteren Mittelrahmen des Smartphones.
-
Halte das Smartphone eine Minute lang schräg, damit der Isopropylalkohol den Kleber erreicht.
-
Alternativ kannst du auch einen iOpener erhitzen und zwei Minuten lang auf die rechte Vorderseite des Smartphones legen.
-
-
-
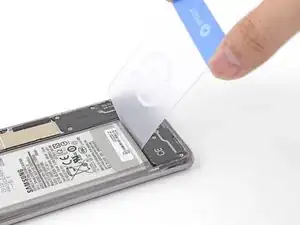
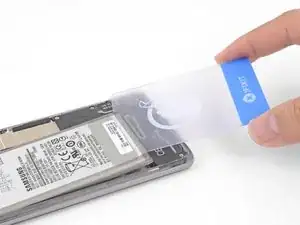
Setze die Ecke einer Plastikkarte in den Spalt zwischen Akku und unterem Mittelrahmen.
-
Heble den Akku fest und gleichmäßig aus seiner Vertiefung heraus.
-
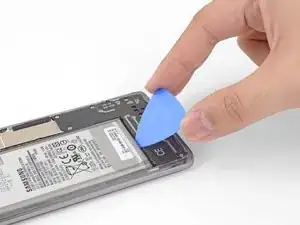
Benutze ein Plektrum, ein Öffnungswerkzeug oder einen Spudger, um den Akku herauszuhebeln. Verwende keine Metallwerkzeuge.
-
Wiederhole die Anwendung von Isopropylalkohol und versuche es erneut.
-
Versuche, den Kleber mehr mit dem iOpener zu erwärmen, damit er weich wird.
-
-
-
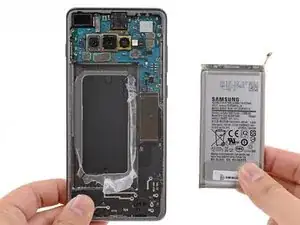
Entferne den Akku.
-
Wenn du Isopropylalkohol verwendet hast, dann warte zehn Minuten, bis er komplett verdunstet ist.
-
Klebe zuerst vorgestanzte Klebestreifen oder doppelseitiges Klebeband auf den Rahmen, bevor du den Akku in die Vertiefung hineindrückst.
-
Es darf kein Kleber auf die offenliegende Rückseite des Displays kommen.
-


***Um dein Gerät wieder zusammenzubauen, folge den Schritten dieser Anleitung in umgekehrter Reihenfolge.
***
Folge dieser Anleitung, um einen Akkuzyklus-Reset durchzuführen und den neuen Akku zu kalibrieren.
Entsorge deinen Elektromüll fachgerecht.
Lief die Reparatur nicht wie geplant? In unserem Antwortenforum findest du Hilfe bei der Fehlersuche.

16 Kommentare
The hardest part was actually getting rid of all the adhesive residue everywhere. That step took the longest. The battery removal went very quickly, surprisingly so.
isely -
Worked great to replace my swollen battery, and thanks to it being swollen I could actually skip the steps to pry open the back cover. Anyway, from my experience everything is correct, the only downside is that I used a little more than a few drops to loosen the battery and after the whole annoyance of removing the glue and placing the new battery I turned on the phone to check everything was working and my back cameras were blurry.... yeah, too much alcohol, had to clean them up very well.... but the sad part is that some of the alcohol made it's way to the front cameras... now they are both blurry.
Brian -
لم استطيع أشحن البطارية خارج أمريكا اذاً ما الفائدة ؟
Omar Al -