Einleitung

Diese Anleitung zeigt dir, wie du den Lithium-Ionen Akku austauschen kannst. Bei einem typischen Akku dauert es bei täglichem Gebrauch etwa 18 - 24 Monate, bis er die Ladung nicht mehr gut hält. Wenn dein Akku seine Ladung nicht mehr gut hält, oder dein Smartphone sich unerwartet abschaltet, dann kannst du es mit Hilfe dieser Anleitung wieder in Ordnung bringen.

Bevor du mit der Reparatur beginnst, musst du erst den Akku auf unter 25% entladen. Ein geladener Akku kann Feuer fangen oder explodieren, wenn er versehentlich perforiert oder beschädigt wird.

Wenn dein Akku aufgebläht ist, dann treffe entsprechende Vorsichtsmaßnahmen und erwärme dein Smartphone nicht. Du kannst eine Pipette oder eine Injektionsspritze benutzen, um Isopropylalkohol (mindestens 90%) um die Kanten der Rückabdeckung zu einzuträufeln und so den Kleber zu schwächen. Aufgeblähte Akkus können gefährlich sein, trage daher eine Schutzbrille und sei sehr vorsichtig. Gib sie im Zweifelsfall zu einem professionellen Reparaturdienst.

  1. jLfiMUGJ2DUP3XEY
    • Durch das Öffnen des Gerätes werden die wasserdichten Versiegelungen beschädigt. Halte entsprechenden Austauschkleber bereit bevor du fortfährst oder achte darauf, dass dein Gerät nicht mit Flüssigkeiten in Berührung kommt, falls du den Kleber nicht ersetzt.

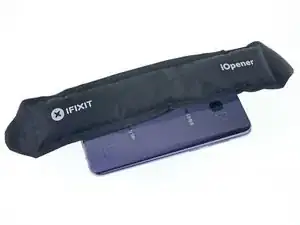
    • Bereite einen iOpener vor und lege diesen auf die linke Kante der Rückseite für etwa 2 Minuten, um den Kleber zu lösen, der die Rückabdeckung befestigt

    • Es kann sein, dass du den iOpener öfter erwärmen musst, um das Gerät entsprechend zu erwärmen. Folge den iOpener Anweisungen, um ein Überhitzen zu vermeiden.

    • Ein Fön, eine Heißluftpistole oder eine Wärmeplatte kann ebenfalls benutzt werden, hier musst du jedoch besonders aufpassen, da das OLED Display sowie der interne Akku sehr anfällig für Hitzeschäden sind.

  2. fmUCutdpOtr3bx4j
    fmUCutdpOtr3bx4j
    akgJfajsUmFxGhhW
    • In den folgenden Schritten wirst du den Kleber entfernen, welcher die Rückabdeckung am Gerät befestigt.

    • Der Kleber ist wie im Bild 1 befestigt und zeigt die Rückabdeckung von innen nachdem sie entfernt wurde.

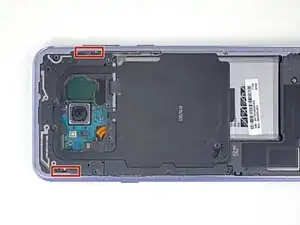
    • Von außen betrachtet durchschneidest du folgende Bereiche vom Kleber:

    • Bereiche mit dickem Kleber

    • Bereich mit dünnem Kleber

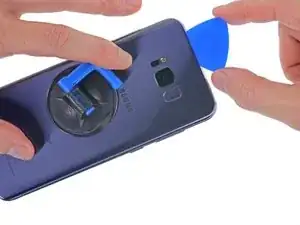
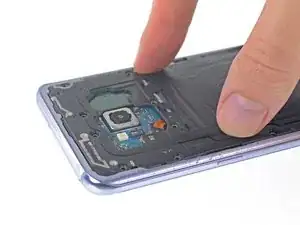
    • Vermeide es, in diesem Bereich zu hebeln oder zu schneiden, da du sonst das Kabel des Fingerabdrucksensors beschädigen könntest.

  3. IAw5futUXpBWGI5M
    IAw5futUXpBWGI5M
    Cox5lfNgS2Y4LJNF
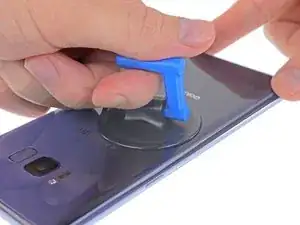
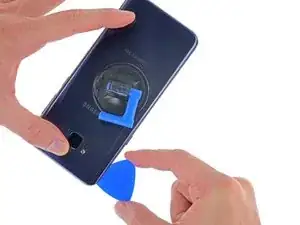
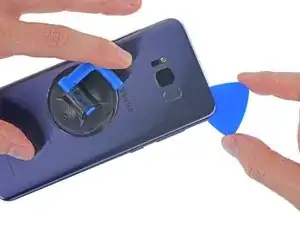
    • Positioniere einen Saugheber so nah an der erhitzten Kante der Rückabdeckung.

    • Der Saugheber wird nicht an den abgerundeten Kanten halten - positioniere ihn aber so weit wie möglich an ihnen.

    • Sollte die Rückabdeckung beschädigt sein, versuche, sie mit starkem Klebeband anzuheben, oder den Saugheber festzukleben und ihn nach dem Trocknen anzuheben.

    • Hebe die linke Kante der Rückabdeckung leicht mit dem Saugheber an, um zwischen Rückabdeckung und Rahmen einen Spalt zu erzeugen.

    • Dies erfordert eine gewisse Kraft, aber du brauchst nur einen sehr kleinen Spalt zu schaffen, um das Plektron einzuführen.

    • Wenn du Probleme damit hast, lass mehr Wärme einwirken, um den Kleber aufzuweichen. Bedenke, dass der Kleber schnell auskühlt, du also recht schnell arbeiten musst.

    • Wenn du einen iOpener benutzt, folge dieser Anleitung, um eine Überhitzung zu vermeiden, denn sonst könnte das Gelpack platzen.

  4. RT3cpsYu15HmcNKT
    RT3cpsYu15HmcNKT
    OJQAxoJex4iacjLB
    • Führe ein Plektron in den Spalt ein

    • Wenn du zu viel Kraft aufwendest oder Metallwerkzeuge verwendest, kann die Rückabdeckung aus Glas brechen.

    • Optional kannst du sobald du ein Plektron zwischen Rückabdeckung und Gerät positioniert hast, ein paar Tropfen Isopropanol verwenden, um den Kleber zu lösen.

    I strongly advise using a modeling knife to cut the adhesive when you get a sufficient gap otherwise you may easily break the corners of the extremely thin back glass on the phone (as I did).

    Michael De Angelis -

    There are NO "Opening Picks" in the repair kit!!!!!

    CA Winters -

  5. MarAL2YgC1cGBFxS
    MarAL2YgC1cGBFxS
    IZas5ZlPULJwSZpW
    RNDcAxuMGmm4PbDj
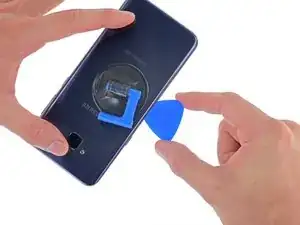
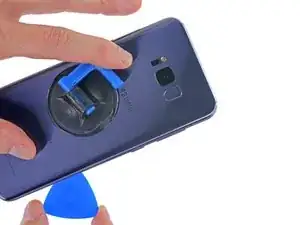
    • Führe das Plektron entlang der linken Kante um den Kleber lösen, der die Rückabdeckung befestigt.

    • Später kann es hilfreich sein, das Plektrum an Ort und Stelle zu lassen und für den nächsten Schritt ein zweites Plektrum zu benutzen. So kann ein erneutes Anhaften des Klebers vermieden werden.

  6. VJxXFLwOaxYg2gaR
    VJxXFLwOaxYg2gaR
    OMJAB1LcXPQCdR5R
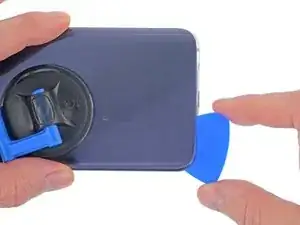
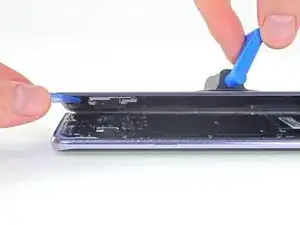
    • Fahre weiter entlang der Unterkante, um den Kleber zu lösen.

    • Erwärme die Rückabdeckung wenn nötig, das verhindert das Auskühlen und Aushärten des Klebers.

    • Hier ist die Klebefläche deutlich größer und du musst das Plektron ein klein wenig weiter einführen, um den Kleber komplett zu lösen.

    • Erneut ist es sinnvoll, das Plektrum an Ort und Stelle zu lassen, und ein weiteres für den nächsten Schritt zu nehmen.

  7. TFYeWYpgQGYPhBbR
    TFYeWYpgQGYPhBbR
    BVIbUUjEdFO5MexR
    oMNV5UaCpeRn3E4m
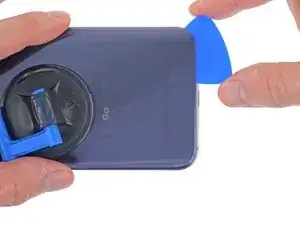
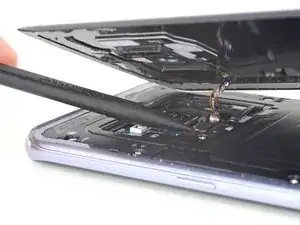
    • Fahre an der Oberkante und der rechten Kante entlang, um den verbleibenden Kleber zu lösen.

    • Du kannst den Fingerabdrucksensor beschädigen, wenn du das Plektron zu weit unter die Rückabdeckung schiebst. Arbeite vorsichtig und benutze das Diagramm im Schritt 2 als Richtlinie.

  8. uOHLZH41FkWWmBBT
    uOHLZH41FkWWmBBT
    5QeembslYAOwImmC
    • Versuch noch nicht die Rückabdeckung vollständig zu entfernen.

    • Hebe die Rückabdeckung vorsichtig von der linken Seite an und klappe sie etwas hoch.

    "Left" edge, "right edge... which one is it? The left edge can be the right edge, and vice versa depending on the phone position on your table. I recommend saying "from the edge with the Power button (opposite to the edge with the Volume and Bixby buttons), as seen in the picture".

    PilotFerdi -

  9. eYWLyoGZUuJU2cOJ
    eYWLyoGZUuJU2cOJ
    R4NovpMBMkJGPLZB
    • Benutze die Spitze eines Spudgers, um den Anschluss vom Fingerabdrucksensors zu lösen.

    Before lifting the back cover, I placed the heating pad over the sensor. That caused the sensor to separate from the case, falling in its location next to the back camera. I am aware that heat is the main enemy of electronic components, however, the pad was not heated at temperature high enough, and was not kept in place for too long, to cause damage to the camera or the sensor (at least, I don't think it did).

    PilotFerdi -

  10. SDmDVPpo5RlPuQLj
    SDmDVPpo5RlPuQLj
    NABnNw2MkCUePhjv
    YBQyBbDYksjbgHlL
    • Um den Sensor beim Zusammenbau wieder in die richtige Position zu bringen, lege die Rückabdeckung erst leicht auf einer Seite auf, bis der Anschluss vom Sensor direkt über dem Sockel ist.

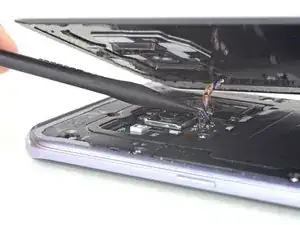
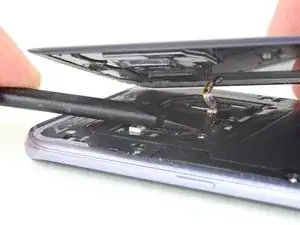
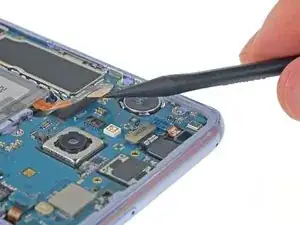
    • Benutze dann das flache Ende eines Spudgers, um den Anschluss vorsichtig auf den Sockel zu drücken.

    • Wenn du schmale Hände hast, kannst du den Anschluss auch mit dem Finger wieder verbinden - aber achte hier darauf das Kabel nicht zu überdehnen.

    • Dies braucht Geduld und ein bisschen Erfahrung. Lass dir Zeit und vermeide es, den Stecker mit Gewalt an seinen Platz zu bringen.

  11. oewOcN2FEaOK6AXW
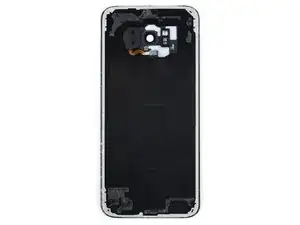
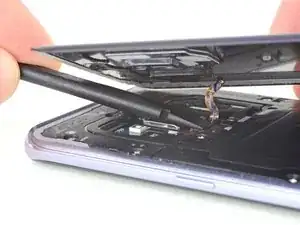
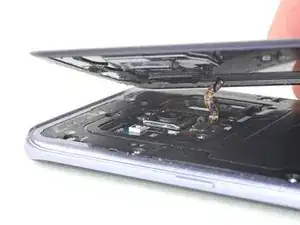
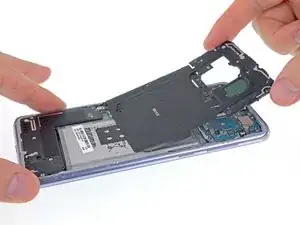
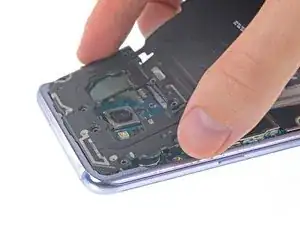
    • Entferne die Rückabdeckung.

    • So wird die neue Rückabdeckung wieder eingebaut:

    • Entferne alle Kleberreste mit einer Pinzette vom iPhone. Reinige dann die Klebeflächen mit hochkonzentriertem Isopropylalkohol (mindestens 90%ig) und einem fusselfreien Tuch, um die Fläche für den neuen Kleber vorzubereiten.

    • Ziehe die Schutzfolie vom neuen Rückseitenglas ab und richte eine Kante des Glases am Smartphone aus. Drücke dann die Rückseite gut fest.

    • Folge dieser Anleitung, um eine Glasrückseite , bei der keine Klebestreifen vorinstalliert sind, wieder aufzusetzen.

    • Schalte das Smartphone ein und teste es ausführlich, bevor du es endgültig zuklebst.

    • Wenn gewünscht, kannst du die Rückabdeckung auch ohne neuen Kleber aufbringen. Hierzu musst du jedoch größere Stücke vom übriggebliebenen Kleber entfernen, damit die Rückabdeckung flach aufsitzt. Erwärme nach dem Einbau die Rückabdeckung und drücke sie fest. Das Gerät ist danach nicht wasserdicht, aber es hält.

    • Eventuell musst du auch die Kameraeinfassung auf das Ersatzteil übertragen. Folge in diesem Fall unserer Anleitung

  12. OJ4EoNU6lvwmrn6C
    OJ4EoNU6lvwmrn6C
    To1LTjPvpNYBtFZS
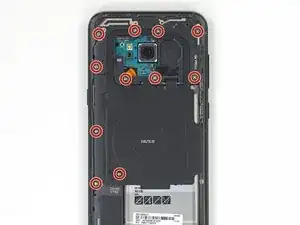
    • Entferne die elf 3,7 mm Kreuzschlitzschrauben, welche die kabelloses Ladespule und die Antenneneinheit befestigen.

    • Wenn du Schwierigkeiten hast, manche der Schrauben zu entfernen, selbst wenn sie ganz herausgedreht sind, kannst du sie mit einer Pinzette herausziehen.

  13. FJR1UamlLtD33TiP
    FJR1UamlLtD33TiP
    YmP6Jkay2FaRacuO
    • Die kabellose Ladespule und Antenneneinheit wird noch mit kleinen Plastikklammern festgehalten.

    • Heble an den markierten Stellen den Kunststoff hoch, um die Klammern zu lösen.

    The spudger tool has a pointy end and a flat end, it’s not clear which end should be used. Furthermore, the flat end is too wide to insert into the area shown, so the pointy end would seem obvious, but there is no clear indication whether it should be used to push any tabs in the area referenced, which I couldn’t find any, or if you’re meant to just sort of pry it in there until the area pops up, which is what I had to do. Then use the flat end of the spudger to lift it up gently after releasing, or popping the opposite side up as well.

    Mark Velasco -

    Unlike its smaller sibling, the Galaxy S8, this model's assembly is tightly attached; not easy to remove. I tried different ways. The one way that worked for me was to

    1. pry a little on the small notch (in the marked area on the side with the Power button) using the tip of the pick, then

    2. lift a little that part, sufficiently to insert a opening pick as support, then

    3. used the flat edge of the pick to pop free that side of the assembly. Then

    4. used the tip of the pick to pry on the little notch on the opposite side (the side with Bixby and Volume buttons) to release the assembly.

    You have to slide it out a little in order to disengage the small plastic clips at the top of the assembly from the frame.

    PilotFerdi -

  14. nf1GEgcgcLaIkBMN
    nf1GEgcgcLaIkBMN
    h2Qa2QyaMIa42H46
    NeAUnJrySrOeycWx
    • Entferne die kabellose Ladespule und die Antenneneinheit.

    • Setze beim Zusammenbau zuerst die Oberkante der Einheit in den Rahmen des Smartphones ein und drücke dann den Rest der Einheit nach unten, damit er einrastet.

  15. PGrD2RYGY2WXySuo
    PGrD2RYGY2WXySuo
    dZUELWBeMCugsJZR
    • Heble den Akkustecker mit einem Spudger gerade aus seinem Anschluss hoch und trenne so den Akku ab.

  16. twGMEnSoXjT1XeVs
    twGMEnSoXjT1XeVs
    kTNWffKDUWsmbDOT
    • Der Akku ist sehr stark festgeklebt.

    • Gib 1 - 2 Tropfen von hochkonzentriertem Isopropylalkohol (mindestens 90%ig) unter jede Ecke des Akkus. Lasse ihn ein paar Minuten einwirken, damit der Klebstoff geschwächt wird.

    • Zu viel Alkohol kann das Display beschädigen.

    • Du kannst auch einen neu erwärmten iOpener zwei Minuten lang auf das Display direkt hinter dem Akku auflegen, damit der Kleber aufgeweicht wird. Wiederhole das Erwärmen und Auflegen des iOpeners so oft wie nötig.

    I'm replacing the battery on this phone for a friend. The back glass had partially come loose because the battery was swollen. I already have two of the tool packs from other phone repairs but this is my first battery swap and first time reading one of your repair guides. When I was first given the phone and saw one corner of the back coming loose, I grabbed one of the blue pics and carefully removed the back glass to do a visual. I didn't know the finger print reader is glued to the back glass. When I took the back off the FP reader stayed with the phone so the back was a breeze to take off.

    Daniel Clayton -

    I would recommend to NOT add alcohol at the top left (connector side) and bottom right corners, as the glue has gaps at those two corners. The alcohol will seep through the gaps onto the graphite layer of your screen, and might damage it. I've found traces of leaked alcohol on the graphite layer when I removed the battery, even though I poured only 3 drops at each corner from a hypodermic (that is, very thin) needle. On the bright side, the alcohol AND heating work. To be clear: I applied the alcohol, then I also applied the heating pad as described in this step.

    PilotFerdi -

  17. fIOPYqMUEdOFTRPo
    fIOPYqMUEdOFTRPo
    GHOmIV6Cfk1ixDQx
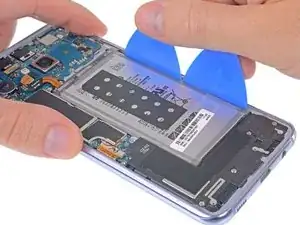
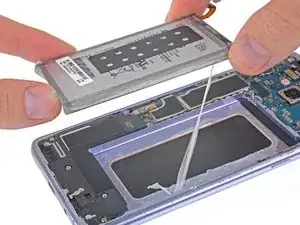
    • Setze einige Plektren oder eine Kunststoffkarte an der Außenkante des Akkus ein.

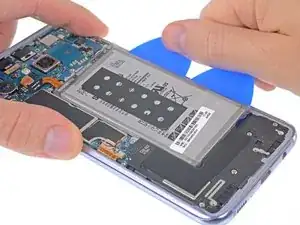
    • Drücke gleichmäßig und konstant, damit sich der Akku langsam aus dem Smartphone hebt.

    • Versuche dabei den Akku so wenig wie möglich zu verbiegen. Aus Lithium-Ionen Akkus mit weicher Hülle können gefährliche Chemikalien herausfließen, sie können Feuer fangen oder sogar explodieren, wenn sie beschädigt werden. Wende beim Hebeln keine übermäßige Kraft an und benutze zum Hebeln keine Metallwerkzeuge.

    This would be a great tip if you would have some space between the battery and frame. Unfortunately, on my phone the battery is snug against each lateral sides, so there is no space where one can insert a pick. I tried several times, moving the pick back and forth to make room for it...no joy.

    My procedure to remove the battery:

    1. applied alcohol as instructed in Step 16, and leaving it to work for some time (maybe 10 minutes?); then

    2. heated the battery side of the screen for about 2 minutes; then

    3. lifting the connector cable to expose some opening under the battery; then

    4. inserted the flat side of the pick under the battery, and pry it against the metal frame (i.e. pushing, and rotating the pick).

    PilotFerdi -

  18. W5GQxtUVhKEurNiy
    • Entferne den Akku.

    • Wenn du einen Akku ausgebaut hast, darfst du ihn nicht wieder benutzen, dies wäre ein Sicherheitsrisiko. Ersetze ihn durch einen neuen Akku.

    • Wenn du Isopropylalkohol verwendet hast, dann warte zehn Minuten lang, bevor du den neuen Akku einbaust, damit der Alkohol vollständig verdunstet ist.

    • Folge dieser Anleitung, um den neuen Akku und neue Klebestreifen einzubauen.

Abschluss

Um dein Gerät wieder zusammenzusetzen, folge den Schritten in umgekehrter Reihenfolge.

Folge dieser Anleitung, um einen Akkuzyklus-Reset durchzuführen und den neuen Akku zu kalibrieren.

Jeff Suovanen

Mitglied seit: 06/08/13

442488 Reputation

14 Kommentare

this Iso + Heat method makes tough adhesive a thing of the past! just be patient. like the guide says, 2 mins to allow iso to penetrate

I applied the alcohol using a small paint brush, dipped into my iso jar, and “painted” along the battery edges.

roughly 30 seconds with heat gun on the front glass, boom, a freed battery

Andrew -

Just received this kit and I see it comes with the big adhesive, but it also has a smaller blue adhesive and a rectangle thing(that I think goes behind the battery?) that has a small one with it. Where do these things go?

Nick Pf -

Check out their guide they have up now for the replacement of this adhesive. Specifically, take a look at the pictures in step 10 to see where the little pieces are supposed to go.

Scott -

Highly recommend against doing this. Even going carefully and reheating, 2 of the corners cracked when moving the pick through. So much for taking perfect care of the phone for 2 years =o(

Nick Pf -

Ditto. I ended up cracking my glass using the iOpener method as well. After no ordering and replacing the rear glass as well now, I am resorting to only using isopropyl alcohol from now on. No matter how hot I got the iOpener, how long I let it heat soak the adhesive, or how many times i reheated the iOpener and reapplied it, I never got any of this adhesive to come off without a risky struggle. And upon ordering all the adhesive kits, I still was shipped missing pieces of adhesive (camera, fingerprint reader, specific support adhesive, etc.). Very frustrating and time consuming process; far more than what these guides say it takes.

Scott -

why no diagrams of where all the gaskets go?! I’m lost.

Jason Everett -

Hi Jason,

Follow this link for a general Galaxy S adhesive guide! Hope that helps.

Arthur Shi -

I’m back! The battery lasted about 16 months,. 2nd time went a lot smoother, particularly since the adhesive behind the battery was now much less. The replacement battery-only did not come with adhesive at all, so I just didn’t use any this time. I ended up just replacing the back to go along with it so I wouldn’t worry about cracking it and it was much easier.

Nick Pf -

Bonjour.

Tuto parfait mais incomplet. Le kit iFixit comprend tous les adhésifs nécessaires. Mais le lien vers le tutoriel adhésifs ne présente que la mise en place de l’adhésif de la batterie - rien sur les autres qui sont pourtant bcp plus difficiles.

Les étapes les moins faciles :

- le retrait de la colle

- La remise en place la plaque arrière qui colle de partout à cause des adhésifs qui sont en place et où il ne faut pas se louper pour la reconnexion du fingerprint

- l’insertion du premier mediator pour trouver l’interstice : tout est affaire de dosage, fermeté mais pas trop, chaleur suffisante, etc …

Le iOpener (gel chauffant) m’a aidé à décoller la batterie en chauffant coté écran; par contre, il est insuffisant pour décoller la coque arrière (preferer séche cheveux)

Soyez patient et réfléchi et vous arriverez.

Didier MAURICE -

This guide should have said that the rear glass is likely to break. I used the IOpener and was very carefully with the picks but 2 corners are cracked. The rest went fine. The phone is working but the rear glass is broken. This is for me okay because I don’t care if the phone is not completly waterproof. I would recommend everyone who doensn’t want their phone to look like this buying a new rear glass and the battery kit togerther. It saves you cleaning time and can be easily done at the end. Also it only costs under 20 $. Or maybe use isopropyl alcohol. Also this kit only includes one isopropyl alcohol pad. This was not enough!!! The cleaning took me more than an hour and there was still glue at some parts of the phone. All in all I needed 3 hours.

Levios -

I just followed all the guides on here to replace my charging port, back glass cover and replace my battery. I managed to do it in around an hour with my Ifixit kit and it has already been paid for on my first phone. Awesome guides as well!

I tried a bag of heated water but heatgun was easier and faster.

Alexander Falk -

After replacing the battery the phone works fine. But it won’t charge. Any ideas what the problem could be?

Dominik -

These instructions are terrible! This is only half the job. What about putting it back together. I tried the links above and it kind of helps but the photos don't match what I have, even slightly, or again is half the steps. I have already wasted what I believe should have gone around the camera because I couldn't figure out it's rotation, before and after the backing was removed. Which way up do these go? Now that the battery glue strip is in, now what? How do I get the back glass on? No instructions, no links, no nothing. NOT IMPRESSED.

Jon Christensen -

This guide is NOT sufficient. Changing the physical battery is only one part of the process. This guide does not address the software side of things. It was the most disappointing feeling to see that there was NO change in battery behaviour after swapping out batteries. The phone still thinks it is an old battery and tries to limit charge level. As far as I know, there is no way to reset battery stats without rooting.

Maybe this will be helpful to someone, haven't tried it myself.

https://forum.xda-developers.com/t/reset...

Tomas -