Einleitung

Benutze diese Anleitung, um den abgenutzten oder kaputten Akku in deiner Samsung Galaxy Watch4 zu ersetzen.

Falls dein Akku aufgebläht ist, musst du entsprechende Vorsichtsmaßnahmen treffen. Entlade deinen Akku aus Sicherheitsgründen auf unter 25 %, bevor du dein Gerät auseinanderbaust. Falls der Akku während der Reparatur versehentlich beschädigt wird, ist so das Risiko geringer, dass er sich entzündet oder explodiert.

  1. tPsOU1qJlNmqKJJs
    • Trenne die Uhr vor Reparaturbeginn vom Ladegerät und schalte sie aus.

    • Entferne das Armband.

  2. ds3Zrry4BmkM4wQH
    • Entferne die vier 4,0 mm langen Tri-Point Y00 Schrauben.

    The correct tool to use here is a tri-point Y00 screwdriver.

    David C -

    What if 2 won't come out?

    Sharon Shelton -

    Yes this step needs to be edited as the correct tool is y00 not y000. I think I stopped my brand new y000 before I figured it out.

    Ryan Stokes -

    Definitely 00

    Andrew -

    Idk guys in my case the Y000 fit much better, the Y00 did turn the screws but felt like it will strip at any moment.

    Adam Duda -

    Ⓨ1.5 can also be used

    coltman88 -

  3. ymfKdMVQZhNEFppe
    ymfKdMVQZhNEFppe
    KDQOI5ShvA2eCphC
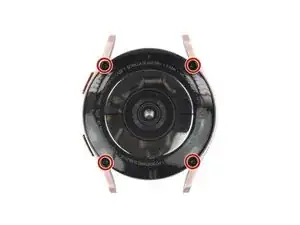
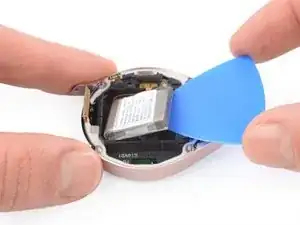
    • Setze ein Öffnungswerkzeug in die Naht zwischen der Rückabdeckung und dem Metallgehäuse ein.

    • Verdrehe das Werkzeug, damit ein Spalt entsteht.

    • Entferne die Rückabdeckung noch nicht ganz. Das Flachbandkabel zum Sensor ist immer noch an der Hauptplatine angeschlossen.

    That isn't glue holding the cover in place. That is the rubber gasket used to waterproof the device. It WILL get damaged and you WILL have to replace it.

    David C -

    Is there a way to remove the casing without damaging this gasket?

    Cove Shores -

  4. IEoNXm5eiJOjSaBs
    IEoNXm5eiJOjSaBs
    IhlOWESk3nwubB1w
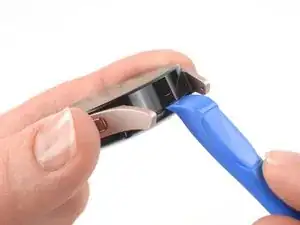
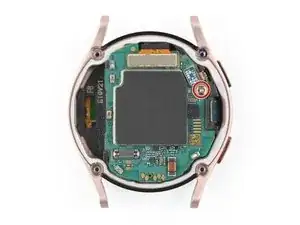
    • Lege die Uhr mit dem Zifferblatt nach unten auf die Arbeitsfläche.

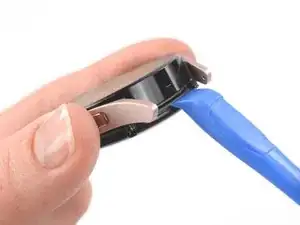
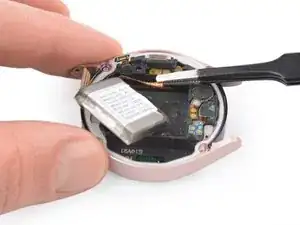
    • Klappe den Deckel auf der Rückseite vorsichtig vom eben erzeugten Spalt her auf.

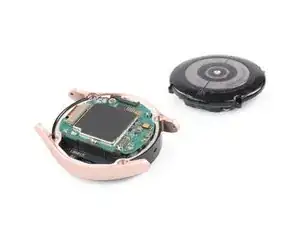
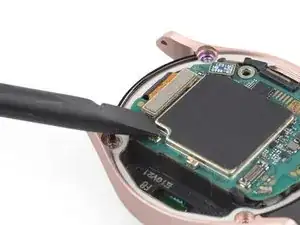
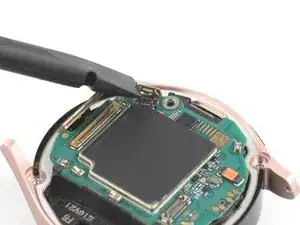
    • Heble das Flachbandkabel zum Sensor mit dem flachen Ende des Spudgers von der Hauptplatine nach oben und trenne es ab.

  5. D5HLPRTGUcyScmHE
    • Entferne die Rückabdeckung.

    • Kontrolliere, ob die Gummidichtung der Rückabdeckung noch in Ordnung ist. Wenn sie beschädigt ist, dann tausche sie aus, damit die Uhr weiterhin wasserfest bleibt.

    If there is then what do I do and also how do I know if it's damaged

    Zev Kaff -

  6. ErvfegsRao3RUki4
    • Entferne die 4,4 mm lange Kreuzschlitzschraube, mit der die Hauptplatine befestigt ist.

  7. P1tQclPfB2KN2DAo
    P1tQclPfB2KN2DAo
    nMHcZUDYpixQdUtw
    • Trenne das Display-Flachbandkabel mit dem flachen Ende des Spudgers ab.

    on watch 4 classic variants there is an additional small connector to the left of the display connector for the rotating dial that will have to be disconnected

    Erik Port -

  8. UFFBPVYGR1HJyywG
    UFFBPVYGR1HJyywG
    vZAxeE1A6GvOOF65
    • Trenne das Flachbandkabel zu den Kronentasten mit dem Spudger ab.

  9. F6byGgFAaHtwERaZ
    F6byGgFAaHtwERaZ
    2nMkDVED3AwfWWmg
    • Hebe die Hauptplatine mit den Fingern nach unten hin aus dem Uhrengehäuse heraus.

  10. Hsp6VICn1uZNoLgD
    Hsp6VICn1uZNoLgD
    VwWysdXiKKYinsqD
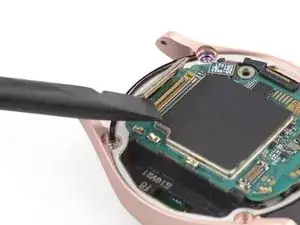
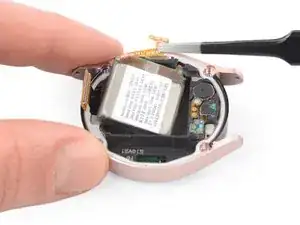
    • Setze das flache Ende eines Spudgers in den kleinen Spalt gegenüber vom Displaykabel zwischen dem Kunststoffrahmen und dem Akku ein.

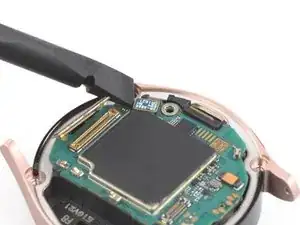
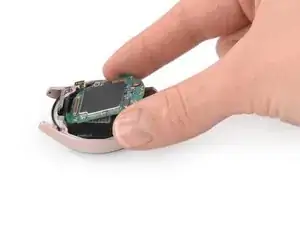
    • Heble den Akku vorsichtig aus seiner Vertiefung heraus.

    • Versuche nicht, den Akku ganz zu entfernen, da sein Stecker noch an der Kern-Baugruppe festgeklebt ist.

  11. HCjMjNWIVJPbhIIH
    HCjMjNWIVJPbhIIH
    FfXQYEALPUF6CiwM
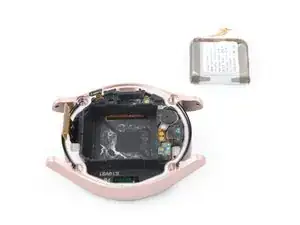
    • Hebe den Akku etwas an, um an das festgeklebte Steckerkabel heranzukommen.

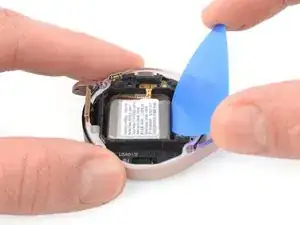
    • Hebe den leicht festgeklebten Akkustecker mit einer stumpfen Pinzette hoch.

    • Du kannst den Kleber wahrscheinlich zum Befestigen des neuen Akkus wiederverwenden. Falls nicht, ersetze ihn durch doppelseitiges oder vorgestanztes Klebeband.

  12. sUoLJN1o6UpMRDW2
    • Entferne den Akku.

Abschluss

Schalte dein Gerät wenn möglich ein und teste deine Reparatur, bevor du neuen Kleber anbringst und es wieder zuklebst.


Befestige deinen neuen Akku mit vorgeschnittenen Klebestreifen oder doppelseitigem Klebeband. Um ihn richtig zu positionieren, bringe das Klebeband im Gerät an, nicht am Akku. Drücke den Akku dann fest an.

Um dein Gerät wieder zusammenzubauen, folge den Schritten dieser Anleitung in umgekehrter Reihenfolge.

Für eine optimale Leistung solltest du deinen neu eingebauten Akku kalibrieren: Lade dein Gerät auf 100 % auf und lasse es zwei weitere Stunden am Ladegerät. Benutze nun dein Gerät, bis der Akku leer ist und es sich von selbst ausschaltet. Lade es dann ohne Unterbrechung wieder auf 100 % auf.

Entsorge deinen Elektromüll sachgerecht.

Hat die Reparatur nicht ganz geklappt? Versuche es mit ein paar grundständigen Lösungen, ansonsten findest du in unserem Forum Hilfe bei der Fehlersuche.

Adriana Zwink

Mitglied seit: 18/12/19

58292 Reputation

15 Kommentare

Will this same battery work for the 42mm Galaxy Watch 4 Classic? Or will I need to keep searching for a replacement for that model?

geeowens -

No! The batteries are completely different sizes.

David C -

Guide worked very well for me on the Watch4 (not classic). My battery adhesive came off during the replacement, so it was good to have gotten the adhesive card just in case.

My only note is that the Y000 Tri-point was tool small for the 2nd step. I used the Y00 Tri-point and it worked perfectly. The battery did take some effort to get out. I also used the flat edge of the plastic spudger to help lever up the corner to slide the pick in better.

Chris -

is it still water resistant

Victor Rhebok -

If you are careful, it still is.

Kartosh (regeditexe) -

It's sad and insanely corrupt that Samsung designed this watch to make changing the battery a long, delicate, tedious and potentially hazardous process. It would have been easy for them to simply design the watch with the battery being the FIRST thing you encounter when you take off the back! They clearly want people to simply buy a new watch when the thing can't hold a charge. This is planned obsolescence and, frankly, should be illegal. Obviously that also applies to all kinds of products/devices from other manufacturers as well. It's a damned shame that so many things wind up polluting landfills because they are designed to be virtually unable to be maintained and/or repaired.

Nick Lento -

This comment is absolutely spot on. I couldn't have said it better myself. I find it utterly infuriating how perfectly good products end up being thrown away just because the battery is either very difficult to remove without potential damage to the device, or impossible to remove in the first place, (looking at you Sphero)

Jon Hidden-Coley -

Will the Samsung Galaxy watch 5 pro or regular battery fit in the four for longer life aren't they the same size

Michel Bergeron -

I got my samsung tab s7+ battery replaced. After getting the batter replaced my battery life was not as good. Then I dialed a code I.e. *#9900# and reset battery stats. After that my battery worked better. Is there some same way in galaxy watch 4?

Udit Bansal -

The ribbon cable came off the watch back when separating the back from the watch. Is there any way to reattach it to the back?

Robin L Bell -

Alles klasse erklärt.super

Frank Haaßengier -

Alles klasse erklärt.super

Frank Haaßengier -

Super clear guide, thanks!
On my first attempt I found out that I got the wrong battery (EB-BR890ABU, instead of the EB-BR890ABY), but that was easily solved. And the second attempt took only a few minutes to complete: experience 😉 It gives a lot of satisfaction to do these small repairs with success. Thanks, iFixit!

Paul Warmer -

I hate having to throw older tech away due to it not charging properly or keeping its charge. Thanks to your guide, which I found easy to follow, I changed the battery on my watch and it now works again like it should. Cheers

John Burke -