Einleitung

Benutze diese Anleitung, um den Akku in deinem Steam Deck LCD ohne Sicherheitsrisiko auszutauschen.

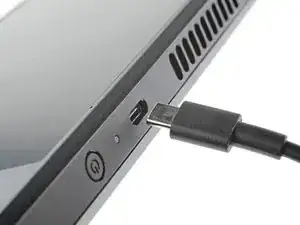
Schalte aus Sicherheitsgründen dein Steam Deck ein und entlade den Akku vollständig, bevor du mit dieser Reparatur beginnst. Ein geladener Lithium-Ionen-Polymer-Akku kann sehr gefährlich sein, wenn er versehentlich beschädigt wird. Das Erhitzen eines geladenen Akkus stellt eine Brandgefahr dar. Wenn dein Akku aufgebläht oder geschwollen aussieht, musst du zusätzliche Vorsichtsmaßnahmen treffen.

Hinweis: Der Akku ist sehr fest mit dem Steam Deck verklebt und erfordert daher mehrfaches Erhitzen und Hebeln. Die durch den iOpener erzeugte Hitze ist möglicherweise nicht ausreichend, ein Heißluftgebläse (oder ein Fön) sind in diesem Falls empfehlenswerter.

Achte während der Reparatur auf allgemeine Vorsichtsmaßnahmen zur Vermeidung von elektrostatischen Entladungen (ESD = engl. electrostatic discharge).

Nachdem der Akku entfernt wurde, darf er nicht wiederverwendet werden, um mögliche Gefahren zu vermeiden. Ersetze ihn deshalb mit einem neuen Akku.

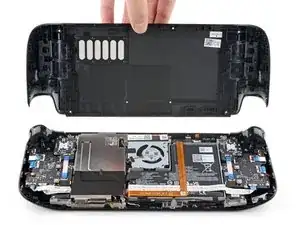
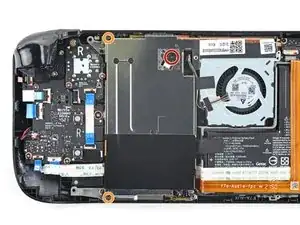
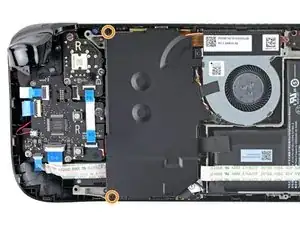
Hinweis: Anfang 2023 brachte Valve Steam Decks LCD mit leichten Änderungen im Inneren heraus. Dein Steam Deck unterscheidet sich vielleicht ein wenig von den hier gezeigten, die Verfahren sind aber gleich. Entferne die Rückseite, um zu überprüfen, welche Version du hast. Das ursprüngliche Steam Deck ist mit einer Metallabschirmung über der Hauptplatine und einem Lüfter mit eckigen Kanten ausgestattet, so wie hier gezeigt. Bei der neueren Version ist die Abdeckung über der Hauptplatine schwarz und die Kanten des Lüfters sind abgerundet, so wie hier zu sehen. Anleitungen für das Steam Deck OLED A findest du hier.

  1. AbyPsiOHIyu5DtQP
    AbyPsiOHIyu5DtQP
    yJCSYPAsUL23w26A
    T1GAZSKCFq2VDTvk
    • Ziehe alle Kabel vom Steam Deck ab.

    • Schalte das Steam Deck ein und entlade den Akku auf unter 5 %, bevor du mit der Reparatur beginnst. Aus einem geladenen Lithium-Ionen Akku können gefährliche Chemikalien austreten, wenn er versehentlich angestochen wird.

    • Versetze das Steam Deck im BIOS in den battery storage mode (Akkuspeichermodus). Hier steht, wie das geht.

    • Wenn du eine microSD-Karte angeschlossen hast, dann musst du sie entfernen, bevor du das Steam Deck öffnest. Wenn du die Rückseite ausbaust, ohne die Karte zu entfernen, kann sie in zwei Teile zerbrechen.

    • Tipp von Profis: Beim Reparieren kann es manchmal hilfreich sein, das Steam Deck auf seine Hülle zu legen, um die Thumbsticks nicht zu beschädigen und Wackeln zu verhindern.

    If your Steam Deck won't charge or turn on, you might need to disconnect your battery and then plug it back in.

    I thought my battery had gone completely dead but when I plugged the battery back in, the Steam Deck would then accept a charge.

    My Deck wouldn't accept at charge or respond at all prior to disconnecting the battery.

    Make sure to try this trick before completely removing your battery.

    Thanks iFixit for making these guides.

    Duane Degn -

  2. bpUGGPG32OkLXnC4
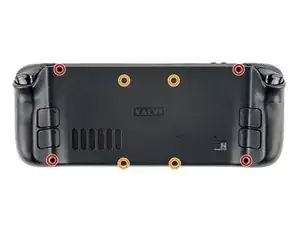
    • Benutze einen Kreuzschlitzschraubendreher, um die acht Schrauben zu entfernen, mit denen die Rückabdeckung befestigt ist:

    • Vier 9,5 mm Schrauben

    • Vier 5,8 mm Schrauben

    • Kreuzschlitzschraubendreher sind zwar standardisiert, trotzdem kann es sein, dass Schraubendreher mit der gleichen Markierung unterschiedlich gut in die Schraubenköpfe passen. Verwende die Größe, die am besten passt.

    • Achte während der gesamten Reparatur auf jede einzelne Schraube und stelle sicher, dass sie genau dorthin zurückkehrt, wo sie herkommt, damit dein Steam Deck nicht beschädigt wird.

  3. 6jtVcFtMGa5ZMqcF
    6jtVcFtMGa5ZMqcF
    Ux5LEj3JfJlkmQMQ
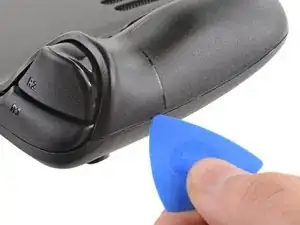
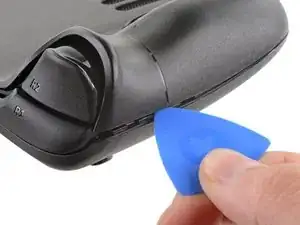
    • Setze ein Plektrum in den schmalen Spalt an der Kante an einem der Griffe zwischen Rückabdeckung und Vordergehäuse ein.

    • Wenn es schwierig ist, das Plektrum in diesen Spalt am Griff einzusetzen, dann versuche es zuerst entweder an der oberen oder unteren langen Kante und schiebe dann das Plektrum zum Griff hin.

    • Heble an der Rückabdeckung, um die Verschlussclips zu lösen.

  4. 6IvIWWqEXPTqW1XB
    6IvIWWqEXPTqW1XB
    1FxwYDjIGOAOCZT2
    KpIx4YIAZrDH1b5T
    • Sobald die Clips an einer Kante gelöst sind, kann der Rest ganz leicht abgetrennt werden.

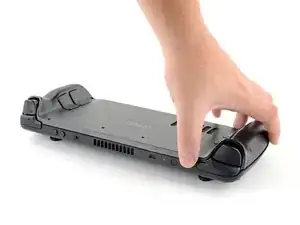
    • Fasse die Rückabdeckung an der eben entstandenen Öffnung und ziehe sie vom Gerät weg, um die Clips an den langen Kanten zu lösen.

    • Entferne die Rückabdeckung.

  5. WuMbLgtJF5JwQtjF
    WuMbLgtJF5JwQtjF
    I6pEKNGEKEDbNymT
    • Wenn du die neuere Steam Deck Version mit der schwarzen Abdeckung über der Hauptplatine hast, dann überspringe diesen Schritt.

    • Entferne mithilfe einer Pinzette das Stück Klebefolie auf der versteckten Schraube auf der Platinenabschirmung.

    • Versuche die Klebefolie nach Möglichkeit nicht zu zerreißen, sodass sie wiederverwendet werden kann. Wenn es nötig ist, kannst du dir auch ein passendes Ersatzstück aus Aluminiumfolie zurechtschneiden und einkleben.

    Use some heat here from a hairdryer to make this part easier.

    If you screw up here you can replace the little aluminium square with some aluminium tape from Amazon. No less than 50 microns thick, slightly thicker is fine. and the square is 13mm both ways.

    Matt S -

    Thanks for that Matt, i destroyed the original tape and i had no solution since i read your comment.

    Cihan Kocaman -

    there are other new version of board shield from 2023.

    Gorf Woo -

    Is it alright to use the deck without the tape?

    Jake -

    You should not. This is EM shielding to protect your processor and ram from radio waves in the air

    Andrew Borsje -

    I found out my 3 Weeks new Steam Deck is a old Version... gg. Valve...

    Miller Schiffer -

    wenn ich aluminium foile benutze, womit soll ich sie dann verkleben?

    Christian Dud -

    If we have the new version with the black shield, how do we access the SSD?

    James Bennett -

    I need this part, does anyone know where to get it?

    rolando norica -

    PSA: The only purpose of steps 5–8 is to enable you to disconnect the battery, which is not essential. I skipped steps 5–8 and did not have any trouble with the repair.

    David H -

  6. fpjCmGxopRvFvGbm
    fpjCmGxopRvFvGbm
    faiNkXVlQKKBKQT5
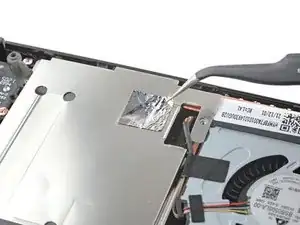
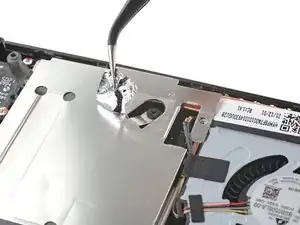
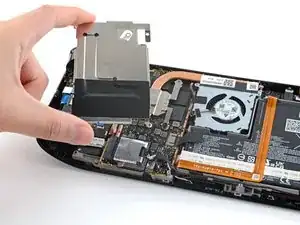
    • Benutze einen Schraubendreher, um die drei Kreuzschlitzschrauben zu entfernen, mit denen die Abschirmung der Platine befestigt ist:

    • Eine 3,4 mm Schraube

    • Zwei 3,7 mm Schrauben

    • In neueren Steam Decks gibt es nur die zwei 3,7 mm langen Schrauben an der linken Kante.

    The procedure ended here for me, used an ifixit PH 00 bit on the screw behind the aluminium tape, bit wouldnt bite too great, one wrong twist and the screw was stripped. Not sure who or what initially screwed in that particular screw as the rest of the screws on the shield were fine, but boy is it in there tight. So now i have a stripped screw and a botched ssd replacement, don't think valve will let me RMA for this, but i'll give it a try and update accordingly.

    Y. van S -

    Any updates? Did they let you RMA?

    Emanuel Gjoni -

    I found one screw to be ridiculously tight too, managed to undo it without stripping thanks to reading your comment beforehand and going extra careful. Not going to lie, it was a tense moment :D

    Andy HL -

    I'm stuck in the same place. I haven't fully stripped it, but I can tell you that if I try and make it budge it will strip. The thing is massively overtightened. The driver fit fine, the metal just gives way before the screw will budge.

    Robert Boswell Johnson -

    I think the tendency is to go too small on the screwdriver bits because you're working on small electronics.

    I used the PH1 bit on the screw under the foil and the PH0 bit for the two remaining screws without any problems.

    Charles Semple -

    What does this shield actually do? Some kind of magnetic protection?

    Corey Cleric -

    if I had to replace the key (R2) and that's it, can I directly remove it or do I have to act here on the motherboard too?

    pujattidanny -

    have you gotten an answer yet? trying to change mines as well but dont wanna do too much to the deck

    briaNN -

    button Not key, i’m sorry

    pujattidanny -

    I used the ifixit tools and used the 00 PH for these screws with no issue

    Luis B -

    If only swapping the SSD, it is not necessary to remove the top left 3.7mm screw. The heat shield is flexible enough that you can move it out of the way to access the SSD screw. For me this was necessary as the 3.7mm screw was completely unmovable and quickly stripped.

    Scott A -

    FYI there is a little pin on the cover that slots into the board. It is located near the top screw. I needed that to be inserted for the cover to go back down properly.

    Seth Robinson -

    For anyone who may have stripped a 3.7mm screw, Steam Support states it's M1.6 diameter with a 0.35 thread pitch and a 3mm length. Hopefully that'll help anyone trying to locate a replacement screw. Hoping iFixIt can make an internal screws kit as they're kinda hard to find the right one online.

    Michael Dyer -

    Did valve change the shield recently as my new 64gb deck has a black shield with no hidden screw.

    David Alexander Hubbard -

    Yes there's a new hardware revision out there that some people are getting. Consider stopping at this point and putting your deck back together if you have one of these new hardware revisions (the fan is quite different as well to the pictures) until iFixit has an updated repair guide.

    Simon M. -

    There are only 2 screws now, but be careful taking the shield off, because there are still thermal pads under it sticking it to a heat pipe.

    Rudolfs Skurulis -

    Are they m2 3.7mm screws? I am looking to replace mine because they instantly stripped and I had to remove them with needle nose pliers because they were over tightened.

    Nick -

    I need this piece, can someone help me where can I find it please?

    rolando norica -

    Hi, is it possible to buy these shields somewhere? I am extremely interested in buying a replacement.

    Yannick B. -

    The refreshed model 1030 has 2 T6 torx screws instead of Philips

    seaniepie -

    Model 1030 is the OLED version, which we have separate guides for! See here: Steam Deck OLED

    Carsten Frauenheim -

  7. JXePTdtVUbrOvVJT
    JXePTdtVUbrOvVJT
    QqjInaZugM3yJK1q
    q4yCQlQQmrvlOOuU
    • Entferne die Abschirmung der Platine.

    • Je nach Alter deines Steam Decks kann diese Abschirmung an den Wärmeleitpads darunter festkleben.

    • Achte beim Zusammenbau darauf, dass das Kabel seitlich an der Platinenabschirmung verläuft und nicht darunter eingeklemmt ist.

    When putting back on, run a pick along the edge of the shield between the wires to make sure nothing is pinching and the wires are clear of the shield before screwing down.

    Matt S -

    Are you saying that the fan cable should be positioned above the board shield instead of being pressed down by it? Just like the image shows, where it 'lays on the side of the board shield'?

    James -

    Necesito esta pieza la mía no la traía se ve que se la quitaro

    rolando norica -

  8. XjI1homB4a5VNhbV
    XjI1homB4a5VNhbV
    qvcjxPUTxawsUUMB
    qa3R33nVHlO1SOpy
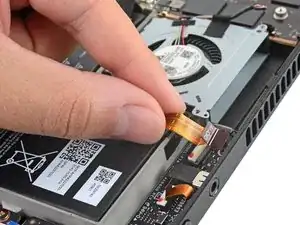
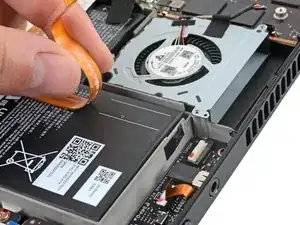
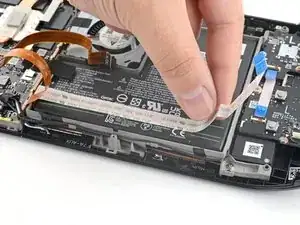
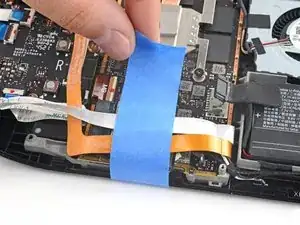
    • Fasse das Akkukabel an seiner Zuglasche und ziehe es vom Motherboard weg, um es abzutrennen.

    • Du kannst den Stecker auch mit dem flachen Ende des Spudgers aus seinem Anschluss herausschieben und dann endgültig mit der Hand abtrennen.

    After fully reassembling my device I found that my battery was not showing any stats anymore. I couldn't start the device without being plugged in, however if I restarted it would stay on even if my power cable was detached. Battery showed 0%. It turns out I had not fully reinserted the battery cable at this stage during reassembly. MAKE SURE YOU PUSH IT ALL THE WAY BACK IN!

    Michael Hoffmann -

    Awesome thanks for this tip!

    petergeranio -

    It is helpful to lift up gently with a the tapered end of a spudger underneath the tucked-in portion of the battery cable, creating a bit of flex in the cable before pulling on the pull tab. I found that without doing so, the fabric pull-tab simply tore off of the cable under light-to-moderate force (the fabric itself ripped cleanly across, like a paper towel). Careful, gentle pressure with a spudger can be used to remove the plug by prying gently on the rear ridge of the plastic plug (not the wire!) if this happens.

    Gene Eckser -

    This is exactly what happened to me. Maybe it was a pull tab previously, mine was a ribbon cable that tore - captured the image here: https://www.ianwootten.co.uk/2022/11/22/...

    Ian Wootten -

    This was the best approach (and I feel safest for the wiring) for me. Mostly push pressure on the plastic ridge with some minor pull tension on the fabric.

    Victor -

    I found it less scary and easier to remove the battery connection by using a fingernail on the ridge and pushing it off the connector. I felt like pulling on the battery cable was too harsh.

    montgomery mchargue -

    Yeah, pulling cables like these is usually ill advice. They might be fine if it's a new device, but for old devices that have been sitting there for years, there's a good chance the connector has grown brittle and the cable might just come off separately (something I learnt the hard way).

    skzm -

    I second this approach. For me, the cable felt way to flimsy and the connector wouldn't budge even under moderate force. Except I used the flat end of a spudger to "scrape" it out.

    Misza -

    Upon plugging the battery back in, I found it easy to use two spudgers- one on each side- to pull/push the connector back into it's port. Be careful to not put any pressure on the battery wires themselves.

    montgomery mchargue -

    When reconnecting the battery cable, you'll know when it's inserted and power is restored, because the white LED will illuminate at the top of the Deck near the power button. You should be able to see it while you're reconnecting the battery cable

    Michael Davis -

    This is only true if you haven't put the deck into battery storage mode as directed.

    Ean Manley -

    Why not just let the battery discharge completely and then not have to disconnect it?

    Jeffrey Martin -

    Completely discharging a battery reduces its lifespan. It's completely unnecessary.

    Stefan Camporese (CENTER) -

    Because no lipo battery is ever completely discharged -- you would not be able to recharge it if it was. There will always be enough power left in it to cause damage if shorted even if it isn't charged enough to power up the device it's connected to.

    David Cameron -

    I would personally not recommend pulling the tab. It doesn’t apply force at the correct angle. You should revise these instructions to advise using a combination of pulling on the tab, and careful pressure on the connector towards the right of the mainboard to carefully work it out.

    Using the pull tab alone could cause problems if not done extremely carefully.

    William Winborne -

    This part was wayyyyy easier than I anticipated and I worried for nothing because I used the ifixit spudger to push it out a bit and then I literally used my finger nail and was able to slide it right off. Dont be afraid, its not that difficult and its not that delicate to break if you do it patiently

    Luis B -

    I inserted the cable very firmly with a spunger, being careful not to press down too hard on the cables, and even tried redoing it, but I don't see any LED illumination. I am now unable to boot the deck into the boot manager. Any additional tips?

    junefish -

    What is the risk of not unplugging the battery? Just curious!

    Nick Hight -

    Once I was changing termal paste on my Windows based expensive tablet PC... And I was so scared to disconnect any cables (there was many of them), so I did it all with battery connected (I didn't even knew where is battery cable). When I tried to put board shield back... it didn't go right into needed place... and short circuit some small component. It flashed. That was the end of my repair. Dudies from repair service later told me that multiple components fried including CPU, so repairing is too hard. That's what can happen if you don't disconnect battery.

    bugwarlabs -

    To pull the battery out I used my spunger, but the batter had actually not space to be pulled out completely. I needed to lift the cable up with the spunger to get the cable fully out. When plugging it in again I had to press the battery down kinda hard so it would fit again. This was really scary and I recommand using two spunger as someone said above.

    Dollique -

    Does it have to be a clean fingernail?

    Steven Murphy -

    I disagree with the order here: I think the battery should be disconnected right after step 4. You can do that before touching anything else by gently pulling the pull tab to the right.

    If all you want to do is to disconnect and reconnect your battery (because your Steam Deck is not booting up... again...) then with a bit of finesse, luck and a flat plastic tool you can even push it back in without removing the shield. Make sure it went all the way back in.

    Fozi -

    Be very careful with this tab, it rips easily!

    Tom Sid -

  9. pD6lUiZQgQBFCfQM
    pD6lUiZQgQBFCfQM
    Hd2oEXcVFHQJ6xZw
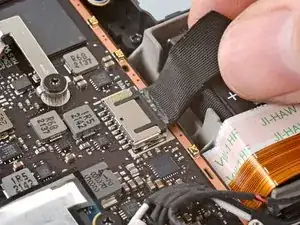
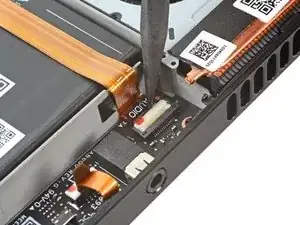
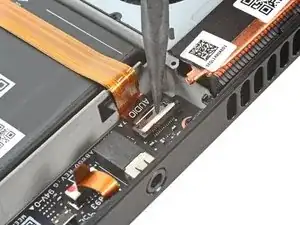
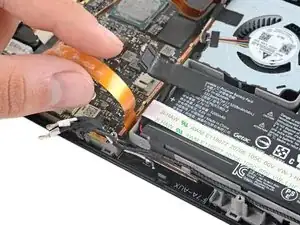
    • Benutze das spitze Ende eines Spudgers, um den kleinen Sicherungsbügel am ZIF-Steckers des Audio-Kabels anzuheben.

    This small lip was black on my deck

    Kerry Lensing -

  10. h55gP6HENwbqq6mx
    h55gP6HENwbqq6mx
    FGMGHwWMI31xLYee
    • Schiebe das Kabel mithilfe einer Pinzette aus seinem Stecker.

    • Fasse das Kabel an seiner Zuglasche und nicht am Kabel selbst.

  11. ErbxNWaZYGjATKxR
    ErbxNWaZYGjATKxR
    2DwFRUnO5De6NdPk
    63GP2Y1hce6hd1Hp
    • Löse das Audio-Kabel vorsichtig vom Akku ab.

    • Das Audio-Kabel ist leicht am Akku festgeklebt.

    • Wenn der Kleber hartnäckig ist, erzwinge es nicht. Erwärme das Audio-Kabel leicht mit einem iOpener oder einem Fön, um den Kleber aufzuweichen.

  12. DJho4FojHYZeLtGp
    DJho4FojHYZeLtGp
    wiyueaw23FQgKARJ
    aDnYOvGIGqyGP3Jv
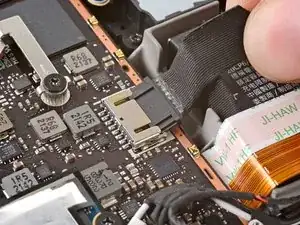
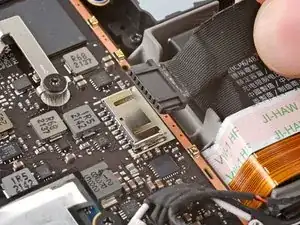
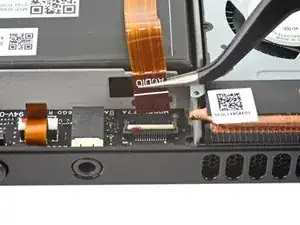
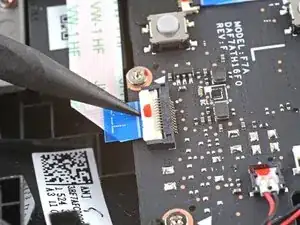
    • Benutze das spitze Ende eines Spudgers, um den kleinen Sicherungsbügel am ZIF-Stecker des Tastenplatinen-Kabels anzuheben.

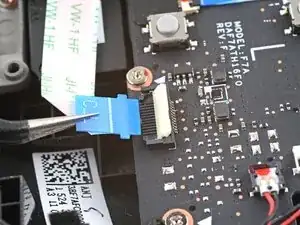
    • Schiebe das Kabel mit einer Pinzette aus seinem Stecker heraus.

    • Fasse das Kabel an der blauen Zuglasche und nicht am Kabel selbst.

  13. wRFomtFgAqP2oSwL
    wRFomtFgAqP2oSwL
    TeiOrDYqxoxbJvBo
    jKUmBkPmHrSUH2rG
    • Löse das Tastenplatinen-Kabel vorsichtig vom Akku ab.

    • Das Tastenplatinen-Kabel ist leicht am Akku festgeklebt.

    • Wenn der Kleber hartnäckig ist, erzwinge es nicht. Erwärme das Tastenplatinen-Kabel leicht mit einem iOpener oder einem Fön, um den Kleber aufzuweichen.

    • Du kannst das Audio-Kabel und das Tastenplatinen-Kabel mit Klebeband so befestigen, dass sie dir beim Ausbau des Akkus nicht im Weg sind.

  14. odnDdNv5AphEV3F1
    odnDdNv5AphEV3F1
    C4ajA1ni3yldJM2E
    1IS2aVkf2nmhPUdL
    • Um den Kleber des Akkus durch die beiden kleinen Schlitze unten am Steam Deck durchtrennen zu können, werden zwei dünne Karten benötigt.

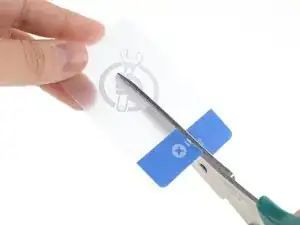
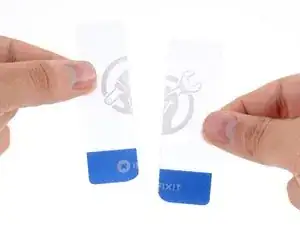
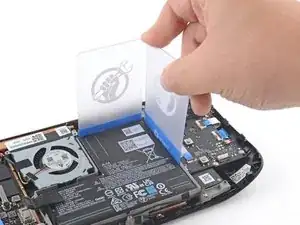
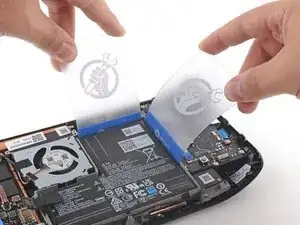
    • Schneide eine Kunststoffkarte der Länge nach entzwei.

    • Runde die scharfen Ecken ab, um zu vermeiden, dass sie den Akku zerkratzen oder durchstechen.

    Start with more cards than you think you'll need! I shattered one of the cut cards while cutting adhesive that wasn't quite hot enough (my battery was puffy, so I was afraid to heat it more than absolutely necessary). Also, REMOVE THE CARDS before reheating. They melt.

    Brad Compton -

  15. fNaGLitfQK5HJ1vQ
    fNaGLitfQK5HJ1vQ
    KFb25TdLffHP5QVB
    MG6Y51foZfjpxZxH
    • Der Akku ist sehr fest mit dem Steam Deck verklebt. Der Kleber lässt sich durch konstante und gleichmässige Kraft lösen, was wiederholtes Erhitzen und Hebeln erfordert.

    • Beim Erhitzen eines geladenen Akkus besteht Brandgefahr. Stelle sicher, dass dein Akku vollständig entladen ist, bevor du mit diesem Schritt hier beginnst.

    • Benutze einen ausgebauten Akku aus Sicherheitsgründen auf keinen Fall erneut, sondern ersetze ihn durch einen neuen Akku.

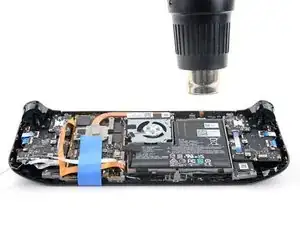
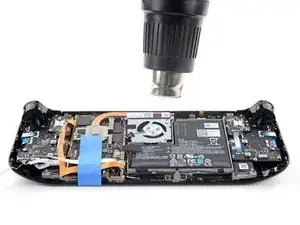
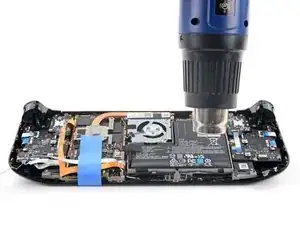
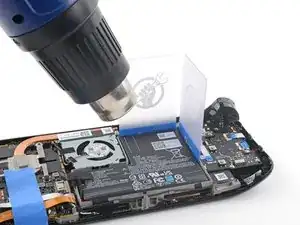
    • Erhitze den Kleber unter dem Akku 1-2 Minuten lang mit einem Heißluftgebläse.

    • Du kannst dafür alternativ auch einen Fön benutzen.

    • Vermeide es unbedingt, den Akku und umliegende Kunststoffteile zu überhitzen. Halte das Heißluftgebläse (bzw. den Fön) etwa 5 cm über den Akku und bewege es ständig hin und her, um zu vermeiden, dass ein Bereich zu stark und zu lange erhitzt wird.

    • Es ist sehr effektiv, den Kleber mit mindestens 90%igem isopropylalkohol zu lösen. Diese Methode hat aber den Nachteil, dass die Flüssigkeit durch die Ausschnitte im Akkufach auf das Display und andere Bauteile gelangen kann.

    Warning, be very careful with the heat gun or you can damage other components such as the left trigger or screen underneath. I would love to see that warning added to the the guide. Especially if you're having a hard time to get the glue to soften at all. Because you can easily cause heat damage without meaning to

    BlindSniper -

  16. fSdbVcX5aLmOLDNX
    fSdbVcX5aLmOLDNX
    vgNIGJKCvUajJBeN
    wTR4GApYbpBF3cXe
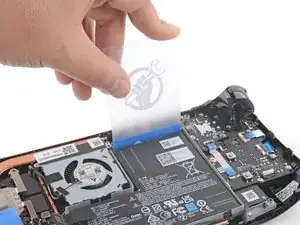
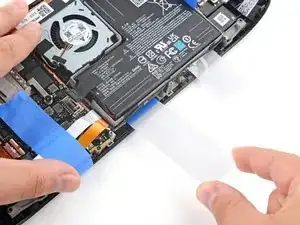
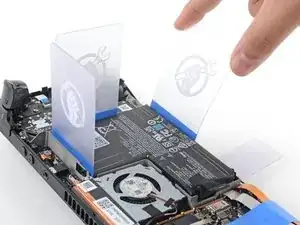
    • Setze eine nicht zerschnittene Plastikkarte zwischen die Oberkante des Akkus und den Rahmen.

    • Setze eine zweite Plastikkarte zwischen die rechte Kante des Akkus und den Rahmen.

    • Vermeide es, dabei zu kraftvoll vorzugehen, und benutze keine Metallwerkzeuge.

    • Versuche, den Akku bei diesem Vorgang nicht zu verformen. Aus Lithium-Polymer-Akkus mit weicher Hülle können gefährliche Chemikalien austreten, sie können sich entzünden oder sogar explodieren, falls sie beschädigt werden.

    • Der Akku wird sich in diesem Schritt wahrscheinlich nicht bewegen, aber die Karten werden hilfreich als Hebel im weiteren Verlauf sein.

  17. cnot6ah13cV4WEvm
    • Du wirst den Kleber mehrfach erneut erhitzen müssen, um ihn aufzuweichen. Der Kleber ist sehr stark und es braucht einige Versuche, bis man es schafft, eine Karte unter den Akku zu bekommen.

    • Vermeide es unbedingt, den Akku zu überhitzen. Halte das Heißluftgebläse (bzw. den Fön) etwa 5 cm über den Akku und bewege sie ständig hin und her, um zu vermeiden, dass ein Bereich zu stark und zu lange erhitzt wird.

  18. DJLIHq5nFgFIDdIZ
    DJLIHq5nFgFIDdIZ
    tmfBTDBrjHwOwAL2
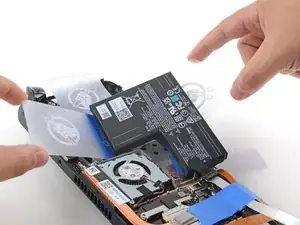
    • Setze eine Hälfte der zerschnittenen Kunststoffkarten nahe an der rechten Unterkante unter den Akku.

    • Drücke die Karte hinein, um den Akku-Kleber zu durchschneiden, und wackle sie dabei hin und her.

    • Wenn das zu schwer geht, benötigst du wahrscheinlich noch mehr Hitze.

    I used a flat wooden coffee stirrer instead of a plastic card, and the effect was very good.(我用了一根扁平的木制的咖啡搅拌棒代替塑料卡,效果非常好。)

    Cube S -

  19. K2pOVd16JkUnmEDy
    K2pOVd16JkUnmEDy
    1qdYDsukLtQXOJUx
    • Setze die zweite Hälfte der zerschnittenen Kunststoffkarte nahe an der linken Unterkante unter den Akku.

    • Drücke die Karte hinein, um den Akku-Kleber zu durchschneiden, und wackle sie dabei hin und her.

  20. YjHWfkgng1lxNae1
    YjHWfkgng1lxNae1
    deIsxQjVcMPCQYRU
    tkSw2UDDdRsZfFeX
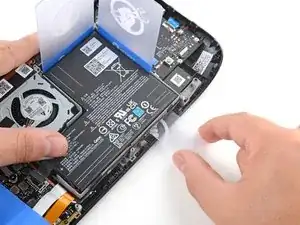
    • Setze eine Kunststoffkarte an der Unterkante unter den Akku und heble den Akku vom Rahmen weg.

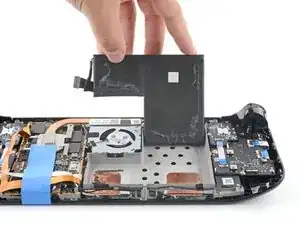
    • Hebe den Akku hoch und weg vom Steam Deck, um den Kleber komplett abzulösen.

    • Gehe nicht zu kraftvoll vor und versuche nach Möglichkeit den Akku bei diesem Vorgang nicht zu verformen.

    • Wenn du Schwierigkeiten hast, wiederhole das Erhitzen und Hebeln um alle Kanten herum, bis sich der Akku ablöst.

  21. qKjiKtnoXUkPJNiy
    • Entferne den Akku.

    • Benutze den Akku nach dem Ausbau aus Sicherheitsgründen auf keinen Fall erneut, sondern ersetze ihn durch einen neuen Akku.

    • So wird der Austauschakku eingebaut:

    • Befeuchte ein fusselfreies Tuch mit Isopropylalkohol (>90%) und entferne damit alle Klebereste aus der Vertiefung, in die der Akku kommt. Das Tuch darf nicht zu feucht sein, es besteht die Gefahr, dass die Flüssigkeit durch die Ausschnitte im Akkufach läuft.

    • Ziehe die Schutzfolien auf einer Seite der neuen Klebestreifen ab und klebe die Klebestreifen auf den neuen Akku, wobei du deinen alten Akku als Vorlage benutzen kannst, um zu sehen, wohin sie genau kommen.

    • Ziehe die restliche Schutzfolie auf der andere Seite ab. Setze den Akku ein und drücke ihn fest.

    • Und nicht vergessen: Der Akku-Stecker darf erst wieder verbunden werden, wenn du mit dem Zusammenbau fertig bist!

    Anleitung ist TOP. 3/4 Stunde zum Austausch gebraucht.

    M Hagemann -

    ¿Is it possible to place a steam deck OLED battery on a common steam deck or is it bigger and doesnt fit?

    Iñigo Vera -

    The Steam Deck LCD and Steam Deck OLED batteries are different sizes and unfortunately incompatible.

    Carsten Frauenheim -

    I only got one of the adhesive strips (the longer one) in my replacement kit. The smaller strip is missing from the box in which you find the battery + adhesives :(

    Pranav Prakash -

    Oh no! Reach out to our customer support and they'll get you sorted. Happy fixing!

    Carsten Frauenheim -

Abschluss

Um dein Gerät wieder zusammenzubauen, folge den Schritten dieser Anleitung in umgekehrter Reihenfolge.

Entsorge deinen Elektromüll fachgerecht.

Lief die Reparatur nicht wie geplant? Versuche es mit einigen grundsätzlichen Lösungsansätzen, ansonsten findest du in unserem Steam Deck Forum Hilfe bei der Fehlersuche.

Carsten Frauenheim

Mitglied seit: 10/03/20

144841 Reputation

14 Kommentare

Is it safe to apply small amounts of >90% isopropyl alcohol under the battery to loosen the adhesive bond? Or would that drip into the screen or other components and potentially cause damage?

RikiGuitarist -

Your mileage may vary. Isopropyl alcohol may be an effective method to loosen the adhesive, but you run the risk of excess leaking onto or into the display or other components, due to the cutouts on the battery tray. Your second sentence is spot-on, hence the recommendation to carefully use heat instead.

Carsten Frauenheim -

Why couldn’t they of used pull tabs for the adhesive so this process would not be so difficult and tedious. It would also be less risk of over heating the battery/steam deck or puncturing the battery. This is really the only design choice I can criticize of the steam deck. Pull tabs would of made this a repair the average person could achieve.

Joshua Marram -

I feel like patience is everything in this scenario I mean. Just take your time and relax & it will all be ok ! When dealing with particular situations like this just take you're time simple as that I promise. Especially, since Ifixit.com has some of the best guides EVER!!

sgtkickazzttv -

It seems crazy to me that they made this process so difficult, surely battery is one of (if not THE) most common things that you'll need to eventually replace? I suppose they must have been limited by what they could achieve?

Marc Johnson -

Having just done a Battery Replacement on the Steam Deck the amount of adhesive is a bit high the use of Pull Tabs would have been wonderful. Thanks iFixit and Valve for making the process easier.

Robert Crawford -

I have a question if battery health is a 22%. Will a new battery fix it or is there something wrong with the board.

Jordan Blackley -

Most probably battery replacement will fix it. Especially if you really see short battery time and you could observe that it shrink after heavy using of Steam Deck.

However, it's possible that it's some false error, so if battery works fine for you, I wouldn't bother. Also, if battery health dropped quickly, it might indicate overheating

Karol Gro -

Why they made this so difficult? We are in 2023, this device uses a very small battery in my opinion, it should be more or lesse the double of current size, and it's very difficult to replace it.

Leandro Tavares -

10/10 not too bad a job at all.

For me I found the original adhesive was to the left and right of the gaps you jam the cards in, so going in diagonally was the way to do it easily.

Only used a heat gun for 2 minutes and was eventually successful with gentle prying.

Everything was as expected.

Directions that come with the new battery direct to charge to 100% and leave on charge for 2h, then fully discharge until off, finally charge once more to 100%.

JamesCodesThings -

The adhesive definitely fought valiantly, but in the end I was victorious after a little bit of patience and my trusty heat gun. Not gonna lie, I was getting a little frustrated, but it was all worth it in the end. Everything else was a breeze, and I now finally get to use my Steam Deck which had just been sitting there as a paperweight since the first batch got sent out. Huzzah!

Zealon -

Avant de commencer le tutoriel, j'avoue que je craignais de ne plus avoir de SteamDeck à la fin ! Mais finalement les étapes sont très bien expliquées, et avec un peu de patience et de soin, tout se passe plutôt bien. L'étape du décollage de la batterie prend un peu de temps, mais au final, ça s'est fait plus rapidement que je ne le pensais. Mission totalement réussie pour moi :) Longue vie au Steamdeck....

thierry_b -

Would applying warm heat via a heating pad to the front side of the device help loosen the battery adhesive for easier removal?

Given that the Steam Deck regularly reaches an internal temp of ~85C under heavy loads (and probably higher temperatures during manufacturing), it would seem reasonable that a not-scalding heating pad could safely radiate enough heat through the screen, and preheat the adhesive through the internals to making it easier to work with. This approach wouldn't risk damaging the screen or its components in any way, would it?

Has this been tested or ruled out? It seems a gentler alternative to primarily using a heat gun to "heat on, apply directly to the battery."

Alfred Eensteen -

The screen and midframe do a surprisingly good job of sinking heat away from the battery adhesive. Also, directly heating the display softens the display adhesive, possibly in places or at times when you wouldn't want it to. A mix of both is certainly more effective — but most users don't have access to a heat pad. Plus, the joysticks protrude, requiring a very specific size of heat pad.

Carsten Frauenheim -