Einleitung

Benutze diese Anleitung, um das linke Touchpad-Modul in deinem Steam Deck LCD zu ersetzen. Das Touchpad selbst ist Teil eines größeren Moduls, inklusive der Haptik, und muss als eine Einheit ausgetauscht werden. Obwohl sich die beiden Vorgänge ähneln, findest du die Anleitung für das rechte Touchpad hier.

Achte während der Reparatur auf allgemeine Vorsichtsmaßnahmen zur Vermeidung von elektrostatischen Entladungen (ESD = engl. electrostatic discharge).

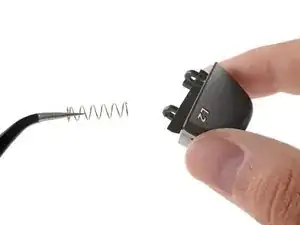
Hinweis: Die Federn des Touchpads sind extrem empfindlich und sehr genau positioniert. Wenn sie verbogen sind, kann es sein, dass das Touchpad klappert oder nicht wie vorgesehen funktioniert.

Diese Schritte beschreiben nur, wie du das Touchpad deiner Spielkonsole physisch ausbauen und ersetzen kannst. Du benötigst möglicherweise zusätzliche Software-Tools und Kalibrierungsverfahren, damit dein Ersatz-Touchpad wie vorgesehen funktioniert.

  1. vQyR3PAE4HOMSLAZ
    vQyR3PAE4HOMSLAZ
    aIKAs5r3P3bY2iTE
    hD1USYJCkAbkluud
    • Schalte das Steam Deck ein und entlade den Akku auf unter 25%, bevor du mit der Reparatur beginnst. Aus einem geladenen Lithium-Ionen-Polymer-Akku können gefährliche Chemikalien austreten, wenn er versehentlich angestochen wird.

    • Valve empfiehlt als zusätzliche Sicherheitsmaßnahme den Akku im BIOS in den battery storage mode (Akkuspeichermodus) zu versetzen, bevor du mit Reparaturen an inneren Bauteilen anfängst. Hier steht, wie das geht.

    • Schalte das Steam Deck komplett aus und ziehe alle Stecker ab.

    • Wenn du eine microSD-Karte angeschlossen hast, dann musst du sie entfernen, bevor du das Steam Deck öffnest. Wenn du die Rückseite ausbaust, ohne die Karte zu entfernen, kann sie in zwei Teile zerbrechen.

    • Es kann hilfreich sein, wenn du während der Reparatur das Steam Deck mit der Oberseite nach unten in seine Hülle legst, um die Joysticks zu schützen und Wackeln zu vermeiden.

  2. bpUGGPG32OkLXnC4
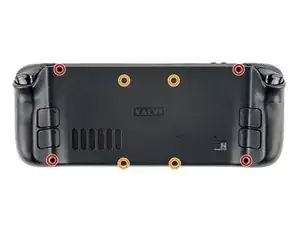
    • Entferne die acht Kreuzschlitzschrauben, mit denen die Rückabdeckung befestigt ist:

    • Vier 9,5 mm lange Schrauben mit Grobgewinde

    • Vier 5,8 mm lange Schrauben mit Feingewinde

    • Obwohl sie eigentlich genormt sind, können sich Kreuzschlitzschraubendreher in Größe und Form unterscheiden. Zwei Schraubendreher mit der gleichen Bezeichnung können unterschiedlich gut in die gleiche Schraube passen. Benutze die Größe, die am Besten in den Schraubenkopf passt.

    • Achte während der gesamten Reparatur auf jede einzelne Schraube und sorge dafür, dass sie genau dorthin zurückkommt, wo sie vorher war, damit dein Steam Deck nicht beschädigt wird.

    there should be a picture of the SD card slot at the start of every Steam Deck teardown. i know the note is there but i generally use the pictures to guide me and forgetting to remove the SD card is a very critical step

    Nathan Barrow -

    I agree, I just broke mine...

    Camille B -

    What is the the #1 philips used for? Only the #0 is mentioned in the instructions.

    Christopher Martin -

    I wish they would specify which size to use for which screws.

    Mark D -

    I found it easiest to use a PH1 for the red screws, and PH0 for the rest (including the internals.)

    Chris Clawson -

    Be careful you can strip the screws take your time

    I use PH00 bit

    jaybush74 -

    I used the PH1 bit for this. You can use smaller bits but ideally there should be no play of the bit in the screw head.

    Charles Semple -

    are there playstation replacements (circle,square,cross,triangle)

    Deór -

    I used the ifixit tools and used the 00 size for the screws on the back.

    Luis B -

    I've completed the guide and found it very helpful!

    I think somewhere in this part it would be helpful to name the size of the correct Phillips driver to use:

    Use a Phillips driver to remove the eight screws securing the back cover:

    Four 9.5 mm screws

    Four 5.8 mm screws

    Maynard -

    I used the PH1 for the 9.5mm screws and PH00 for the 5.8mm screws. The PH0 wanted to strip one of the small ones.

    Pol Llovet -

    FYI - 512gb version has blue threadlocker on the Orange screws.

    Kyle -

    Just a point for knowledge sake, the Four 5.8mm screws on this step are factory installed with a version of locktite. Not sure why but there will be slight resistance when removing the first time.

    Derek Schmidlin -

    Stripped two of the 5.8mm screws, feel pretty dumb, now I'm stuck at step 2 of 43 :|

    Yareyous -

    The screw bit that came with my fix kit just stripped the screws of my steam deck. I guess I should've just sent it in...

    Randy Jackson -

    Model 1030 SteamDeck uses Torque #6 (CR-V T6) 5.0mm for all 8 screws making it far less likely to damage the screw heads.

    seaniepie -

    Model 1030 is the OLED version, which we have separate guides for! See here: Steam Deck OLED

    Carsten Frauenheim -

    the steamdeck that I purchased in April 2025 no longer uses phillips for the rear panel screws, but instead uses a Torx T6H driver

    Kevin James -

    Do you have an LCD or OLED model?

    Carsten Frauenheim -

  3. 6jtVcFtMGa5ZMqcF
    6jtVcFtMGa5ZMqcF
    Ux5LEj3JfJlkmQMQ
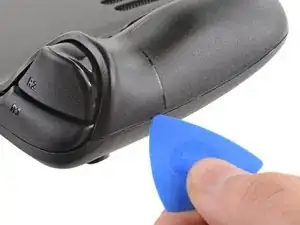
    • Setze ein Plektrum in die schmale Fuge zwischen Rückabdeckung und Vorderschale an der Kante des rechten Griffs ein.

    • Wenn du Schwierigkeiten hast, das Plektrum in die schmale Fuge am Griff einzusetzen, dann versuche es erst an den langen Kanten oben oder unten und schiebe dann das Plektrum zum Griff hin.

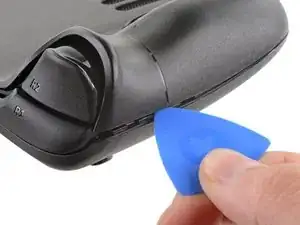
    • Heble die Rückabdeckung hoch, um sie aus den Clips zu lösen, mit denen sie befestigt ist.

    I found it easiest to start this process at the top of the device near the fan exit.

    Peter Lindberg -

    second that and inserting the pick in the bottom middle and sliding the pick to each side

    Sub -

    I also found the top near the fan exit to be easier

    Travis Patton -

    Thank you for this tip, it definitely was easy starting at the top instead of by the bumper/triggers. After I opened the top I did the bottom and then it was way easier to gently open the sides. be very careful and go slowly to make sure that none of the clips are damaged

    Luis B -

    this as suggested above:

    1. open the top

    2. open the bottom

    3.gently open the sides

    austrasier -

    same; i pried from the top of the screen area. I was unable to find an opening on the side

    Dennis Wu -

    I also started from the middle of the deck and worked my way out since I couldn't get a grip with the pick on the deck's side grips. Since this is a common step for pretty much all guides for opening the deck I think it's also worth noting that you should be careful not to bend the trims/seams where the front and back covers meet with the pick. When I first opened my deck you can definitely see where I nudged the pick in between the covers since I was probably using too much force on the pick itself.

    Kaleb McKone -

    It would be useful to note here that if you want to insert the little blue triangular iFixit opening picks into the right side along the edge, there isn't actually a gap as the directions say, at least not on newer Decks. You'll be making the initial gap using the pick. Brace it on something because you will need to use enough downward force that you're flexing the pick a bit and it'll probably be digging into the skin of a bare hand. With enough force suddenly it will make a click and go in just a bit, and then you're in business.

    CaptFrost -

    plastic picks didnt work for me but finger males did the job on prying this open

    jacobbagsic -

    I found it easiest to open starting with R1 or L1 buttons and proceeding to the center of the top edge

    Karol Gro -

    This step was the hardest by far. First I didn't find an opening at the sides, and it did take a really long time until I finally got it open... Then, when I had the one side opening open it didn't just pop out, I needed to slide all the way to the other side with the pick and open everything. I guess they made it even more drop resistant.

    Dollique -

  4. 6IvIWWqEXPTqW1XB
    6IvIWWqEXPTqW1XB
    1FxwYDjIGOAOCZT2
    KpIx4YIAZrDH1b5T
    • Wenn alle Clips von einer Kante gelöst sind, kann der Rest ganz einfach entfernt werden.

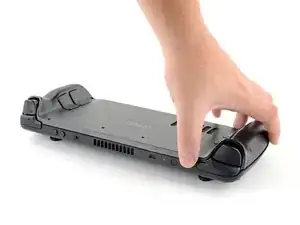
    • Fasse die Rückabdeckung an der Öffnung, die du gerade erstellt hast, und ziehe sie nach oben vom Gerät weg, um die Clips an den langen Kanten zu lösen.

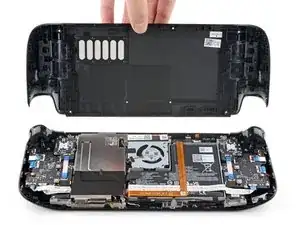
    • Entferne die Rückabdeckung.

    If you have an SD card, you will want to take it out. I followed the guide and didn't think about the SD card I had inside. When I went to snap the case back on it clapped shut on the exposed SD card, shearing it in half and leaving the bottom half stuck in the SD card slot. I am still endeavoring to get it out.

    Novice -

    you can use the case that comes with the steam deck to support it once the lid is removed

    Luis Barbosa (Armored Saint) -

    You can get the pry pick inserted easier if you start in the gap for the shoulder buttons. A lego brick separator works well here

    Andrew Borsje -

  5. WuMbLgtJF5JwQtjF
    WuMbLgtJF5JwQtjF
    I6pEKNGEKEDbNymT
    • Wenn du die neuere Steam Deck Version mit der schwarzen Abdeckung über der Hauptplatine hast, dann überspringe diesen Schritt.

    • Entferne mithilfe einer Pinzette das Stück Klebefolie auf der versteckten Schraube auf der Platinenabschirmung.

    • Versuche die Klebefolie nach Möglichkeit nicht zu zerreißen, sodass sie wiederverwendet werden kann. Wenn es nötig ist, kannst du dir auch ein passendes Ersatzstück aus Aluminiumfolie zurechtschneiden und einkleben.

    Use some heat here from a hairdryer to make this part easier.

    If you screw up here you can replace the little aluminium square with some aluminium tape from Amazon. No less than 50 microns thick, slightly thicker is fine. and the square is 13mm both ways.

    Matt S -

    Thanks for that Matt, i destroyed the original tape and i had no solution since i read your comment.

    Cihan Kocaman -

    there are other new version of board shield from 2023.

    Gorf Woo -

    Is it alright to use the deck without the tape?

    Jake -

    You should not. This is EM shielding to protect your processor and ram from radio waves in the air

    Andrew Borsje -

    I found out my 3 Weeks new Steam Deck is a old Version... gg. Valve...

    Miller Schiffer -

    wenn ich aluminium foile benutze, womit soll ich sie dann verkleben?

    Christian Dud -

    If we have the new version with the black shield, how do we access the SSD?

    James Bennett -

    I need this part, does anyone know where to get it?

    rolando norica -

    PSA: The only purpose of steps 5–8 is to enable you to disconnect the battery, which is not essential. I skipped steps 5–8 and did not have any trouble with the repair.

    David H -

  6. fpjCmGxopRvFvGbm
    fpjCmGxopRvFvGbm
    faiNkXVlQKKBKQT5
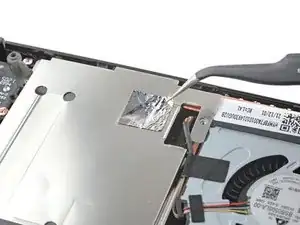
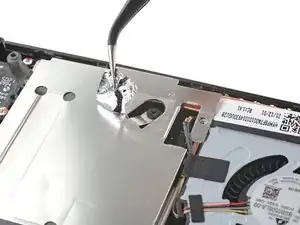
    • Benutze einen Schraubendreher, um die drei Kreuzschlitzschrauben zu entfernen, mit denen die Abschirmung der Platine befestigt ist:

    • Eine 3,4 mm Schraube

    • Zwei 3,7 mm Schrauben

    • In neueren Steam Decks gibt es nur die zwei 3,7 mm langen Schrauben an der linken Kante.

    The procedure ended here for me, used an ifixit PH 00 bit on the screw behind the aluminium tape, bit wouldnt bite too great, one wrong twist and the screw was stripped. Not sure who or what initially screwed in that particular screw as the rest of the screws on the shield were fine, but boy is it in there tight. So now i have a stripped screw and a botched ssd replacement, don't think valve will let me RMA for this, but i'll give it a try and update accordingly.

    Y. van S -

    Any updates? Did they let you RMA?

    Emanuel Gjoni -

    I found one screw to be ridiculously tight too, managed to undo it without stripping thanks to reading your comment beforehand and going extra careful. Not going to lie, it was a tense moment :D

    Andy HL -

    I'm stuck in the same place. I haven't fully stripped it, but I can tell you that if I try and make it budge it will strip. The thing is massively overtightened. The driver fit fine, the metal just gives way before the screw will budge.

    Robert Boswell Johnson -

    I think the tendency is to go too small on the screwdriver bits because you're working on small electronics.

    I used the PH1 bit on the screw under the foil and the PH0 bit for the two remaining screws without any problems.

    Charles Semple -

    What does this shield actually do? Some kind of magnetic protection?

    Corey Cleric -

    if I had to replace the key (R2) and that's it, can I directly remove it or do I have to act here on the motherboard too?

    pujattidanny -

    have you gotten an answer yet? trying to change mines as well but dont wanna do too much to the deck

    briaNN -

    button Not key, i’m sorry

    pujattidanny -

    I used the ifixit tools and used the 00 PH for these screws with no issue

    Luis B -

    If only swapping the SSD, it is not necessary to remove the top left 3.7mm screw. The heat shield is flexible enough that you can move it out of the way to access the SSD screw. For me this was necessary as the 3.7mm screw was completely unmovable and quickly stripped.

    Scott A -

    FYI there is a little pin on the cover that slots into the board. It is located near the top screw. I needed that to be inserted for the cover to go back down properly.

    Seth Robinson -

    For anyone who may have stripped a 3.7mm screw, Steam Support states it's M1.6 diameter with a 0.35 thread pitch and a 3mm length. Hopefully that'll help anyone trying to locate a replacement screw. Hoping iFixIt can make an internal screws kit as they're kinda hard to find the right one online.

    Michael Dyer -

    Did valve change the shield recently as my new 64gb deck has a black shield with no hidden screw.

    David Alexander Hubbard -

    Yes there's a new hardware revision out there that some people are getting. Consider stopping at this point and putting your deck back together if you have one of these new hardware revisions (the fan is quite different as well to the pictures) until iFixit has an updated repair guide.

    Simon M. -

    There are only 2 screws now, but be careful taking the shield off, because there are still thermal pads under it sticking it to a heat pipe.

    Rudolfs Skurulis -

    Are they m2 3.7mm screws? I am looking to replace mine because they instantly stripped and I had to remove them with needle nose pliers because they were over tightened.

    Nick -

    I need this piece, can someone help me where can I find it please?

    rolando norica -

    Hi, is it possible to buy these shields somewhere? I am extremely interested in buying a replacement.

    Yannick B. -

    The refreshed model 1030 has 2 T6 torx screws instead of Philips

    seaniepie -

    Model 1030 is the OLED version, which we have separate guides for! See here: Steam Deck OLED

    Carsten Frauenheim -

  7. JXePTdtVUbrOvVJT
    JXePTdtVUbrOvVJT
    QqjInaZugM3yJK1q
    q4yCQlQQmrvlOOuU
    • Entferne die Abschirmung der Platine.

    • Je nach Alter deines Steam Decks kann diese Abschirmung an den Wärmeleitpads darunter festkleben.

    • Achte beim Zusammenbau darauf, dass das Kabel seitlich an der Platinenabschirmung verläuft und nicht darunter eingeklemmt ist.

    When putting back on, run a pick along the edge of the shield between the wires to make sure nothing is pinching and the wires are clear of the shield before screwing down.

    Matt S -

    Are you saying that the fan cable should be positioned above the board shield instead of being pressed down by it? Just like the image shows, where it 'lays on the side of the board shield'?

    James -

    Necesito esta pieza la mía no la traía se ve que se la quitaro

    rolando norica -

  8. XjI1homB4a5VNhbV
    XjI1homB4a5VNhbV
    qvcjxPUTxawsUUMB
    qa3R33nVHlO1SOpy
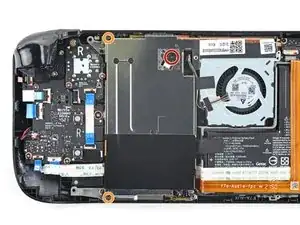
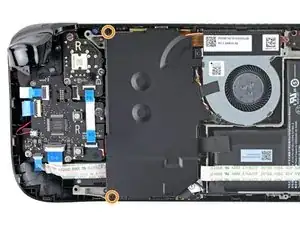
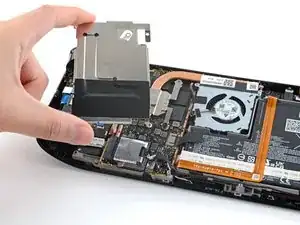
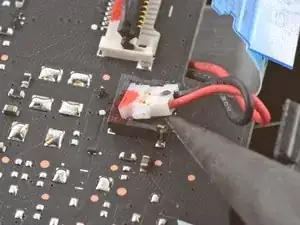
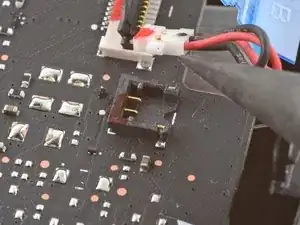
    • Fasse das Akkukabel an seiner Zuglasche und ziehe es vom Motherboard weg, um es abzutrennen.

    • Du kannst den Stecker auch mit dem flachen Ende des Spudgers aus seinem Anschluss herausschieben und dann endgültig mit der Hand abtrennen.

    After fully reassembling my device I found that my battery was not showing any stats anymore. I couldn't start the device without being plugged in, however if I restarted it would stay on even if my power cable was detached. Battery showed 0%. It turns out I had not fully reinserted the battery cable at this stage during reassembly. MAKE SURE YOU PUSH IT ALL THE WAY BACK IN!

    Michael Hoffmann -

    Awesome thanks for this tip!

    petergeranio -

    It is helpful to lift up gently with a the tapered end of a spudger underneath the tucked-in portion of the battery cable, creating a bit of flex in the cable before pulling on the pull tab. I found that without doing so, the fabric pull-tab simply tore off of the cable under light-to-moderate force (the fabric itself ripped cleanly across, like a paper towel). Careful, gentle pressure with a spudger can be used to remove the plug by prying gently on the rear ridge of the plastic plug (not the wire!) if this happens.

    Gene Eckser -

    This is exactly what happened to me. Maybe it was a pull tab previously, mine was a ribbon cable that tore - captured the image here: https://www.ianwootten.co.uk/2022/11/22/...

    Ian Wootten -

    This was the best approach (and I feel safest for the wiring) for me. Mostly push pressure on the plastic ridge with some minor pull tension on the fabric.

    Victor -

    I found it less scary and easier to remove the battery connection by using a fingernail on the ridge and pushing it off the connector. I felt like pulling on the battery cable was too harsh.

    montgomery mchargue -

    Yeah, pulling cables like these is usually ill advice. They might be fine if it's a new device, but for old devices that have been sitting there for years, there's a good chance the connector has grown brittle and the cable might just come off separately (something I learnt the hard way).

    skzm -

    I second this approach. For me, the cable felt way to flimsy and the connector wouldn't budge even under moderate force. Except I used the flat end of a spudger to "scrape" it out.

    Misza -

    Upon plugging the battery back in, I found it easy to use two spudgers- one on each side- to pull/push the connector back into it's port. Be careful to not put any pressure on the battery wires themselves.

    montgomery mchargue -

    When reconnecting the battery cable, you'll know when it's inserted and power is restored, because the white LED will illuminate at the top of the Deck near the power button. You should be able to see it while you're reconnecting the battery cable

    Michael Davis -

    This is only true if you haven't put the deck into battery storage mode as directed.

    Ean Manley -

    Why not just let the battery discharge completely and then not have to disconnect it?

    Jeffrey Martin -

    Completely discharging a battery reduces its lifespan. It's completely unnecessary.

    Stefan Camporese (CENTER) -

    Because no lipo battery is ever completely discharged -- you would not be able to recharge it if it was. There will always be enough power left in it to cause damage if shorted even if it isn't charged enough to power up the device it's connected to.

    David Cameron -

    I would personally not recommend pulling the tab. It doesn’t apply force at the correct angle. You should revise these instructions to advise using a combination of pulling on the tab, and careful pressure on the connector towards the right of the mainboard to carefully work it out.

    Using the pull tab alone could cause problems if not done extremely carefully.

    William Winborne -

    This part was wayyyyy easier than I anticipated and I worried for nothing because I used the ifixit spudger to push it out a bit and then I literally used my finger nail and was able to slide it right off. Dont be afraid, its not that difficult and its not that delicate to break if you do it patiently

    Luis B -

    I inserted the cable very firmly with a spunger, being careful not to press down too hard on the cables, and even tried redoing it, but I don't see any LED illumination. I am now unable to boot the deck into the boot manager. Any additional tips?

    junefish -

    What is the risk of not unplugging the battery? Just curious!

    Nick Hight -

    Once I was changing termal paste on my Windows based expensive tablet PC... And I was so scared to disconnect any cables (there was many of them), so I did it all with battery connected (I didn't even knew where is battery cable). When I tried to put board shield back... it didn't go right into needed place... and short circuit some small component. It flashed. That was the end of my repair. Dudies from repair service later told me that multiple components fried including CPU, so repairing is too hard. That's what can happen if you don't disconnect battery.

    bugwarlabs -

    To pull the battery out I used my spunger, but the batter had actually not space to be pulled out completely. I needed to lift the cable up with the spunger to get the cable fully out. When plugging it in again I had to press the battery down kinda hard so it would fit again. This was really scary and I recommand using two spunger as someone said above.

    Dollique -

    Does it have to be a clean fingernail?

    Steven Murphy -

    I disagree with the order here: I think the battery should be disconnected right after step 4. You can do that before touching anything else by gently pulling the pull tab to the right.

    If all you want to do is to disconnect and reconnect your battery (because your Steam Deck is not booting up... again...) then with a bit of finesse, luck and a flat plastic tool you can even push it back in without removing the shield. Make sure it went all the way back in.

    Fozi -

    Be very careful with this tab, it rips easily!

    Tom Sid -

  9. EWppHNyTD2c1kDxt
    EWppHNyTD2c1kDxt
    uIiUGhOUlETpu42S
    • Der linke Trigger wird sich zu deiner Rechten befinden, wenn du am Steam Deck arbeitest, da es mit der Unterseite nach oben liegt.

    • Die Trigger des Steam Deck sind mit zwei Stiften an der Trigger-Halterung befestigt, die gleichzeitig als Scharnier dient.

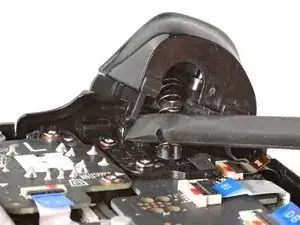
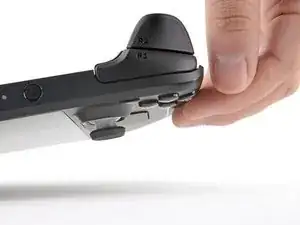
    • Setze das flache Ende eines Spudgers auf die Innenkante des linken Clips des Triggers.

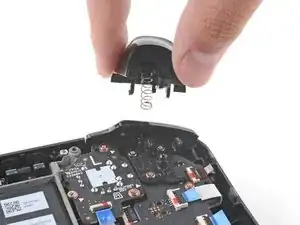
    • Klappe den Trigger-Clip heraus, und aus dem Stift nach oben heraus, um ihn zu lösen.

    • Achte beim Zusammenbau darauf, dass du mit dem Einsetzen zuerst beim ganz außen liegenden Stift anfängst. Sobald er sitzt, kannst du den Trigger herunterdrücken, sodass er im ganz innen liegenden Stift einrastet, dabei solltest du ein "Klick"-Geräusch hören.

    • Stelle sicher, dass die Trigger-Feder richtig ausgerichtet ist. Teste die Trigger-Funktion, bevor du mit dem Zusammenbau weitermachst.

    This step is taking me a while to get the trigger out.

    Tom Sid -

    I solved this by pushing the trigger to the left while inserting the spudger.

    Twist the spudger, it will take some force.

    The trigger and spring will fly out.

    Tom Sid -

    Yeah, the trigger takes a bit and is a little tricky to get out. Eventually got it though

    Kane -

  10. SBsBhSJIRJhqfCNd
    SBsBhSJIRJhqfCNd
    eqNcME4RdKWjBlPH
    • Entferne den linken Trigger.

    • Achte darauf, die Trigger-Feder nicht zu verlieren. Sie wird auf einen Stift auf der Unterseite des Triggers aufgedrückt.

    In case the spring gets lost, it's 19 mm long with about 14 coils.

    Claudiu Avram -

    Omg thank you

    Jill Flanagan -

  11. IQ1XfGaxeSPaaoo5
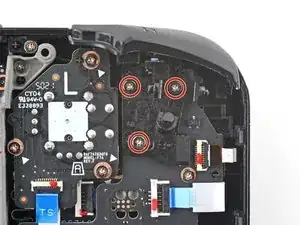
    • Benutze einen Kreuzschlitzschraubendreher, um die drei 5,2 mm Schrauben zu entfernen, mit denen die linke Trigger-Halterung befestigt ist.

  12. gLTTOYllyXg1MQkM
    • Entferne die linke Trigger-Halterung.

    • Ersatztrigger müssen kalibriert werden, damit sie funktionieren, wie sie sollen. Folge dieser Anleitung, um deinen Trigger zu kalibrieren.

    If I only need to get to this part to check if I have to change the button or the daughterboard, do I HAVE to disconnect the battery ? The less I fiddle with things the more likely it is that I won’t break anything else…

    Monsieur_Croco -

  13. 6oggHEmLNyWtjQOW
    6oggHEmLNyWtjQOW
    gFu215gY6TEGHsXA
    vvsWCYPLany4OFI4
    • Benutze das spitze Ende eines Spudgers, um den kleinen Sicherungsbügel am ZIF-Verbinder des Analogstick-Kabels anzuheben.

    • Schiebe das Kabel mithilfe einer Pinzette aus seinem Anschluss.

    • Fasse das Kabel an der blauen Zuglasche und nicht am Kabel selbst.

    My tweezers keep slipping off, this pull tab has poor grip.

    Tom Sid -

    I ended up just using my fingernails and it worked.

    Tom Sid -

  14. HRNOTKMgOUugPJFH
    HRNOTKMgOUugPJFH
    oPFIHB3Jmtv3SI3t
    • Benutze einen Kreuzschlitzschraubendreher, um die drei 5,2 mm Schrauben zu entfernen, mit denen der Analogstick befestigt ist.

    • Beim Zusammenbau musst du das Steam Deck möglicherweise anheben, sodass es nicht auf dem neuen Analogstick aufliegt, während du die Schrauben festziehst.

  15. IgmCIUSUWQftAMuX
    IgmCIUSUWQftAMuX
    V53KuXu23pjmic1d
    • Entferne den linken Analogstick.

  16. mDCVZu1Uhy4u1FDT
    mDCVZu1Uhy4u1FDT
    kGrqEKvGXVwu5Cl1
    LxMfQatUstacaDiZ
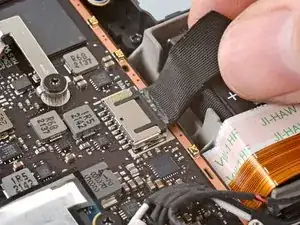
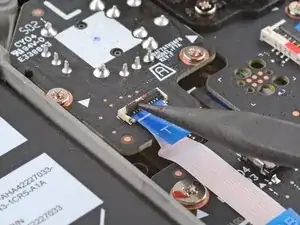
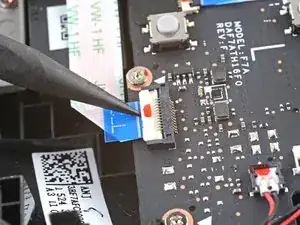
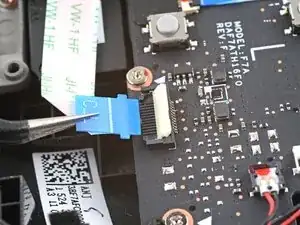
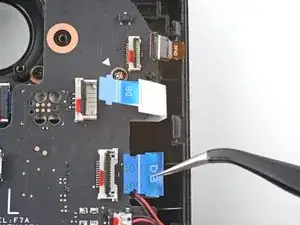
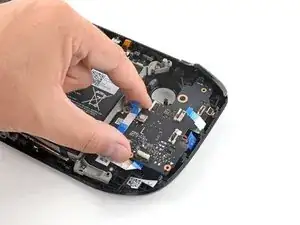
    • Benutze das spitze Ende eines Spudgers, um den kleinen Sicherungsbügel am ZIF-Verbinder des Verbindungskabels zur Tastenplatine hochzuheben.

    • Schiebe das Kabel mit einer Pinzette aus seinem Anschluss.

    • Fasse das Kabel an der blauen Zuglasche, und nicht am Kabel selbst.

    Interconnect cable is along bottom of left board (on your right hand side). Ought to put a picture of where it is for easier reference.

    David Boers -

  17. BpQaphbbu6FsVrgA
    BpQaphbbu6FsVrgA
    pK1xSdVRI5etk6Lp
    YmJgw4ZUkjHTcmNR
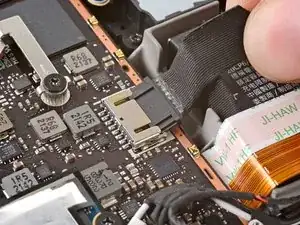
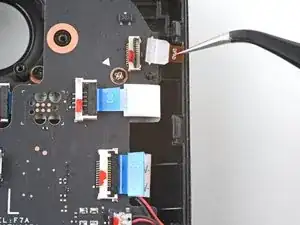
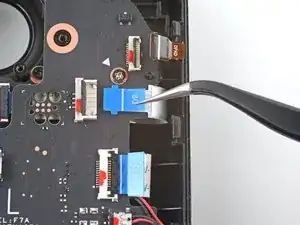
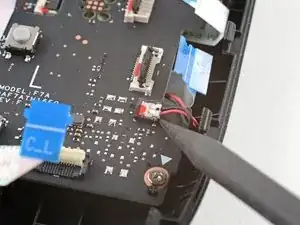
    • Es kann sein, dass manche Stecker mit Klebeband bedeckt sind. Entferne es mit einer Pinzette.

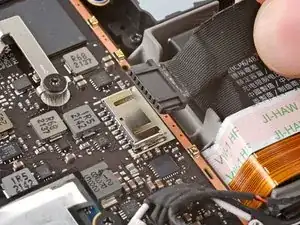
    • Benutze das spitze Ende eines Spudgers, um die kleinen Sicherungsbügel an den restlichen ZIF-Verbindern der Tastenplatine hochzuheben. Schiebe die Kabel mit einer Pinzette aus ihren Anschlüssen:

    • Trenne das Kabel des Steuerkreuzes (D-Pad) ab.

    • Trenne das Kabel der Touchpad-Platine ab.

    • Trenne das Touchpad-Kabel ab.

  18. N2a5ZS5voou2PGXw
    N2a5ZS5voou2PGXw
    N65FYVBb2Gr6RdCf
    HPFEq1JNulDkfuWS
    • Sei vorsichtig, wenn du diesen Stecker anhebst - achte darauf, dass du nur den Stecker selbst aufhebelst, aber nicht sein Gehäuse.

    • Benutze die Spitze eines Spudgers, um das Kabel der Haptik anzuheben und abzutrennen.

    • Du kannst die Haptik auch an der Tastenplatine angeschlossen lassen. Dann musst du die Platine hochklappen und über die Kante des Gehäuses aus dem Weg legen.

    Any advice on resoldering a disconnected haptics connector housing?

    Will Rarich -

    If you dont accidently launch the housing some where you cant find it

    Jimbo -

    Der Stecker steckte fester im Gehäuse als das Gehäuse auf der Platine... Eine Idee, wie das in Ordnung gebracht werden kann?

    Mariano Mertinat -

    Broke the housing in half, still usable though. This was while only prying the connector, which stretched the housing too much. I highly recommend the flipping over the edge alternative :)

    Radu Bonea -

  19. UcMiMRyDPQsrZjom
    • Benutze einen Kreuzschlitzschraubendreher, um die vier Schrauben zu entfernen, mit denen die linke Tastenplatine befestigt ist:

    • Drei 5,2 mm Schrauben

    • Eine 3,9 mm Schraube

    during reassembly you will need to remember to line up board with 2 plastic mounts. pcb has good flex and can push down top to get top screw to line up flush

    B P -

    also the 2nd cable from the top (the one below shoulder button cable) should be pulled free before tightening your screws lol

    B P -

  20. T3q2SpIndCErUVJK
    T3q2SpIndCErUVJK
    hYjLHCFdWsy1cjKZ
    • Entferne die linke Tastenplatine.

    • Achte auf die Steam-Taste und ihre Membran, denn sobald die linke Tastenplatine ausgebaut ist, halten sie nicht mehr.

    This is useful, but how do I get a Left Button Board? Mine is damaged in the left bumper button micro switch and I need a replacement.

    KaizerJV -

    i thought i needed to replace L1 but i need to replace daughter board too. Valve has said they will supply left daughter boards they are just sold out rn

    B P -

    Same, i replaced the assembly for nothing, its the board that needs to be replaced, since i cant solder at all and its the blue button that is faulty

    rubenalexandredinisaraujo -

    Where can I purchase a board

    Charlie Trevino -

    I need this board to fix my deck

    Avery Jones -

    que precio tiene esta pieza, se daño la de mi steam deck

    jose cortes -

    when will the button board be for sale?

    Brett Archey -

    L4 button not worked. When will the button board be for sale?

    Racoon Family -

    Will a button board be available for purchase soon?

    Sean Gillum -

    Please provide daughter board, l1 button stopped working. Pads lifted off the board.

    Alistair Pullen -

    Please sell a button board. L1 button stopped working. Seems to be a common issue.

    Jimmy -

    Will a button board be available for purchase soon?

    Ernesto Bauer Maza -

    Also need a button board....

    Ben Bartlett -


    Guys, I have the same problem as everyone else. The STEAM button stopped working almost immediately after purchase, Steam actually refused the warranty - they offered me to bring the console myself to the other side of the world, although they could have simply sent a replacement part or a new one. You can’t buy spare parts anywhere - they simply weren’t made “in reserve.” As a result, I have a dead, useless console for a lot of money. No trust in Valve now. I'm thinking of filing a class action lawsuit against the company. Maybe we can get together? I'm @paaladin on social networks and Steam.

    Pavel Semenov -

    Where can I buy this board? If this board isn't available, what else could I do to fix the L1 button switch?

    Amanda Huggett -

    Same issue happened to me soon after purchasing Street Fighter 6. Once you continue pressing these triggers excessively, they eventually bend down where as the trigger can't activate the Micro Switch any more. Luckily I purchased my Deck New, directly from Valve and not used. So in my case they had no shipping me a New unit immediately after receiving my faulty Deck. So what I did to remedy this issue was purchase a Victrix Pro FS Arcade stick just to play my favorite fighting game Street Fighter 6 on the deck and PC. These triggers definitely don't hold up to constant presses + pressure. I do feel bad for those that find themselves in this situation but purchase there deck used with no form of warranty.

    David -

  21. Ww5uYZNJyhx6UIiC
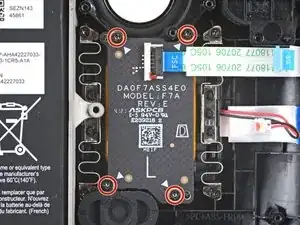
    • Benutze einen Kreuzschlitzschraubendreher, um die vier 4,7 mm Schrauben zu entfernen, mit denen die Touchpad-Platine befestigt ist.

  22. 1kG1nFhqhawfmZQP
    1kG1nFhqhawfmZQP
    BpwBhukKLDAdnnl5
    • Entferne die Touchpad-Platine.

  23. KRRUKCeB3XVrtVYv
    KRRUKCeB3XVrtVYv
    uv1XJKMi3XughicY
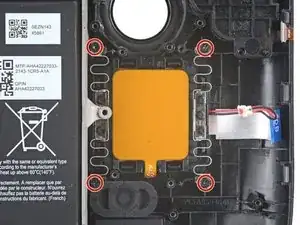
    • Benutze einen Kreuzschlitzschraubendreher, um die vier 4,7 mm Schrauben zu entfernen, mit denen das Touchpad befestigt ist.

    • Eventuell musst du zeitweise die Membran der Steam-Taste entfernen, um an die untere linke Schraube heranzukommen.

    • Jede der vier Montage-Ecken des Touchpads verfügt über einen Führungsstift. Achte beim Zusammenbau darauf, dass jeder einzelne korrekt sitzt.

  24. kLBLfSMYSmkiMuNJ
    kLBLfSMYSmkiMuNJ
    fridwPUtIZuASwKu
    LEUZmeVJSVBrxgyf
    • Die Federn des Touchpads sind extrem empfindlich und sehr genau positioniert. Wenn sie verbogen sind, kann es sein, dass das Touchpad klappert oder nicht wie vorgesehen funktioniert.

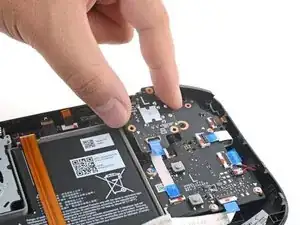
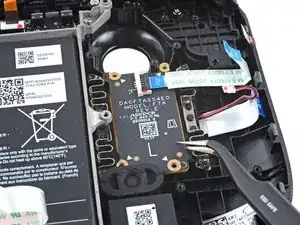
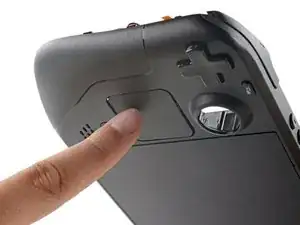
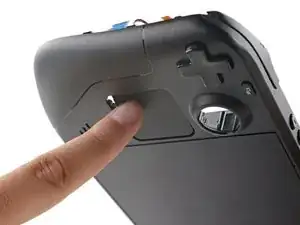
    • Drücke das linke Touchpad von der Vorderseite des Steam Deck her etwas durch die Vorderschale, um es abzulösen.

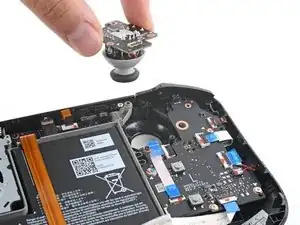
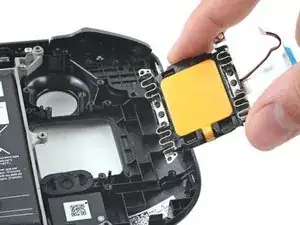
    • Hebe das Touchpad unter dem überhängenden Bereich des Mittelrahmens heraus.

    • Entferne das Touchpad.

Abschluss

Um dein Gerät wieder zusammenzubauen, folge den Schritten dieser Anleitung in umgekehrter Reihenfolge.

Entsorge deinen Elektromüll fachgerecht.

Lief die Reparatur nicht wie geplant? Versuche es mit einigen grundsätzlichen Lösungsansätzen, ansonsten findest du in unserem Steam Deck Forum Hilfe bei der Fehlersuche.

Carsten Frauenheim

Mitglied seit: 10/03/20

144841 Reputation

10 Kommentare

Are there any leads on where to get replacement touch pads?

Mitch B -

I, too, would like to know where we can obtain replacement touchpads.

informal.mak -

Yeah where are the replacement touch pads? My left pad is stuck and clicky.

Jeff Salata -

Where i can get touch pad?

xNer0TM -

I want to purchase replacement parts. where to buy

ccola id -

I can't find trackpads anywhere... :(

Matt Beard -

Step 18, the white housing on the Red/Black connector came off my Right pad. And it's lost. I'm looking for a replacement please.

Moe Fawkah -

Still nowhere to buy these trackpads? You can buy almost every part except for them which is strange, and valve charge a fortune to send it and repair it if out of warranty which seems a bit sus imo I was even told by valve that if I am comfortable to do repair myself I can buy from here but the repair I need to do you can't buy the part. I'm loving the deck but if we are to be allowed to customise, obviously understanding we lose warranty, then why not allow us to buy all parts so we can repair ourselves.

David Wilson -

Installing the button daughterboards or touchpads in the Steam Deck requires special calibration that isn't currently publicly available from Valve. As of right now we don't know if/when these could be available for purchase.

Carsten Frauenheim -

You'll have to find them on eBay like I did since they aren't available elsewhere.

Great guide, Carsten. Thanks for putting this together!

Marco Vermeulen -