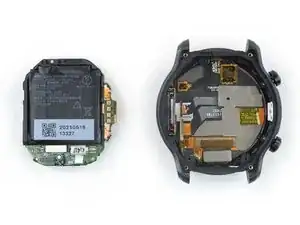
Einleitung

Nutze die Anleitung, wenn du den Akku in deiner TicWatch Pro 3 GPS ersetzen möchtest.

Für deine eigene Sicherheit: Entlade den Akku der Uhr unter 25%, bevor du die Uhr auseinander nimmst Das verringert das Risiko, dass sich der Akku entzündet, falls er während der Reparatur beschädigt wird. Falls dein Akku aufgebläht ist, musst du entsprechende Vorsichtsmaßnahmen treffen.

Du musst den Kleber ersetzen, wenn du die Uhr wieder zusammensetzt. Das Gerät wird danach wieder ordnungsgemäß funktionieren, verliert aber seine IP (Ingress Protection) Bewertung

  1. vSj6cyQPPAgmMDAo
    vSj6cyQPPAgmMDAo
    i3yCY6eMJCalJGet
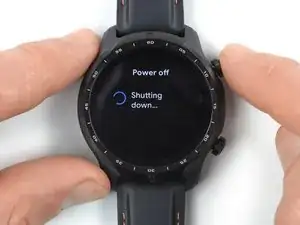
    • Bevor du mit der Reparatur beginnst, nimm deine Uhr vom Ladegerät und schalte sie ab.

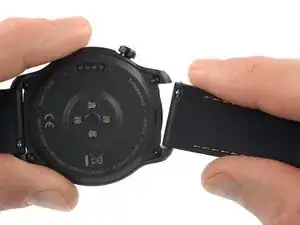
    • Entferne das Uhrenarmband.

  2. LWbfEUyt33T3cNNg
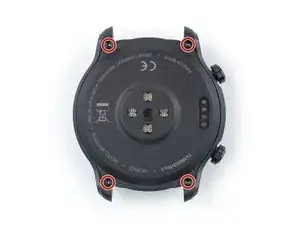
    • Verwende einen Torx T3-Schraubendreher, um die vier 4,1 mm langen Schrauben zu entfernen, mit denen die hintere Abdeckung befestigt ist.

  3. kOKfWXIjOdEqYBkX
    • Lege einen erhitzten iOpener 5 Minuten lang auf die Rückseite der Uhr, um den Klebstoff darunter zu lösen.

    • Du kannst auch einen Fön, eine Heißluftpistole oder eine Heizplatte verwenden, achte jedoch darauf, das Gerät nicht zu überhitzen.

  4. U6O1BVJMFNvOOMIy
    U6O1BVJMFNvOOMIy
    5CpaKqBYhhBAOCEj
    HZETxDRaXtAuJBVI
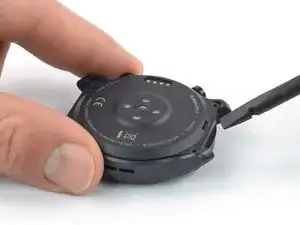
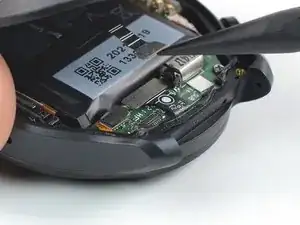
    • Stecke das flache Ende eines Spudgers in die Mikrofonöffnung an der oberen Kante der hinteren Abdeckung.

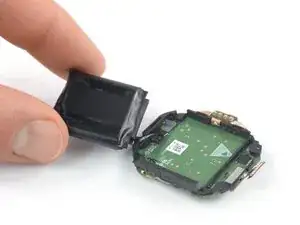
    • Heble die hintere Abdeckung nach oben, um sie zu lösen. Dies kann etwas Kraft erfordern.

    • Versuche noch nicht, die hintere Abdeckung ganz zu entfernen. Sie ist noch mit der Tochterplatine verbunden.

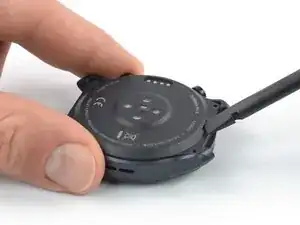
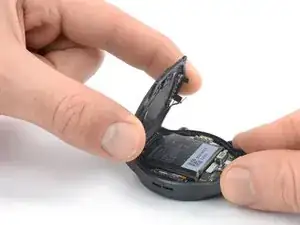
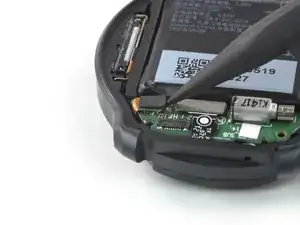
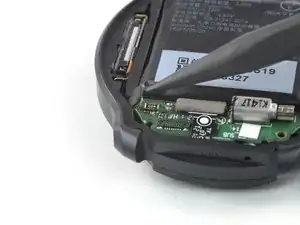
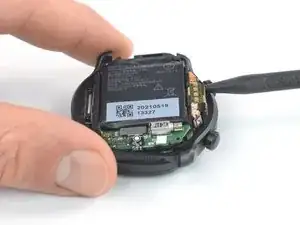
    • Klappe die hintere Abdeckung um 45 Grad auf, um Zugang zum Kabel der Sensoreinheit zu erhalten.

  5. lQZND6EACeU1FNIt
    lQZND6EACeU1FNIt
    4sDAoEnxKo3vM1sQ
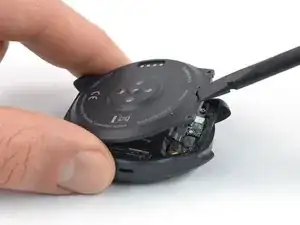
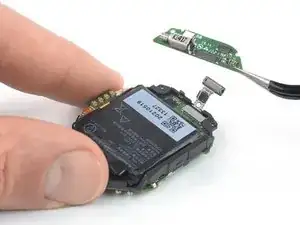
    • Verwende einen Spudger, um das Kabel der Sensoreinheit zu lösen, indem du den Stecker gerade aus dem Anschluss hebelst.

    • Um Druckverbinder wie diesen wieder anzubringen, richtest du sie vorsichtig aus und drückst sie auf einer Seite nach unten, bis sie einrasten, dann wiederholst du den Vorgang auf der anderen Seite. Drücke dies nicht in der Mitte. Wenn der Stecker nicht richtig ausgerichtet ist, können sich die Pins verbiegen und dauerhafte Schäden verursachen.

  6. dYNcQ3f6QEmip3bb
    dYNcQ3f6QEmip3bb
    PbRUoZOCJ2jsMKRC
    osNCvNgNMJlS1oZR
    • Entferne die hintere Abdeckung.

  7. HbCFGe5MWGrOEfMs
    HbCFGe5MWGrOEfMs
    kXvUN4yZjCalCmTk
    • Heble den Stecker am Mikrofonkabel mit dem Spudger gerade hoch und trenne das Kabel ab.

  8. mlesRANSQXNigOBi
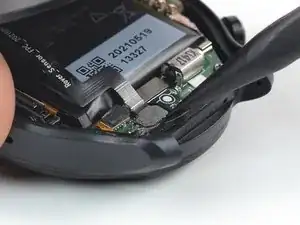
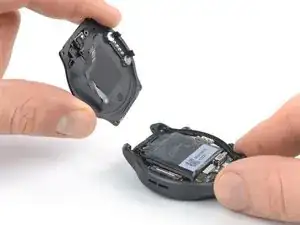
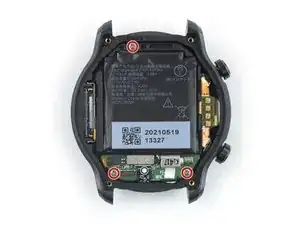
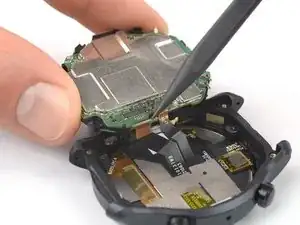
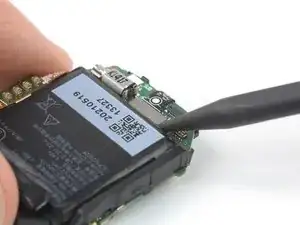
    • Entferne die drei 4,1 mm langen Kreuzschlitzschrauben, mit denen die Haupteinheit befestigt ist.

  9. JJFgmhWcTgUXTM2m
    JJFgmhWcTgUXTM2m
    LxwWFyDRlFiQCFZw
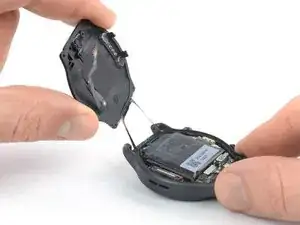
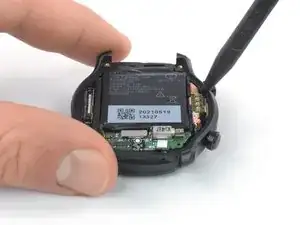
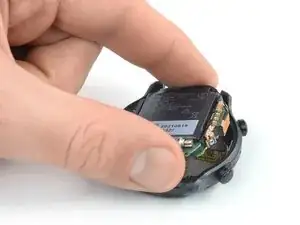
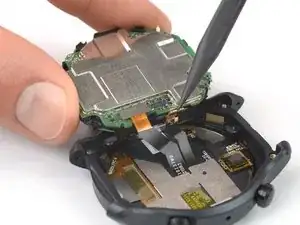
    • Setze einen Spudger mit der Spitze zwischen die rechte Kante der Haupteinheit und dem Rahmen der Uhr ein.

    • Heble nach oben, bis sich die Haupteinheit löst.

    • Entferne die Haupteinheit noch nicht, sie ist immer noch am Display angeschlossen.

  10. qgG1GEVSNRNUsXsB
    qgG1GEVSNRNUsXsB
    gEeHLnne1px6T2f1
    V4GIu2MKoBjdegfp
    • Klappe die Haupteinheit vorsichtig wie die vordere Seite eines Buches auf.

    • Spanne die Displaykabel an der Unterseite der Haupteinheit nicht zu stark an, sie könnten zerreißen.

    At this point, the little transparent plastic square over each button got away on my tear-down.
    Those have a black dot in the middle, i though they might only be for waterproofing, but with or without them in place, i cannot push any of the button anymore. I think i just killed my watch.

    If i'm not a fluke, i think this need a bit more warning.

    VLycop Doo -

  11. ZwHcLVMfPH2nbByE
    ZwHcLVMfPH2nbByE
    MO2RBdSFIOSIxRO3
    RBfCHZ5WDtAoZkEn
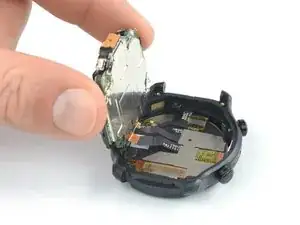
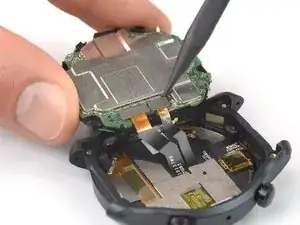
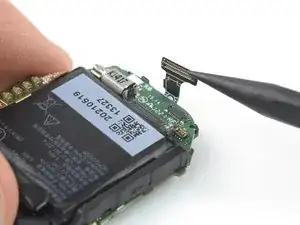
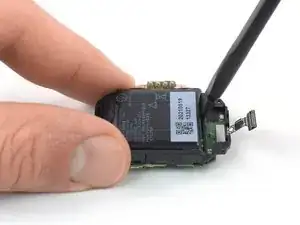
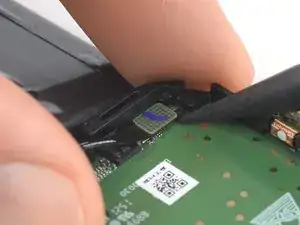
    • Heble die Stecker am Display- und Touchscreenkabel mit einem Spudger aus ihren Anschlüssen nach oben und trenne sie ab.

  12. XqP4DnbggnhGF5TX
    XqP4DnbggnhGF5TX
    XmjkHcgBWIRyAYjS
    • Entferne die Haupteinheit.

  13. XRbGjHXgbAsxPgqm
    XRbGjHXgbAsxPgqm
    o3aODLClXSRBQxjK
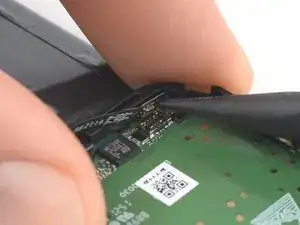
    • Heble den Stecker am Verbindungskabel mit einem Spudger gerade aus seinem Anschluss nach oben und trenne ihn ab.

  14. J4CWsA6COjntHopM
    J4CWsA6COjntHopM
    HfZwJBipSfFAflUN
    • Entferne die Tochterplatine mit einer Pinzette.

  15. WFOUHShF2HkuFtS1
    WFOUHShF2HkuFtS1
    YblE1L6LTS6B2rSE
    • Der Akku ist leicht festgeklebt.

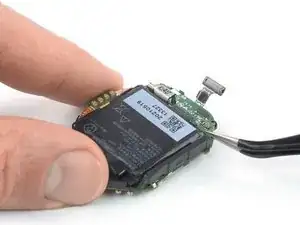
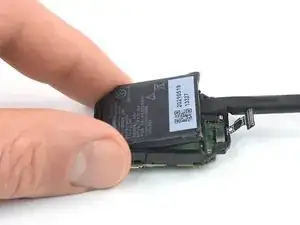
    • Setze einen Spudger mit dem flachen Ende zwischen die Unterkante des Akkus und dem Mittelrahmen ein.

    • Achte darauf, dass der Akku nicht versehentlich durch dein Werkzeug angestochen oder verbogen wird, er könnte in Brand geraten oder gefährliche Chemikalien verlieren.

    • Heble nach oben, bis sich der Akku löst.

    • Wenn sich der Akku nicht leicht lösen lässt, dann lege einen erwärmten iOpener auf die Hauptplatine, um den Kleber aufzuweichen. Lege den iOpener nicht direkt auf den Akku.

    • Entferne den Akku jetzt noch nicht, er ist immer noch an der Hauptplatine angeschlossen.

  16. PEJcThvHRYOJOqoa
    PEJcThvHRYOJOqoa
    XC3KWrXixHPRokKO
    • Klappe den Akku vorsichtig herum, um an den Akkustecker zu gelangen.

    • Spanne das Akkukabel nicht zu stark an, es könnte zerreißen.

  17. jCxp3h2c2LNNsxPt
    jCxp3h2c2LNNsxPt
    RfAjjZlbsWbRKmo4
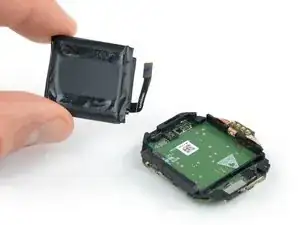
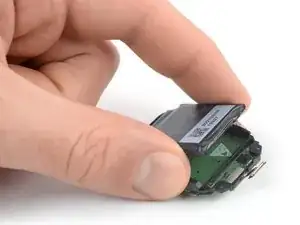
    • Heble den Akkustecker mit einem Spudger gerade nach oben aus seinem Anschluss heraus und trenne ihn ab.

  18. ayX1EBWcPNxeTpiJ
    ayX1EBWcPNxeTpiJ
    M3ayFJdX4dobXKSQ
    • Entferne den Akku.

    • Baue einen beschädigten oder verformten Akku nicht wieder ein, das wäre ein Sicherheitsrisiko.

    • Befestige den Akku mit vorgestanzten Klebestreifen oder doppelseitigem Klebeband. Damit der Akku richtig sitzt, bringe die Klebestreifen an den Stellen im Gerät an, wo die alten auch schon waren, nicht am Akku selbst. Drücke dann den Akku gut fest.

    Battery : pls advise the exact dimensions of the battery? And or provide a weblink?

    Thanks,

    AjTic -

    Donde comprar la batería?

    Jesús bp -

    I passaggi dal n° 5 al n° 14 non sono necessari !!! Più connettori si scollegano e più si ha la probabilità di rovinarli quando si andranno a riattaccare !!! Basta fare un po' di attenzione e si riesce a sollevare la batteria senza staccare tutti i connettori indicati in questi passaggi non necessari.

    DAHD -

    How do you restore the water resistance during reassembly?

    Tom -

    Quando la batteria si gonfia i pulsanti non funzionano più specie dopo una carica completa

    MARIO TAMBURIELLO -

    Quando l orologio fa una carica completa la batteria si gonfia e spinge sul connettore pulsanti che smettono di funzionare come risolvere .

    Forse sostituire batteria?

    MARIO TAMBURIELLO -

Abschluss

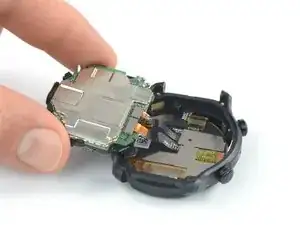
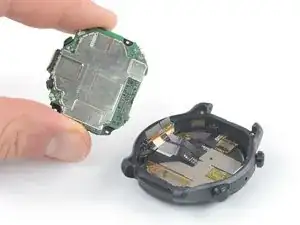
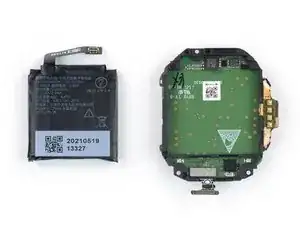
Vergleiche dein neues Ersatzteil mit dem Originalteil – möglicherweise musst du verbleibende Komponenten übertragen oder Klebepads von dem neuen Teil entfernen, bevor du es installierst.

Um das Gerät wieder zusammenzubauen, folge den Schritten dieser Anleitung in umgekehrter Reihenfolge.

Falls notwendig, säubere alte Klebestellen mit Isopropylalkohol (> 90 %) und bringe neue Klebestreifen an.

Nach Abschluss dieser Anleitung solltest du deinen neu eingebauten Akku kalibrieren.

Entsorge deinen Elektromüll sachgerecht.

Hat die Reparatur nicht ganz geklappt? Versuche es mit ein paar grundständigen Lösungen, ansonsten findest du in unserem Forum Hilfe bei der Fehlersuche.

Dominik Schnabelrauch

Mitglied seit: 23/11/16

235812 Reputation

17 Kommentare

Where did you buy a replacement battery (if you did)? I have scoured thru aliexpress, ebay, and tried to find shattered-screen watches I could transplant from, with no luck so far. I guess I'll keep looking. My watch barely lasted a year before the battery life halved. The voltage sag is so bad the watch bootloops whenever it vibrates below 30% voltage.

George -

I've found a listing in aliexpress for an aftermarket battery but need to de-solder the original BMS and transfer to this new battery. Here's the link to aliexpress.

https://www.aliexpress.com/item/10050049...

Daniel Lee -

I don't think it's tin welding, but most likely TIG welding.

Difficult to open it, but the less experienced could solder the battery contacts on the top without opening the old solder.

https://imgur.com/zhFXcQ4

https://imgur.com/cKJb137

marco deirossi -

A small problem (solved) that I encountered with the battery purchased as compatible from ali-express is the greater ( >5mm)

distance (compared to the battery) of the original two poles of the battery.

You have to bend them carefully inwards to be able to weld them afterwards.

https://imgur.com/5mrfzDk

https://imgur.com/v2OCVCc

https://imgur.com/Izw3dU1

https://imgur.com/QsnAN6I

marco deirossi -

Hello all,
I bought this battery as marco deirossi but I don't know how to weld them properly. What's the welding method? It doesn't seem like typical welding for me. Also, I have taken off the sticker of the new batter and the new orange foil out of it. Did I do something wrong? Shall I buy new batter?
Best Regards
Paul

rybson1908 -

Hello... Does anyone know where you can get this battery? since on Aliexpress it appears as out of stock in all the sellers that publish it.

luciano.alonso84@gmail.com -

Was able to install a new battery thanks to all the comments here but had to improvise a bit.

I had some trouble connecting the battery adapter to the battery and ended up shortening one of the flat connectors on the battery. Used some copper wire to bridge the gap and make it a bit easier.

After soldering the wires to the original adapter I made a small hole in the flat connectors of the battery, threaded the wire through there and soldered that. Ended up removing the wire insulation to be able to bend it in space. Recommend taping off anything you don't want the wires to touch beforehand if you do try to prevent short circuiting.

Also be mindful of the buttons during repair. Somewhere in the process I somehow lost the tiny clicker on one and misaligned the other. Was able to glue the latter back in the proper spot. Luckily only the one is necessary to do most stuff.

Hope this helps someone

https://imgur.com/a/QCb2nAX

Ferdi -

Hi Ribson

the best thing to do is bend the two poles of the battery 90° inwards and give them a spot of soldering directly on the plus and minus contacts of the BCM circuit. It is NOT necessary to extract the mainboard as per the guide because you risk damaging the button contacts. Remove the cover, unhook the sensor flat cable, slightly heat the battery, pry it and unhook it from the flat cable. Open the battery film in the BCM circuit part and cut the two poles of the battery so that only the charging circuit remains in your hand

marco deirossi -

bend the two poles 90° inwards and solder on the BCM circuit

https://imgur.com/OiLXSrL

marco deirossi -

Hi Ferdi,

I don't understand why you did all that work,

pull the old BCM circuit out of the old battery.

Bend the two poles of the new battery 90° inwards.

spot solder directly on top without drilling anything or adding bits of wire.

marco deirossi -

What's the best temperature for iron to solder the terminals? I have a new battery, I have the old dissected and the terminal pad removed. The new battery already came with the poles be t inwards 90 degrees. Do I need to do more to the BCM circuit? I just cut the old poles off the battery.

Jeffery Cates -

is that LOSONCOER battery capable to fit to 3 pro ultra ?

or i need to look into another battery?

Soh Meng Kuan -

Hello there, I replaced battery but the watch doesn't turn on anymore...
Is there any guide for repair that could help me to understand what's wrong?

Thank you.

Max DC -

i've assembled and disassembled this a few times now and get power and screen, but the buttons never work anymore?? And this last time that little tiny brass contact that seems to touch the inside of the watch case metal plate (near the bottom button; you see it touching his index finger in Step 11) snapped off !! is that important (will the buttons work without it even)? or am i really screwed?

Daevid Vincent -

Belle spiegazioni ,mi potresti dire se anche il ticwatch 5 pro monta la batteria allo stesso posto? In attesa di risposta ringrazio anticipatamente.

antonio mignone -