Einleitung
Werkzeuge
-
-
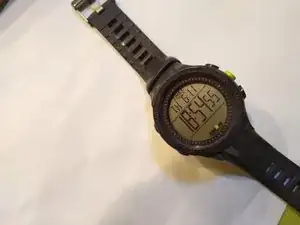
Hier ist deine Uhr! Eigentlich ist das meine. Deine ist diejenige mit der leeren Batterie. Meine Batterie war vor nicht allzu langer Zeit auch leer, aber ich habe sie ersetzt und das kannst du jetzt auch!
-
Als Erstes musst du das Uhrenarmband entfernen, dessen Flansche die Rückseite überlappt.
-
Aber halt! Das Uhrenarmband ist nicht das, was es scheint zu sein. An der Seite dieser Uhr befinden sich scheinbare Schraubenköpfe, die das Band festhalten. Das sind keine Schraubenköpfe, das ist Deko. Stattdessen musst du einen Schraubendreher oder eine andere dünne Klinge verwenden, um die Federstifte zusammenzudrücken, um das Band zu entfernen.
-
-
-
Entferne die Rückseite, indem du die vier kleinen Kreuzschlitzschrauben an den Ecken der Rückseite abschraubst.
-
Lege sie in eine Schale, oder an einen anderen sicheren Ort!
-
Entferne die Metallrückseite.
-
-
-
Juhu, du hast die Rückseite abbekommen!
-
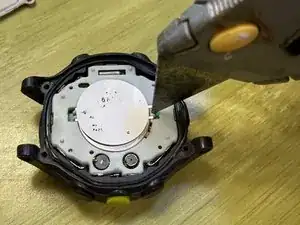
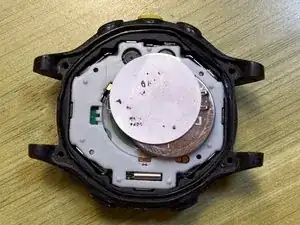
Als Nächstes musst du das Metallband unter dem Aufkleber lösen, das die Batterie hält. Dieses Band ist auf beiden Seiten um ein Paar Kunststoffausbuchtungen gewickelt.
-
Hier Übersetzung einfügen
-
(Wohlgemerkt: Das Bild mit dem Messer wurde mehrere Jahre nach dem früheren Bild aufgenommen, der Aufkleber ist ziemlich verblasst!)
-
-
-
Juhu, wir haben die Batterie rausbekommen! Ersetze diese mit einer neuen Batterie.
-
Bringe das Metallband wieder an; hake eine der Metallschleifen über ein Paar Kunststoffausbuchtungen, bringe die andere Schlaufe in die richtige Position und drücke sie nach unten, um die Metallschlaufe um das andere Paar Kunststoffausbuchtungen einzurasten.
-
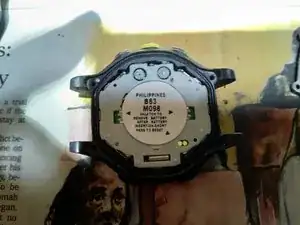
Wenn das Display nach dem Fertigstellen leer ist, musst du vielleicht die Uhr zurücksetzten, indem du die "Pads kurschließt", auf die der Aufkleber zeigt.
-
In diesem Bild sind die "Pads" die beiden kleinen Metallkreise, die teilweise von der Batterie verdeckt werden. Du Kannst sie kurschließen, indem du beide gleichzeitig mit einem Kupferdraht oder einem anderen leitenden Metallstück berührst, das klein genug ist, um in das kleine ovale Kunststofffenster zu passen.
-
-
-
Schließe den Zusammenbau ab, indem du die Rückseite wieder anschraubst und das Armband wieder anbringst.
-
Du bist ein toller Mensch.
13 Kommentare
Replaced battery per above, but screen is blank. How to reset? Sticker says “short pads to reset.” What pads? Short??
Lily Tom -
Oh! golly, is that necessary? I’m trying to remember whether I did that. Okay, explanation, apologies if you already knew all of this.
1) The term “short” refers to creating an electrical connection, sometimes known as a “short-circuit”, between two points.
2) The term “pads” refers to electrical contacts.
On the sticker (in the photo above), you will see an arrow (really more of a small triangle) at the lower right of the sticker, pointing to two circular metal contacts, or “pads”. In order to reset the watch, I believe you will need to create a “short” by touching both of these pads with a conductive object. A short piece of copper wire would work, or nearly anything else that’s conductive. Let me see… Actually, if you took any unplugged appliance, you could probably use one of the prongs of a 110VAC plug to bridge these. (Reiterating: NOT WHILE IT’S PLUGGED IN.) Maybe it would be safer to use a fork, spoon, or conductive screwdriver.
I’m guessing that I did this, and neglected to mention it. Yikes!
I just replaced my battery and didn’t have to short the contacts. I inserted the battery and reassembled the two halves, and when I turned it over it was already running.
Oh! Interesting! I should update the instructions to reflect that.
My Ironman is a bit different: The battery can be removed without removing "the sandwich" - Take the sticker off, unscrew the screw near the battery which releases the retaining metal strap and the battery.
Hugh -
Wow, that sounds delightful. Is there any chance that your procedure would apply to the watch in my pictures as well?
In light of your comment, I re-evaluated my own process, and realized that there is absolutely no need to disassemble the sandwich. I've completely revised the guide. So... your comment no longer makes sense, but digital archaeologists will know that your comment used to make sense, and in fact guided me to an overhaul of this guide. Thanks!