
Einleitung
Für diese Anleitung wird der Carbon Copy Cloner verwendet. Eine Festplatte mit CCC zu klonen ist sehr einfach. Leider ist CCC nur für macOS verfügbar und nicht für Linux oder Windows.
Ersatzteile
-
-
Lade Carbon Copy Cloner von der Website von Bombich Software herunter.
-
Führe die Installation auf deinem macOS-basierten Computer durch. Hierzu werden später Administratorprivilegien benötigt. Auch muss CCC in den Programme-Ordner verschoben werden.
-
-
-
Auf dem Hauptbildschirm von CCC angelangt, verbinde deine Festplatte mit einem geeigneten SATA-Anschluss an deinen Mac.
-
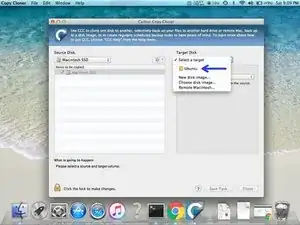
Unter "Source Disk", wähle deine zu klonende Festplatte (HD/SSD) aus. Hier wurde beispielsweise die verbaute Festplatte mit dem Namen "Macintosh SSD" ausgewählt.
-
-
-
Als Nächstes wählst du deine Ziel-Festplatte aus. Hier im Beispiel heißt die Ziel-Festplatte "Ubuntu". Die Festplatte kann einen beliebigen Namen haben.
-
-
-
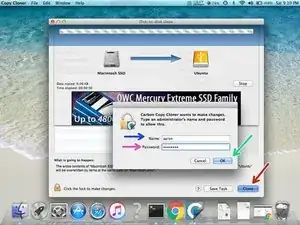
Wähle "Clone" (also "Klonen") aus.
-
Gib deinen Administrator-Nutzername ein.
-
Gib dein Administrator-Kennwort ein.
-
Bestätige mit "OK".
-

Zum Abschluss, baue die Festplatte ein und probiere aus, ob sie funktioniert. Falls nicht, versuche sie erneut zu klonen.

10 Kommentare
I have used CCC for years and years. It is an excellent program!
When upgrading MAC OS to a new version, I always clone a drive before starting the upgrade.
Mal -
What if you have several volumes on each disk ? Does it scan the entire structure and boot options ?
CCC clones per volume, not per disk. So you have to clone each volume on their own, how many are bootable?
Jelan -
I have tried cloning my 2012 Mac book pro with a vector ssd sata111, my Mac does not see the disk when I connect with usb or caddy, this is getting frustrating anyone has the same problem where you mac not seeing the ssd drive
thank you
Peter
Peter -
Aaron, Please post the version info for the app you used.
Dan -
@danj Edited. Good idea, thanks!
[deleted] -