Einleitung

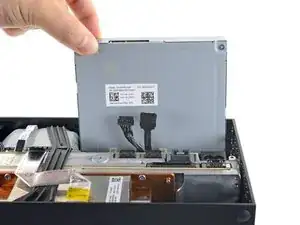
Nutze diese Anleitung, um das das Netzteil in der Xbox Series X zu ersetzen.

Wenn deine Xbox sich nicht anschalten lässt, oder das Licht an der Konsole nicht angeht, könnte das Netzteil fehlerhaft sein.

Denke daran, alle Maßnahmen zur Vermeidung elektrostatischer Entladungen zu treffen, wenn du an deiner Konsole arbeitest.

  1. 3bZJo5AEqOISmVxU
    3bZJo5AEqOISmVxU
    kGOaBCslJWZrcPUf
    • Schalte deine Konsole vollständig aus und entferne alle Kabel, bevor du mit dieser Anleitung beginnst.

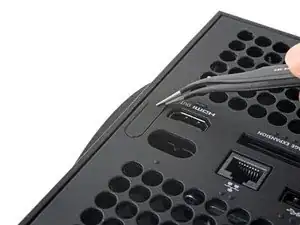
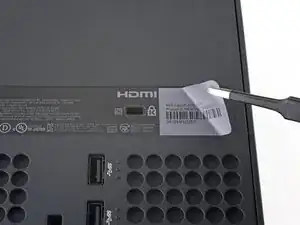
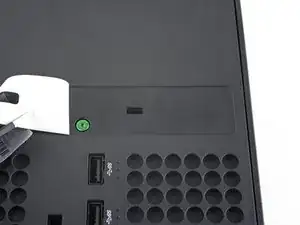
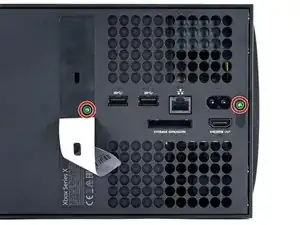
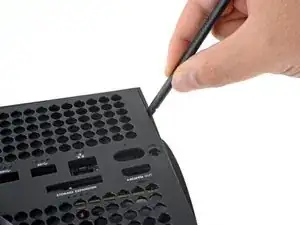
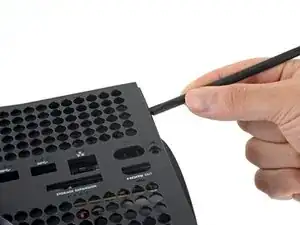
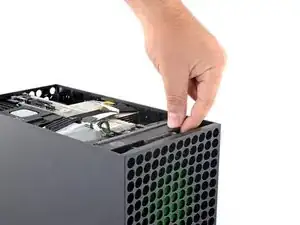
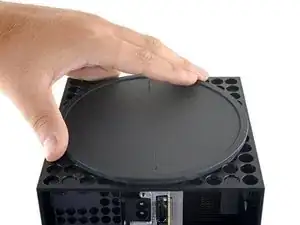
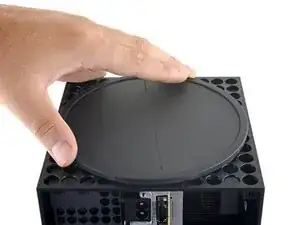
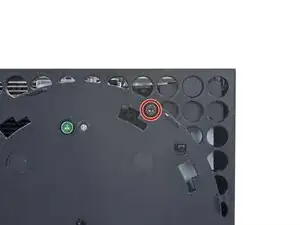
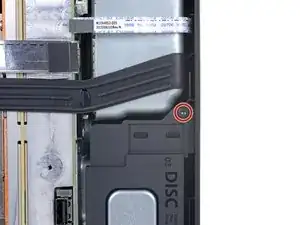
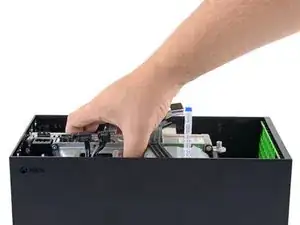
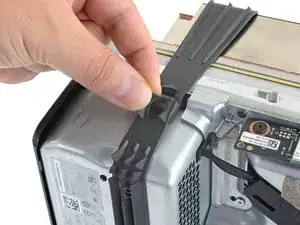
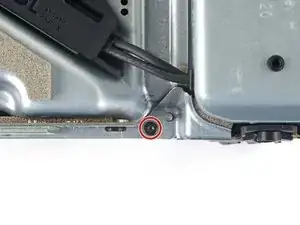
    • Entferne mit einer Pinzette den Aufkleber nahe der Unterkante, unter dem die erste Schraube ist.

  2. QVtqrbDsBgrw6WZq
    QVtqrbDsBgrw6WZq
    IVS6BushCHXDMTuP
    wWNRqGPUqtlhrNV2
    • Nimm einen iOpener oder einen Haartrockner zum Erwärmen des Aufklebers. Er lässt sich dann sauberer entfernen.

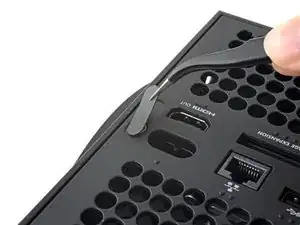
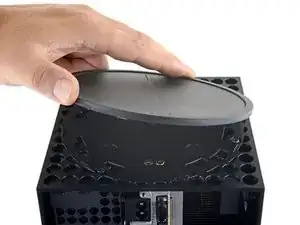
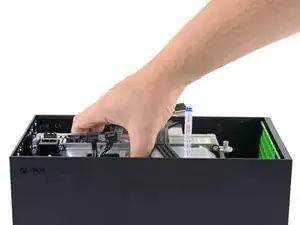
    • Ziehe mit einer stumpfen Pinzette den großen Aufkleber auf der Rückseite ab, um die zweite Schraube freizulegen.

    • Du musst den Aufkleber nur so weit abziehen, dass du an die Schraube gelangst. Du musst ihn nicht ganz abziehen.

    • Technisch gesehen sind das Garantiesiegel, aber keine Sorge. Microsoft kann dir die Garantie nicht entziehen, solange du nichts kaputt machst. Viel Spaß.

    Recommend using a hair dryer to soften the label adhesive.

    Crash -

    Microsoft can void your warranty. They can use whatever excuse if it is sent in because you opened it and you cannot prove you didn’t damage it.

    DirtyD -

    actually those stickers would look better after removal if you use a really sharp blade to slide under it and get a corner up, then use your fingers to peel it, since it wouldn't leave those wrinkles and rough edges.

    Leooooo1061 -

  3. aqjZt2Xb3m3aolZQ
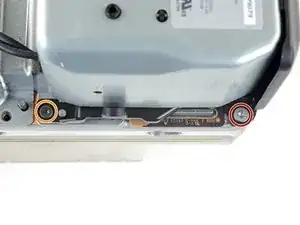
    • Entferne die beiden 7,4 mm langen Torx T8 Schrauben, mit denen die Rückseite befestigt ist.

    • Achte bei der Prozedur drauf, die Schrauben nicht durcheinander zu bringen und sie wieder an der richtigen Stelle einzusetzen, um keine Schäden zu verursachen.

  4. m4ius4PHhbf1vBgc
    m4ius4PHhbf1vBgc
    dAiRHFUnRejZqcLE
    IbXFLL4MqqboGYqR
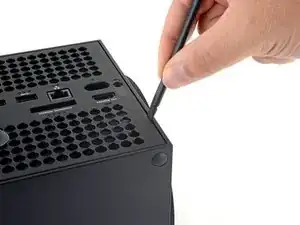
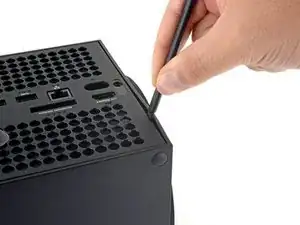
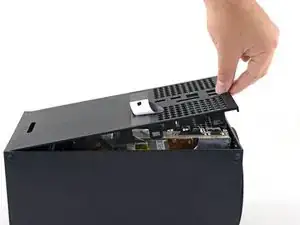
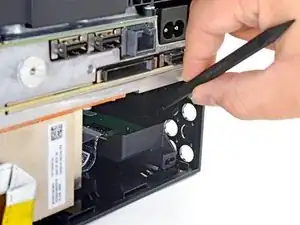
    • Schiebe das flache Ende eines Spudgers an der unteren Kante links in den Spalt zwischen Rückseite und Gehäuse.

    • Heble mit dem Spudger die Rückseite hoch, um die Clips zu lösen.

  5. v3nCqkOqZPiQPTiV
    v3nCqkOqZPiQPTiV
    enZdeM2q3kplUM35
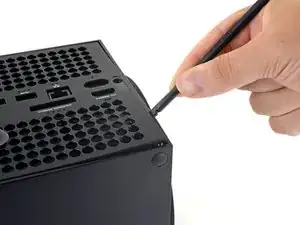
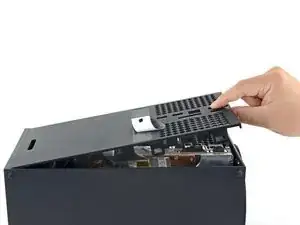
    • Schiebe das flache Ende eines Spudgers an der unteren Kante rechts in den Spalt zwischen Rückseite und Gehäuse.

    • Heble mit dem Spudger die Rückseite hoch, um die Clips zu lösen.

  6. T3KZEDU3kapNSLob
    T3KZEDU3kapNSLob
    dTuJey3MhNX4153H
    3Uhf3MV2ssejZD2H
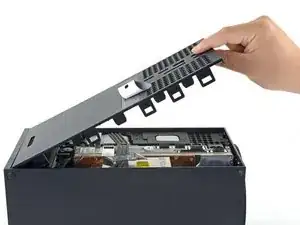
    • Greife die Rückseite an der Öffnung, die du gerade geschaffen hast und ziehe sie vom Gehäuse ab, um die Clips an der langen Seite zu lösen.

    • Drücke beim Zusammenbau an den Kanten entlang, damit die Clips wieder einrasten.

  7. uldRdnlZxZAALgGC
    uldRdnlZxZAALgGC
    LL1Kmc3SnuUNCMOg
    cxQDaTGO2Zcg2IFW
    • Die Rückseite steckt an der oberen Kante in einer Vertiefung.

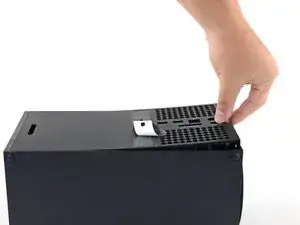
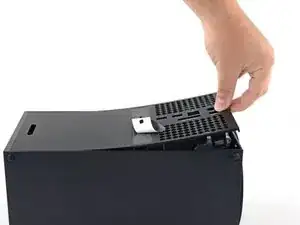
    • Drehe die Rückseite nach oben und ziehe sie von der Oberkante weg, damit sie sich aus der Vertiefung löst.

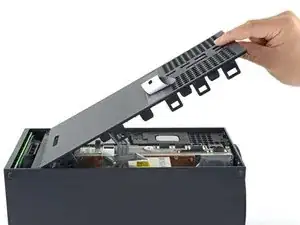
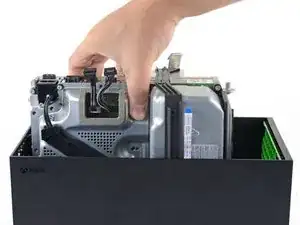
    • Entferne die Rückseite.

  8. s5HXWZ15bUqFvXiV
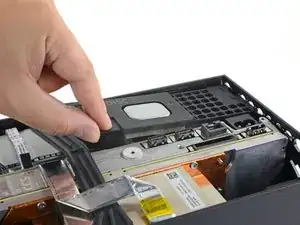
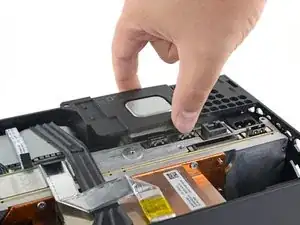
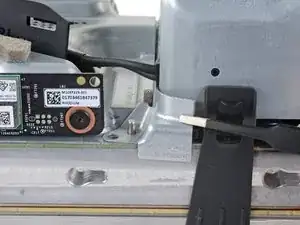
    • Entferne die drei T8 Torx Schrauben, die den Lüfter am Chassis fixieren.

    • Eine 10,5 mm Flachkopfschraube

    • Zwei 8,8 mm Schrauben

    are there any 10.5mm wide head screw for the xbox fan for sale because i need a replacement because i accidentally broke mine

    GhostMindX9 -

    If the 10.5 mm screw isn’t budging, use some pliers to loosen it

    Joseph Grant -

  9. IPQZ2JOW6g3mq6yw
    IPQZ2JOW6g3mq6yw
    dDipWLCFPsWOO3Qq
    s5TfshEoqJTMEWXb
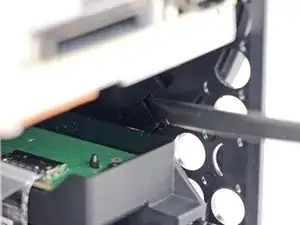
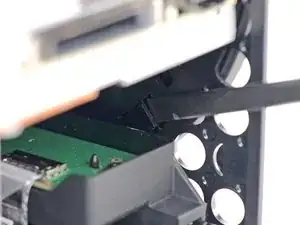
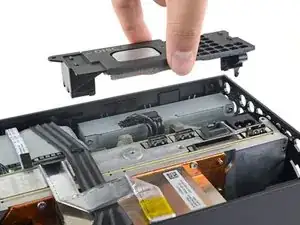
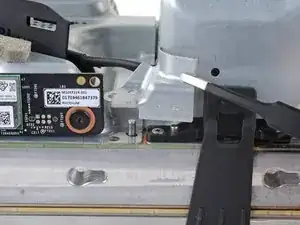
    • Greife die Kanten des Lüfterkabelanschlusses mit deinen Fingern oder einer stumpfen Pinzette und ziehe ihn nach oben, um ihn vom Chassis zu lösen.

    • Ziehe nie direkt am Kabel, immer nur am Anschluss, damit nichts kaputtgeht.

    • Schiebe das Kabel beim Zusammenbau wieder in die kleine Kabelführung, damit die Rückseite sich richtig schließt.

    But don’t pull the connectors with tweezers because you will inevitably still damage the cable as you have no grip on the connector and the tweezers will slip.

    Leif DeWolf -

    Tweezers do not work

    Marquis Wylie -

  10. 32I1KI24pY3JZu4k
    32I1KI24pY3JZu4k
    LWIG3ECKkFoVTfRt
    • Schiebe den Lüfter aus der Halterung, um ihn zu entfernen.

    • Der Lüfter passt nur auf eine Art in die Halterung. Achte beim Zusammenbau darauf, dass der Master Chief zu dir schaut.

    • Der Einbaurahmen aus Kunststoff wird bei einem neuen Austauschlüfter möglicherweise nicht mitgeliefert. Diese Halterung ist mit vier Torx T10 Schrauben am Lüfter festgeschraubt. Dies wird in der Anleitung nicht gezeigt.

  11. TeS1w2jBIiJyJ5tC
    TeS1w2jBIiJyJ5tC
    GBcGsYAAuvqUAZFE
    MjvRJVRGOvIri4t6
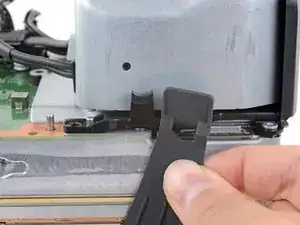
    • Löse die Halteklammer, die die Unterseite mit dem Chassis verbindet, mit dem flachen Ende eines Spudgers.

  12. N5ypbFiuFLLgCRbP
    N5ypbFiuFLLgCRbP
    SvsN3qWZdXACBrlc
    MfVUqOiHMbDUfFb5
    • Drehe die Unterseite gegen den Uhrzeigersinn, damit sie sich vom Chassis löst.

    • Vielleicht musst du die Halteklammer offen halten, damit du drehen kannst.

    • Entferne die Unterseite.

    • Lasse beim Zusammenbau die Halterungen der Unterseite in die Aussparungen fallen und drehe die Unterseite im Uhrzeigersinn, bis die Halteklammer zuschnappt.

    • Wenn alles richtig sitzt, ist der "Hello from Seattle" Schriftzug parallel zu den Seiten der Konsole.

    had trouble getting the base off, what worked for me is setting the console on the table sitting on the base and turning the whole console while pushing down.

    techy Waterville -

  13. WCybWp1L2MMPSGZ3
    WCybWp1L2MMPSGZ3
    re5IVejujiRDrS1l
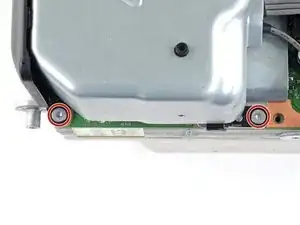
    • Entferne die beiden 8,8 mm T8 Torx Schrauben, mit denen der Vibrationsabsorber des Laufwerks am Chassis befestigt ist: Eine an der Unterseite und eine oben am Absorber.

  14. Sv4TqfXBjJZ6SbRH
    Sv4TqfXBjJZ6SbRH
    KK1xoHxekFkfFF4m
    5rqMYEVtOxgVyGeJ
    • Hebe den Vibrationsabsorber des Laufwerks nach oben, um ihn zu entfernen.

    • Der Vibrationsabsorber umfasst das Laufwerk mit den Silikonflächen von beiden Seiten. Du musst das Laufwerk vielleicht herauswackeln.

    • Achte beim Zusammenbau darauf, dass der Vibrationsabsorber wieder komplett drin sitzt und nicht höher ist als der Rest des Chassis.

  15. CuDAfMsFFYR4hvEI
    CuDAfMsFFYR4hvEI
    1ZM1OpOHMG6rvTHp
    6nmdPY3SVdBaAHVU
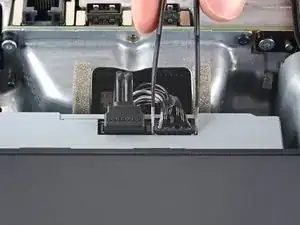
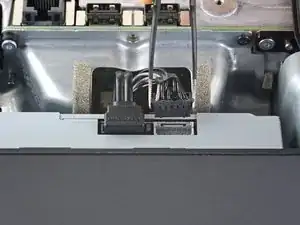
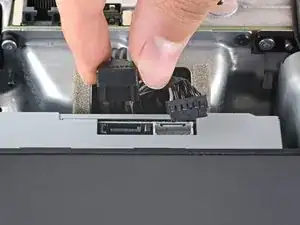
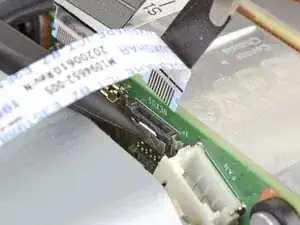
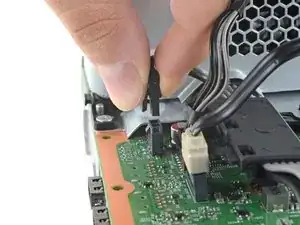
    • Greife die Kanten des Stromkabelanschlusses mit einer stumpfen Pinzette und ziehe ihn nach oben, um ihn abzutrennen.

    • Ziehe immer nur am Anschluss, nie an den Kabeln selbst.

    • Greife den Datenkabelanschluss mit deinen Fingern und ziehe ihn nach oben, um ihn abzutrennen.

    Once again, DO NOT use tweezers to pull these connectors out. That’s a great way to slip and damage something.

    Leif DeWolf -

    I managed to get the power connector unplugged, but the data cable just refuses to move. I've used quite a bit of force, and using any more feels like I would damage it. I have no clue on how to get it out safely :(

    Izaac Brånn -

    Try to "walk" the connector out: pry up one side, then the other. Best of luck!

    Carsten Frauenheim -

  16. wM13ZRag2JLuhebq
    wM13ZRag2JLuhebq
    aHGUfCTjqFMty3f2
    • Greife die Oberkante des Laufwerks und ziehe es aus der Halterung, um es zu entfernen.

    • Richte die kleinen Stifte an der Unterkante des Laufwerks beim Zusammenbau an den Aussparungen in der Halterung aus.

    • Wenn das Laufwerk nicht sauber sitzt, kann der Vibrationsabsorber nicht richtig eingesetzt werden und der Schlitz vorne an der Konsole stimmt nicht mit dem Laufwerk überein.

  17. JThLNufCC5TuxZGO
    JThLNufCC5TuxZGO
    iDoNjhi3S2Tt1bY2
    PiESWahhDgT3noij
    • Die Flachbandkabel und die Anschlüsse sind extrem empfindlich, sei also beim Lösen und Entfernen sehr vorsichtig.

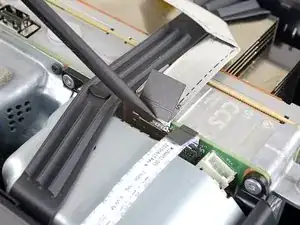
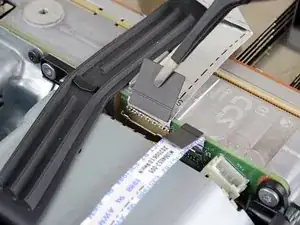
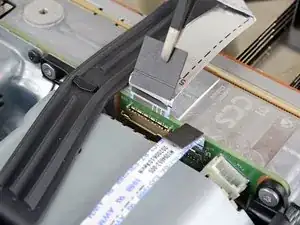
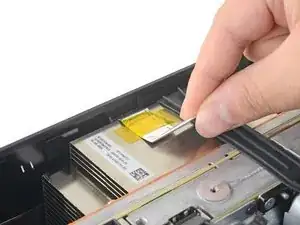
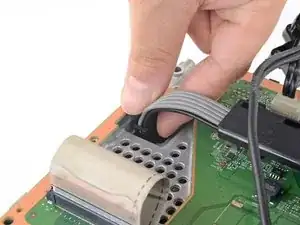
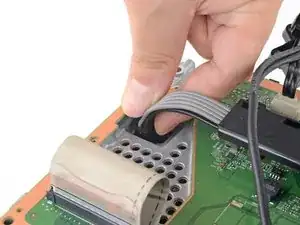
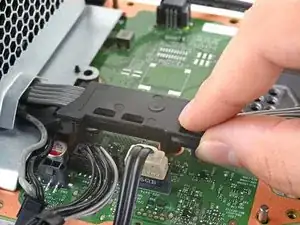
    • Löse die metallene Halteklammer des Flachbandkabels der USB-Anschlüsse mit dem flachen Ende eines Spudgers.

    • Lass die Halteklammer wieder sanft einschnappen, wenn du die Kabel wieder angeschlossen hast.

  18. reQaG4PGLwSMrQSa
    reQaG4PGLwSMrQSa
    CBr1rFORlKfRrMYn
    • Ziehe die schwarze Zuglasche am Flachbandkabel der USB-Anschlüsse mit einer Pinzette nach oben, um es so vom Mittelrahmen zu lösen.

    • Ziehe nur an der Lasche, nicht an den Kabeln.

    • Wenn das Kabel zum USB-Anschluss am Metallrahmen zu kleben scheint, dann erwärme es mit einem iOpener oder einem Haartrockner, um den Kleber aufzuweichen. Je nach Modell deiner Xbox musst du eventuell den Kleber mit einem Plektrum auftrennen.

    Connector i-pex Evaflex 5-HD 24 pin

    20952-024e-02

    http://www.i-pex.com/sites/default/files...

    drops206 -

    The silver ribbon cable is glued down to the center chassis, so only pulling on the black plastic pull tab will result in it pulling free from the cable as that tab is only glued to the cable.

    Better to heat the silver ribbon cable's adhesive with a hair dryer, separate the cable from the center chassis, and then pull the cable from the connector using the black plastic pull tab.

    Crash -

  19. CW421D6MGHTlbFdZ
    CW421D6MGHTlbFdZ
    rHN4vD2UGeuUT6BS
    nnCD6TpLq3CurvBs
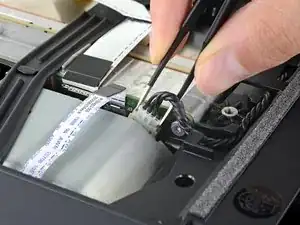
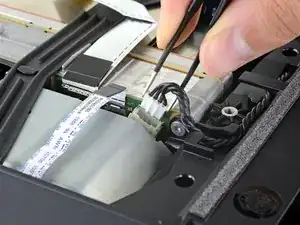
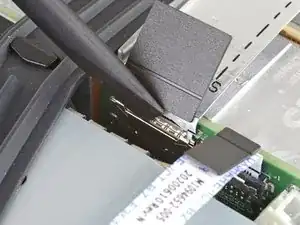
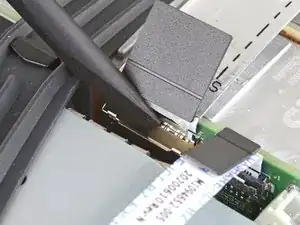
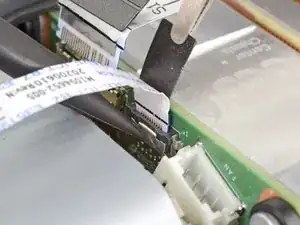
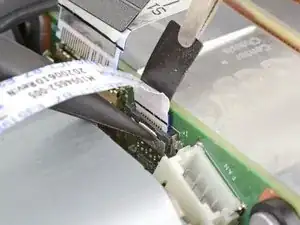
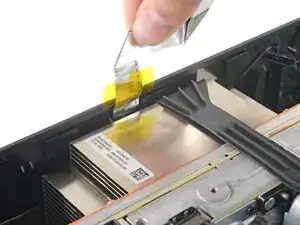
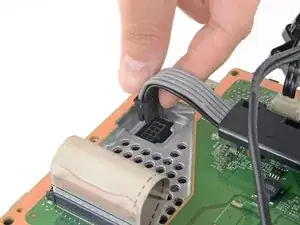
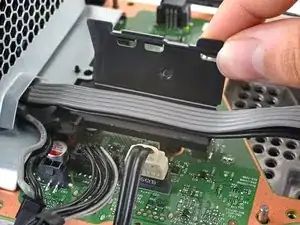
    • Drücke die metallene Halteklammer des Flachbandkabels des Power Buttons mit dem spitzen Ende eines Spudgers.

    • Ziehe die schwarze Zuglasche am Flachbandkabel des Power Buttons mit einer Pinzette nach oben und löse es so vom zentralen Chassis. Halte dabei die Klammer gedrückt.

    • Ziehe nur an der Lasche, nicht an den Kabeln.

    • Ziehe nicht am Kabel, wenn du nicht die Klammer drückst. Du könntest sonst das Kabel oder den Anschluss beschädigen.

    • Bein Zusammenbau sollte das Kabel leicht in die richtige Position "schnappen".

    I broke this connector during disassembly. Is there a part number I can use to get a replacement on Mouser or Digikey?

    Peter LeCraw -

    I broke this connector during disassembly too. Where can I get this connector?

    Oscar Cedeño -

    the manufacturer of connectors in series x is I-PEX.  exact part number (as far as I'm not mistaken) 20535-010E-02 EVAFLEX 5-VS.  0.5mm pin spacing (10pin connector). a possible rescue may be to desolder the connector from the switch board and solder it permanently there.

    http://www.i-pex.com/sites/default/files...

    drops206 -

    How do I purchase this from their website?

    munirbisharat12 -

    I have these connectors. Baycroc@fedtel.net

    Evenson Electronics -

    Would we be able to order them from you directly

    bailey jackson -

    Yes would we be able to order these connectors directly from you?

    Blake Roan -

    XSX NEXUS FPC Socket

    kasynlife -

    There is no black pull tab on mine😬. How am I supposed to pull it safely?

    Karman Wilmot -

  20. mRjpYsIcQtO1VZSR
    • Entferne die drei 7,4 mm Torx T8 Schrauben, die das zentrale Chassis am Gehäuse befestigen.

  21. BG1mV12jbtdhWuqh
    BG1mV12jbtdhWuqh
    CdanjTj5YnExFJQ6
    • Ziehe das angeklebte Flachbandkabel der USB-Anschlüsse vorsichtig vom Kühlkörper.

    • Je nach Modell deiner Xbox kann das Kabel an der Unterseite festgeklebt sein. Erwärme das Kabel in diesem Fall mit einem iOpener oder Haartrockner.

  22. FlZxtfQKAsehwPZS
    FlZxtfQKAsehwPZS
    b2mITSOoDXR14Vbx
    vRsFH3BGMFfUPM5w
    • Das zentrale Chassis wird mit kleinen Stiften am Gehäuse ausgerichtet. Diese Stifte müssen aus ihren Aussparungen herausrutschen, damit das Chassis entfernt werden kann.

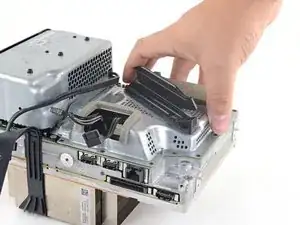
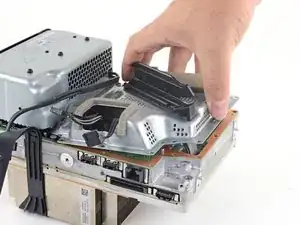
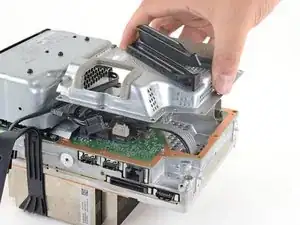
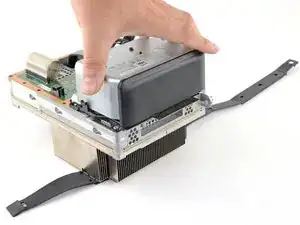
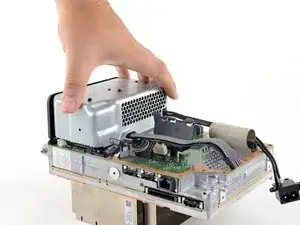
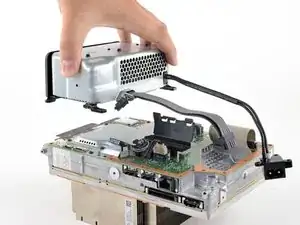
    • Greife das zentrale Chassis und ziehe es zum grünen Lüftergitter an der Oberseite des Gehäuses, damit sich die Stifte aus dem Gehäuse lösen.

    • Hebe das zentrale Chassis heraus, um es vom Gehäuse zu entfernen.

    • Achte beim Zusammenbau darauf, dass die Flachbandkabel nicht zwischen Chassis und Gehäuse eingeklemmt werden.

  23. PYOZMckEM6YFZhnc
    PYOZMckEM6YFZhnc
    1xsCRjdeKn6b1eoP
    NNMHxwPIFQL3C4Ar
    • Löse den Gurt um das Chassis rechts vom Netzteil.

  24. O5LimDYwRbpCTd5s
    O5LimDYwRbpCTd5s
    aNJ2mCPCnydLJNkt
    Y2hMWBBmZBgqoLlF
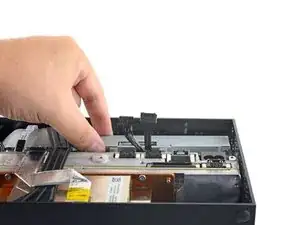
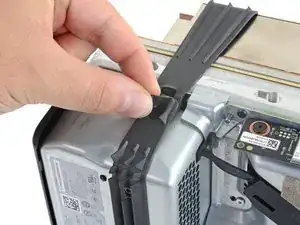
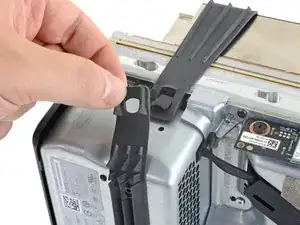
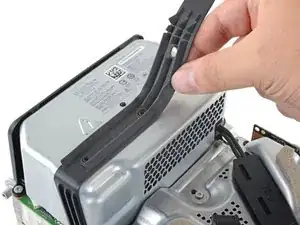
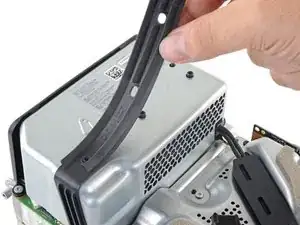
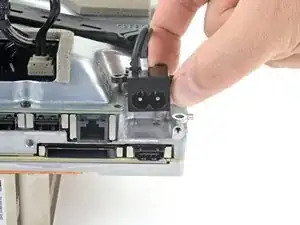
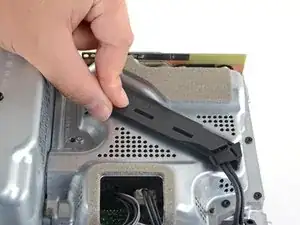
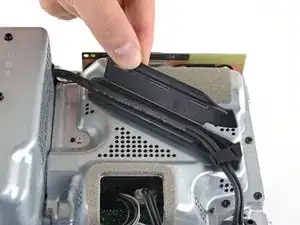
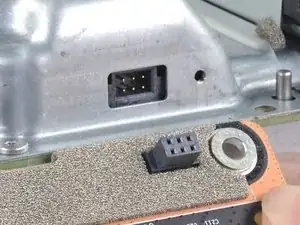
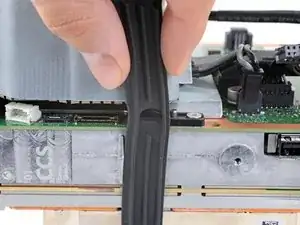
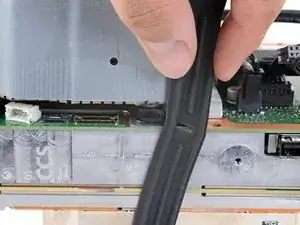
    • Ziehe den Gurt nach oben und vom Netzteil ab.

    • Sobald der Gurt gelöst ist, lege das lose Ende auf die Seite.

  25. GBlIOmPDpNFrqNdF
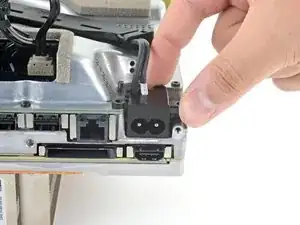
    • Löse die drei Torx T8 Schrauben, mit denen der Anschluss für das Stromkabel am Netzteil befestigt ist.

    • Zwei 13,1 mm Schrauben

    • Eine 35 mm Schrauben

  26. aYbxQRVnLPbBFWNf
    aYbxQRVnLPbBFWNf
    FnA3ZScMTg45uAJO
    • Hebe den Anschluss für das Stromkabel aus seiner Vertiefung im Chassis.

  27. sqLilxkGrnaq151Q
    sqLilxkGrnaq151Q
    mu1KLCXIfNFXMPvi
    • Löse und öffne den Deckel der Kabelführung.

  28. YqxgDwTSMenfB1ns
    YqxgDwTSMenfB1ns
    rWUjplqC1bSAYotZ
    • Ziehe das Stromkabel aus dem Extrateil der Kabelführung.

  29. OYB4xdKpWGwK2EHc
    • Entferne die 8,8 mm Torx T8 Schraube, die die Abdeckung der Netzteilecke fixiert.

  30. EotceFdOWymKnXZB
    EotceFdOWymKnXZB
    vbekhNFC3ZJhOth5
    • Löse die Abdeckung der Netzteilecke mit deinen Fingern oder einer Pinzette.

  31. WAXNimblJlfmOjur
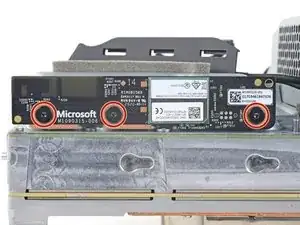
    • Entferne die drei 9,6 mm Torx T3 Schrauben, mit denen die zusätzliche Antennenplatine am zentralen Innenrahmen befestigt ist.

  32. yeLfZ2CVc3L5rv1U
    yeLfZ2CVc3L5rv1U
    T3KNJtEWBPPcsCv5
    WCSpIiUQKvtbyJdr
    • Greife die Antennenplatine und ziehe sie gerade vom Chassis ab, um sie zu lösen.

    • Richte beim Zusammenbau den Anschluss der Platine mit dem Anschluss am Chassis aus und drücke sie zusammen.

  33. CLBLTRUoR5UPpsHP
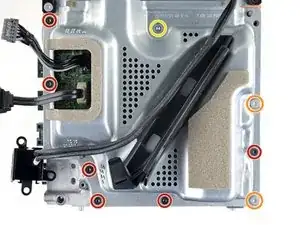
    • Löse die neun Torx T8 Schrauben, die die Abdeckung des Boards fixieren:

    • Sechs schwarze 8,8 mm Schrauben

    • Zwei silberne 35 mm Schrauben

    • Eine silberne 13,1 mm Schraube

    one of the 35mm screws was screwed in too tightly and I had to use a drill to break the screw.

    does not understand these fitters who screw all the way

    Rached Cherradi -

  34. ed2OQTpgQwFvMecU
    ed2OQTpgQwFvMecU
    5jFlTnpv5x4Fo6WV
    y1CJe1tURHSg4CpT
    • Hebe die Abdeckung des Boards vom zentralen Chassis.

  35. xqF4FkWDslSLS1dW
    xqF4FkWDslSLS1dW
    iLT2ZobnMhcXJaI6
    2RvTQF2vuxMbnfVk
    • Löse den Gurt des Chassis von den Haltestiften auf beiden Seiten des Netzteils.

  36. Txif23FLcch2M1Wn
    Txif23FLcch2M1Wn
    1VlIaR6A5mNNHqmM
    • Entferne den Chassis-Gurt.

  37. bqM55PxtNo3VPsF6
    bqM55PxtNo3VPsF6
    c43M1l4OA3C4xFGP
    AwJurGPHQtFKlCBX
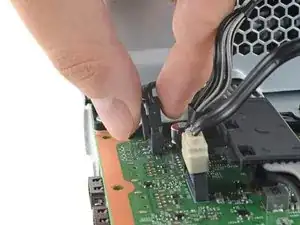
    • Greife und drücke die Halteklammer am 10-Pin-Stromkabel zusammen.

    • Halte die Klammer gedrückt und ziehe den Anschluss gerade nach oben, um ihn vom Board zu lösen.

    • Ziehe nie direkt am Kabel, immer nur am Anschluss.

  38. xILA1c4SIgUSIuEI
    xILA1c4SIgUSIuEI
    YQwxxx3nfELPHGSF
    eKCxxRbEarj6E3Hc
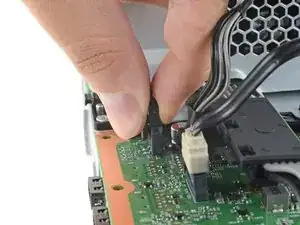
    • Greife und drücke die Halteklammer am 2-Pin-Stromkabel zusammen.

    • Halte die Klammer gedrückt und ziehe den Anschluss gerade nach oben, um ihn vom Board zu lösen.

  39. DPQNOoY3HMDNLE1E
    DPQNOoY3HMDNLE1E
    XYpvIAhXWueKViKk
    • Öffne die Klappe der Kabelführung des Stromkabels.

  40. mPwRblGEyTccQIka
    mPwRblGEyTccQIka
    OcKwPwUlFYWDoKXw
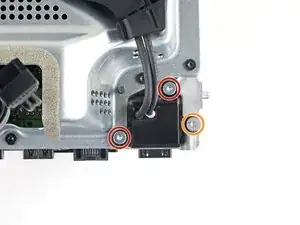
    • Entferne die vier Torx T8 Schrauben, die das Netzteil fixieren:

    • Drei silberne 35 mm Schrauben

    • Eine schwarze 8,8 mm Schraube

  41. W5RqOYm3UarxNcSK
    W5RqOYm3UarxNcSK
    EHv43ZpwFtkyD65O
    • Entferne das Netzteil.

    Bei meinem Ersatznetz teil musste ich auch die Kunststoff Halterung tauschen, da sonst die Löcher für die Schrauben nicht passten

    Mark Kommnick -

    super gute Anleitung

    Andreas Fleischmann -

Abschluss

Um dein Gerät wieder zusammenzubauen, folge diesen Schritten in umgekehrter Reihenfolge.

Entsorge deinen Elektromüll fachgerecht.

Hat die Reparatur nicht ganz geklappt? In unserem Forum findest du Hilfe bei der Fehlersuche.

Carsten Frauenheim

Mitglied seit: 10/03/20

144841 Reputation

24 Kommentare

So, I am a skilled DIYer. I had 1 series x that had no power all the sudden, under warranty, sent back and received a refurb. Then I got a halo infinite edition, it all the sudden wouldn't send video. It would power up but I couldn't boot in safe mode or low res mode. Sent it back, send me a refurb. Now my brothers Xbox did the same thing. It turns on but never boots then shuts off after few minutes. No controller connects either, and can't have the xbox sync with the flash. His is not under warranty so I bought a PSU and replaced, still same thing. Any ideas? Microsoft just sends you a refurb and doesn't tell you what was wrong or else I'd know since it happened to my infinite console.

heavychevy9 -

Have you tried replacing the SSD drive?

Kason M -

FYI this guide is amazing! Down to providing the length of screws and circling in photos. A++

heavychevy9 -

Well ladies and gentlemen I did it. Took about an hour and a half, only because I put one of the cables on backwards, otherwise it would have only taken an hour. SHES ALIVE!!!! Thank you so much to the person that created these instructions they were SPOT ON!

CAN I GET A A'MEN!!!

Jake Burton -

It just worked for me too! Took me about 2 hours, but I tend to work on this stuff extra slowly to be careful. Thanks so much!

Jon Aron -

Great guide! It took me about an hour with my 7 year old son helping me. I have PC and laptop background so that helped me a lot about knowing how to remove the ribbon cables and other connections. MS wants $300 to just give you another Xbox. Even with buying the tools I still saved $200. Great job ifixit!

Eric Culler -

The hardest thing was that %#*@ base plate,, everything worked great thank you

steven ramey -

This guide and the replacement power supply worked perfectly! We got the Xbox Series X when it was first released. In February 2023 it would no longer power on. I took it to two local repair shops and they both said it was too new, they couldn't work on it. Thankfully I found this guide and my 13 year old son and I were able to take it apart and put it back together again ourselves. It did help to have a Torx wrench that you can get some leverage with (L-shaped), especially for the screw with the oversized head. We kept track of the screws by writing the step number on a Post-it Note and sticking each screw on the note with a double-sided adhesive sticker. I wish we would have done this sooner!

Crystal R -

My house took a lightning strike 3 months ago and the only two things it fried was my cable modem and Series X. My luck, the Series X's warranty expired about 5 days before that happened. I ordered a PSU from iFixit and just finished installing it. Works like a charm and I'm finally back up and running. I used to build computers when I was younger so the install was pretty straightforward. This was much better than spending $600 on a new system :). Thanks iFixit!

Kason M -

Mine just had an issue where it turns on, button lights up white along with a beep, fan spins up for about 5 seconds then stops,
Light stays on but no video feed then shuts off.

Dunno is this is a PSU issue?
I ordered one to be safe, if it still doesn't fix it I will just send it back but if this isn't the issue then what is?
The SSD?

Udon Rodriguez -

Hi , I hope you are fine

I have the same problem with my Xbox Series X, for me, when it turns on, after a few minutes of working, a green screen crash suddenly occurs, and as you said, it turns off and then turns on normally. It is not possible and as you said, it is difficult to turn on. Is your problem solved? what have you done?

arshia noor -

Just tried changing the PSU and still wont boot up.
Anyone got any bright ideas?
Out of warranty and qoute from MS is for 400$ to send it in.

Rikard -

I recently moved into a new apartment with my wife and my Xbox did not survive the move. While I don't believe the move or packing damaged the power supply, it still did not power up once it was set up in our new apartment. With the LED not even turning on by pressing it, I suspected the power supply. I ordered a new power supply from the iFixit website and followed the repair guide. As soon as I reassembled my Xbox, I powered it on and, to my excitement, it powered on and works!

This was an incredibly helpful and cost effective solution. Thank you for creating this helpful guide!

Stephen Good -

very good guide. because of a screw problem, it took me 3 hours. but I'm happy. in fact, for €80 I was able to repair my Xbox where Microsoft was asking me €340, almost the price of a new one.

Thanks to the author of this guide

Rached Cherradi -

Guida fantastica, seguita passo per passo il problema è stato risolto! Grazie!

Ugo Petroni -

About an hour for me because a ribbon cable tab came off, had to glue it back on. Guide is flawless and it fixed the console. Thanks!

Ian Weston -

I’m considering doing this but I’m worried about breaking it in the process. Any idea how risky it is?

Jake Calcutt -

It is not risky if you already had experience opening up laptops etc, but if you don't, the biggest risk is breaking some of the cables. (There is really no risk when it comes to screws other than losing them -- make sure to organize your screws well.) And the solution to that is simple -- religiously follow all the instructions here, don't use force to pull something out when it does not come off -- make sure you are always doing the right thing. If anything seems confusing to you, find a Youtube video and follow what they are doing. You'll be ok.

lzps -

Excellent Guide can't go wrong with this. My boy is reborn

Jm10 -

I couldn't get the board shield to go back on after I swapped out the power supply. The ten pin power cord seems to be longer than the original.

Chris Conner -

These directions were absolutely perfect. Thank you so much. You saved me $220 that Microsoft would have charged me to do the same thing detailed here. My Xbox went from brick to fully functional. Took about an hour of work but the step by step guide with photos was SPOT ON. Cannot be happier.

Farty McGee -

Thanks Farty McGee!

Carsten Frauenheim -

Thank you so very much for this guide, I will now order the power supply kit. I thought that I would have to go without for months while I saved enough to have it repaired. Again thanks you have renewed my faith in that there is good people out there. 👍

Dj.Ford -

Super tutoriel !

Ma Xbox ne démarrait pas et en changeant l'alimentation elle remarche !!! Merci beaucoup !!

maximeGG29 -