Einleitung

Grundständige Anleitung: Austausch der Logic Board Einheit im iMac 27" 2017.

  1. HVZOuLlAiUTsB4f1
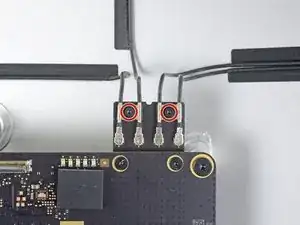
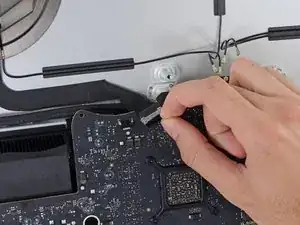
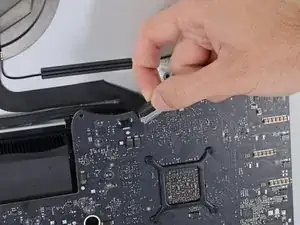
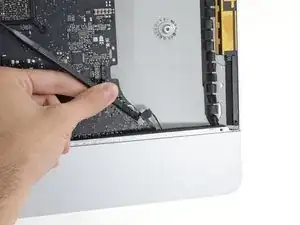
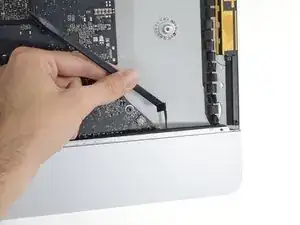
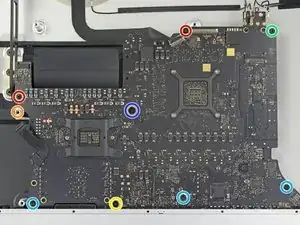
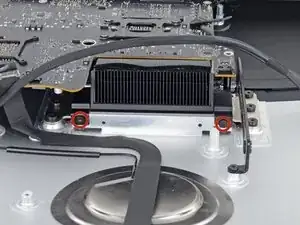
    • Drehe die beiden 4 mm Torx T5 Schrauben heraus, mit denen die AirPort/Bluetooth-Antennenkabel befestigt sind.

    Rather than unscrew the antenna cables, I usually unscrew the screws on the board and slide out the whole AirPort/Bluetooth module, which means I need not keep track of which antenna cable goes where.

    johann beda -

    Fully agree with comment of johann! I did it that way and was glad to not having to deal with the microscopic IPEX "coax" antenna connectors and order of them.

    I'd like to add that after removing the 2 screws, the wifi/bt module is still holding into these 2 holes with 2 metal pieces.

    Before pulling the module out of its socket, one has to slightly lift it away from the mainboard (maybe 1mm, so the metal pieces leave the holes).

    Thomas Waldmann -

    Confirmed. 2 T5 screws, and pull the board straight up out of its socket behind he motherboard. Leave all cables attached.

    ebay -

    Fully agree. It is not only handy for order of cables but especially eliminates risk of damaging the quite delicate IPEX connectors on the broadcomm wifi/bluetooth board when removing and reconnecting later. This happened to me. It is a huge hassle to replace / repair.

    This should be main option!! Wish I read this comment first.

    Starting Genius -

    Does anyone know if this board can be upgraded to Bluetooth 5

    Christopher C.S. -

  2. qIA5fvOeCOnWH1Vh
    qIA5fvOeCOnWH1Vh
    XXMEBjJLNYXOl3aY
    nmVCPlZOoapjC5D2
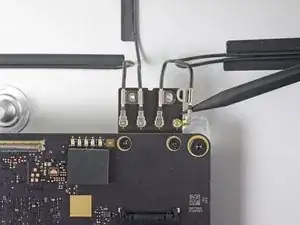
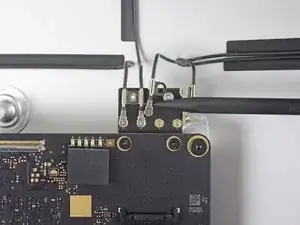
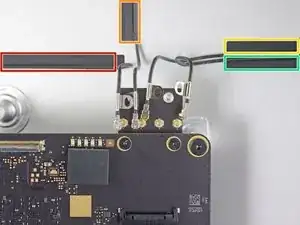
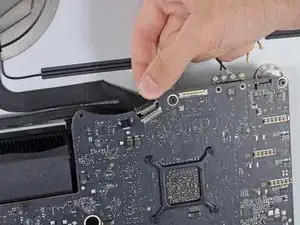
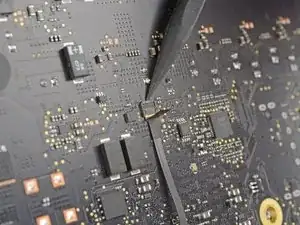
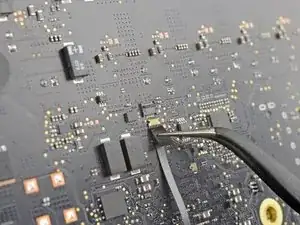
    • Trenne jeden der vier Antennenstecker mit der Spudgerspitze von der Airport/Bluetooth Karte ab.

    • Beachte die originale Position der vier Verbinder beim Zusammenbau. Die Antennen sind von links nach rechts auf der Karte in dieser Reihenfolge verbunden:

    • ganz links

    • oben

    • oben rechts

    • unten rechts

    TIP: Tape all 4 cables first to keep them in the correct position when re-assembling.

    Les Lesaca -

    My 2019 i9 has a bluetooth/airport card that doesn't look like this and it is not removable like this image suggests. If you look in the service manual, you'll see that a service wedge is required to hold this card in position while removing the logic board. When I upgraded my machine I didn't know this and detached the cables as you describe. Once upgraded and rebuilt, bluetooth no longer functioned - although wifi did. This card cannot be replaced either as it is soldered to the board. A costly mistake for me meaning I now have to use a wired mouse. Apple supplies the service wedge to authorised outfits only but I would love to get my hands on one if anyone knows where I can get one. Thanks, Rich :)

    Richard Ellis McCallum -

  3. LDGWovmq5iqPhCh5
    LDGWovmq5iqPhCh5
    rcpRC6BN2MsLiAJS
    Oy3WASyxuKZMQQ3p
    • Das ist eine sehr empfindliche Verbindung, die leicht kaputt gehen kann.

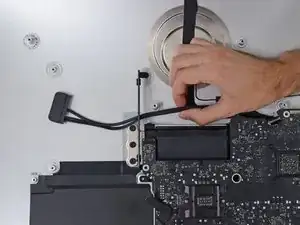
    • Klappe die Metallhalterung auf dem iSight Kamerakabel nach oben.

    • Ziehe den Stecker des Kamerakabels senkrecht aus dem Anschluss zur Oberkante des iMac hin.

  4. PZGoVl3TfEGOINTp
    PZGoVl3TfEGOINTp
    OYq3NjhImKlULFKy
    GsEHxDSgxuouCSCj
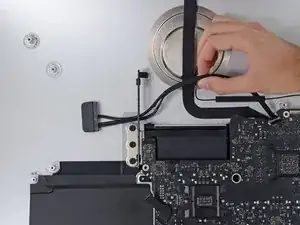
    • Löse mit dem flachen Ende eines Spudgers den Stecker des Kopfhörerbuchsenkabels aus seinem Anschluss auf dem Logic Board heraus.

    • Schiebe das Kabel behutsam aus dem Weg.

  5. Ioj6vLmqt1UTLkBu
    Ioj6vLmqt1UTLkBu
    gBUV2Xy1qEjgOyOT
    lFXqMinhpxQcgWV2
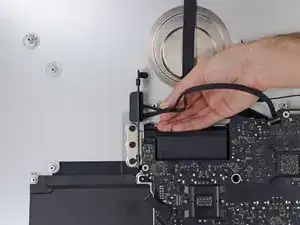
    • Klappe den Sicherungsbügel am ZIF-Verbinder des Mikrofonkabels mit der Spudgerspitze hoch.

    • Achte darauf, dass du wirklich nur am Sicherungsbügel hebelst, und nicht am Anschluss.

    • Ziehe das Mikrofon-Flachbandkabel mit einer Pinzette gerade aus seinem Anschluss heraus.

    Make a 10x macro photo of that connection with a good camera (showing how far the ribbon cable is inserted into the connector) BEFORE opening/pulling and later AFTER reinserting/closing it. Then carefully compare the photos concerning how far the cable is inserted.

    The only mistake I made while fixing my iMac was not to fully reinsert that ribbon cable and thus the mic did not work at first.

    Thomas Waldmann -

    ¿Porque en mi Imac no esta este conector? También he visto otras fotos en las que tampoco aparece este conector, hay varios modelos de placa base para el mismo año? Si este conector no lo tengo en mi placa base ¿Donde se conecta este cable ya que me ha quedado suelto en la carcasa y ahora no funciona el microfono interno y no veo donde estaba conectado antes. Gracias!

    Javier Blf -

    Es el conector del micrófono y no en todos los modelos viene así, las 2017 y 2019 así lo tienen, no se que otro modelo viene como en la foto.

    Pksin -

  6. piGgRxFUMj33AWDI
    piGgRxFUMj33AWDI
    ieBtZtFwkdn3cTrW
    • Entferne folgende Schrauben, mit denen das Logic Board befestigt ist:

    • Zwei 23,7 mm Torx T8 Schrauben

    • Eine 20,1 mm Torx T25 Abstandshalterschraube

    • Eine 17,6 mm Torx T8 Schraube

    • Eine 7,2 mm Torx T8 Schraube

    • Drei 7,1 mm Torx T8 Schrauben

    • Eine unverlierbare Torx T8 Schraube

    • Diese Schraube befindet sich unter einem Loch im Logic Board. Wenn du keinen Schraubendreher von iFixit verwendest, benötigst du wahrscheinlich eine Verlängerung oder einen Schraubendreher mit langem Schaft.

    A 3.0 Hex driver worked for the T25 spacer screw.

    johann beda -

    1/8” hex worked, too

    ebay -

    For the T25 I used a regular chisel tip screw driver that was exactly the width between two opposite sides of the Torx star

    The standoff is only screwed in by two or so turns and came out very easily for me

    So you shouldn't have to force it and damage threads

    Eoin -

  7. fJgFkZyHLLZdB1YH
    fJgFkZyHLLZdB1YH
    fHGiChnXJmROP3ek
    Yg2G1MP6Jo3XplDC
    • Ziehe das SATA-Kabel und den Stecker der Festplatte durch die rechte Festplattenhalterung. Bewge das Kabel auf die rechte Seite des iMac aus dem Weg für den Abluftschacht.

    • Das SATA Festplattenkabel kann im Moment noch nicht ganz entfernt werden, dies wird jedoch beim Entfernen des Logic Boards passieren.

    When reassembling one should not "pull it through the right bracket", but rather "pull it through between the right bracket and the case".

    Thomas Waldmann -

  8. KUFY5kVqKEZvTX1t
    • Drehe die beiden 5,6 mm Torx T8 Schrauben aus dem oberen Teil der Kühleröffnung.

    For the life of me I jut could not get these two screws to go back in neatly

    I had the same issue on both a 2017 and 2019 iMac 5K

    After some thinking I realised the don't do much anyways so I left them out

    No harm was done to either machine

    Eoin -

  9. cGF6KPqP4fUBB4jw
    cGF6KPqP4fUBB4jw
    WdI1VHP2UFCNPGCu
    ZSWNOLBKTDVCVItY
    • Achte beim Ein- und Ausbau des Logic Boards darauf, dass du nicht das empfindliche Mikrofon-Flachbandkabel unten links am Logic Board beschädigst.

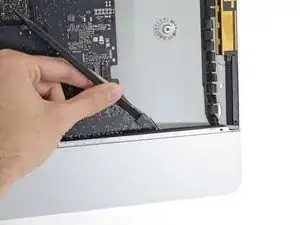
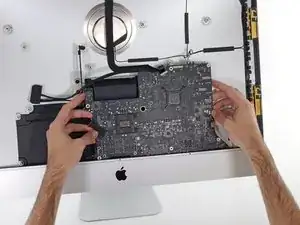
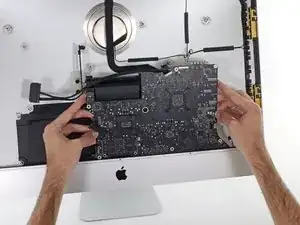
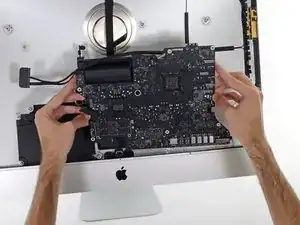
    • Kippe das Logic Board leicht nach vorne.

    • Hebe das Logic Board nach oben und aus dem iMac heraus. Sei vorsichtig, dass du an keinen Schraubenpfosten kratzt, die im Gehäuseinneren hervorstehen.

  10. u1JfbBecaKwUb6Nd
    u1JfbBecaKwUb6Nd
    NsDLWtU6RtvWJA3w
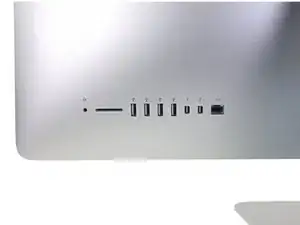
    • Beim späteren Zusammenbau musst du darauf achten, dass alle äusseren I/O Anschlüsse sauber in die Öffnungen passen. Das Logic Board könnte schief sitzen, sogar wenn alle Schrauben befestigt sind.

    • Du kannst einen USB-Stecker oder ein Ethernetkabel benutzten, um den korrekten Sitz des Logic Boards zu gewährleisten während du es festschraubst.

    Insbesondere die USB3.1 Port sollten mit einem Stecker belegt werden! Ich habe nur die USB3.0 (A?) Ports mit Steckern belegt und konnte nach dem Zusammenbau alle Port benutzen, aber nicht die USB3.1 (C) Ports. Am besten überall einen Stecker rein.

    Boris Boesler -

    Boris is correct. I reassembled mine usig the USB3.1 ports for alignment and found that my USB-C plugs would not go in. Be sure to use USB-C ports for alignment!!!

    Please update the instructions with this information.

    Erik -

    Confirmed. Used the rightmost USB-C and the leftmost USB-A connector and it aligned perfectly.

    Thomas Waldmann -

Abschluss

Um dein Gerät wieder zusammenzusetzen, folge den Schritten in umgekehrter Reihenfolge.

Adam O'Camb

Mitglied seit: 11/04/15

212278 Reputation

0 Kommentare