Einleitung

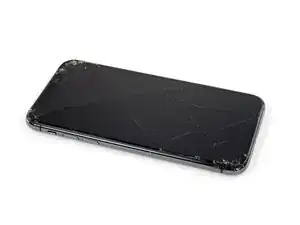
Wenn das Display deines iPhone 11 zerbrochen ist, kein Bild beim Einschalten zeigt oder nicht auf Berührung reagiert, kannst du mit Hilfe dieser Anleitung dein iPhone 11 Display tauschen und dein Handy selbst reparieren.

Diese Anleitung gilt für Ersatzdisplayeinheiten, bei denen die metallene LCD Abschirmung vorinstalliert ist. Wenn dein Ersatzdisplay nicht damit ausgestattet ist, dann benutze stattdessen diese Anleitung für die Reparatur.

Die kombinierte Baugruppe aus Ohrhörer-Lautsprecher und Sensoren ist mit dem iPhone ab Werk gepaart. Du musst sie deswegen mit Hilfe der folgenden Anleitung bei jedem Displaytausch von deinem alten auf das neue Display übertragen. Sie enthält den Flood Illuminator, das ist ein Bestandteil des biometrischen Face ID. Wenn er beschädigt oder ausgetauscht wird, funktioniert Face ID nicht mehr. Sei also besonders vorsichtig und beschädige während der Reparatur keines dieser Bauteile. Nur von Apple "autorisierte" Techniker können die Face ID-Funktion wiederherstellen.

Hinweis: True Tone funktioniert nach einem Displaytausch nicht mehr, selbst wenn original Apple Teile verwendet werden.

  1. T2yIKTYtWTOpeGir
    T2yIKTYtWTOpeGir
    1BRQlG3vB6hGYvKS
    • Bevor du beginnst, entlade deinen Akku auf unter 25%. Ein geladener Lithium-Ionen-Akku kann sich entzünden und/oder explodieren, wenn er bei der Reparatur versehentlich beschädigt wird.

    • Schalte dein iPhone aus, bevor du mit dem Zerlegen anfängst.

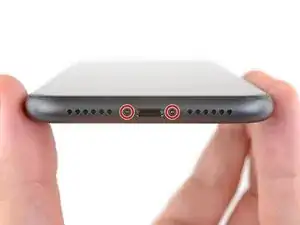
    • Entferne die beiden 6,7 mm langen Pentalobe Schrauben an der Unterkante des iPhone.

    • Wenn du das Display des iPhone öffnest, werden seine wasserfesten Dichtungen beschädigt. Halte Ersatzdichtungen bereit, bevor du nach diesem Schritt weitermachst, oder vermeide es, dein iPhone Flüssigkeiten auszusetzen, wenn du es ohne neue Dichtungen wieder zusammenbaust.

    the right screws wouldn’t come off

    Yusef San Inocencio -

    ok one came of but my right wont come of either!!!!

    Aisa Jawara -

    Hello guys, I still haven't found away to power off the iphone without using the screen. Cheers!

    danielaguirre93 -

    You can try this.

    Quickly Press and release the volume up button.

    then Quickly Press and release the volume down button.

    then press and hold the power button and wait until it turns off.

    worked for me :D

    Benóný Egilson -

    Where does one get replacement seals? Is this the same as the display assembly adhesive?

    Brian Baker -

    not of the screwdrivers i have seem to be able to turn the screws

    Aisa Jawara -

    how do you change battery of an iPhone 11 and still the battery health shows, do you use a software for that?

    Great Me -

    Battery health won’t show on a non Apple battery.

    DON’T forget to discharge old battery before removing it. Very impressive fire (and smoke!) if you puncture it. Ask me how I know

    Doug Harrowing -

  2. 6UPwoloGBO4tmVoS
    6UPwoloGBO4tmVoS
    BmSYPJmOy6dbHipF
    3EOdQPAGOmiuhoKU
    • Wenn du ein Plektrum zu tief einschiebst, kann das Gerät beschädigt werden. Dieser Schritt zeigt, wie du eine Marke am Plektrum anbringen kannst, damit das nicht passiert.

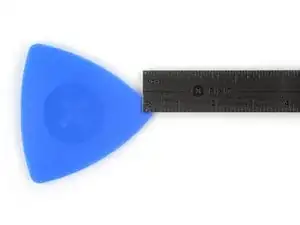
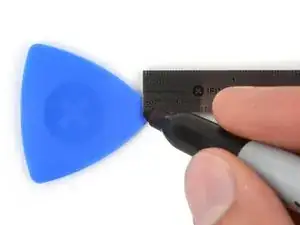
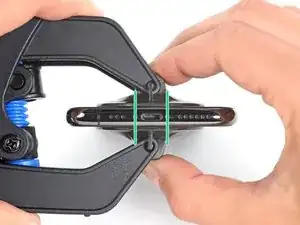
    • Zeichne mit einem Permanentmarker 3 mm von der Spitze des Plektrums entfernt einen Strich.

    • Du kannst die anderen Ecken ebenfalls mit Strichen in verschiedenen Abständen markieren.

    • Du kannst auch eine Münze so mit einem Klebeband auf das Plektrum kleben, dass sie einen Abstand von 3 mm zur Spitze hat.

    Got to step 2 and realized the fix kit doesn't include an opening pick! Looks like a guitar pick, and I have those lying around. Is that expected? Looks like the pick is used in many steps below. There's a little blue crowbar that isn't mentioned in the instructions. Perhaps that replaces the opening pick?

    Sloan Looney -

    Hi! I can't see which guide you were using when writing this comment. Can you reply here with which guide and fix kit you used?

    Clay Eickemeyer -

    I see you posted this in Meta. I hope it's resolved soon! In the meantime, a guitar pick may work well enough for your repair.

    Clay Eickemeyer -

    what fix kit?

    Meow Purr -

    My fix kit didn't include an opening pick either

    WILLIAM HARRIS -

    Make sure you check inside the black boxes after emptying them. My pick was stuck inside one of the boxes.

    AndyF -

    My AliExpress refurbished screen came with a pick that has a coin-like circle that pops out, so no modification was necessary

    Gijs Leegwater -

    the picture shows 3 cm but the description says 3 mm's. Which one is it?

    John Pena -

    That is a misunderstanding. It is a ruler with a scale for cm, it shows 0.3 cm, i.e. 3 mm.

    VauWeh -

    Oh, come ON!

    Big Ed -

    It will ALWAYS be millimeters on a phone, but this step is ridiculous, skip it!

    Leif DeWolf -

    @leifdewolf I wouldn't skip it for a first repair.

    Gabriel-Science -

    It's not an Ifixit KIT if it doesn't include everything. You'll need to order the opening pic separately. Or head to Walmart like myself and look for guitar pics. Hopefully, this will work just as well.

    Jaleeljb97@icloud.com -

    No pick in mine as well. It’s really not clear that you have to order this separately when ordering an IPhone SE 202/2022 screen repair kit. Is this the case?

    Jackson Castiglione -

    Frustrated, I ordered a compact package where everything was encapsulated. Useless suction tools could not separate the screen. If it is unable to decouple the screen, then why sucking suction tools you have provided.

    Shourob Datta -

    For my kit the triangle pick was stuck inside the box with the screen not with the other tools maybe it's also there for you

    Henry Scheibehenne -

    Y’all are getting far, FAR too detailed with some of this stuff…. Measuring and marking the pick that you won’t actually use to open the device?!? lol that’s kinda funny. Just heat it up, grab a spudger, and the back just pops right off! The iFixit tech need to stick to the KISS method more often, you know KEEP IT SIMPLE STUPID!!! Like l, for reals, I’ve been doing this stuff for YEARS and using iFixit guides regularly and this is just ridiculous at this point!

    Leif DeWolf -

    Will the phone still work if the sensor assembly on the back of the screen is damaged?

    Mutshidzi Rambau -

    I don't have a pick, but how much better are these picks than an old credit card for opening an iPhone 13 mini?

    mike eng -

    The pick in my iFixIt kit was packed with the battery, not with the rest of the toolkit.

    Tony Houlihan -

  3. FLq6W2khWOq4uAQr
    FLq6W2khWOq4uAQr
    2XIfBVvS5Ty5QtZF
    4Df24ZLS6kBFTyVU
    • Wenn die Glasscheibe des Displays an deinem iPhone zerbrochen ist, überklebe sie mit geeignetem Klebeband, um weitere Brüche und Verletzungen während der Reparatur zu vermeiden.

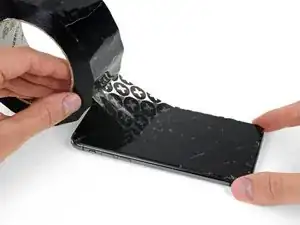
    • Überdecke die Glasscheibe des Displays komplett mit überlappenden Streifen von durchsichtigem Paketband.

    • So werden die Glasscherben zusammengehalten, wenn du das Display als Ganzes hochhebelst.

    • Trage eine Schutzbrille, um deine Augen vor Glassplittern zu schützen.

    • Wenn das Glas so stark zerbrochen ist, dass der Saugheber in den nächsten Schritten nicht gut haftet, dann versuche ein starkes Klebeband ("Panzerband") zu einem Griff zu falten und so auf die Scheibe zu kleben, dass du sie damit hochziehen kannst.

    • Wenn das alles nicht funktioniert, dann klebe den Saugheber mit Sekundenkleber am Display fest.

  4. 4fhdeZSxwgTn4VgI
    4fhdeZSxwgTn4VgI
    BxknskOQsXXo6dog
    NEQnchvrYpEJPYKS
    • Wir haben die Anti-Clamp entwickelt, um das Öffnen von Geräten zu erleichtern. Die nächsten drei Schritte zeigen, wie sie verwendet wird. Wenn du sie nicht benutzen willst, überspringe die nächsten drei Schritte und folge einer anderen Methode.

    • Genaue Anweisungen für die Anti-Clamp findest du hier.

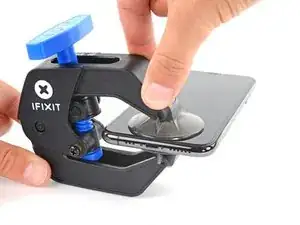
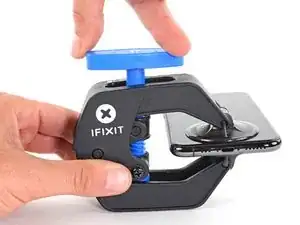
    • Drücke den blauen Griff zurück, damit die Arme der Anti-Clamp frei beweglich werden.

    • Schiebe die Arme entweder über die linke oder die rechte Kante des iPhones.

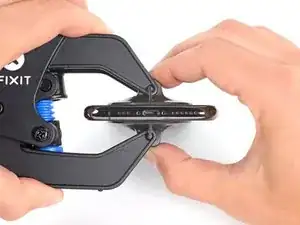
    • Bringe die Saugheber nahe an der Unterkante des iPhones an, einen auf der Vorderseite, den anderen auf der Rückseite.

    • Drücke die Saugheber zusammen, so dass sie auf den Oberflächen haften.

    • Wenn die Saugheber nicht gut auf den Oberflächen des iPhones haften, dann kannst du Stücke aus Klebeband verwenden, um eine griffigere Oberfläche zu schaffen.

  5. DtDpThOATcyQb4yT
    DtDpThOATcyQb4yT
    MAGI2JXwXnS5LvCO
    NgpQQ6M1sP5xBcXQ
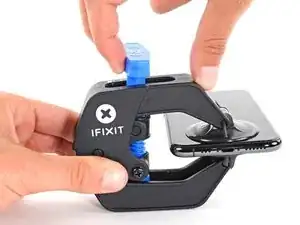
    • Drücke den blauen Griff vorwärts, um die Arme wieder zu verriegeln.

    • Drehe den Griff eine volle Umdrehung im Uhrzeigersinn, oder bis du merkst, dass sich die Saugheber dehnen.

    • Achte darauf, dass sich die Saugheber weiterhin gegenüber stehen. Wenn sie sich nicht mehr gegenüber stehen, dann löse die Saugheber ein wenig ab und schiebe sie in die richtige Position.

  6. oRZ6AXaleqoRTKND
    oRZ6AXaleqoRTKND
    bDhAC4ImHIc3XQdf
    PwksbtqrErhZsc6T
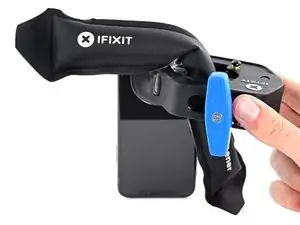
    • Führe einen erwärmten iOpener durch die Arme der Anti-Clamp.

    • Forme den iOpener so, dass er auf der Unterkante des iPhones liegt.

    • Warte eine Minute, damit sich der Kleber lösen und ein Spalt entstehen kann.

    • Du kannst den Kleber auch mit einem Haartrockner oder einem Heißluftgebläse aufweichen.

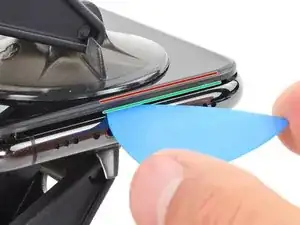
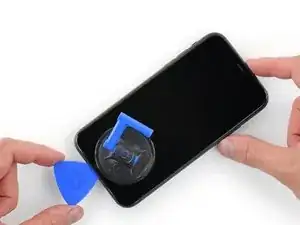
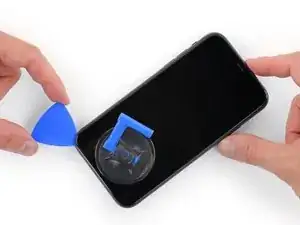
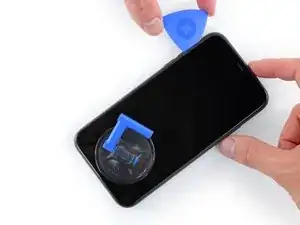
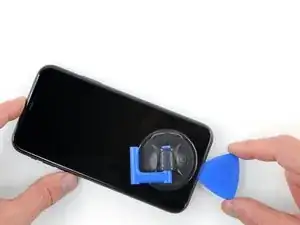
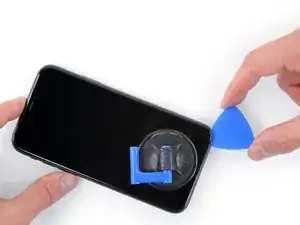
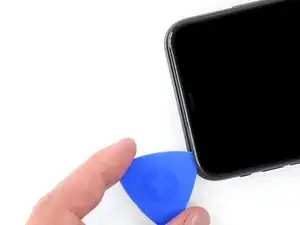
    • Setze ein Plektrum in den Spalt unter das Display und der Kunstoffblende ein, nicht unter das Display selbst.

    • Wenn es nicht gelingt, mit der Anti-Clamp einen ausreichend großen Spalt zu erzeugen, dann erwärme die Stelle nochmals und drehe den Griff eine viertel Umdrehung im Uhrzeigersinn weiter.

    • Drehe den Griff jeweils nicht mehr als eine viertel Umdrehung weiter und warte jedes Mal eine Minute lang. Gib der Anti-Clamp Zeit, ihre Arbeit zu erledigen.

    • Überspringe die nächsten drei Schritte.

    Any suggestions if the screen is broken and the anti-clamp just separates the screen from the bezel?

    Nathan Friedly -

  7. yQbwAmoITNyEmrSn
    • Durch das Erwärmen der Unterkante wird der Kleber darunter aufgeweicht, so dass das Display leichter abgenommen werden kann.

    • Benutze einen Haartrockner, ein Heißluftgebläse oder bereite einen iOpener vor und erwärme eine Minute lang die Unterkante des iPhones.

    어짜피 못쓰고 버릴 거라면, 이것보다 인두기를 직접 대는 방식을 추천 합니다. 어짜피 유리라 연기나 반응도 없고 무엇보다 금방 열기가 올라와요.

    코딩의달인 -

    Gut gehen auch Kirschkernsäckchen. Damit hatte ich Erfolg!

    Hoetgen -

  8. aJCRTiaUBHVMoAUV
    aJCRTiaUBHVMoAUV
    YhJejcEpMhlQpvWX
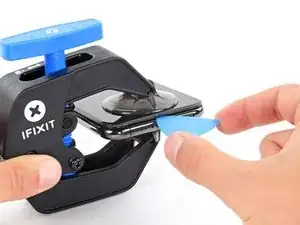
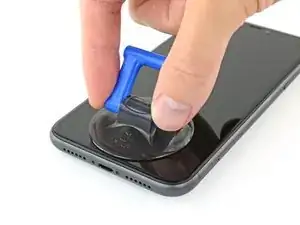
    • Wenn du einen einzelnen Saugheber benutzt, dann setze ihn an der Unterkante des iPhones auf. Vermeide dabei den gebogenen Teil der Glasscheibe.

  9. MKShqPOGkjD2vOPp
    MKShqPOGkjD2vOPp
    dJknkSwVsVBaZabR
    XgeYpSK2b4NpndCh
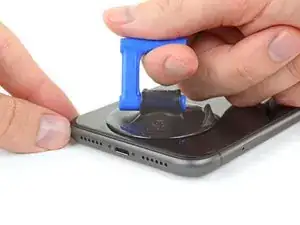
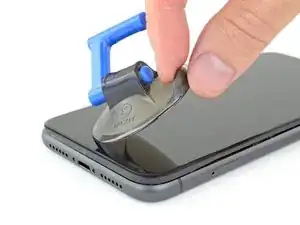
    • Ziehe den Saugheber kräftig und gleichmäßig hoch, so dass ein kleiner Spalt zwischen Frontpanel und Rückgehäuse entsteht.

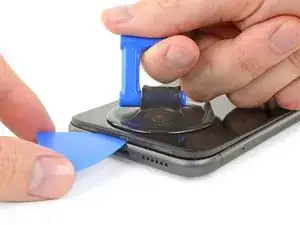
    • Setze ein Plektrum in den Spalt unter dem Display und der Kunstoffblende ein, nicht unter dem Display selbst.

    • Die wasserdichte Verklebung des Displays ist sehr stark. Du brauchst deswegen ziemlich viel Kraft, um den Spalt zu öffnen. Wenn es schwer geht, dann kannst du nochmals Wärme anwenden und das Display vorsichtig auf und ab ruckeln, damit die Klebeverbindung geschwächt wird und endlich ein Spalt entsteht.

    This turned out to be the most difficult part for me. My old ifixit suction cup didn't suck hard enough to generate enough force to pry the display from the case. I ended up applying heat at least a dozen times, and I had to pull up on the suction cup forcefully over and over and over while repositioning it several times. I finally had success inserting my pick into the tiny gap after 30 or so rapid tugs on the suction cup.

    matthew r -

    I pulled the screen by accident instead of the bottom layer, now what?

    Alvaro -

    I have the same question

    Konstantinos Solakoglou -

    After heating (I used a hair dryer for 4-5 mins, moving around whole frame, to make sure was pretty hot, then let sit for 1 minute), insert a razor blade between the bezel and the frame, at the bottom edge. Lever upwards, the screen will easily pull away. You won’t even need the suction cup.

    Damian -

  10. BiTGA23MOOmtexSG
    BiTGA23MOOmtexSG
    l5NWMTOshIlqjNtG
    IfJRwFLPwsBL4klh
    • Schiebe das Plektrum um die untere linke Ecke herum und dann an der linken Seite nach oben. Trenne so die Verklebung des Displays auf.

    • Setze das Plektrum nicht tiefer als 3 mm ein, du könntest sonst innere Bauteile beschädigen.

  11. FCPAxbSlJhdAIRLG
    • An der rechten Seitenkante verlaufen empfindliche Kabel. Setze das Plektrum an diesen Stellen nicht ein, die Kabel könnten beschädigt werden.

  12. K5iUxKTkELONJBVf
    K5iUxKTkELONJBVf
    ZhlLOMfaksHRxZJV
    yy5WtAu2UqSpCUTX
    • Setze das Plektrum erneut an der Unterkante des iPhones ein und schiebe es zum Auftrennen des Klebers an der rechten Seite nach oben.

    • Setze das Plektrum nicht tiefer als 3 mm ein, du könntest sonst die Displaykabel beschädigen.

    Instructions are confusing as the last step says not to insert at certain points, while this says to slide all the way up the right side - is it that sliding is ok but inserting isn't (whatever that might mean) or just not more than 3mm?

    Peter Hill -

    Just slide slightly and the display will rise without problems on all iPhone models, sometimes if I have long nails I even insert a fingernail and lift the display.

    Tonynox -

  13. J1ZVUrqQ61e4NOZ1
    J1ZVUrqQ61e4NOZ1
    HsxeMCkPLyCeHKpI
    tegZUpHyY4wGd2Ww
    • Die Oberkante des Displays ist mit Kleber und mit Rasten befestigt.

    • Ziehe die rechte Kante des Displays behutsam nach unten (in Richtung des Lightning-Anschlusses).

    • Setze das Plektrum in die obere rechte Ecke des Smartphones ein.

  14. 5mKceYJffKEaQo4L
    5mKceYJffKEaQo4L
    kQQD2XkOMWjrOjMu
    • Ziehe das Display soweit wie nötig nach unten (in Richtung des Lightning-Anschlusses), bis der Spalt groß genug ist, um ein Plektrum einzusetzen.

    • Schiebe das Plektrum zur oberen linken Ecke hin und trenne alle restlichen Klebeverbindungen auf.

    • Setze das Plektrum nicht tiefer als 3 mm ein, du könntest sonst die Face ID-Sensoren beschädigen.

  15. 24nVgAyDKPTICLhV
    • Ziehe an der kleinen Noppe am Saugheber, so dass er sich vom Frontpanel ablöst.

  16. IDOegN1rKCFFJMBF
    IDOegN1rKCFFJMBF
    QcgYHgKIt6XMTsnK
    xVdpJyR6i213HsJ2
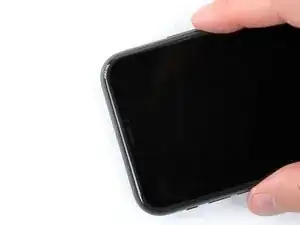
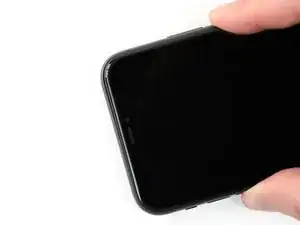
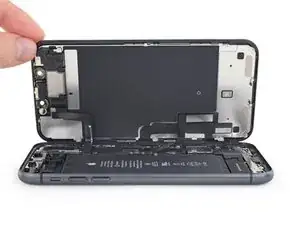
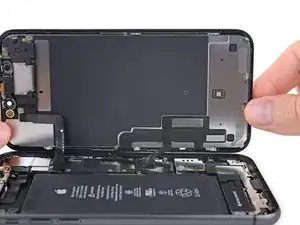
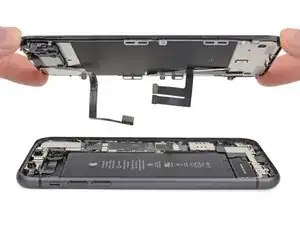
    • Klappe das Display von der linken Seite her, wie die Rückseite eines Buchs, hoch und öffne das iPhone.

    • Versuche noch nicht, das Display ganz abzutrennen, es ist immer noch mit einigen empfindlichen Flachbandkabeln am Logic Board angeschlossen.

    • Stütze das Display an einem stabilen Gegenstand ab.

    • Lege das Display beim Zusammenbau in die richtige Position, richte die Rasten an der Oberkante aus und drücke erst die Oberkante fest, bevor du den Rest des Displays nach unten einschnappen lässt. Wenn es nicht einrastet, dann überprüfe nochmals den Zustand der Rasten rings um das Display und stelle sicher, dass sie nicht verbogen sind.

    $@$*. i tore the display cables. what do i do now?

    Crystal F -

  17. KxoYscx1ItVaLely
    KxoYscx1ItVaLely
    ZA5AX6xqq3r5qUNN
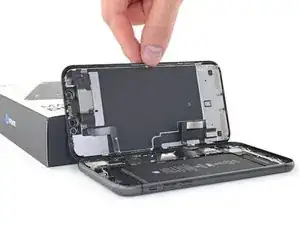
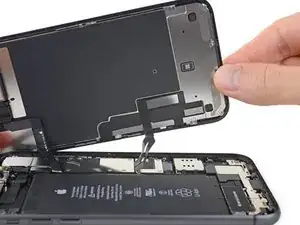
    • Hebe das Display ein wenig an der Unterkante an und kippe es dabei, so dass du im folgenden Schritt besser an die Schrauben herankommst.

    • Achte darauf, die Displaykabel dabei nicht zu spannen oder zu zerreißen.

  18. fPaVWtYy3NJ53YvD
    fPaVWtYy3NJ53YvD
    jFRf1tI5V4hicZKU
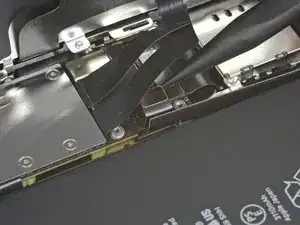
    • Entferne die drei 1,1 mm Y000 Schrauben, mit denen die Halterung des Akkusteckers befestigt ist.

    • Bewahre während der ganzen Reparatur deine Schrauben gut sortiert auf und stelle sicher, dass alle Schrauben wieder an ihren Platz zurück kommen.

    • Beim Zusammenbau ist jetzt eine gute Gelegenheit, das iPhone einzuschalten und alle Funktionen zu überprüfen, bevor das Display wieder festgeklebt wird. Achte darauf, dass du danach das iPhone wieder ausschaltest, bevor du mit dem Zusammenbau fortfährst.

    During reassembly, I had to connect my phone to the charger before it would power up.

    Austin Culberson -

    Die Schrauben sind wahnsinnig kurz, tatsächlich winzig klein. Nach dem Herausdrehen könnte es im ersten Moment so aussehen, als habe man die Schrauben ausgebohrt anstatt herauszudrehen, sie sind jedoch sehr schnell gelöst und liegen dann entweder im Gehäuse oder sind neben dem Gehäuse herausgefallen. In jedem Fall sollten sie nie auf den Boden fallen, da sie dann kaum mehr auffindbar wären.

    Bernd Sonneck -

    I got to this point thinking/hoping I could eek by with a Y1 orY0 or even a PH000 driver but no such luck. The Y000 is in fact necessary. Finishing this repair will have to wait for now.

    ALSO thanks Apple, there is ABSOLUTELY no reason AT. ALL. to use so many random, oddball screw heads, BUT to make self repairs more difficult and expensive. A real F-U to the consumer!

    John M -

  19. HKBUYhWeIUlYLqdG
    • Entferne die Halterung.

  20. XN1PHiCYxtERqDgF
    XN1PHiCYxtERqDgF
    XKgOIM6e2mmR1ecq
    • Heble den Akkustecker mit einem Spudger oder einem Fingernagel aus seinem Anschluss auf dem Logic Board.

    • Beschädige nicht die schwarzen Silikondichtungen an diesem und den anderen Anschlüssen auf der Platine. Diese Dichtungen schützen zusätzlich vor Staub und Feuchtigkeit.

    • Biege den Stecker ein wenig vom Logic Board weg, so dass er sich nicht versehentlich mit seinem Anschluss verbinden kann.

  21. kMZitLQGk2hTRk6G
    kMZitLQGk2hTRk6G
    Cdvg2fNT2Lf21uEE
    • Drehe die fünf 1,1 mm Y000 Schrauben heraus, mit denen die Halterung der Logic Board Abdeckung befestigt ist.

    Die Schrauben sind wahnsinnig kurz, tatsächlich winzig klein. Nach dem Herausdrehen könnte es im ersten Moment so aussehen, als habe man die Schrauben ausgebohrt anstatt herauszudrehen, sie sind jedoch sehr schnell gelöst und liegen dann entweder im Gehäuse oder sind neben dem Gehäuse herausgefallen. In jedem Fall sollten sie nie auf den Boden fallen, da sie dann kaum mehr auffindbar wären.

    Bernd Sonneck -

  22. hwCpiXUDeKoMTWEh
    • Entferne die Halterung.

  23. IFoKtCq1UVwNZXJv
    IFoKtCq1UVwNZXJv
    FRZEdrhrUWadPZFT
    iT2xWjWSHH5EdMbq
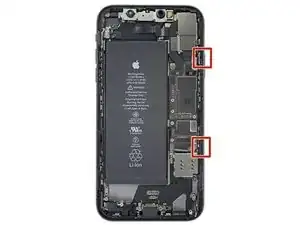
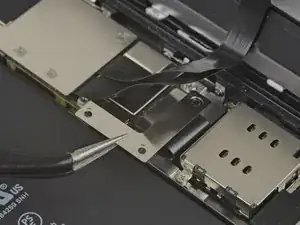
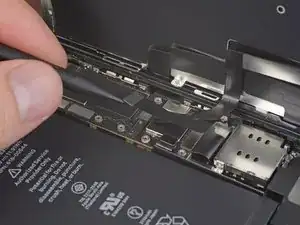
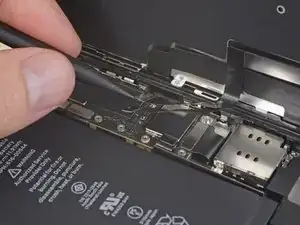
    • Trenne den Stecker am Kabel zum LCD-Panel mit einem Spudger oder dem Fingernagel ab.

    • Trenne den Touchscreen-Stecker daneben ab.

    Be mindful when reconnecting LCD panel connector and digitizer connector. It’s looks very similar. These 2 ribbon connectors a slightly different.

    Pay attention.

    Josmaknolavic -

    내 아이폰이 디스플레이 분리 단계를 거친 후, 전원이 들어오지 않습니다. 층전기를 꽂아도 배터리에 미세한 전기 반응이 느껴지지 않고, 탭틱 엔진도 작동하지 않게 되었습니다. cpu 온도는 여전히 뜨껍습니다. 내 마더보드가 디스플레이 분리 후 갑자기 고장난건가요?

    Protoncal -

    Hast Du das Problem gelöst?

    Bernd Sonneck -

    커넥터 핀을 빼거나 다시 넣기 위해 구부러졌을 수 있습니다. 핀이 구부러진 경우 돋보기 등으로 살펴보고, 그렇다면 적절한 매장에 가져가세요.

    Hampter -

    Hier war mein Problem schon gelöst. Durch einen Sturz hat sich der Touchscreen Stecker gelöst. Wieder eingesteckt funktionierte die Touch-Eingabe wieder.

    Hoetgen -

  24. FXVmdXMPZpEU2F5j
    FXVmdXMPZpEU2F5j
    BxKUHpGvITeIEOQL
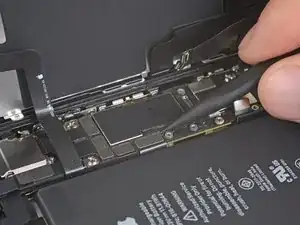
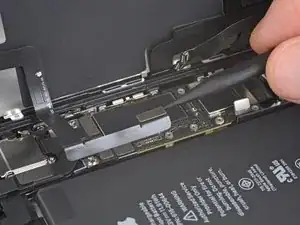
    • Trenne den Stecker zur Frontsensoren-Gruppe mit der Spudgerspitze oder dem Fingernagel ab.

    There needs to be an extra step between 24 and 25 for reassembly, telling folks to apply adhesive here. I got the thing almost all the way put back together before realizing that the adhesive was a single piece that needs the cables to be disconnected in order to apply it.

    Nathan Friedly -

  25. VoZNhVF2Va3NVwit

    After this step its probably a good idea to test the new screen (you dont have to plug in the front camera assembly)

    Richard Kraus -

    Not a technician, so correct me if I'm wrong: I think that it's at this step of reassembly (before you reattach the screen) that you apply waterproof glue, if you have it.

    Athanasius Pernath -

    You are both correct. Testing the screen before putting on adhesive means the screen can be returned if faulty. Many places will not accept a screen return that has adhesive on it.

    So if it works apply adhesive at this point. When testing don’t just rely on Apple logo test touch functionality also .

    Daniel -

  26. c6KLaRqIueRjBTgF
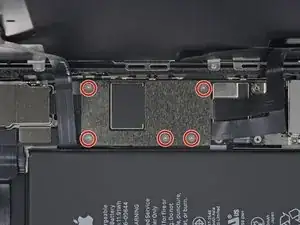
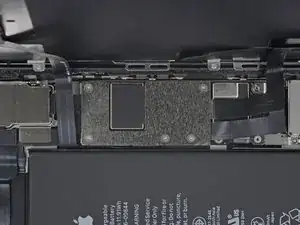
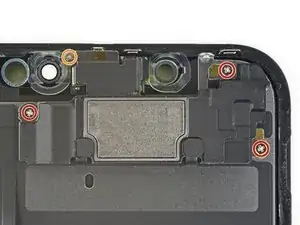
    • Entferne die vier Schrauben, mit denen die Lautsprecher/Sensorbaugruppe befestigt ist:

    • Drei 1,6 mm Kreuzschlitzschrauben

    • Eine 1,3 mm Y000 Schraube

    Correct me if I am wrong but you no longer need to do this as of IOS 15.2 as apple doesnt disable Face ID on 3rd party repairs

    Oliver Pressello -

    For red screw use 000 Phillips screw

    Torsten -

    Bonjour, je n'arriva pas à retirer les trois vis cruciformes. vous aurez une astuce ?

    Sedrick Azebaze -

  27. kYVNaZrgZMhtMCXL
    kYVNaZrgZMhtMCXL
    nwamPbIXeL1OewgJ
    RnjYEKHkwPDfATDD
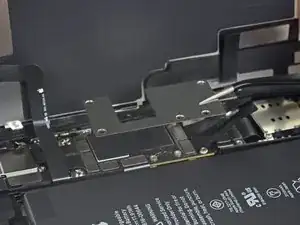
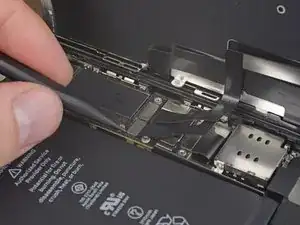
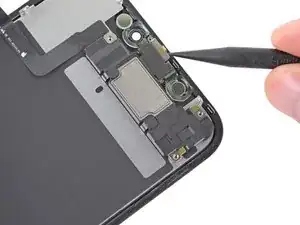
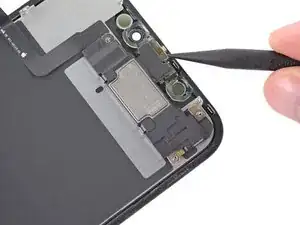
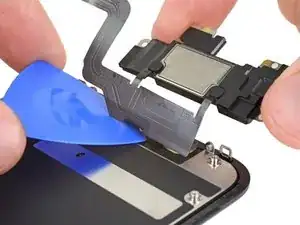
    • Heble die Oberkante des Lautsprechers behutsam mit der Spudgerspitze hoch.

    • Klappe die Lautsprechereinheit um, weg von der Oberkante des Displays nach unten.

    • Der Lautsprecher bleibt über sehr dünne Flachbandkabel angeschlossen. Spanne die Kabel nicht zu sehr an und beschädige sie nicht.

    스피커 어셈블러가 끊어 졌습니다. 연결하거나 구할 방법이 있을까요?

    코딩의달인 -

  28. xfUHGAfxC4XQewxL
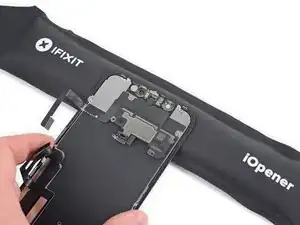
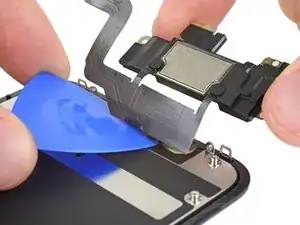
    • Benutze einen Haartrockner, ein Heißluftgebläse oder bereite einen iOpener vor und erwärme den oberen Displayrand ein bis zwei Minuten lang, damit der Kleber an den Sensoren weich wird.

    Sometimes this won't be sufficient for the glue to melt. I ripped the ambient cable twice trying to remove it from the greenish plastic piece (the one with two round holes on the two sides). Here's a less risky procedure: take off the plastic piece together with the rest of the speaker + front sensors, as a block. Then when reassembling, remove the plastic piece from the new screen, and apply the whole block instead.

    Athanasius Pernath -

  29. bwXuCcEMEB1YeDuI
    bwXuCcEMEB1YeDuI
    4vpEnJnhOv2gDdLV
    YQPQG2yANhuqASYR
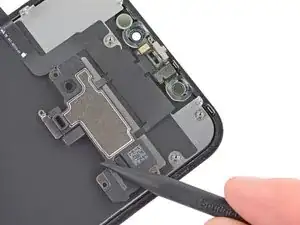
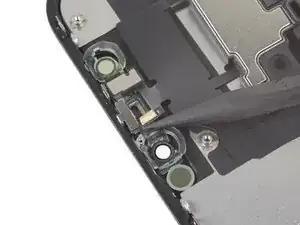
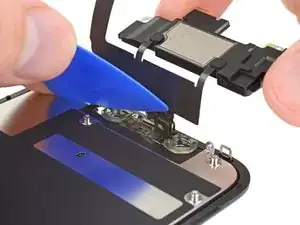
    • Schiebe behutsam die Kante eines Plektrums unter das Flachbandkabel unterhalb des Mikrofons.

    • Verdrehe es vorsichtig und löse das Mikrofon ab. Achte dabei darauf, dass du das Flachbandkabel nicht zu stark anspannst oder beschädigst.

    • Benutze, falls nötig, die Spudgerspitze, um das Mikrofon endgültig aus seiner Ausbuchtung im Frontpanel zu lösen.

    This step was a little bit confusing. I thought that the entire ribbon assm should be removed once the speaker was detached. The entire assm doesn’t actually come off until Step 30.

    Andre LeBlanc -

    Be careful in the next few steps, as you can easily damage some parts. Make sure that you operate gently, and that you don't pull, twist or apply too much pressure on the components.

    Athanasius Pernath -

  30. dXZ3PHSBGHLEvaLM
    dXZ3PHSBGHLEvaLM
    ENJqTZ4wTQ1X4uUB
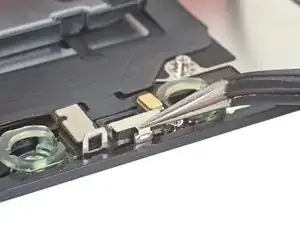
    • Schiebe die kleine Halterung mit einer Pinzette gerade nach oben vom Helligkeitssensor ab.

    As you remove it, familiarise with its position. It will be hard to put it back into place. If you pay close attention to how it comes out, it will be easier to put it back

    Athanasius Pernath -

  31. qyhj5vpN62hd25d5
    qyhj5vpN62hd25d5
    SUHMfqCo2aAR1pSw
    • Wackle mit einer Pinzette am Helligkeitssensor und hebe ihn aus seiner Ausbuchtung im Display heraus.

    • Wenn sich der Sensor nach einigen Sekunden Wackelns nicht löst, dann erwärme nochmals und versuche es erneut.

    • Der Sensor bleibt am Rest der Sensorbaugruppe durch ein sehr dünnes Flachbandkabel angeschlossen. Sei vorsichtig, spanne dieses Kabel nicht zu stark an und beschädige es nicht.

  32. wb6W2SWkoFbmgPjS
    wb6W2SWkoFbmgPjS
    xhy3trMJUKSBPfJo
    sKLITAxVAEeNPLu2
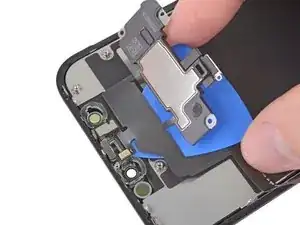
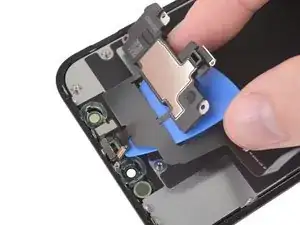
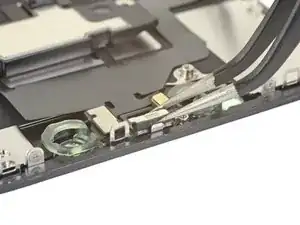
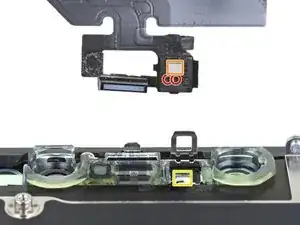
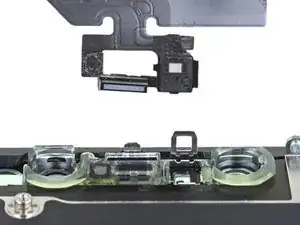
    • Schiebe ein Plektrum von links nach rechts unter das Flachbandkabel und unter das Näherungssensor/Flood Illuminator- Modul.

    • Wackle behutsam am Modul und hebe es aus seiner Ausbuchtung im Frontpanel heraus.

    • Es geht besser, wenn du den Lautsprecher anhebst, um leichteren Zugang zu haben. Sei aber vorsichtig und ziehe dabei nicht an dem dünnen Flachbandkabel.

  33. sSfLtFMiJbEoBxdc
    sSfLtFMiJbEoBxdc
    GJvrQZVwkH6MoFqI
    6ntOJfMeAsUcrAFv
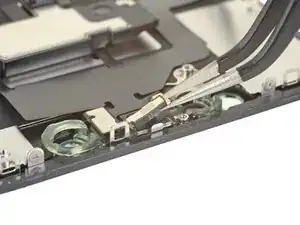
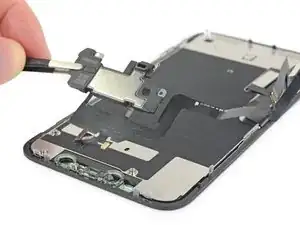
    • Entferne den Ohrhörer-Lautsprecher und die Front-Sensor-Baugruppe.

    • Überprüfe beim Zusammenbau die Position des schwarzen Plastikmoduls mit folgenden Bauteilen:

    • Näherungssensor

    • Flood Illuminator

    • Das Modul muss so eingesetzt werden, dass keines dieser Bauteile durch Klebstoff blockiert wird.

    Also, your iPhone 11 will now display a notification that the screen on it is not original.

    Rob -

    Also if I‘m using an original Display? Will coping screen data with iCopy help? Or is there any other solution to get rid of this?

    Katrin -

    How about LCD shield plate removal instructions?

    Os Reini -

    When I reinstall this assembly on the new (ifixit) screen, once all the sensors are in their holes and you fold the speaker back over, the screw holes don't line up, OR the speaker doesn't fit snugly. You can move the speaker so its no longer snug, and the screw holes line up. Is there a trick to this?

    John M -

    My replacement screen didn't come with the transparent plastic bits surrounding the front camera, infrared and earpiece speaker... I wonder what would have turned up if I didn't purchase the " original" version in that dodgy shop... lol. If this is your case, you need to clean the glass off this piece of plastic and metal, try not to damage the earpiece protection included on top of that piece, and go back to that shop for a good argument! Got some pics if needed.

    Simon Villaeys -

    Correction: I finally got rid of the earpiece protection because I hadn't noticed that was included in the replacement screen, although of much lower quality than the "real" original.

    Simon Villaeys -

    In addition: be veeeeeery gentle on the heat gun, I accidentally melted a bit of the plastic in the "plastic and metal piece"... Made the ambient light sensor fit kinda loose. :/

    Simon Villaeys -

    Thanks a lot ! My son's iphone is reborned, and I'm upskilled !

    Jean-Philippe d'HAUSEN -

Abschluss

Um dein Gerät wieder zusammenzusetzen, folge den Schritten in umgekehrter Reihenfolge.

Entsorge deinen Elektromüll fachgerecht.

Die Reparatur verlief nicht wie geplant? In unserem iPhone 11 Forum findest du Hilfe bei der Fehlerbehebung.

Arthur Shi

Mitglied seit: 03/01/18

296783 Reputation

12 Kommentare

Zu Schritt 13:

Was kann ich tun wenn die Metallplatte sich nicht aus dem Gehäuse löst?

Jakob Hahn -

Versuchen Sie, das Telefon beim zweiten Mal dort erneut aufzuwärmen, wo es in der Anleitung angegeben ist. Vielleicht versuchen Sie auch, Ihren iOpener für längere Zeit in der Mikrowelle zu erhitzen/zu erhitzen. Wenn das nicht funktioniert, überprüfen Sie, ob keine weiteren Schrauben entfernt werden müssen. Und das Letzte, was Sie versuchen könnten, wäre, ein paar andere Hebelwerkzeuge zu verwenden und/oder zu versuchen, es in einer anderen Richtung aus dem Gehäuse zu bekommen.

Platinumgaming57 “Solar_Flare” -

During reassembly, is there a step in which I need to apply adhesive? (asking since you find adhesive as you disassemble)

Athanasius Pernath -

Most often you will re-apply the adhesive to the new LCD assembly itself. Note that the part you will need is designed to provide waterproofing to the device. If you put the adhesive + waterproof seal onto the new LCD incorrectly then the device will not be waterproof. Note: I'm no qualified professional, and I'm only a 9th grader but I have lots of experience with this particular repair and I have almost mastered it.( I have fixed maybe 7 or 8 iPhone 11s alone) And in my experience, applying the new adhesive + seal to the new LCD assembly has always worked out great and resulted in a happy customer and good feedback.

Platinumgaming57 “Solar_Flare” -

I had the same problem, I had ordered a display plus adhesive here at iFixit shop, but there were no instruction how to attach it. I looked at manuals of other adhesives and found a proper way, that worked for me: Before reattaching the display cables I attached the adhesive on the phone, not on the display. At first you have to remove all old adhesive properly, if you have isopropanol you can use it to clean the frame. Then you remove the protective sheet (the side with the tab) from the new adhersive, place it carefully on the phone and press it with a spudger all around the frame. The protective sheet on this side is made of different parts so you can remove them on parts where you have to work on. Then you can attach the display cables and the battery cable and test if it works. If all works fine you can remove the last protective sheets and go on to attach the whole display unit.

SiRo -

flawless execution!

Kofi Kantanka -

Will I still be able to use face id

littlemanjayjay -

Is there a difference between the US/World/Chinese model of iPhone 11 and this repair?

brian -

Hey thank you for this guide, I just followed it and didn't kill my phone! The level of detail is super appreciated.

Ari Evergreen -

I took off the ambient light sensor, proximity sensor and flood illuminator at the bottom of the phone. I went to the new screen I got from “youdoit” (by the way, is youdoit just a rebranding from I fix it?). So with the sensors in hand, I went to afix them in place but then found the little plastic thing they are supposed to be afixed to was loose. The plastic thing has a greenish transparent colour to it, with two holes on it. It was very well adhered to my old phone. But now on the new youdoit screen it’s loose so that I’ve snuck the sensors in place but it’s just flopping around with the plastic piece. The support person just wrote me back and told me that it does Have to be adhered to the screen and that they only do it for the sake of convenience for the customer. I wanted to poll the community and ask your thoughts on this. It doesn’t seem right to me.

Thanks,

Caleb

Caleb Carlos -

I see there is another guide for "iPhone 11 Series Non-Genuine Screen Warning/Important Display Message" will I need to complete this guide also?

Finbarr -

Hi there!

You would only follow that guide if you want to get rid of the non-genuine message after replacing the screen (it'll go away after a few days regardless). That guide, however, requires soldering and some finesse. It's up to you if you want to do it, but the guide you just followed should be enough :)

Alex Diaz-Kokaisl -