Einleitung

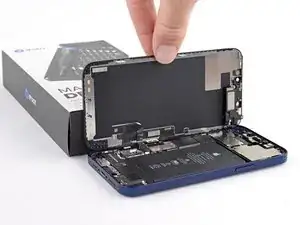
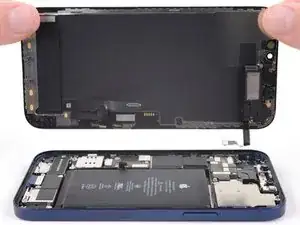
Tausche das Display deines iPhone 12 aus, wenn es zerbrochen ist, der Touchscreen defekt ist oder beim Einschalten kein Bild mehr anzeigt. Mit dieser Schritt-für-Schritt-Anleitung kannst du das iPhone 12 Display und die Touch-Funktion wiederherstellen – ideal für eine Reparatur zu Hause.

Die kombinierte Ohrhörer-Lautsprecher und Sensoreinheit auf der Rückseite des Displays ist ab Werk mit deinem iPhone gekoppelt, deswegen musst du sie bei einem Displaytausch vom alten auf das neue Display übertragen. Darin ist auch der Flood Illuminator enthalten. Der Flood Illuminator ist Teil des biometrischen Face ID Systems, seine Funktion geht verloren, wenn das Originalteil beschädigt ist oder falsch eingebaut wird. Es funktioniert auch nicht mit einem neuen Ersatzteil, sei also bei der Reparatur besonders vorsichtig und beschädige keines dieser Teile. Wenn etwas davon kaputt geht, kann nur Apple selbst oder eine von Apple autorisierte Werkstatt die Funktion wiederherstellen.

Hinweis: Bei iOS 17.6 und früher funktioniert True Tone nach einem Displaytausch nicht mehr, selbst wenn Originalteile von Apple verwendet werden. Ab iOS 18 kannst du das Display mit Hilfe von Apples Repair Assistant neu kalibrieren, um True Tone an Originaldisplays von Apple wiederherzustellen.

  1. oBBxtkV2gJcIPKkK
    • Bevor du beginnst, entlade deinen Akku auf unter 25%. Ein geladener Lithium-Ionen-Akku kann sich entzünden und/oder explodieren, wenn er bei der Reparatur versehentlich beschädigt wird.

    • Schalte dein iPhone aus, bevor du mit dem Zerlegen anfängst.

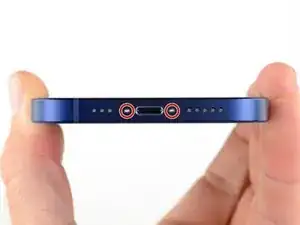
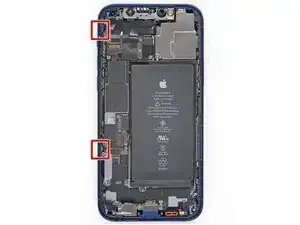
    • Entferne die beiden 6,75 mm langen Pentalobe P2 Schrauben an der Unterkante des iPhone.

    • Wenn du das Display des iPhone öffnest, werden seine wasserfesten Dichtungen beschädigt. Halte Ersatzdichtungen bereit, bevor du nach diesem Schritt weitermachst, oder vermeide es, dein iPhone Flüssigkeiten auszusetzen, wenn du es ohne neue Dichtungen wieder zusammenbaust.

    Do you sell the waterproof seals separately or are they included in the kit?

    Heather Furnas -

    Do you sell the waterproof seals separately or are they included in the kit? (I would like to know this as well.)

    CaliforniaGunner -

    I just got my Fix Kit and it includes the seals. Not sure if a "part only" version would, though.

    Neal Sofge -

  2. 6UPwoloGBO4tmVoS
    6UPwoloGBO4tmVoS
    BmSYPJmOy6dbHipF
    3EOdQPAGOmiuhoKU
    • Wenn du ein Plektrum zu tief einschiebst, kann das Gerät beschädigt werden. Dieser Schritt zeigt, wie du eine Marke am Plektrum anbringen kannst, damit das nicht passiert.

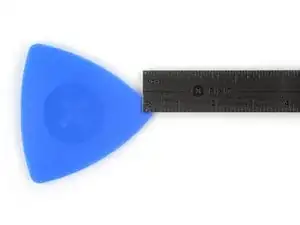
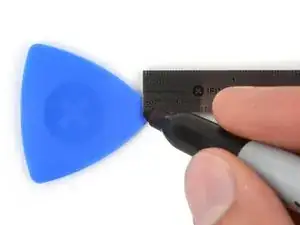
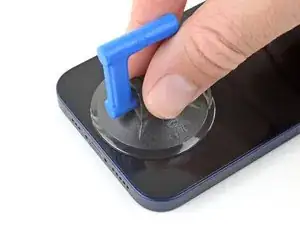
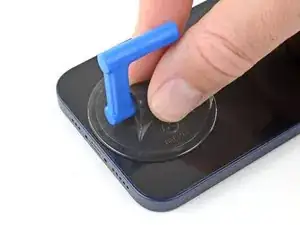
    • Zeichne mit einem Permanentmarker 3 mm von der Spitze des Plektrums entfernt einen Strich.

    • Du kannst die anderen Ecken ebenfalls mit Strichen in verschiedenen Abständen markieren.

    • Du kannst auch eine Münze so mit einem Klebeband auf das Plektrum kleben, dass sie einen Abstand von 3 mm zur Spitze hat.

    Got to step 2 and realized the fix kit doesn't include an opening pick! Looks like a guitar pick, and I have those lying around. Is that expected? Looks like the pick is used in many steps below. There's a little blue crowbar that isn't mentioned in the instructions. Perhaps that replaces the opening pick?

    Sloan Looney -

    Hi! I can't see which guide you were using when writing this comment. Can you reply here with which guide and fix kit you used?

    Clay Eickemeyer -

    I see you posted this in Meta. I hope it's resolved soon! In the meantime, a guitar pick may work well enough for your repair.

    Clay Eickemeyer -

    what fix kit?

    Meow Purr -

    My fix kit didn't include an opening pick either

    WILLIAM HARRIS -

    Make sure you check inside the black boxes after emptying them. My pick was stuck inside one of the boxes.

    AndyF -

    My AliExpress refurbished screen came with a pick that has a coin-like circle that pops out, so no modification was necessary

    Gijs Leegwater -

    the picture shows 3 cm but the description says 3 mm's. Which one is it?

    John Pena -

    That is a misunderstanding. It is a ruler with a scale for cm, it shows 0.3 cm, i.e. 3 mm.

    VauWeh -

    Oh, come ON!

    Big Ed -

    It will ALWAYS be millimeters on a phone, but this step is ridiculous, skip it!

    Leif DeWolf -

    @leifdewolf I wouldn't skip it for a first repair.

    Gabriel-Science -

    It's not an Ifixit KIT if it doesn't include everything. You'll need to order the opening pic separately. Or head to Walmart like myself and look for guitar pics. Hopefully, this will work just as well.

    Jaleeljb97@icloud.com -

    No pick in mine as well. It’s really not clear that you have to order this separately when ordering an IPhone SE 202/2022 screen repair kit. Is this the case?

    Jackson Castiglione -

    Frustrated, I ordered a compact package where everything was encapsulated. Useless suction tools could not separate the screen. If it is unable to decouple the screen, then why sucking suction tools you have provided.

    Shourob Datta -

    For my kit the triangle pick was stuck inside the box with the screen not with the other tools maybe it's also there for you

    Henry Scheibehenne -

    Y’all are getting far, FAR too detailed with some of this stuff…. Measuring and marking the pick that you won’t actually use to open the device?!? lol that’s kinda funny. Just heat it up, grab a spudger, and the back just pops right off! The iFixit tech need to stick to the KISS method more often, you know KEEP IT SIMPLE STUPID!!! Like l, for reals, I’ve been doing this stuff for YEARS and using iFixit guides regularly and this is just ridiculous at this point!

    Leif DeWolf -

    Will the phone still work if the sensor assembly on the back of the screen is damaged?

    Mutshidzi Rambau -

    I don't have a pick, but how much better are these picks than an old credit card for opening an iPhone 13 mini?

    mike eng -

    The pick in my iFixIt kit was packed with the battery, not with the rest of the toolkit.

    Tony Houlihan -

  3. U6uMaQ2w3xOXGqZt
    U6uMaQ2w3xOXGqZt
    CPoII2uYnsjeyboh
    UYpZQjIJZTscr1dr
    • Wenn die Glasscheibe des Displays an deinem iPhone zerbrochen ist, überklebe sie mit geeignetem Klebeband, um weitere Brüche und Verletzungen während der Reparatur zu vermeiden.

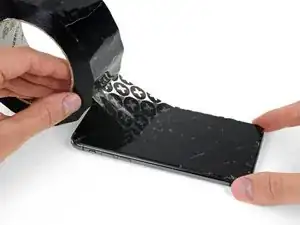
    • Überdecke die Glasscheibe des Displays komplett mit überlappenden Streifen von durchsichtigem Paketband.

    • Trage eine Schutzbrille, um deine Augen vor Glassplittern zu schützen.

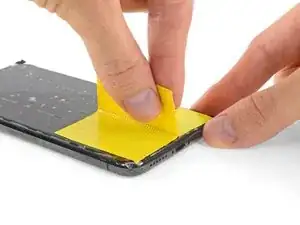
    • Wenn das Glas so stark zerbrochen ist, dass der Saugheber in den nächsten Schritten nicht gut haftet, dann versuche ein starkes Klebeband ("Panzerband") zu einem Griff zu falten und so auf die Scheibe zu kleben, dass du sie damit hochziehen kannst.

    • Wenn das alles nicht funktioniert, dann klebe den Saugheber mit Sekundenkleber am Display fest.

  4. B3jjMp2cvD5Rjabx
    B3jjMp2cvD5Rjabx
    QXAiF3sdtAYXQTQt
    FMOPQmVFrA1qxL1R
    • Wir haben die Anti-Clamp entwickelt, um das Öffnen von Geräten zu erleichtern. Die nächsten drei Schritte zeigen, wie sie verwendet wird. Wenn du sie nicht benutzen willst, überspringe die nächsten drei Schritte und folge einer anderen Methode.

    • Genaue Anweisungen für die Anti-Clamp findest du hier.

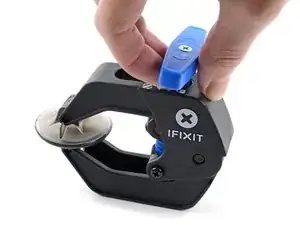
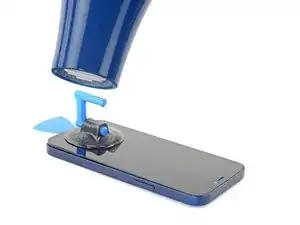
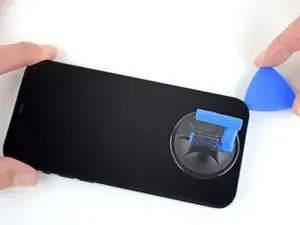
    • Drücke den blauen Griff zurück, damit die Arme der Anti-Clamp frei beweglich werden.

    • Schiebe die Arme entweder über die linke oder die rechte Kante des iPhones.

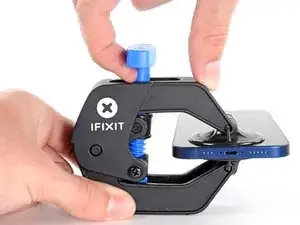
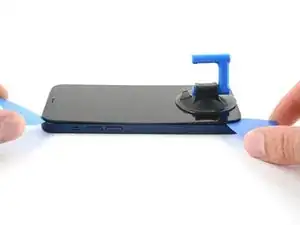
    • Setze die beiden Saugnäpfe am unteren Rand des iPhones an, einen auf der Vorder-, den anderen auf der Rückseite.

    • Drücke die Saugheber zusammen, so dass sie auf den Oberflächen haften.

    • Wenn die Saugheber nicht gut auf den Oberflächen des iPhones haften, dann kannst du Stücke aus Klebeband verwenden, um eine griffigere Oberfläche zu schaffen.

  5. oVcZhyKbh6AqAYBD
    oVcZhyKbh6AqAYBD
    bPLD3rBQF23DDmGa
    mpAqXAZbRjfBNAkL
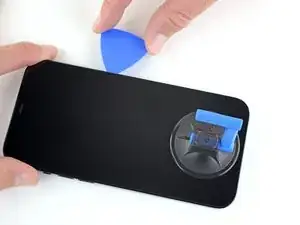
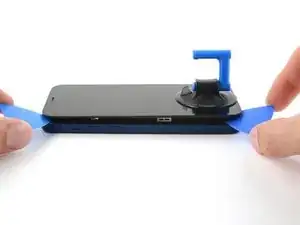
    • Drücke den blauen Griff vorwärts, um die Arme wieder zu verriegeln.

    • Drehe den Griff eine volle Umdrehung im Uhrzeigersinn, oder bis du merkst, dass sich die Saugheber dehnen.

    • Achte darauf, dass sich die Saugheber weiterhin gegenüber stehen. Wenn sie sich nicht mehr gegenüber stehen, dann löse die Saugheber ein wenig ab und schiebe sie in die richtige Position.

  6. u1p2GSBABb4i1qXl
    u1p2GSBABb4i1qXl
    TEVkJ3VWQ5bWEZ2G
    LMDHoJDdVkP56a4a
    • Lege dein iPhone auf einen stabilen Gegenstand, z.B. ein Buch mit festem Einband. Es sollte frei und parallel zur Arbeitsfläche liegen, dadurch wird die Arbeit bei nachfolgenden Schritten leichter.

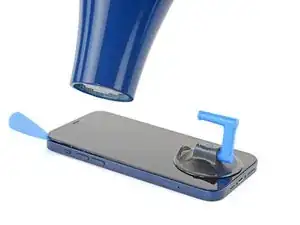
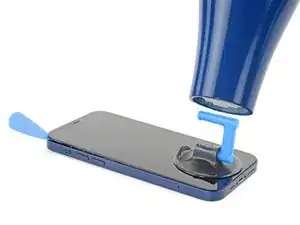
    • Erwärme die Unterkante des iPhones mit einem Haartrockner. Sie sollte so heiß sein, dass du sie gerade noch anfassen kannst.

    • Genauere Anleitungen zur Verwendung des Haartrockners findest du in dieser Anleitung.

    • Warte eine Minute, damit sich der Kleber lösen und ein Spalt entstehen kann.

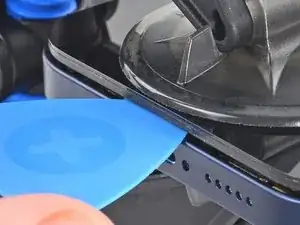
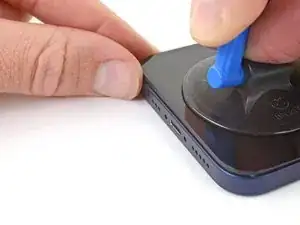
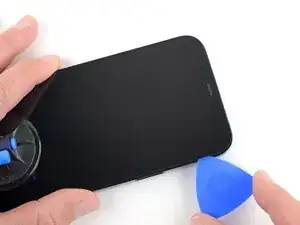
    • Wenn der er groß genug ist, setze ein Plektrum in den Spalt unter die Kunststoffblende am Display ein.

    • Wenn es nicht gelingt, mit der Anti-Clamp einen ausreichend großen Spalt zu erzeugen, dann erwärme die Stelle nochmals und drehe den Griff eine viertel Umdrehung im Uhrzeigersinn weiter.

    • Drehe den Griff jeweils nicht mehr als eine viertel Umdrehung weiter und warte jedes Mal eine Minute lang. Gib der Anti-Clamp Zeit, ihre Arbeit zu erledigen.

    • Überspringe die nächsten drei Schritte.

  7. OXZKWsxxXqG3arZh
    • Erwärme die Unterkante des iPhones 90 Sekunden lang (bzw. so lang, bis du sie gerade noch anfassen kannst)mit einem Haartrockner oder einem Heißluftgebläse.

    • Richte den Heißluftstrom nie zu lange auf eine Stelle.

    Also: 3D Printer's heated bed set to 70-80 degrees Celcius for a few minutes does the job, as it basically works the same way heating mats used in professional repair shops do.

    3D Printing Enthusiast -

  8. ASLAa2AJO4E5GYT1
    ASLAa2AJO4E5GYT1
    EMmHxm3YOfOoLkEG
    • Wenn du einen einzelnen Saugheber benutzen willst, dann bringe ihn am unteren Rand des Smartphones an, aber nicht zu nahe an der Kante.

  9. QdfiItrQQ6MhHWbj
    QdfiItrQQ6MhHWbj
    4nKuwPf1B6TyCssL
    eU1UEGuDjKnyIdUg
    • Ziehe den Saugheber fest und gleichmäßig nach oben, so dass ein kleiner Spalt zwischen dem Display und dem Rahmen entsteht.

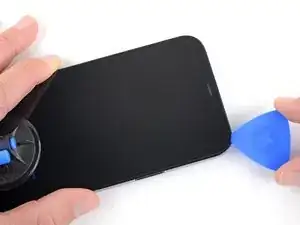
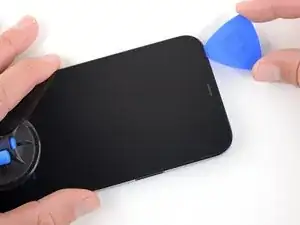
    • Setze ein Plektrum in den Spalt unter dem Kunststoffrahmen des Displays ein.

    • Das Display ist stark mit wasserfestem Kleber befestigt. Um den Spalt zu erzeugen, muss ziemlich viel Kraft aufgebracht werden. Wenn dies zu schwer geht, dann erwärme es nochmals und ruckle die Scheibe vorsichtig auf und ab, bis der Kleber schwächer wird und ein ausreichend großer Spalt für das Plektrum entsteht.

    This seems impossible. I've been trying for an hour with heat and rocking, and the screen doesn't budge. :(

    Aubi Abramowitz -

    this is impossible, will take years

    Evan Z -

    Don’t give up! Use more heat and a tad more force. I know you may fear breaking it more, but as long as you don’t stick the prying tool too far or tug too hard, you can do it! I have faith that you can do it!

    Rachel Kelley -

    I'm in the same boat, this isn't coming off. I've tried the hair dryer as well as the heating pad from ifixit. Any other ideas?

    The suction cup comes off before the screen will

    Brian Melcher -

    Is there a better tool for this? Just saw a video on YouTube where a kid pryed it open with no heating/etc. in 5 seconds.

    Brian Melcher -

    I've changed the batteries in probably a half dozen iphones of different models. But 25 minutes of heating and pulling had no effect on iPhone 12

    Ryan Thornburg -

    Welp. I finally ended up breaking the screen attempting this. DO NOT ATTEMPT THIS REPAIR! Not worth the broken screen and losing the cost of shipping both ways when you return the battery.

    Ryan Thornburg -

    thx, I ll go to an apple repair center

    Ronald Geerligs -

    Back (and bad...) experience ! Even if you heat a lot, the screen is hardly sticked. Take care, before sliding the mediator under the screen, this one should be moved up, at least 2 mm. On my side i have slided around 1 mm and .... inserted the mediator between the glass screen and the screen structure ring.... result : glass break and screen to change (my initial exercise was the battery removal !). I feel that next time i will visit a repair center...

    Gilbert -

    Pro tip for anyone having trouble with this. You have to use multiple rounds of heat and pulling. Use a hair dryer and not the iOpener that comes with the fix kit and get it just too hot to touch then quickly start pulling and wiggling it up and down. Once it cools down grab the hair dryer again and repeat it a couple times until you start to get a big enough gap.

    I just did this yesterday and it took around 5 rounds of heating and pulling to get it to seperate enough from the body.

    Oliver Pressello -

    It's important to insert the pick under the bezel. I just delaminated my screen. The screen was probably fine, but it was glitching, so I wanted to check for a bad connection. Anyway, now I get a new screen.

    Under the bezel, eh.

    Chris Green -

    After reading this almost a year later to the day I last commented on it, I now know that the best way I have found to remove a screen, from pretty much any phone, not just this one, is heat (I use a heating pad on 80 degrees celsius) and before putting the phone on the heating pad, I use 91% isopropyl alcohol around the edges that you will be sliding your pry tools in, and I leave it on for 10 min. I then take it off, add more alcohol, and then put it back on the pad for another 5 min. Also, while I am sliding my tools around the screen, I continuously add more alcohol, and if it takes a really long time, then more heat as well. Heat, alcohol, and patience, lots of patience, and you should be good. Hope this helps, good luck!

    Rachel Kelley -

    Can confirm, this does indeed work. Just keep warming it up, lifting up and down, and repeat when phone goes cold. After around 10 rounds it would move enough to where I could see inside the phone when lifted. You can then insert pick

    Tip: You can also try to apply heat and lift the other corner, just enough to make it move slightly. This will ease pressure needed to separate the glue on the other side as-well.

    Thomas -

    No worries guys! it’s completely doable! You just need to be patient and keep trying multiple times

    Giordano Urettini -

    I don't doubt that you folks eventually got this open, but how on earth do you not lose your mind with the suction cup popping off every 5 seconds? Agree with Ryan above, have replaced batteries on several other iPhone generations with nowhere near this much effort. Still working on it going on 1 hr, about 10 rounds of hair dryer heat. Did Apple use a stronger adhesive for the 12?

    davidum -

    Success. iOpener doesn't get the phone nearly hot enough. Multiple rounds of hair dryer + isopropyl alcohol dribbled in b/w case and screen while pulling up on suction cup. For me, the bottom left hand corner (volume rocker side) seemed to lift up first, so I moved the suction cup to that corner while doing the heat + alcohol.

    davidum -

    When I changed the battery on a 7+ instead of the suction cup/heat method I used an Cacto blade inserted horizontally along the bottom edge to break the seal. Would this work on the 12?

    mikefunkpa_c -

    I struggled with this step, but eventually got it. Use LOTS of isopropyl alcohol, and soak the entire perimeter. Let it sit for 30 seconds after application, then heat it up, then pull with the clamp and rock back and forth. Reapply the alcohol and repeat until it works. Took me about 30 mins, but I eventually got it up just enough for the first pick. The iOpener is completely useless, I just used a shrink wrap gun and made sure to hold it 8-12 inches from the phone on the lowest heat setting.

    Wesley Kelly -

    iOpener along the bottom edge, the Anti-Clamp, and three tries about 5 minutes each worked for me. Never popped off, just needed lots of patience and 1.5 screw turns on the clamp. Bottom left corner was first, like another commenter.

    Neal Sofge -

    This is extremely bad way to describe how to open the screen. I ended up detaching screen without reaching to bevel. Now I have a broken display. Super disappointed

    Daud E -

    I was unable to remove the screen, even with my heat gun. I’ve repaired at least a dozen iPhone 6 and may five or six iPhone 7, but the 12 defeated me. I worked for about an hour varying heat from the gun and using my old IFixit iSclach custom suction cup device to no avail (even permanently broke the clamp). After an hour I was so worried I was going to either crack the screen or delaminate it, I gave up. IFixit makes this look MUCH easier than it is. :-(

    John Lipscomb -

  10. TLFrov6MrYfe6MLs
    TLFrov6MrYfe6MLs
    DDIYLM3VDKPF1sdb
    • Erwärme die rechte Kante des iPhones (die Kante mit der Einschalttaste) 90 Sekunden lang (bzw. so lange, dass du sie gerade noch anfassen kannst) mit einem Haartrockner.

  11. rGMaUZMOwp6jDZup
    rGMaUZMOwp6jDZup
    sBgqGmTWBfaWInJQ
    rxBEr5BO3bFbLaRG
    • Schiebe das Plektrum um die untere rechte Ecke des iPhones herum, um den Kleber aufzutrennen.

    • Schiebe das Plektrum weiter an der rechten Seite entlang, bis du die obere rechte Ecke erreicht hast.

    • Setze das Plektrum nicht tiefer als 3 mm ein, du könntest Bauteile im Inneren beschädigen.

    • Lasse das Plektrum in der oberen rechten Ecke stecken.

    There is a spot on this side where a slight ridge in the iPhone frame makes the pick stick. Eventually I used two, one twisting a bit to open a path for the other. But if you're not expecting it you feel like you're going to break something.

    Neal Sofge -

    If you do not heat the phone enough, you may separate the digitizer from the lcd screen when the suction cups begin to pull, instead of lifting the whole lcd plus digitizer assembly. If so, you may just have destroyed your lcd. No big deal if you were going to replace the screen, but very bad news if you just wanted to change the battery.

    Robert Hoffman -

  12. EEAWPuNCXwOopd5j
    • Erwärme die Oberkante des iPhones 90 Sekunden lang (bzw. so lange, dass du sie gerade noch anfassen kannst) mit einem Haartrockner.

  13. jjDP5cRJDxygaS4e
    jjDP5cRJDxygaS4e
    wfpdoWB6GTpFmSWF
    hRbFaNyEBNemtUjd
    • Schiebe das Plektrum um die obere rechte Ecke des iPhones herum, um den Kleber oben aufzutrennen.

    • Setze das Plektrum nicht tiefer als 3 mm ein, du könntest die oberen Sensoren beschädigen.

    • Lasse das Plektrum in der oberen linken Ecke stecken.

    Note Step 17 about being careful about the cables on the left edge!

    Neal Sofge -

  14. 1iVQp4WpwoHLdBEJ
    1iVQp4WpwoHLdBEJ
    oTaCH2yFmSQBq4A5
    • Erwärme die linke Kante des iPhones 90 Sekunden lang (bzw. so lange, dass du sie gerade noch anfassen kannst) mit einem Haartrockner.

    Also: 3D Printer's heated bed set to 70-80 degrees Celcius does the job - it basically works the same way professional heated mats that are used in phone repair shops.

    3D Printing Enthusiast -

  15. 1EkaRCPsl1hLCcO5
    • An der linken Seitenkante des iPhones verlaufen empfindliche Kabel. Setze hier kein Plektrum ein, du könntest empfindliche Kabel beschädigen.

    I kinda forgot about this step when I opened my first iPhone 12.
    For the next one, I'm going to mark that edge of the phone with blue tape roughly where each cable is to help me remember.

    Also FWIW, I got the 70 cent adhesive cutting tool from Apple with my genuine battery and used that for all my display prying needs after getting the first opening propped with a guitar pick.

    It worked great and did not damage anything so no need to sweat inserting something too far and causing damage.

    Daniel Cassel -

    Could you PLEASE move this to step 13?? I tore the front sensor cable. 😭

    Renee Riley -

  16. U32XuDLs5g4YdpJX
    U32XuDLs5g4YdpJX
    P1QKu5D5XkUVQHhB
    • Setze ein zweites Plektrum in die untere linke Ecke des iPhones ein.

    • Verdrehe beide Plektren gleichzeitig, bis sich die Rasten an der linken Seite lösen.

    • Steigere allmählich die Kraft beim Verdrehen.

    • Wenn sich der Kleber nicht lösen lässt, erwärme die Kante nochmals.

  17. IWXGOEkVZMt431sG
    IWXGOEkVZMt431sG
    Qxj6lbMWEEfMw45M
    NoVbSlrJHyCMaaFN
    • Drehe das iPhone so, dass die rechte Kante zu dir zeigt.

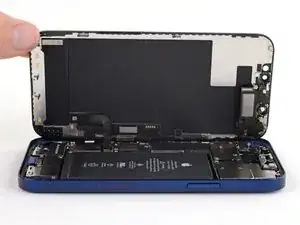
    • Öffne das iPhone so, wie man einen Buchdeckel von rechts her aufschlägt.

    • Versuche noch nicht, das Display ganz zu entfernen, es ist noch mit empfindlichen Flachbandkabeln am Logic Board des iPhones angeschlossen.

    • Lehne das Display gegen einem stabilen Gegenstand, so dass es während der Reparatur gut abgestützt stehen bleibt.

    • Lege das Display beim Zusammenbau in der richtigen Position hin und richte die Rasten an der Oberkante aus. Drücke dann erst die Oberkante fest und lasse dann das restliche Display einrasten. Wenn es nicht gut einrastet, dann überprüfe den Zustand der Rasten um das Display herum und kontrolliere, dass sie nicht verbogen sind.

    i did this and the shroud with the earpiece speaker still stuck with the phone so its just wedged in there i cant get it out

    lil teslas -

    Must have slid a pick in too far as the front sensor ribbon in step 27 was broken…<sigh>. Any chance that sensor is easy to replace?

    Jon -

  18. fVLd1ujMC23kPMBM
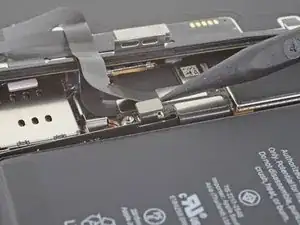
    • Entferne die beiden 1,1 mm langen Y000 Schrauben, mit denen die Abdeckung am Stecker des Akku- und Displaykabels befestigt ist.

    • Halte während der ganzen Reparatur alle Schrauben gut geordnet und achte darauf, dass jede Schraube an ihren alten Platz zurück kommt, sonst kann das iPhone schwer beschädigt werden.

    • Beim Zusammenbau ist jetzt eine gute Gelegenheit, um alle Funktionen zu testen, bevor du das iPhone wieder zuklebst. Vergiss nicht, es danach wieder auszuschalten.

    Ouch, I see a broken flat here…

    Alessandro Sordelli -

    Can I use a y 0.6 if I don’t have y000

    kellciou cr -

    Yep! The measurements for Y000 are 0.6 mm.

    Alex Diaz-Kokaisl -

  19. nCqmqLuRyNhUsecI
    • Entferne die Abdeckung.

    Hi

    On my original display on an iPhone 12, there is no metal hinge as shown here and therefore no place for it when closing the phone. Have double-checked model and the original display - and it is just not there. Is there another model based on serial number?

    Hinge marked: https://www.dropbox.com/scl/fi/asztgi60g...

    Best regards,

    Carsten

    Carsten Feltman -

  20. q1GE6ij6DBGAtVUa
    q1GE6ij6DBGAtVUa
    UFeAbkthIglN1PdG
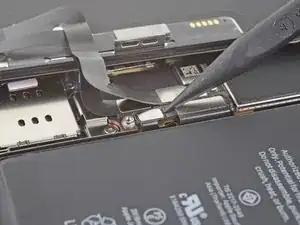
    • Heble den Akkustecker mit einem Spudger oder dem Fingernagel aus seinem Anschluss auf dem Logic Board hoch.

    • Beschädige dabei nicht die schwarze Silikondichtung an dieser und anderen Verbindungen auf der Platine. Diese Dichtungen schützen zusätzlich gegen Staub und Feuchtigkeit.

    • Biege den Stecker ein wenig vom Logic Board weg, damit er sich nicht wieder versehentlich verbinden und während der Reparatur das Gerät mit Strom versorgen kann.

  21. JWGf11bubrJIQJqt
    JWGf11bubrJIQJqt
    JnsnSmZNtLSbSfID
    • Trenne den Stecker am Displaykabel mit einem Spudger oder dem Fingernagel ab.

    • Um Press-fit-Verbinder wie diesen hier wieder anzuschließen, musst du ihn sorgfältig ausrichten und erst an einer Seite herunterdrücken, dann an der anderen. Drücke nicht in der Mitte. Wenn der Stecker nicht richtig aufgesetzt wird, können die Kontakte verbogen und dauerhaft beschädigt werden.

  22. FtXJDFkUoD1lyBai
    FtXJDFkUoD1lyBai
    lnDDQGdsvpfnyRjt
    • Trenne den Stecker am Touchscreenkabel mit einem Spudger oder dem Fingernagel ab.

    • Wenn der Touchscreen nach der Reparatur nicht überall richtig funktioniert, dann trenne den Akku nochmals ab und verbinde ihn wieder, so dass er gut einrastet und kein Staub oder Schmutz den Kontakt behindert.

  23. vanQfZqXPQGekhh1
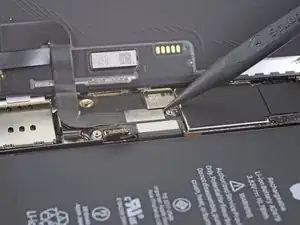
    • Entferne die vier Y000-Schrauben, mit denen die Abdeckung am Stecker der Frontsensoren befestigt ist:

    • Drei 1,1 mm lange Schrauben

    • Eine 1,4 mm lange Schraube

  24. KJnJAuPTwlxnICBD
    KJnJAuPTwlxnICBD
    MHdESpgJCsSSZaMy
    1qodeTMyy56DyGRv
    • Klappe die Abdeckung an der linken Seite hoch, bis sich die kleine Raste auf der rechten Seite löst.

    • Entferne die Abdeckung.

    • Setze beim Zusammenbau die Raste auf der rechten Seite zuerst in ihren Schlitz ein, und setze dann die restliche Abdeckung ein.

  25. LC4oSHWw4nEIZ3H5
    LC4oSHWw4nEIZ3H5
    5PkRCF6AJnj1hYTc
    • Trenne den Stecker am Kabel zu den Frontsensoren mit einem Spudger oder dem Fingernagel ab.

  26. XrIRhPcqOHJyMV1q
  27. FNoMExEdtM2bCQRG
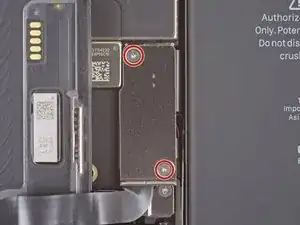
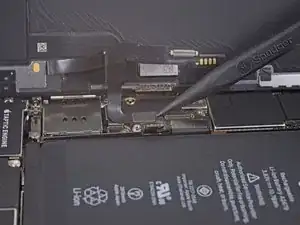
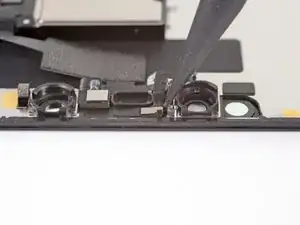
    • Entferne die vier Schrauben, mit denen die Lautsprecher/Sensoreinheit an der Rückseite des Displays befestigt ist:

    • Zwei 1,4 mm lange Kreuzschlitzschrauben

    • Eine 1,7 mm lange Y000 Schulterschraube

    • Eine 1,2 mm lange Y000 Schraube

    The 2 left screws on my iphone 12 wont budge I dont know what to do?

    Jack aouff -

  28. DfRmLtFThgt3RCJF
    DfRmLtFThgt3RCJF
    JFRDHIoLXoAcQd3j
    • Der Ohrhörer-Lautsprecher ist leicht verklebt.

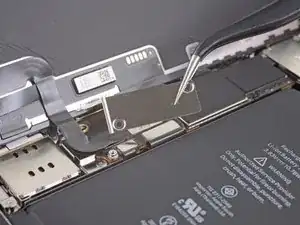
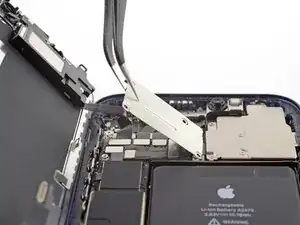
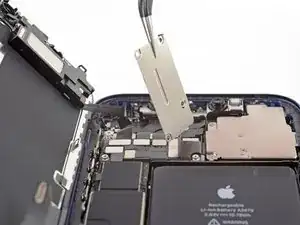
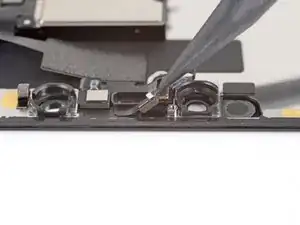
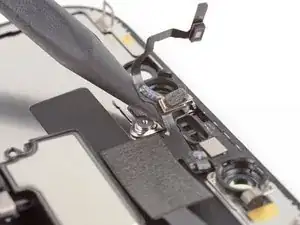
    • Heble die Oberkante des Lautsprechers behutsam mit der Spudgerspitze hoch.

    • Klappe die Lautsprechereinheit um, also nach unten von der Oberkante des Displays weg.

    • Der Lautsprecher ist noch mit einem dünnen Flachbandkabel angeschlossen. Belaste das Kabel nicht zu sehr, damit es nicht beschädigt wird.

  29. RdXToegN2BGGYdyN
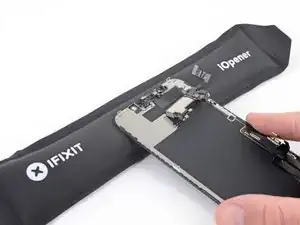
    • Erwärme den oberen Rand des Displays 1-2 Minuten lang mit einem Haartrockner, einem Heißluftgebläse oder einem iOpener, um den Kleber aufzuweichen, mit dem die Sensoren befestigt sind.

  30. BVjAbVWW2crHEFdI
    BVjAbVWW2crHEFdI
    YXlZGYoSRLPmpVEO
    2sEdYZwZK5YtBN5o
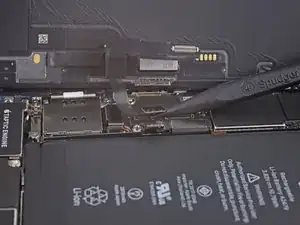
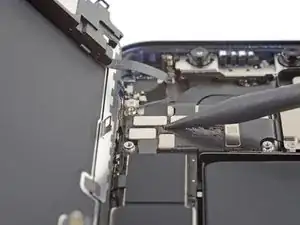
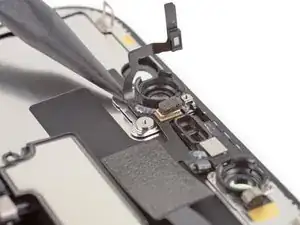
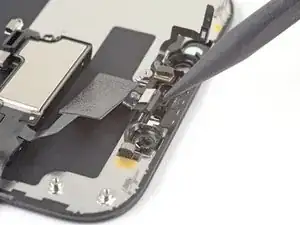
    • Hebe den Umgebungslichtsensor mit der Spudgerspitze hoch und löse ihn aus seiner Vertiefung im Frontpanel heraus.

    • Beschädige beim Hebeln nicht die Flachbandkabel des Umgebungslichtsensor.

    • Schiebe den Spudger weiter unter den Umgebungslichtsensor und sein Kabel und löse die Klebeverbindung des Kabels.

  31. gJMTCKnBTFbYMGir
    gJMTCKnBTFbYMGir
    FW3JR4BeQlirVqEl
    HBEGxfStEHZDjFgw
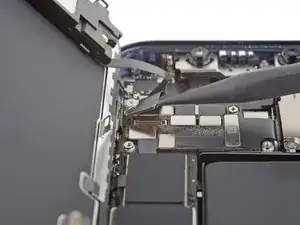
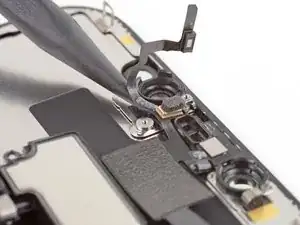
    • Heble das Mikrofon mit der Spudgerspitze hoch und löse es aus seiner Vertiefung im Frontpanel heraus.

  32. skZ4Y3qHkQJvCHId
    skZ4Y3qHkQJvCHId
    ZqJ3P6fCmcwlKyCw
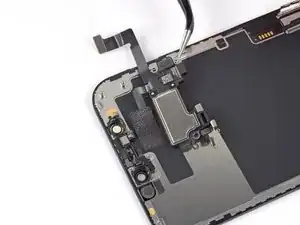
    • Hebe das Modul bestehend aus Näherungssensor und Flood Illuminator mit der Spudgerspitze hoch und löse es aus seiner Vertiefung im Frontpanel heraus.

  33. MgCiuB1KVM4cVrui
    MgCiuB1KVM4cVrui
    lP1ybDY4QKcSBQsp
    cJ3liVwEWJmas4Zq
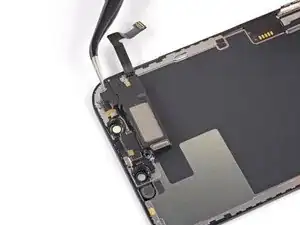
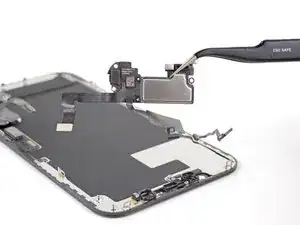
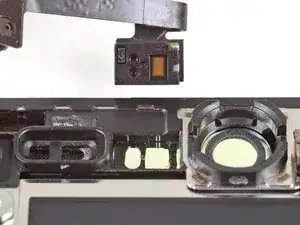
    • Entferne den Ohrhörer-Lautsprecher und die Frontsensoreinheit.
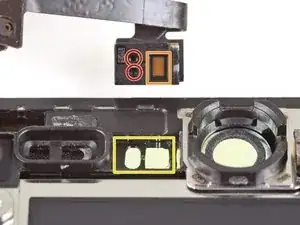
    • Überprüfe beim Zusammenbau die Position des schwarzen Kunststoffmoduls mit diesen beiden Bestandteilen:

    • Näherungssensor

    • Flood Illuminator

    • Das Modul muss so eingebaut werden, dass diese beiden Bauteile nicht durch Kleber behindert werden.

    Beim Testen des neuen Displays ist zu beachten, dass der Hell- Dunkelregler nicht funktioniert, solange der Lichtsensor nicht auf das neue Display montiert wurde.

    Mike Schriewer -

Abschluss

Vor dem Einbau eines neuen iPhone 12/12 Pro Displays solltest du dein Ersatzteil mit dem Originalteil vergleichen. Eventuell musst du fehlende Bauteile übertragen oder Schutzfolien entfernen, bevor du es einbauen kannst.

Um dein Gerät wieder zusammenzubauen, folge den Schritten in umgekehrter Reihenfolge.

Je nach eingebautem Ersatzteil kannst du es möglicherweise mit Apples Repair Assistant neu kalibrieren, verfügbar ab iOS 18. Führe ein Update des Gerätes durch, navigiere zu Einstellungen General About Parts & Service History, tippe auf Neustart und Reparatur abschließen. Folge dann den Anweisungen auf dem Bildschirm.

Entsorge deinen Elektroschrott sachgerecht.

Hat die Reparatur nicht den gewünschten Erfolg gebracht? Versuche einige grundsätzliche Lösungen oder frage in unserem iPhone 12 Forum um Hilfe.

Adam O'Camb

Mitglied seit: 11/04/15

212278 Reputation

9 Kommentare

i am trying to source a replacement screen for my iPhone 12 that needs a new digitizer and battery. My main concern is since I cannot purchase an original part from apple and have to resort to eBay they have several option;

Lcd / Oled soft / Oled hard / Incell lcd??

I asssumed the 12 came with the oled screen and I’m worried that if I put a non original type screen it could damage phone after awhile?

what digitizer should I get?

Adam Anderson -

Hi, I would recommend looking at places like Fixez.com rather than Ebay. Their prices are lower and they have a LCD buyback program which is very helpful. They have a wide ranging variety of LCD's. On a scale of best to worst LCD's its ranges: OLED Soft,OLED Hard, Incell LCD, LCD. I hope this helps

Tecc World -

Hi there,

I have read that by installing an aftermarket screen, I would get a non-genuine display message. Has Apple addressed this issue?

Than

Alex Hsu -

Genuine components have chips that allow the phone to identify them - third party ones frequently do not. The phone is doing what it is designed to do so there isn’t really anything for Apple to address. Much as anything it’s to stop companies refurbishing iPhone’s ‘in-house’ and selling them as having genuine parts. The non genuine part message is t inherently a bad thing, it’s an advisory rather than an error.

Core Confusion -

Hi, I lent my grandson my iphone 12 and I got it back with a broken screen and a broken back glass. I have another iphone 12 for parts. I was going to swap out the screen and the back glass. My question is do I have to remove all these parts as described above or c an I just plug the new screen in ? Second question my iphone has a Qlink wireless SIM card in it and it works perfect. The same SIM card will not work in my other iphone that being said would it be easier to somehow take my other iphone and use the parts from my broken one so the SIM card would work in it? I don't know what it would entail to do such a thing but if you would possibly know what I would have to do to make this happen please let me know... Otherwise I will take the screen and back glass and continue to install them on my own phone. also which procedure would be easier to do?? Kudos to you on this article I followed it to the letter and everything worked perfect I removed the screen without any problems. GREAT ARTICLE! Thanks Jeffrey

Jeffrey Miller -

Great guide.... I was able to successfully replace the screen. However, the step to apply the glue sheet is missing. I had to undo what I spent 40 mins doing correctly just to get the adhesive sheet applied and redo it.

CV Sayani (cvs) -

Bonjour suite au changement d'écran sur mon iPhone 12 j'ai acheté un écran d'origine ( service pack) depuis j'ai un message suite a un changement d'écran pièce inconnu impossible de vérifier l'authenticité etc..... d'où peut venir le soucis ?

Aurélien -

Friday March 8,2024 United States Iphone12

Old one had white lines on the left > Put the new one>turned it on and my finger prints would not allow it to open it and did two soft reset up,down and hold power button on until apple logo appears and no success. So next was removing the film that comes attached to it on the back side of new screen , plugged it back in and no success. So then i plugged the old one but only connected two connectors pretty much was lazy to take it all apart lol. Last was put that tiny screen protector that came with the 3rd party screen and sure enough it WORKED!! I also was studying about the motherboard but it did not seem to go that deep in it. Oh and the facetime works as well . I am going to update and let it scan my face for facetime . Don't give up it . You got this.

Kevin Ventura -

Ich möchte bei einem iPhone 12 das Display wechseln aber ohne Einschränkungen und Fehlermeldungen, kann mir da jemand helfen?

Lias -