Einleitung

Diese Anleitung zeigt dir, wie du den An-/Aus-Schalter deines iPhone 7 entfernen oder ersetzen kannst. Die Anleitung ist nur für die Taste selbst, nicht für die elektronischen Schalter darunter.

Wenn du das Kabel der Lautstärkeregelung und zum An-/Aus-Schalter tauschen musst, folge dieser Anleitung.

  1. ELMlFSUOebPWtXjT
    • Vor dem Beginn sollte der Akkuladestand des iPhones unter 25 % liegen. Ein geladener Lithium-Ionen Akku kann bei Beschädigung Feuer fangen oder explodieren.

    • Schalte das iPhone aus, bevor du es zerlegst.

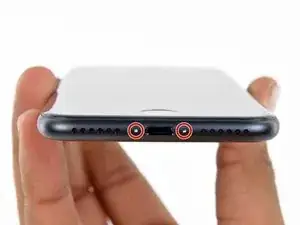
    • Entferne die zwei 3,4 mm Pentalobe Schrauben an der Unterkante des iPhones.

    • Beim Öffnen des Gerätes werden die Dichtungen für den Spritzwasserschutz beschädigt. Halte Ersatzdichtungen bereit, bevor du fortfährst. Wenn du diese nicht ersetzt, ist dein Gerät nach der Reparatur nicht mehr gegen Spritzwasser geschützt.

    Can anyone confirm 7/7P's pentalobe screws have a ring of seal near the screw head?

    Cooper Chase -

    Confirmed, the screws have a black ring seal around the head.

    rcheing -

    Can’t get the display front

    Bernadette Pfeifer -

    From personal experience, I highly recommend before doing this procedure or any other, that you do a backup of your phone (preferably local) in case your procedure goes south.

    ballina5ny -

    I purchased the repair tools with the replacement battery from iFixit. The tools include a screw driver and three heads none were labeled 3.4 mm. I think the one that fit the pentalobe screws was labeled Y000. The guide should identify the screw driver head supplied by the kit not 3.4mm.

    Mark Lieberman -

    in the iphone 7 replacement battery kit from iFixit, the screwdriver that fits the 3.4 mm pentalobe screws is labeled P2 (and not Y000)

    Jan-Tijn Oppermann -

    3.4 mm is the height of the screw and is not related to the screw driver code.

    Ahmad Vaziri -

    the screwdriver PH000 does not work i wasted two screws and now they dont have the 4 cross mark they are now a circle, i buyed it all from Paraguay and it doesnt work, had to assembly back the parts because i got stuck like i mention with some screws, well im just going to send to a professional to install, thanks

    Martin Frutos, Nuñez -

    The bottom screws are Pentalobe, not Phillips.

    Bram Driesen -

    Before starting, I would recommend backing up your Iphone’s data just in case.

    Jon Moylan -

    If you managed to make it to this section, just send the phone into apple for 50 + 6 dollars shipping. The ribbon cables on the screen are designed to break. I can literally twist on the rest of the cable and it won’t fall apart but there is a diagonal section where it snaps. This is the fault of apple and the fault of ifixit for misrepresenting the fragility of the cables.

    Ryan Huebert -

    Had to reheat it a few times for a minute each with a hairdryer to get the seal to break after pulling and rocking the suction

    Cynthia Lamb -

    I’m technically challenged. Is there a premier national service who can professionally install a replacement battery got my 7 +?

    Richard -

    Do the screws come out in total?

    YVES THEUGELS -

    They may come out or may not. If you loosen as much as you can and they don't come out you should still be able to pry open the bottom. Once you get the screen off you can then push the screws out from the inside.

    Anthony Falabella -

    Is it the P2 you should use for the bottom??

    YVES THEUGELS -

    I heated the bottom of the phone with a hairdryer and then used a syringe to put a couple of drops of acetone directly into the bottom two screw holes. I GENTLY pulled on the screen with the suction cup and used the pry tool to GENTLY separate the screen. The sealant is applied around the entire display so be very careful pulling it off so you don’t break the fragile display cables.

    Anthony Scaminaci -

    At first it was very difficult to open, per instructions. I used a heat/ice pack and nuked it for 1 minute. The pry tool wasn’t working so I carefully used my pocket knife to wedge the cover open. The rest of the procedure went well until I cracked the glass while trying to get the top right corner to pop off. Other than that mistake, all went well. Tip: before setting the new battery, attach the battery connector first and leave enough room for the taptic engine, or better yet, place the taptic engine before adhering the replacement battery. This way you’ll have a small gap between the two, whereas mine barely fit. Good job on hosting the video, Gwendyl.

    Klaus Preiss -

    I love the fact that the screw bit and shaft are magnetic! I almost lost a screw and found it attached to the magnet.

    I used a heat/ice pack and nuked it for 1 minute. At first the display cover was very difficult to open with the pry tool, per instructions. The pry tool wasn’t working so I carefully used the blade of my pocket knife to wedge the cover open. The rest of the procedure went well until I cracked the glass while trying to get the top right corner to pop off. Other than that mistake, all went well. Tip: before setting the new battery, attach the battery connector first and leave enough room for the taptic engine, or better yet, see the taptic engine in place before adhering the replacement battery. This way you’ll have a small gap between the two, whereas mine barely fit because I placed it almost too low.

    Good job on hosting the video, Gwendyl.

    Klaus Preiss -

    I replaced the lightning connector assembly and reassembled. The old one did not 'click' into the cable and had corrosion inside, it needed the cable to be placed in a specific way to charge. The new part - does not recognize that a charger is plugged in at all.

    I backtracked the assembly - took it apart, put it back again - and find that every thing on the part works - the mic, speakers, taptic engine.

    The original problem with the cable still persists. Any ideas?

    H K -

    get a new batt to replace whilst you 're at it

    Graham Sargerson -

  2. 6UPwoloGBO4tmVoS
    6UPwoloGBO4tmVoS
    BmSYPJmOy6dbHipF
    3EOdQPAGOmiuhoKU
    • Wenn du ein Plektrum zu tief einschiebst, kann das Gerät beschädigt werden. Dieser Schritt zeigt, wie du eine Marke am Plektrum anbringen kannst, damit das nicht passiert.

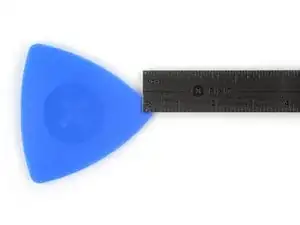
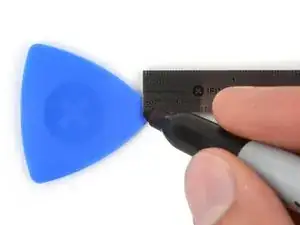
    • Zeichne mit einem Permanentmarker 3 mm von der Spitze des Plektrums entfernt einen Strich.

    • Du kannst die anderen Ecken ebenfalls mit Strichen in verschiedenen Abständen markieren.

    • Du kannst auch eine Münze so mit einem Klebeband auf das Plektrum kleben, dass sie einen Abstand von 3 mm zur Spitze hat.

    Got to step 2 and realized the fix kit doesn't include an opening pick! Looks like a guitar pick, and I have those lying around. Is that expected? Looks like the pick is used in many steps below. There's a little blue crowbar that isn't mentioned in the instructions. Perhaps that replaces the opening pick?

    Sloan Looney -

    Hi! I can't see which guide you were using when writing this comment. Can you reply here with which guide and fix kit you used?

    Clay Eickemeyer -

    I see you posted this in Meta. I hope it's resolved soon! In the meantime, a guitar pick may work well enough for your repair.

    Clay Eickemeyer -

    what fix kit?

    Meow Purr -

    My fix kit didn't include an opening pick either

    WILLIAM HARRIS -

    Make sure you check inside the black boxes after emptying them. My pick was stuck inside one of the boxes.

    AndyF -

    My AliExpress refurbished screen came with a pick that has a coin-like circle that pops out, so no modification was necessary

    Gijs Leegwater -

    the picture shows 3 cm but the description says 3 mm's. Which one is it?

    John Pena -

    That is a misunderstanding. It is a ruler with a scale for cm, it shows 0.3 cm, i.e. 3 mm.

    VauWeh -

    Oh, come ON!

    Big Ed -

    It will ALWAYS be millimeters on a phone, but this step is ridiculous, skip it!

    Leif DeWolf -

    @leifdewolf I wouldn't skip it for a first repair.

    Gabriel-Science -

    It's not an Ifixit KIT if it doesn't include everything. You'll need to order the opening pic separately. Or head to Walmart like myself and look for guitar pics. Hopefully, this will work just as well.

    Jaleeljb97@icloud.com -

    No pick in mine as well. It’s really not clear that you have to order this separately when ordering an IPhone SE 202/2022 screen repair kit. Is this the case?

    Jackson Castiglione -

    Frustrated, I ordered a compact package where everything was encapsulated. Useless suction tools could not separate the screen. If it is unable to decouple the screen, then why sucking suction tools you have provided.

    Shourob Datta -

    For my kit the triangle pick was stuck inside the box with the screen not with the other tools maybe it's also there for you

    Henry Scheibehenne -

    Y’all are getting far, FAR too detailed with some of this stuff…. Measuring and marking the pick that you won’t actually use to open the device?!? lol that’s kinda funny. Just heat it up, grab a spudger, and the back just pops right off! The iFixit tech need to stick to the KISS method more often, you know KEEP IT SIMPLE STUPID!!! Like l, for reals, I’ve been doing this stuff for YEARS and using iFixit guides regularly and this is just ridiculous at this point!

    Leif DeWolf -

    Will the phone still work if the sensor assembly on the back of the screen is damaged?

    Mutshidzi Rambau -

    I don't have a pick, but how much better are these picks than an old credit card for opening an iPhone 13 mini?

    mike eng -

    The pick in my iFixIt kit was packed with the battery, not with the rest of the toolkit.

    Tony Houlihan -

  3. uSKuDUqkPXShJGIe
    uSKuDUqkPXShJGIe
    VcewaYwFWPodicdm
    UuEMr1v4SuV4fLE3
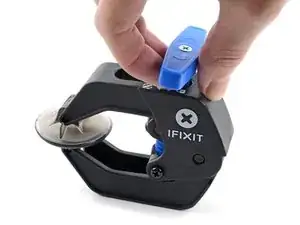
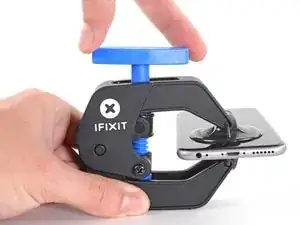
    • Wir haben die Anti-Clamp entwickelt, um Geräte sicher zu öffnen. Die nächsten drei Schritte zeigen die Benutzung der Anti-Clamp. Wenn du sie nicht verwenden willst, überspringe die nächsten drei Schritte und folge einer anderen Methode.

    • Genaue Anweisungen, wie die Anti-Clamp benutzt wird, findest du hier.

    • Drücke den blauen Griff zurück, damit die Arme der Anti-Clamp frei beweglich werden.

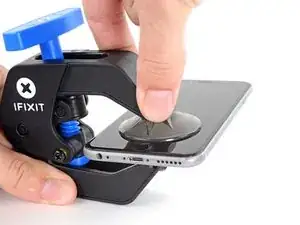
    • Schiebe die Arme entweder über die linke oder die rechte Kante des iPhones.

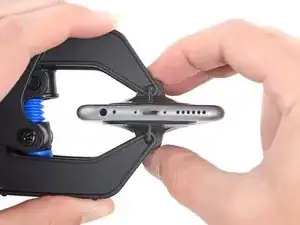
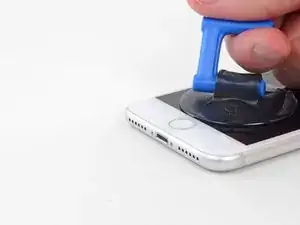
    • Bringe die Saugheber am unteren Rand des iPhones direkt über dem Home Button an, einen auf der Vorderseite, den anderen auf der Rückseite.

    • Drücke die Saugheber zusammen, so dass sie auf den Oberflächen haften.

    • Wenn die Saugheber nicht gut auf den Oberflächen des iPhones haften, dann kannst du die beiliegenden Stücke aus Klebeband verwenden, um eine griffigere Oberfläche zu schaffen.

  4. TWCRek6KAd4BXPEo
    TWCRek6KAd4BXPEo
    5bA1wXPF4DYK1xqZ
    WBMxwmobsDvHpXqL
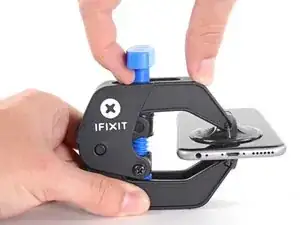
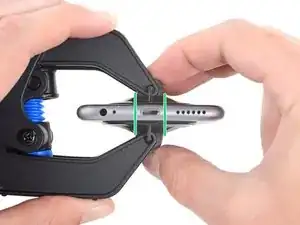
    • Drücke den blauen Griff vorwärts, damit die Arme wieder fest sind.

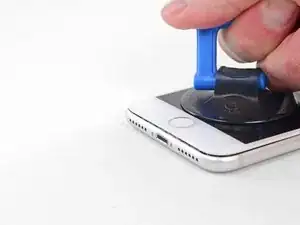
    • Drehe den Griff eine volle Umdrehung im Uhrzeigersinn, oder bis du merkst, dass sich die Saugheber dehnen.

    • Achte darauf, dass sich die Saugheber weiterhin gegenüber stehen. Wenn sie sich nicht mehr gegenüber stehen, dann löse die Saugheber ein wenig ab und schiebe sie in die richtige Position.

  5. 1UMWDAgvEgkQkwPM
    1UMWDAgvEgkQkwPM
    5SG2UIItrZgdZEa4
    • Führe einen erwärmten iOpener durch die Arme der Anti-Clamp.

    • Forme den iOpener so, dass er auf der Unterkante des iPhones liegt.

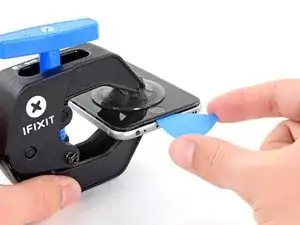
    • Warte eine Minute, damit sich der Kleber lösen und ein Spalt entstehen kann.

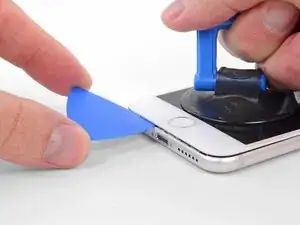
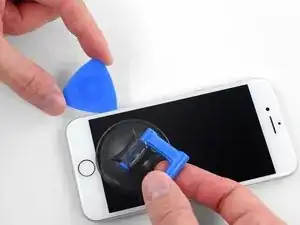
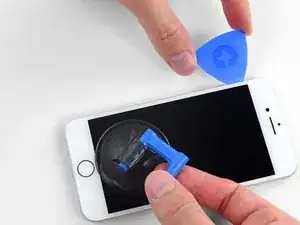
    • Wenn die Anti Clamp einen ausreichend großen Spalt erzeugt hat, setze ein Plektrum unter das Display ein.

    • Wenn es nicht gelingt, mit der Anti-Clamp einen ausreichend großen Spalt zu erzeugen, dann erwärme die Stelle nochmals und drehe den Griff eine viertel Umdrehung im Uhrzeigersinn weiter.

    • Drehe den Griff jeweils nicht mehr als eine viertel Umdrehung weiter und warte jedes Mal eine Minute lang. Gib der Anti-Clamp Zeit, ihre Arbeit zu erledigen.

    • Überspringe die nächsten drei Schritte.

    it looks like a....

    Gergely Soki -

  6. HWFBtehBMjCQcFAc
    • Die nächsten drei Schritte zeigen, wie das Display mit einem Saugheber abgelöst werden kann.

    • Es ist leichter das iPhone zu öffnen, wenn du das untere Ende erwärmst, so werden die Verklebungen aufgeweicht.

    • Du kannst das untere Ende des iPhones mit einem Haartrockner oder einem iOpener etwa 90 Sekunden lang erwärmen, dann sollte der Kleber weich genug sein.

    No hair dryer so GENTLY heated over stove burner

    John Toth -

    Hello,

    What temperature is suitable for removing the front display ? I bought i-Fixit ProTech which is not include the heating "roller" . Thanks for help

    Jiří Sítko -

    I was about to ask the same Question...

    Enno Winch -

    Ich habe eine heiße Wärmflasche verwendet. Das hat gut funktioniert :-)

    Moritz Hartges -

    I laid my phone face-down on my 3D printer’s heated bed, and set the temperature to 60 C. After a few minutes, it was ready to loosen.

    Nate B -

    Hey, that's smart !

    Gabriel-Science -

    If you don’t have an “iOpener” or heat gun, try using an electric heating pad. I have a small $11 pad I got at CVS for my knee. On medium heat it worked fine for removal and with the “pennies” for setting the new seal.

    Pete P -

    I used a heated tea kettle and a tea towel, it worked!

    Adam Yavner -

    I put on the furnace vent for 10 minutes to get it warm to the touch but not hot.

    terrelldoc -

    I attached it to the after burner of my rocket ship and that worked.

    Matt Brown -

    I'm holding mine just above an erupting volcano but I'm still waiting to see if it has worked. How long does it need?

    Paul Aron -

    It won't work if you don't throw it in the lava.

    Gabriel-Science -

    I used a water-filled ziploc bag, heated it in microwave. fast, cheap, worked.

    John Barker -

    Hairdryer works fine for this step. No issues.

    tripmusic -

    Agree! Just did it for 2 times to make sure I didn't overheat the phone.

    André Lopes -

    The most effective way to heat up the glue is to leave the phone in full sun - if it's available. In fact I would always wait for a sunny day to repair any glued together Apple device. The heat will be very even and the phone was probably designed to survive anything the sun can throw at it - although it can get very warm. (I'm in the UK) If you leave the phone turned on it will give a warning if it goes near the temperature limit.

    John -

    I'm sorry but I tried both the hair dryer (for 3 minutes!) and the eye opener (also 3 minutes) and no luck. Not even a hint of loosening the adhesive holding down the display!! Do I send this kit back for a refund or what??!!

    John Noble -

    No luck, guys. 3 minutes of hair drying and 3 minutes heating up the iopener. What next?

    John Noble -

    Okay, a half hour later i finally got the screen loose, but not after super heating it for at leat 10 minutes with a hair drying and burning my hand trying to pry it open. Also, watch out for the power button because it inadvertently keeps switching the phone back on while you wrestle with it. More later . . .

    John Noble -

    . . . and now I need to buy a new phone!!! the cable broke as I was trying to unscrew one of the top screws, so thanks! I FIXed IT but Good!!!!

    John Noble -

    Nate B's advice was key. I couldn't get the temperature of the display hot enough to break the seal with a hair dryer. A heat gun set to low speed and 550F (287C) got the display up to just over 130F, close to the 60C Nate mentioned.

    Matt C -

    This part was actually much easier than I thought. I used a hair dryer on max for 2 minutes on each side of the phone, less than half an inch away from the phone, just on the bottom half. It was hot! Screen came right out!

    Nuno Lopes -

    I used a tube sock full of about 1 cup of white rice. Tied a knot in the top of the sock. Put the sock of rice in the microwave on 60% power for 1 minute. Kept doing this until the temp felt right. Put the sock of rice down, put bottom edge on sock, then covered w/ other half of the sock/rice. Put a piece of paper towel between phone and sock/rice to absorb any moisture. When lifting up on front panel, I rested the phone on the sock/rice. Worked nicely once I got the temp of the rice high enough.
    (threw the rice away later :-) )

    Burning Sensation -

    “Threw the rice away later” has to be the best advice here. I wrapped my phone in a small heating pad and turned it up to 6 of 8. Worked great in 5 min or less! No need for water bottles, microwaves, heat guns, volcanoes, …. I kept the heating pad later ; )

    dantegd -

    I popped my iPhone under a desk lamp with a 60w filament light bulb in it, switched it on, (See this photo) then read the iFixIt instructions and comments. By the time I’d done that, the glue had softened enough to start work. I managed to do the whole process, slowly and methodically, without incident. The iPhone even worked after I’d put it all back together. So we’ll done iFixIt. Another satisfied customer!

    Tony Houlihan -

  7. VRy3fVrOovwUCabE
    VRy3fVrOovwUCabE
    A5IlSaM3n1xvayKW
    • Setze einen Saugnapf auf die untere Hälfte der Vorderseite , direkt über den Home Button.

    • Passe dabei auf, dass der Saugnapf den Home Button nicht bedeckt, sonst kann der nicht mehr dicht abschließen.

    Even with using high heat from a blow dryer, I had to put the suction cup over the home button or the bottom edge wouldn’t lift at all. That waterproof adhesive is incredibly strong.

    Aaron Soderholm -

    As others have said, this part really stinks, but it’ll work if you keep trying. Agree with multiple rounds of hair dryer on high (did about 60-90s each time), and with having to out the suction cup over the home button. You don’t need a big gap to pry it open - it’ll be slight …

    Johnny Emrica -

    Patience is the key here. Expletives and patience. Like previous comments say, putting the suction cup over the home button (I used packing tape to maintain the seal) will allow you to apply force to the proper location to separate the screen. Good luck!

    J Rawlinson -

    Get a suction cup pliers. It’ll make this part fun

    Bradley Steiner -

    iSclack EVO opened the iPhone easily even without heating with no fear of accidentally over-opening it like with a simple suction cup.

    Matti Haveri -

    If you don't have the anti-clamp device, to prevent the screen from tearing open when suctioning it, I suggest some layers of tape around it and the back of the phone (the tape has to be stretchy enough to just minimise the momentum when separating the screen), or some big rubberbands

    Raziocinjo -

    This was the time consuming part. I’d recommend having a thin bladed knife or similar to get things going. I used the small blade on my Swiss Army knife, but be careful. When it goes, it can be unexpectedly sudden. I also used a strong rubber band to stop any excessive opening of the screen.

    Tony Houlihan -

  8. PnYJMHrBqA2Jh22u
    PnYJMHrBqA2Jh22u
    5BxGfRPfmCqCLMOc
    xYlJ5IgLFMxCDZ2B
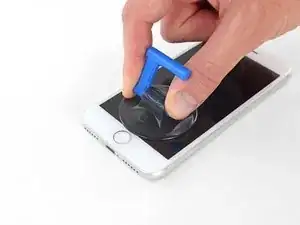
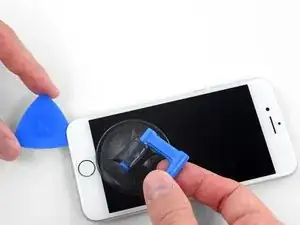
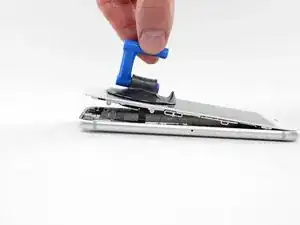
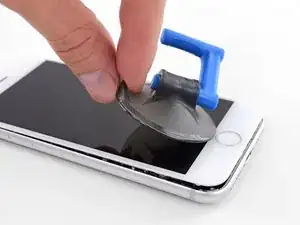
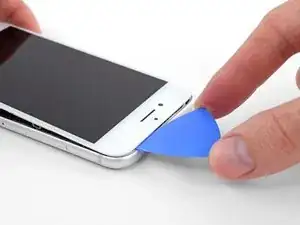
    • Ziehe gleichmäßig und fest am Saugnapf. Es sollte sich ein kleiner Spalt zwischen Display und Rahmen bilden.

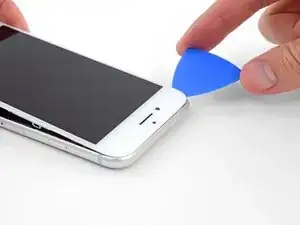
    • Setze ein Plektrum in den Spalt ein.

    • Die wasserdichte Verklebung am Display ist sehr stark. Um den Spalt zu öffnen, musst du recht viel Kraft aufbringen. Wenn du Schwierigkeiten hast, solltest du nochmals Wärme anwenden und dann die Scheibe vorsichtig hoch und runter ruckeln, um so die Klebeverbindung zu schwächen, bis du genug Platz hast, um dein Werkzeug einzuführen.

    The screen on my phone was so broken, a suction cup did not work, so I softened the adhesive with a blow dryer and used a Jimmy to carefully pry open the phone from the bottom just enough to slip a pick in.

    charguy -

    Just completed a smashed screen replacement, this is probably the most time consuming part. Used packing tape to cover the screen to help create a suction surface (had to replace it a couple times because it pulls away after a purple good pulls ) Used consistent heat for about 5 minutes, then stuck a pick in the tiniest opening… and pry pry pry!

    Brian Gill -

    I failed at this step. No amount of heating, pulling, and rocking opened up enough of a gap to slip in even a knife let alone the blue plastic tool. That's with a phone that has an undamaged screen - just trying to replace the battery. Apple won this round :(

    Michael Sherman -

    Be really careful here. I placed a sucker to the front and rear to help lever off the screen. However, the whole thing came away much easier than I anticipated and I ripped the front part completely away from the rear, tearing all three connector cables. New iPhone required.

    Chris Wood -

    Note that the opening pick they show here does not appear to come with the kit, which is a bummer! The plunger, the mini blue crowbar thing, these are too thick. I ended up using a really thin guitar pick.

    Johnny Emrica -

    Following careful methods can mostly preserve the seal and reusable. Won’t be as water tight but probably still pretty good.

    Bottom edge is pull up with suction + separating tool. Use small precision scissor to cut any tape that gets overly stretched upon initial opening.

    - For the 2 long edges, use an exacto knife to separate the seal from the screen. This keeps the tape on the chassis. Go slow along the long sides. Becareful to avoid scratching the paint on underside of the screen’s edge.

    - Top corners have a thick sealed tape. Best to just use separating tool to twist it open.

    In summary, top and bottom edge use separating tool. Side long edges can use exacto knife to gradually gently separate the seal from underside of the screen’s edge.

    Howard -

    4 picks and an exacto knife, plus 45 minutes later, I finally got it to open! Thanks tor the tip!

    Cat -

    Intact screen, check. Tool kit, check. Hair dryer hot enough to make the phone too hot to touch, check. Following all instructions, check. Screen still in place and refusing to come off, check.

    I heated, reheated, pulled and pulled. I simply could not get it off. Worked at it for an hour and a half, and I’m not a small guy. Yes it is hard to hold, but could get a grip. Just could not get it to budge. Off to the iPhone repair shop tomorrow. Anybody want to buy a repair kit and replacement battery?

    Jim Meyers -

    After struggling for 30m, I looked up some alternate methods and found this helpful:

    https://www.youtube.com/watch?v=25zAK5mG...

    - I used a utility knife and pried up right under the home button

    - the angle matters! I was trying to go too far down before going in. The top surface of the phone is rather thin, so you go in after barely getting under the chassis lip

    - tilt utility knife left to right once you’ve got it under to work it in

    - leave the utility knife in, and now add that pick

    Jared Wilk -

    Pro-tip: don't be an idiot like me. Instead, remove the screen protector you have on the phone before applying the suction cups. Derp.

    hunter.geofizz -

    I struggled with a hair dryer at first and a singular suction cup. However, I tried putting packing tape on the spot where I put the suction job (even though my screen isn't cracked) and I was able to do it first try with ease. Definitely recommend packing tape.

    Alessio Toniolo -

    Suction cup pliers. Dead easy

    Bradley Steiner -

    After successful screen replacement, returning to give my thanks here. Excellent tips from you all - if you’re using force, you’re doing it wrong. Heat, very very gentle exact-o knife barely down then fully under the screen below the home button … perfect. Slow and patient around the upper corners, and don’t forget to heat there as well! Thank you all!

    dantegd -

    The problems with this step are (1) not having three hands and (2) managing to hold the phone in a way that doesn't put reverse pressure somewhere else on the screen. Exacto knife was the best tip. It's a little dangerous. On a misstep you may scratch the screen or jab yourself, but it's what got me in.

    thewrytstf -

    sorry, could not lift off the display any nano-meter even after applying enough force I think and heating it up. need to visit a store.

    Andi Tony -

    I used a razor blade and plenty of heat, and it somehow worked like a charm at the cost of me cutting myself. Definitely be careful when doing this, I used the razor blade on the left side of the iphone then wedged in a small screwdriver and then used the pick to cut the rest of the material away.

    Sharaf Kazi -

  9. 2QPL6xQ1bKKTHEE2
    2QPL6xQ1bKKTHEE2
    Scr2EQgs2BWhSj3N
    KyO5DVLoiSXnDh2Z
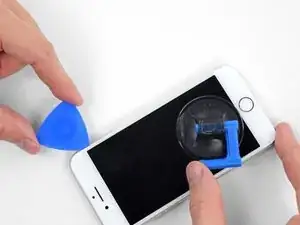
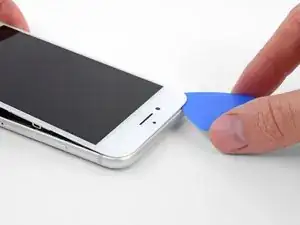
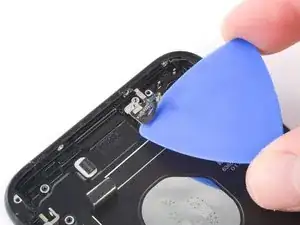
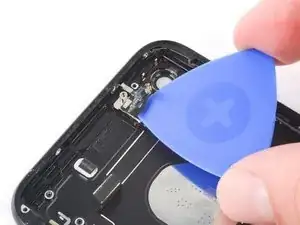
    • Schiebe das Plektrum entlang der linken Kante von der unteren Ecke an nach oben in Richtung der Tasten für die Lautstärkeregelung und des Stummschalters. Trenne so die Klebeverbindung des Displays auf.

    • Halte vor der oberen linken Ecke an.

    • Versuche nicht, die Oberkante des Displays vom Rückgehäuse wegzuhebeln, denn hier halten Plastikclips die Teile zusammen. Die Clips könnten abbrechen.

    My Plektrum worked ok, but the edges broke off a bit towards the end

    griffin.weber -

  10. g1bJoLynAKeivqUm
    • An der rechten Seitenkante verlaufen empfindliche Kabel. Setze das Plektrum an diesen Stellen nicht ein, die Kabel könnten beschädigt werden.

    I was trying to replace my battery, and accidentally cut one of the cords on my screen. I marked my pick, so i don't know how it happened.

    Gib Jeffries -

  11. bYHHQWBLX2SbZ4ZM
    bYHHQWBLX2SbZ4ZM
    oWPIhKQUMFLQKwJF
    VbhlSMqUKVaR3i4t
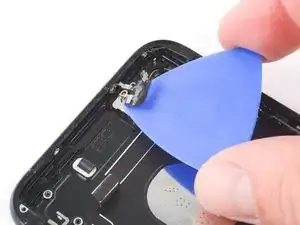
    • Setze das Plektrum an der rechten unteren Ecke ein. Schiebe es um die Ecke herum, dann entlang der rechten Kante nach oben. Trenne dadurch die Verklebung.

    • Setze das Plektrum nicht tiefer als 3 mm ein, du könntest sonst die Displaykabel beschädigen.

    No pick in the kit you sent me.

    Ted Cooper -

  12. JsELGeLj2sULj4Rl
    JsELGeLj2sULj4Rl
    1Q5TB6TXChTQrCSO
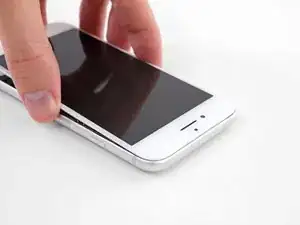
    • Hebe vorsichtig den Saugnapf an und mit ihm den unteren Teil des Displays.

    • Hebe das Display maximal 15° an. Du könntest sonst die Flachbandkabel des Displays überdehnen und beschädigen.

    • Ziehe an der kleinen Lasche am Saugnapf, um ihn vom Front Panel zu lösen.

  13. 1wx6fuMwGlVmTVwg
    1wx6fuMwGlVmTVwg
    L5DvjVj5xMJAlXg4
    y6nMrARZIGjH4KZO
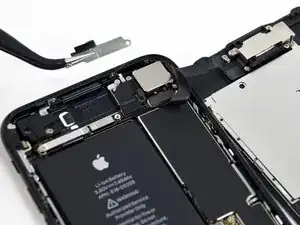
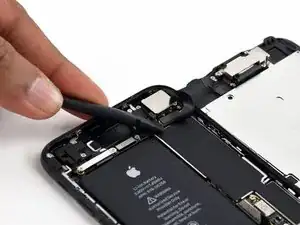
    • Schiebe das Plektrum unter das Display um die obere linke Ecke und die Oberkante entlang, um die letzte Klebeverbindung zu trennen.

    I did end up using just a smidge of IFIXIT adhesive remover along the edge before opening and that seemed to really help

    Karen Flowers -

    I have been using the pointed tweezers to pull the adhesive strands apart and out as the display comes off.

    Adam Yavner -

    This bit was awkward as to get a good grip I kept inadvertently switching the %#*@ phone on!

    wendyhoward -

  14. pmOBsioPu6PHdocL
    pmOBsioPu6PHdocL
    wCWsnncFGO1Jy1KT
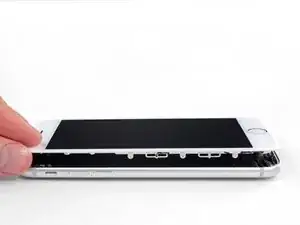
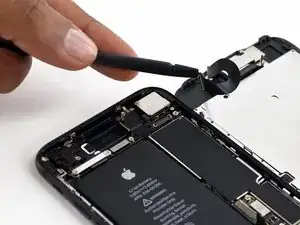
    • Schiebe die Displayeinheit leicht nach unten, weg von der Oberkante, um die Clips zu lösen, mit denen sie am Rückgehäuse gehalten wird.

    I had trouble sliding down the display and found I hadn't separated the stop enough.

    Jeffrey Anderson -

    When you are pulling the display downward, be very careful! I pulled a little too hard and the display cables tore from the downward (toward home button) motion. Now I have to replace the display! 😭

    So Munch Love -

  15. XaJPKiESSbHGIDqx
    XaJPKiESSbHGIDqx
    TKsLuMfvlLBnsdMa
    uyGD4MIvBrhLyuiO
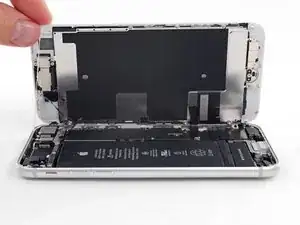
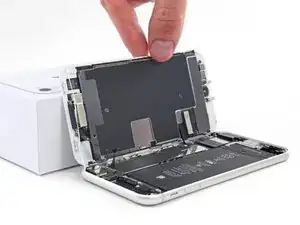
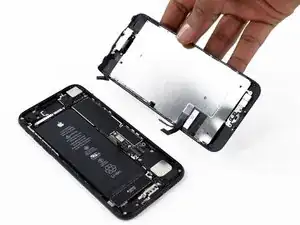
    • Öffne das iPhone, indem du das Display von der linken Seite her umklappst, so wie wenn du ein Buch öffnest.

    • Versuche noch nicht, das Display ganz zu trennen. Verschiedene empfindliche Flachbandkabel verbinden es noch mit dem Logic Board.

    • Lehne das Display an einen geeigneten Gegenstand, um es gut zu stützen, während du weiter am iPhone arbeitest.

    Nach RECHTS klappen - nicht nach links!

    Manfred Wachtel -

    Als ich das Flachbandkabel auf der rechten Seite sah, hab ich mich auch gefragt, ob die das mit nach Links klappen ernst meinen, und das „Buch“ lieber auf japanische Art nach rechts aufgeklappt. Das sollte dringend in der Anleitung korrigiert werden!

    Sebastian Plickert -

    “Up from the left” means lift up the left side.

    Which is the same as folding to the right.

    “Like the back cover of a book” explains it even more clearly.

    Maybe it gets lost in translation?

    Nick Shtangey -

    Fold to THE RIGHT - not to the left!

    Jim Glenys -

    When I saw the ribbon cable on the right side, I also wondered if they were serious about folding it to the left, and the "book" would rather be opened to the right in the Japanese way.This should be corrected urgently in the manual!

    Jim Glenys -

    Hi Jim, the display opens from the left side, toward the right side. It should look like the back cover of a book. Hope this helps. Good luck with the repair!

    Adam O'Camb -

    DO NOT LAY THE TWO HALVES FLAT!!! There is a reason why the third photo shows the screen half leaning against a box! This really needs to be a warning in addition to the one about not separating the display.

    Mangled Jargon -

    If you're skipping the screen and taptic engine removal like I did, I suggest you tape the back of the phone to the table, and also tape the screen to the vertical object it lays on, so it stays still. That way you will avoid having to constantly readjust it because of the sliding of the housing of the phone when you're working on it. Be careful where you're putting the tape on the screen though, if you're doing it on the internal components.

    Raziocinjo -

  16. QVGa5KTCal3B6epN
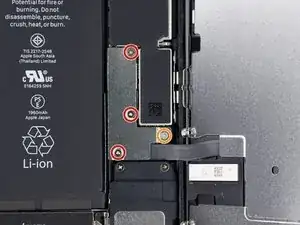
    • Entferne die vier Tri-Point Y000-Schrauben, die die Abdeckung der unteren Anschlüsse befestigen, sie haben folgende Längen:

    • Drei 1,2 mm Schrauben

    • Eine 2,4 mm Schraube

    • Passe während der ganzen Reparatur gut auf die Schrauben auf und sorge dafür, dass sie genau an ihren alten Platz zurück kommen, sonst kann das iPhone beschädigt werden.

    Ahhh shoot! accidentally ordered tri-wing vs tri-point (must have just looked for y000).. It seems they only did this to annoy repair folks because not everything is tri-point on the phone...

    Steve -

    These screws just spin for me. They don't back out, but the heads aren't stripped either. I've tried applying backpressure to help lift the screws, but no luck

    Jeff Hurst -

    The Y000 took out one of the screws but not the other 3. I even tried the PH000 as suggested but nothing.

    dbright -

    What driver do I need to remove these screws i’m stuck

    Nasser Nader -

    i cant use, the Y000 it isnt working.

    joscarlos91 -

    What if I stripped a screw what do I do??

    Jacob Ramos -

    Yep, only the 2.4mm came out, other 3 won’t budge, and worried I’ve stripped the heads. Anyone got any ideas?

    Stephen Babbage -

    It’s the screwdriver bit that is the problem. I had the same issue with 2 Y000 bits not grabbing the screw properly. I fixed it by using a small 3 sided file to slightly grind the groves in the Y000 bit just a bit deeper. Then the bit worked like a charm on these screws.

    Jim Staples -

    Use Y000 on all 4. U have to be very sensitive on the 1.2mm screws. Put the bit in the screw, put the left pointing finger on top of the screwdriver and turn the driver carefully to the right until you feel a “bump”, thats the trick :-), then you are able to screw the screw out.

    Magne Eivindson -

    For me the key here was a LOT of downward pressure to ensure the Y000 bit caught in the screw. Not sure i can describe how much exactly, but is was significant. Otherwise the bit would not catch.

    Erik Fredriksen -

    What do I do if I Stripped one of them?

    Adam Corral -

    Can’t get them removed what to do ?

    cowling_luke -

    Managed to get the central one out. The upper one won't move, the lower one I've popped out with some force. This allows you to rotate the cover enough to unplug the various bits. Not ideal, but works. I've tried applying a lot of pressure, using the tighten/ loosen method, but the heads have just got mashed… no wonder Samsung are now No1, sigh…

    jimpoolio -

    You need to be careful when just rotating the cover as you can accidentally slice through the two black antennas! You only need to nip them…As you can tell I have done this in the past :/

    Kyle Webb -

    The first, longer screw came out fine, but the other three wouldn’t budge, regardless of more/less pressure or a slight angle or anything. I finally filed down the tip of the Y000 bit ever so slightly, and then it worked. Hope this helps someone.

    Harmony -

    Filing down the bit worked for me. The tip about putting an index finger on the end of the screwdriver handles and then turning gently until it clicks into place was very helpful! Using these 2 tips I didn't need much downward pressure. Screws are out in a few turns.

    Chris Bennett -

    If you can’t get the bit to grip the screw properly, you can use a little bit of the water-proof sealing between the bit and the screw. That worked for me. Hope this helps anyone.

    jvalaamo -

    Mine came out easily. I placed the screws in the area where the bit goes in my kit so I can keep track.

    Gina Torres -

    I used a bunch of medicine cups to track my screws. You need like 12 if you want them all in cups. I ran out. There are so many different sizes that literally vary by 1mm. The tolerances on these things are tight.

    Ray Bieze -

    I use a 28 day pill box and keep every screw separate and reburn to exact slot because they all vary in length, width and can really damage u phone if too long and nt secure if to small.  use a magnetised screwdriver,  or make the cheap freebees magnetic for a short period by rubbing it up an a magnet. lol

    scallyteacher -

    Absolutely ridiculous had to go get a different one just stupid

    mark golling -

    I couldn’t get the lowest one out and just turned the metal bracket out of the way and replaced battery.

    qwerty77x -

    Was able to get the outer bracket screws out using fine needle nose pliers 90 degrees straight down for the outer ones by pressing down a little and using medium gripping force. Had to take these out first before i could use tweezers on the middle one, for which I had to use tweezers to hold the screw, then rotating the bracket (not the screw) counter clockwise a few mm many times over to slowly unscrew it 1/32th of a turn at a time, repeat. (this loosened middle screw). Think ‘rotating bracket 3minutes/degrees counterclockwise at a time while holding screw in place.) You are gonna need really small/fine pliers and tweezers for this because the heads are countersunk into the bracket.

    Galen Wollenberg -

    The top screw in the step was much longer than 1.2mm. It has the same head as the 1.2mm, but different than the 2.4mm. It’s good to keep track of where they came from.

    All are so small that I thought I’d lost one, when it was still sitting in the phone.

    Mark -

    To help tell if the screw is turning, put a small dot from a marker on the head of the screws.  This helped me to know I wasn't just stripping the head.

    Darren Thibodaux -

    try heating the iPhone with a hairdryer or a bag of rice or about 60 degrees in an oven for 3 minutes . It has worked for me. If the screws don’t come out while hot the will come out as the iPhone cools.

    David Howard -

    A small tapered triangle file using moderate pressure did the trick for me.

    Jack -

  17. G1PuHnw2PiNeAdMC
    • Entferne die Abdeckung der unteren Anschlüsse.

    my battery cable connector was stuck to the bottom of this metal bracket plate so be careful when you lift it off

    Josh Martin -

    This may have been intentionally done by Apple to make sure the battery gets disconnected before any other connector is disconnected. So always make sure to disconnect the battery before disconnecting and reconnecting the connectors for the display.

    Oscar Moreno -

    So…I forgot to put this bracket back on when reassembling. Now I’ve adhered the display to the case and don’t have another adhesive strip…so I’m wondering: what purpose does this bracket serve? The phone is powering on and seems to work okay.

    Am I going to run into trouble with this bracket missing?

    Ian Fritz -

    Well, that didn’t last long. The phone shuts down without warning. So I guess that plate is important…

    Ian Fritz -

    I also forgot to put the battery shield in, and adhered the display. I’m tempted to leave it like that. However, your negative experience is a good data point telling me to not be cheap.

    Ordered a new adhesive , under $2 shipped from eBay.

    Yishai Sered -

    Thanks, Josh Martin! Mine was stuck too, so I lifted carefully.

    Cynthia Lamb -

  18. kagyl1qcW4AtoBlf
    kagyl1qcW4AtoBlf
    ewZDHDrtMTUxnlnK
    NUEP2PSRVV54cedx
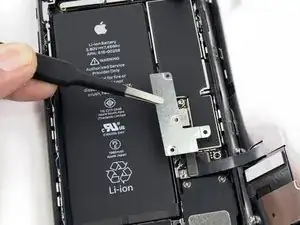
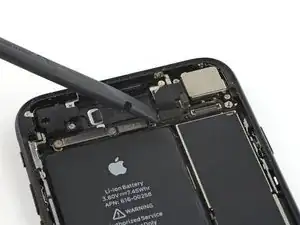
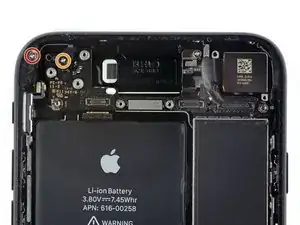
    • Mit der Spitze eines Spudgers kannst du den Stecker der Batterie vom Anschluss auf dem Logic Board heben.

    • Biege das Kabel leicht nach unten, um zu verhindern, dass es mit dem Anschluss in Berührung kommt und das Telefon mit Strom versorgt.

    Was kann passieren wenn man diesses Kabel vergessen hat zu entfernen `?

    Julian Eltrich -

    Reconnecting the battery poorly can cause the iPhone to appear to be properly powered and functional, but then suffer a reboot loop.

    I had difficulty after a screen replacement, and the Console app on my Mac showed that the ‘thermalmonitord’ process was throwing lots of errors from not getting any sensor readings from the battery. It would never charge past 1% and just kept rebooting.

    The contacts on this conector looked fine so even though I had reseated this connector several times already, I reconnected it very firmly using my thumb and a spudger to really press all the corners and middle and really gave it a good massage and then finally it showed the normal dead battery screen and started properly charging and eventually booted back up to normal functionality.

    It seems the battery has to be able to transmit data to the phone to say it’s not overheating or iOS will not allow any current into the battery to recharge it, and the kernel will panic from the null readings and just reboot over and over again.

    jason -

    In my case, the battery connector was attached to the bracket. We just left it connected bracket when we pryed it up.

    Dave Miller -

    Reconnecting the battery connector was a bit difficult in my case. The cable that comes out of the battery was a tiny bit too long, or that I placed the battery a bit too high (i.e., too close to the top of the phone). It took me several frustrating minutes of fiddling with the connector for it to sit right into the socket. I was not sure if that was connected correctly but, alas, the phone came back to life when it was turned back on.

    Tomoharu Eguchi -

    VERY IMPORTANT NOTE: Please READ the reply here by jason.

    It is very easy to knock off or nudge the little pins near the battery socket, see https://guide-images.cdn.ifixit.com/igi/... and https://guide-images.cdn.ifixit.com/igi/....

    Those pins are the data lines to extract battery info: temperature, charge, etc. If you accidentally nudge/knock off them the phone could appear to work normally, even for a few days. But then you will start getting wrong battery reads and then after that it may suffer a reboot loop. If you enter settings > privacy > analytics & improvements and you scroll down you will find panic errors from thermalmonitord that there are missing sensors (TG0B or TGXXX) and you will have to micro solder them. DO NOT NUDGE THEM and double check the socket connector when reconnecting the battery.

    PJM -

    After successful screen replacement, returning to give my thanks here. Excellent tips from you all! Careful removing the lower bracket - mine was stuck to this battery connector, which came up with the bracket. Luckily no cable or connector damage. Be careful. Thank you all!

    dantegd -

    after installing new ifixit battery kit, note the foam on the new battery is thicker than old apple one, managed to remove the old foam and swap to new battery connector, sheild plate now level

    Neil Mills -

  19. aMorTfedGgH3rI5R
    aMorTfedGgH3rI5R
    j6YutYie6sBNvKB2
    DTNCSTyuPgJxNIkh
    • Bevor du in diesem Schritt ein Kabel ablöst oder wieder verbindest, musst du den Akku abtrennen.

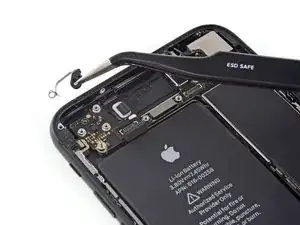
    • Nutze das Flache Ende deines Spudgers oder deinen Fingernagel, um die Anschlüsse des Flachbandkabels am unteren Ende des Displays zu lösen.

    • Um die Stecker wieder zu verbinden musst du diese unbedingt erst an einer Seite, dann an der gegenüberliegenden herunterdrücken. Drücke nicht in der Mitte, da sie sich verbiegen und im schlimmsten Fall funktionsunfähig werden können.

    • Wenn du nach dem Zusammenbau deines Smartphones ein leeres Display, weiße Streifen, teilweisen oder kompletten Ausfall des Touchscreens hast, dann versuche nochmals diese beiden Kabel abzutrennen und sorgfältig wieder anzuschließen. Achte darauf, dass sie wirklich fest sitzen.

    To be honest you don’t really need to disconnect the display cables in step 15 or 16 to get the battery out. Just keep the suction cup on the screen to keep it propped up and to give the cables some slack. The only reason to take these cables off is that it’s a pain to apply the replacement display adhesive with those cables in the way. If you’re not re-waterproofing your phone just leave these attached.

    Austausch der iPhone Display Klebestreifen

    minimalist -

    MAKE SURE you hold the top screen when dislodging the cable connections. I let the screen lie flat down and ended up tearing one of the cable connections, now my touch ID does not work at all! I’m going to have to order a whole new screen.

    Arjun Nagarajan -

    Don’t miss that SECOND CONNECTOR like I did. It will break very easily if not disconnected :(

    garrett peek -

    An earlier comment said to re-apply the suction cup to the right side of the display so that it acts as a stand when the phone is partially opened. That’s a great idea, and helps a lot for this step and the next.

    Mark -

    Hey – I broke one of these flex cables and I cant find them to purchase anywhere. Can somebody help me? It’s the LCD connector first and what is the second flex cable for? Thanks!

    Chan Ty -

    I broke the second (smaller) display connector flex cable.

    1) Is it replaceable or repairable?

    2) Where can I get the replacement?

    Ben Blom -

    Same happened to me. What solution did you find? Could you replace a part to make it work? Thank you!

    Viktoria -

    I replaced the screen and have ended up with a blank screen. Touch control seem to work (touch button works and I can shut down the phone by pressing power button for some seconds and then swipe left to right in the upper part of the screen). But the screen is blank. I’ve tried to disconnect and connect the two connectors in step 16 but with the same result (blank screen). What do I need to do?

    Thanks for advice!

    Bjorn -

    this point is the most important in the whole manual.

    Please pay attention not to strain the flex cables or they will end up breaking

    Jose Joaquín Sanz Iniesta -

    I should have been more careful - the second cable tore off.

    My own fault after having done this replacement about four times previously without any issues, I clearly got cocky and didn’t pay enough attention.

    Be VERY CAREFUL and remember to unplug those cables. Don’t skip steps.

    I’ve now had to order a replacement screen.

    Stuart -

    Echo minimalist’s comment here. Prop the display up and skip to step 19 to save time and remove risk.

    .A. -

    If you replace the screen and there is no display apply io propyl alcohol 99.9 & purse to both connectors on the screen and on the iPhone with a clean toothbrush and let them dry for 45 minutes and then fit the screen and reassemble the iPhone..

    It works for me . when I get a new screen I do t5his before fitting it.

    David Howard -

    I tried to save time by not removing the screen during battery replacement as some comment here, HOWEVER, I ended up having to use a little force to remove the battery and in the process broke the second, lower smaller cable, resulting in loss of home button function and needing to get a new screen. Next time I will follow these steps and completely remove the screen during a battery replacement

    chrislacey -

    I removed the screen and cable still got ripped during reassembling :(

    Viktoria -

    There is a critical fact missing from the steps here, for reassembly: That bottom (underlying) cable is longer than it should be. Loads of people are reporting that the Home button is dead after this repair, but the cables aren't torn. I'm pretty sure this is why. Here is a picture of the problem.

    When reassembling the phone, you must poke this cable back into the body of the phone while you bring the halves together, or you will crush, crimp, and destroy the cable.

    Gavin Stokes -

    I’m only reading your very useful comment now, after the exact thing happened to me and my cable got ripped during reassembling phone. Would you be able helping me naming this part, so I can look for a new one? Thank you very much!

    Viktoria -

    thanks gavin. ifixit should have included this piece of info.

    soupamanx -

    Can somebody help me with the name of the part that these cables belong to? The bottom one got ripped during my battery replacement, I need a new one but unsure what to look for.

    Viktoria -

  20. bmgfPpWHNVhhLV2o
    bmgfPpWHNVhhLV2o
    krsGsMngtAk6HqyE
    XC5yVbnZluTweVIj
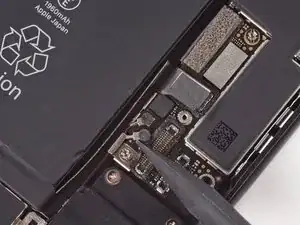
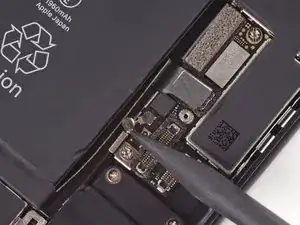
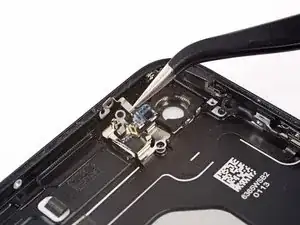
    • Entferne die beiden 1,3 mm Kreuzschlitzschrauben #000, mit denen die Abdeckung über dem Stecker der Frontsensoreinheit befestigt ist.

    • Es können auch Y000 Schrauben sein. Apple hat etwa in der Mitte der Produktionszeit auf Y000 umgestellt.

    Has anyone had trouble getting these two screws off? I’ve been working on these for about 10 minutes and the LEFT screw wont spin. It seems like the little PH000 screwdriver bit won’t even grip it. (The one of the right comes off, no problem)

    It looks like I’ll have to pick this project up again with a screwdriver that will actually take off this piece.

    Makana Sylva -

    If you’re having trouble removing these screws;

    the screw on the right goes into a standoff screw that is screwed into the frame.The left one goes into the logicboard.

    If your phone is used most likely it has been repaired in the past and the person that repaired it put the screws in way too tight.

    If your phone is brand new And you know 100% it is then the problem is your screwdriver.Stop before you strip it completely and buy a better screwdriver (EBAY).

    If you already stripped the screw head take the phone to a shop before you break it.

    there are ways to get them out but truthfully it’s extremely dangerous and sometimes your better off quitting while you are ahead.

    Vegeta Barrett -

    The right screw kept spinning, tried different levels of force but didn’t work. I left the screw on and bent the shield to get to the cable.

    s h -

    I used a #1 flat head tip to loosen.

    Peter Pearson -

    I couldn’t get the two screws out either—used the correct screw tip and everything. Stripped the screw. Will now attempt to just keep the cable attached…..

    Therese Peffer -

    Use the PH000 and apply a little more force before spinning, should come right out!

    Sierra Scolaro -

    ^To anyone having trouble, this is the correct answer. Put the phone on a firm surface, align your driver carefully, press down hard, and twist. As long as your driver is approximately the right size, it’ll come out.

    Jeff Suovanen -

    the two screw i have are stripped and i have n way of getting either screws off whats my next bet

    Alexis Marie Colon -

    The PH000 bit is to large. I can’t get the screws out either which really sucks…now I have to put everything back together, find another bit that will work and try this again another day. Not impressed with IFIXIT’s attention to detail so far :-(

    Ryan Welborn -

    Using iFixit’s driver kit, I prefer a PH00 for this, which is larger than the PH000. If you think the PH000 is too big, something is wrong.

    Jeff Suovanen -

    I think part of the issue with the iFixit PH000 is that it is slightly too pointy. The PH00 fits better because the splines engage the slots of the screw before the point bottoms out. The PH000 tip bottoms out in the screw’s center point and the splines don’t engage as well. I have other PH000 tips that are more blunt nose and they work better than the iFixit bit.

    rcarswell -

    Use the J00 bit. Worked perfectly

    efazio588 -

    PH000 screwdriver didn’t work for any of these screws, or the barometric vent, or the taptic engine. It was too big. I had to use a different screwdriver from another kit I had.

    minimalist -

    I’d do this step before removing the ribbon cables by the battery connector. That way you can disconnect all of them at the same time.

    Ray Bieze -

    i used the little +-shape 30 mm screwdriver (not the Y…but the + shape).

    mason -

    the cable tore. is that it i need a new phone?

    patricia loving -

    You don’t need a new phone, but your selfie camera and phone speaker will not work. You can get replacements for that about $10.

    jack jones -

    Reconnecting this cable and coverplate took a good 20 minutes. O_O

    Nicole Crome -

    What can I do to remove the screw (I stripped it)

    Alex Vu -

    I also had issues to loosen up the screws, in two parts the right side up and the left side down, i think the PH000 is to pointy or something or its too hard for the srews of the iphone, i cannot take it off and know im regreting i bought i order all the way from Paraguay in south america and know so angry it doesnt work

    Martin Frutos, Nuñez -

    I skipped this step. Just be really careful not to pull on the screen.

    Takumi Arai -

    The guide says they changed these to the Y000 “at some point in the t middle of the product’s lifecycle”…

    That can’t be true, I have a *day one*, preordered iPhone 7, and mine had, unmistakably, Y000 screws!

    and also, I’m just faithfully following the guide here, but can anyone clarify *why* is is necessary to entirely remove the display AND the Taptic Engine at all? The battery seems accessible just fine… oh well

    PS- I’m doing this on an older backup iPhone 7. My iPhone 12 Pro just went berserk and stopped working completely a little over a year after I got it day one of its release… since the iPhone X I’ve only had easily breakable, overly sensitive phones. I’ve had every numbered iPhone except for the 8 (I got the X released at the same date) and the 11, and man, are these newer iPhones post X fragile!

    Cam F -

    This worked for me! As mentioned use PH000 and apply pressure and then unscrew the screws. They are tiny, adhere to a piece of tape so you don't lose them.

    Rosie J -

    Indeed - I also had some problems with the righ screw: ...a standoff screw that is screwed into the frame - like above explained...! Suddenly I had three screws in front of me and was a little surprised... Ok You have to mount first this screw again - with a small flat srewdriver - otherwise You could not fix the Metalstripe on both sides, because the second small screw has no grip!

    Fridtjof Schüssler -

    Not screw related: Mark the top of the cover with a felt pen or sharpie before removal. I didn’t and on reassembly, spent a few minutes trying to work out which way it went back on - Doh!

    Tony Houlihan -

  21. uCv2qq5X3dLp5gXA
    uCv2qq5X3dLp5gXA
    3XQvxPR6gZtBBjeL
    • Entferne den Stecker der Display Einheit von seinem Anschluss auf dem Logic Board.

    • Der Stecker sollte nicht mittig festgesteckt werden, um ein Verbiegen zu vermeiden.

    Das ist sehr mutig, das Kabel dort so zu strapazieren.

    Mich würde das Display daneben stellen und mit irgendetwas stützen, dass es nicht umkippen kann um Beschädigungen an dem Kabel zu vermeiden. Das reißt sehr schnell ein.

    Detlef Menninger -

    Is this the connector for the earpiece, as well? I did the screen replacement and everything worked, except now I can’t use my earpiece… I’m afraid I didn’t fully connect this particular portion.

    Victor Bui -

    @victorbui714 Correct, this is also the connector for the earpiece speaker. Check the flex cable carefully and make sure it wasn’t pinched or torn. Make sure the connector socket is clean (give it a blast with some compressed air if needed) and try reseating it. If that doesn’t help, you may want to remove the earpiece speaker and inspect the four springs on the back, and check that they’re intact and making good contact with the four circular pads on the flex cable. Give the pads a wipe with some IPA and try not to leave any skin oils on them. If none of that works, try replacing the entire flex cable/sensor assembly. Good luck!

    Jeff Suovanen -

    This is the only connector that is quite easily possible to put back in the wrong way. If you do so, the phone will just get into a continuous loop where it shows the boot screen, goes blank and then shows the boot screen again and again. If this happens, do not despair-just put it back in the right way.

    Roy Mathew -

    After putting together, I had a continuous loop boot up (as noted above). I saw articles where this (front panel sensor connection) was the reason. I disconnected this connection and the boot up loop stopped. I tried reconnecting several times but had the same problem (boot up loop). However, it turns out that I needed to apply extra pressure when installing until a heard a (faint) second click when pressing down. Note - before I was using the spudger to press the connection together, which didn’t do the job. I ended up using my finger to press harder to get it to click in. Solved that issue.

    Ed Scannell -

    The ribbon cable on this step is torn. Is this something that can be replaced? Is this only to the earpiece?

    John Daily -

    The ribbon cable on this step is torn. Is this something that can be replaced? Is this only to the earpiece?

    Sarah Valencia -

  22. GgLw2SeVMeWxZEj3

    When removing the screen, be aware of the two tiny square black rubber grommets on the Penelope screw brackets that secure the screen. They can fall off very easily and be lost without even knowing it (it happened to me, but was lucky enough to find them).

    Guy Cooley -

    Sorry, I’m so unclear about when to replace the Adhesive tape. Should I put the iPhone 7 Display Assembly Adhesive at this step, or after I’ve replaced the battery?

    Victor Bui -

    @victorbui714 Battery first, then adhesive during reassembly, as it says in the instructions. ;)

    Jeff Suovanen -

    This is the 3rd screen iv put in my phone and everyone them bust at the top by the camera every time iv bought one of these screen idk if it’s the manufactures fault or what?

    trent bost -

    @trentb28922 Ouch! That’s not normal. Is your phone’s frame bent? Are you having to use a lot of force when you install the display?

    Jeff Suovanen -

    If the instructions are followed step by step, then adding the adhesive comes before changing the battery.

    If I had to do it all over again, I'd skip adding the adhesive, because you have to disconnect the battery, plus the two lower display connecters and the front panel sensor assembly connector. It was a nightmare trying to marry the components back together without disturbing the wire prongs, and I don't even want to talk about reinserting the tiny screws that kept twirling around on the tip of the screwdriver as well. It wasn't worth the time or aggravation!!

    If you decide to skip this step, just avoid using your iPhone near water.

    Rosie J -

    Ich habe das Display nicht abgenommen, sondern mit Hilfe von Tesafilm und Styroporstücken in einem Winkel von ca. 80° Winkel fixiert und nicht demontiert! Das ging auch sehr gut und ich musste nicht noch mehr von den empfindlichen Steckern zum Touch und Display trennen!

    Fridtjof Schüssler -

  23. IfrBpBsmlVovxamd
    IfrBpBsmlVovxamd
    sCq4TfWd3nbvGsJk
    2NXAEq1jYgy5IGVS
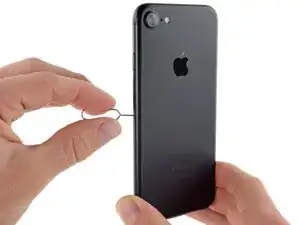
    • Führe das SIM-Auswurfwerkzeug oder eine Büroklammer in das Loch am SIM-Karteneinschub.

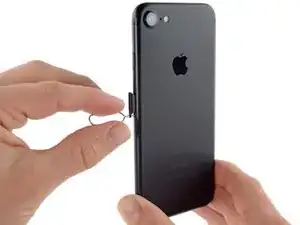
    • Drücke das Werkzeug in das Loch, um den SIM-Karteneinschub auszuwerfen.

    • Dies erfordert mehr Kraft als man denkt. Achte darauf, dass das Werkzeug korrekt ausgerichtet ist, damit der Auswurfmechanismus nicht beschädigt wird.

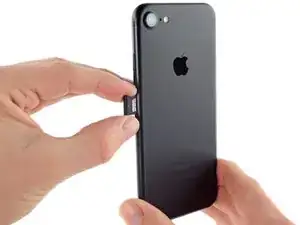
    • Entferne den SIM-Karteneinschub aus dem iPhone.

    • Wenn du die SIM-Karte wieder installierst, vergewissere dich, dass die Karte richtig herum in den Karteneinschub eingelegt ist.

    Received a sim card tray from IFIXIT for my iphone 7. I can’t seem to get it to close flush no matter how hard I try. Any suggestions?

    AJ Dereume -

    Why would it require a significant amount of force? Is it because the iPhone 7 is water resistant? When I removed my tray it was like it was stuck in goop inside the phone and the tray had a glue like sticky substance on it? It did not ‘click’ back in smoothly like my other iPhones, I had to push it against the ‘goop’. Is this normal for iPhone 7??

    Rebecca Diakun -

    I used the tip of the super pointy tweezers, and it worked well.

    Cynthia Lamb -

  24. iCXmnQ2VkFsBteMC
    iCXmnQ2VkFsBteMC
    QBYe21tjhLCCcrTg
    • Benutze das flache Ende eines Spudgers, um den Anschluss der Rückkamera zu trennen.

  25. vFL4V1xyjFNsViSb
    vFL4V1xyjFNsViSb
    lsJArt1QKgGAfxxp
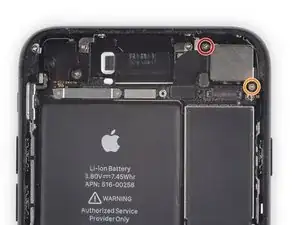
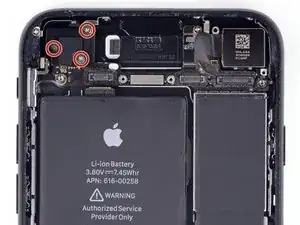
    • Entferne die folgenden Kreuzschlitzschrauben, mit denen die Halterung der Rückkamera am Rückgehäuse befestigt ist:

    • Eine 1,3 mm Schraube

    • Eine 2,5 mm Schraube

    I couldn’t get my 1.3mm screw out. It’s not required thankfully as you can just bend the cover up and out of the way to complete the rest of the steps.

    Ray Bieze -

    i removed them with PH000

    Flavien -

  26. qYoINNlJ1OYkRZNu
    • Entferne die Halterung.

  27. weoIIGlN5DKMWtyg
    weoIIGlN5DKMWtyg
    EZuqhRGoHaLNqWqB
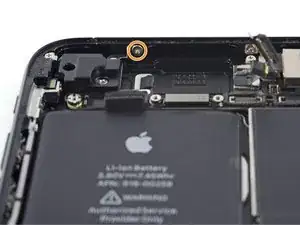
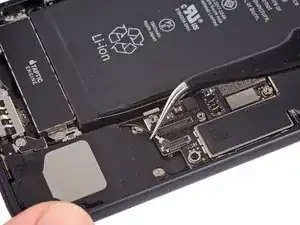
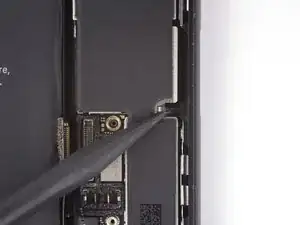
    • Heble den Stecker am Antennenkabel direkt links neben dem Rückkameramodul mit der Spudgerspitze hoch und löse ihn ab.

    There is one Step missing before removing the flash light cable: Remove Camera cable, right?

    Achim Breidenbach -

    I broke this and can’t find it on amazon. Is it part of the volume control flash connector? If not, can you send me a link on where to find this connector,…and possible instructions on how to replace?

    Daniel Buhler -

  28. 62t3ZEvJPO5oLGGY
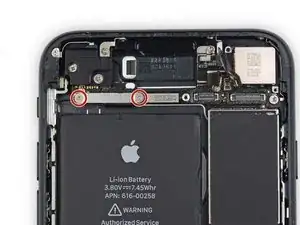
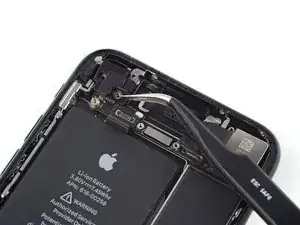
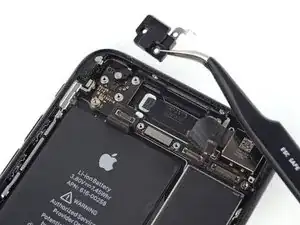
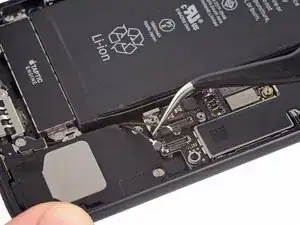
    • Entferne die beiden 1,2 mm Tri-point Schrauben, mit denen die obere Kabelhalterung befestigt ist.

    these are too tight cant get rid off them from y000

    Narendra Mane -

    ok with Y000 from pro tool kit

    Flavien -

    Had to push down to get the Y000 in place

    Cynthia Lamb -

  29. xXENCDBKZZU3ZoVP
    xXENCDBKZZU3ZoVP
    3StSTjEckTiODQLJ
    • Entferne die obere Kabelhalterung.

  30. mg16HsMEJesVGkOY
    mg16HsMEJesVGkOY
    xU1TOLDoJLu6fdmx
    • Verwende das flache Ende eines Spudgers, um den oberen Kabelstecker zu trennen.

    Este cable q funciona tiene porfavor lo desconecte y funciona normal

    Johnny Bolaños -

  31. GmEQ4Wr3gATVGCPJ
    GmEQ4Wr3gATVGCPJ
    TicMoHhgZPntQRqV
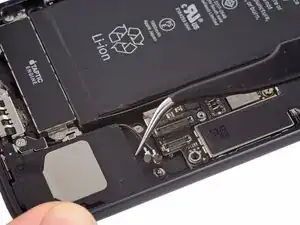
    • Entferne die vier Kreuzschlitzschrauben, mit denen die Wlan-Antenne befestigt ist:

    • Drei 1,2 mm Schrauben

    • Eine 1,7 mm Schraube

    I lost one of these 1.2 mm screws. Will that affect the signal reception?

    Bethany Knaebel -

    There is another screw connecting the antenna to the case.

    tbaiello -

    How do you open the 1.7mm screw? LOL

    Kyle Victor -

    The screws are not threading in for some reason. I measured the screws to be exactly 1.2mm with a caliper.

    Loopy75 -

    Yes there are 4 x screw 3 x 1.2mm and 1x 1.7mm securing the antenna to the case

    ANDREW -

    Yes : 4 screws and not 3 !!

    sirthomasnardin -

  32. ZoGWCGbxnaWOfy2K
    ZoGWCGbxnaWOfy2K
    YHFpeIYUDp4WE6n6
    • Entferne die linke obere Antenne.

    ** also remove the small Phillips screw fastening the WiFi antenna to the top rear casing of the phone

    iBroke -

  33. 4rOcVoQi5e6PZDqS
    • Entferne die folgenden Kreuzschlitzschrauben:

    • Eine 1,3 mm Schraube

    • Eine 2,2 mm Schraube

    Möglicherweise muss man den Kleber zuerst entfernen!

    Evan Winter -

  34. fr4dpd4ULvGG1Iew
    fr4dpd4ULvGG1Iew
    BndRvliUykyn2562
    • Entferne die Halterung.

    What's this bracket called

    Cris Velasquez -

    %#*@, lost that part during the job, thought it’d be alright without it. Couple days later figured out NFC doesn’t work anymore. Any ideas on where to get this part from, colleagues?

    azowux -

  35. iNFaLrBgGLTPtqAW
    • Entferne die 2,2 mm Abstandsschraube von der Erdungsklammer.

    • Abstandsschrauben werden am besten mit einem Schraubendreher für Abstandsschrauben entfernt.

    • Zur Not geht es auch mit einem kleinen Flachschraubendreher, du musst dabei aber aufpassen, dass du nicht abrutschst und umliegende Bauteile beschädigst.

    What bit is this? The link doesn’t use the same name.

    Mike Moran -

    I didn’t even have an eyeglass repair kit flathead, so I hit the end of a paperclip with a hammer to make a flathead, and it works!

    Ark -

    I hate getting the deep into a repair to find there’s a tool missing. This bit should be part of the toolkit!

    Ark -

    Its in the toolkit now. Looks like a Philips head but up close the end is squared off with a point in the middle.

    Jesse de Vries -

    I received two boxes - one box contained the repair part, the other was the tool kit. I only opened the tool kit before disassembling the phone. The standoff screwdriver bit was not in there. Neither was the guitar pick. I used a real guitar pick and a small standard screwdriver from my toolbox. When I was ready to reassemble, I opened the repair part box and guess what was in there - the standoff screwdriver bit and guitar pick. So, I guess if you just order the part it will come with (at least) those two tools. The tool kit contains tweezers, suction cup, three screwdriver bits (tri-point, pentalobe, and phillips) and screwdriver handle, a long black spudger with a flat end and a pointy end, and a smaller, thicker spudger with a wide, flat ends.

    bronyaur -

    The flat end of the spudger works a treat too.

    Robert Trammel -

    Thank you, bronyar. Since there is a box labeled “Repair Tools”, I never would have looked in the parts box for tools. I was able to use the standoff tool to takie the phone apart, not just to put it back together.

    Mike Ruzicka -

    I used standoff bit for iPhone from my pro tool kit

    Flavien -

  36. UkPLKk5IZUaqOqLk
    UkPLKk5IZUaqOqLk
    HwYHEraUMNpdpMoZ
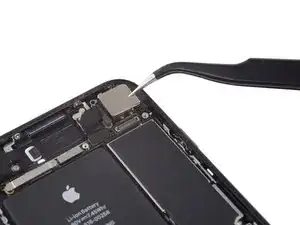
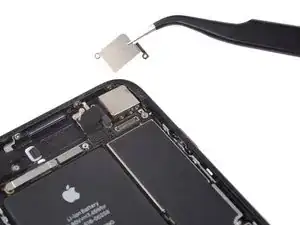
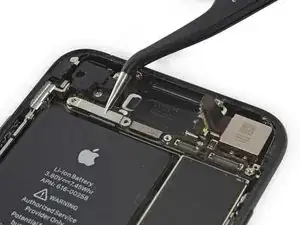
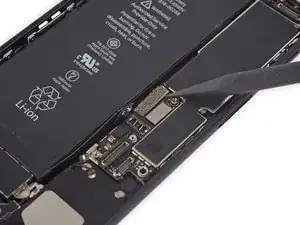
    • Mit einer Pinzette kannst du den Erdungswinkel des Logic Boards vorsichtig aus dem Weg biegen.

    I accidentally broke the grounding bracket, is it very important to get a new one to replace? as I can't seem to find them for sale anywhere

    Mustifa shah -

    I also broke it. Did your phone work after?

    Did you find a replacement?

    Ben Schorr -

    Did your phone work ?

    Emin -

    also broken does it work without?

    Emin -

    I broke mine while doing this step. A bit confusing. You’re just supposed to bend it out the way, not pull on it entirely. Will the phone still work without this?

    Chandler Forrest -

    $@$*, i broke the grounding bracket

    Z1xus -

    I just didnt bend this one.. Ill tell you how it went

    Lauren Campbell -

  37. jTuwBpAh1MDu5KFL
    jTuwBpAh1MDu5KFL
    C3dWjUqEMRwSGMKj
    EHRB24fGSIVadrKG
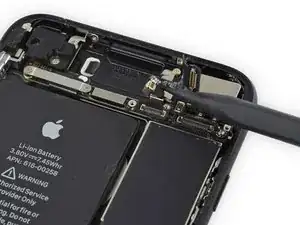
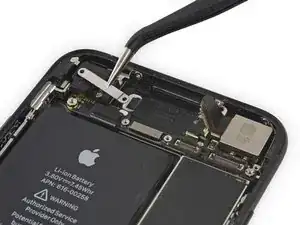
    • Hebe die beiden Antennenverbinder mit der Spudgerspitze aus ihren Sockeln auf dem Logic Board.

  38. mU5afhxI5LK3EiUx
    mU5afhxI5LK3EiUx
    cPiCXxtILZMZkaZF
    cXRTArDl5i5V3bNN
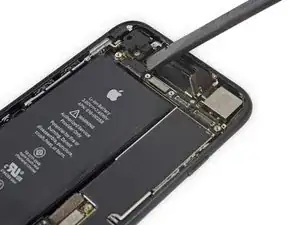
    • Fädle die Antennenkabel vorsichtig mit einer Pinzette aus dem Metallhalter auf dem Logic Board.

  39. DfhnCM3OmmjhMvGZ
    DfhnCM3OmmjhMvGZ
    E1bJGKSyOFTItPJr
    • Löse den unteren Kabelverbinder mit der Spudgerspitze.

    Wat voor kabel is dit? Deze is beschadigd bij mijn IPhone 8 Plus

    Maarten -

  40. NpOHcmg4wFQtv1bR
    • Entferne folgende Schrauben:

    • Eine 1,4 mm Kreuzschlitzschraube

    • Drei 2,2 mm Abstandsschrauben

    • Abstandsschrauben lassen sich am besten mit einem Schraubendreher für Abstandsschrauben herausdrehen.

    • Zur Not geht es auch mit einem kleinen Flachschraubendreher, du musst dabei aber aufpassen, dass du nicht abrutschst und umliegende Bauteile beschädigst.

    Link may be missing or broken!

    Standoff screws are best removed using an [linked product missing or disabled: IF145-343-1] and driver handle.

    Phrase Neither -

  41. Jk1oSKjTgN5iCrPW
    Jk1oSKjTgN5iCrPW
    tKmQRurxLSh3AGgp
    • Schiebe den Kolben des SIM Kartenauswerfers mit der Spudgerspitze aus dem Weg des Logic Boards.

  42. scFa2Dxmuyqv41xJ
    scFa2Dxmuyqv41xJ
    YWoRIhOqookg6CPk
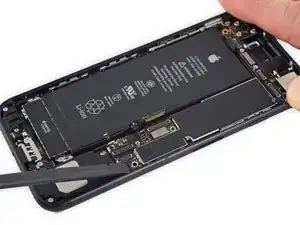
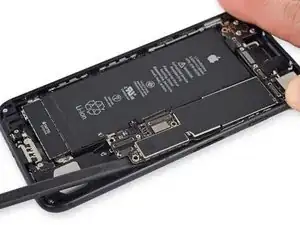
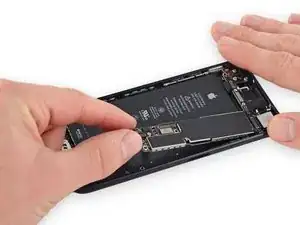
    • Hebe vorsichtig das Ende des Logic Boards mit dem Akkuanschluss hoch. Benutze dazu das flache Ende des Spudgers.

    • Achte darauf, dass du an keinen Kabeln ziehst. Falls du Widerstands spürst, prüfe nochmals, ob alle Kabel, Bauteile und Verbinder frei sind.

  43. yoanbXPtecq1uQHW
    yoanbXPtecq1uQHW
    EdHP1V6iMmajjT5h
    DEYaRuLhAQBg1OpT
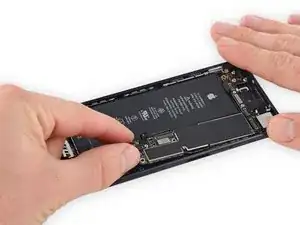
    • Hebe das Logic Board am Ende mit dem Akkuanschluss hoch und ziehe es aus dem Rückgehäuse.

    • Achte darauf, dass sich das Logic Board nicht an irgendwelchen Kabeln verhakt.

    Très bien pour ces étapes

    Théophile Bita -

  44. OFNNtQDPmF6bSAs4
    OFNNtQDPmF6bSAs4
    ghdHphgohyI4E4gF
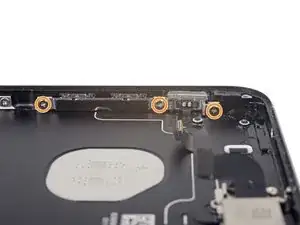
    • Entferne folgende Kreuzschlitzschrauben:

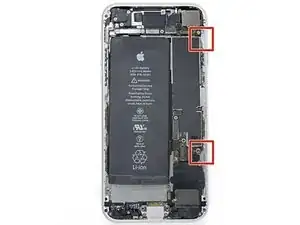
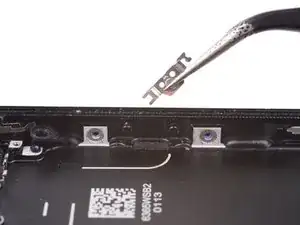
    • Zwei 1,9 mm Schrauben, die den An-/Ausschalter befestigen.

    • Drei 2,3 mm Schrauben, die die Lautstärketasten befestigen.

    You need to remove the battery first.

    Jasper Shemilt -

  45. aJIucZQtDuijZLAs
    aJIucZQtDuijZLAs
    uDiCuTXURXjaKUAP
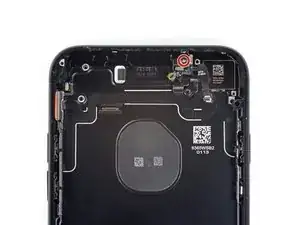
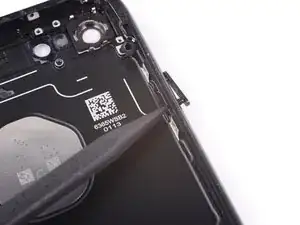
    • Entferne folgende 1,3 mm Kreuzschlitzschrauben:

    • Eine neben der Rückkamera

    • Eine am Gehäuserückteil

  46. xdqNUyVHVTINwtTF
    xdqNUyVHVTINwtTF
    ucKr2JnHe3soKIVu
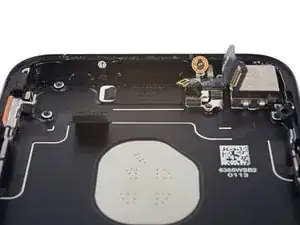
    • Drücke von außen mit der Spudgerspitze die Hold-Taste in das Gehäuse.

    • Dadurch lösen sich die Hold-Taste und die Dichtung vom Gehäuse.

  47. nxGjAe14GJwISk4O
    nxGjAe14GJwISk4O
    ehYygyXHWFFBbFhT
    • Entferne die Rückkamera mit einer Pinzette.

  48. j23dtgnBZXZNA2lC
    j23dtgnBZXZNA2lC
    mBDALytZhi3rAvHy
    • Setze ein Plektrum von der Seite mit dem Einschaltknopf ein und trenne den Kleber, der das Flexkabel der Antenne am Gehäuse befestigt.

  49. TkRBjWQEHFOlN2P1
    TkRBjWQEHFOlN2P1
    TTnO1IAhJsRNansK
    • Schiebe die Spitze des Plektrums unter das Antennenflexkabel in Richtung Oberkante des iPhones und trenne so noch bestehende Klebeverbindungen.

  50. jxi5JHDKErVBAgFt
    jxi5JHDKErVBAgFt
    JRFvV1KMAoHtjNQv
    • Ziehe das Antennenflexkabel mit einer Pinzette weg vom Rand des iPhones und befreie so die geschraubte Klammer vom Gehäuse .

    • Entferne das Antennenflexkabel.

  51. MfYMuejljDCibHhU
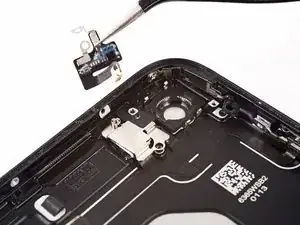
    • Entferne die 2,3 mm Abstandsschraube, mit der die Blitzhalterung am hinteren Gehäuse befestigt ist.

    • Am besten drehst du sie mit einem speziellen iPhone Abstandsschraubendreherbit und einem Bithalter heraus.

    • Zur Not geht es auch mit einem kleinen Schlitzschraubendreher, du musst aber aufpassen, dass er nicht verrutscht und die umliegenden Komponenten beschädigt.

  52. GNP5MM64STC2fmFf
    GNP5MM64STC2fmFf
    VTRTSEMsPUZYgWEp
    • Entferne die Halteklammer des Blitzes.

  53. EEBKXZd2TvOMCmdQ
    EEBKXZd2TvOMCmdQ
    JMxtUnvGmm3VYLsW
    • Löse vorsichtig die Blitzmodul mit der Spudgerspitze aus seinem Sitz.

  54. xAvnJRBxkM1GxvFV
    xAvnJRBxkM1GxvFV
    1Cl4dpGIWZUCmARg
    • Ein "Halberd Spudger" hat eine Klinge in Hellenbardenform. Trenne damit den Kleber, der das Mikrofon am Gehäuse festhält.

  55. uTFgDGxAKgIoPn4T
    uTFgDGxAKgIoPn4T
    a63sCVrbhYABuYNQ
    • Falte vorsichtig das ganze Einschaltmodul vom Rand des Gehäuses weg.

  56. EFtwpeLvP5El3uDg
    EFtwpeLvP5El3uDg
    1pbnRXaLSWE6P2Ff
    XBj5Bw4U1mDggyqs
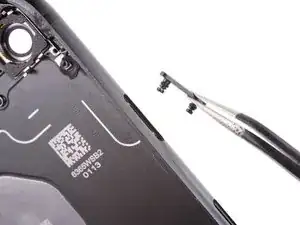
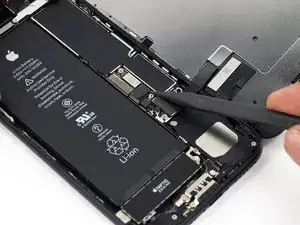
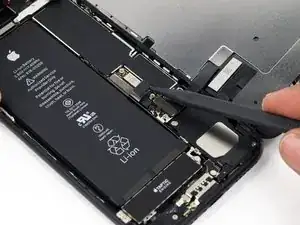
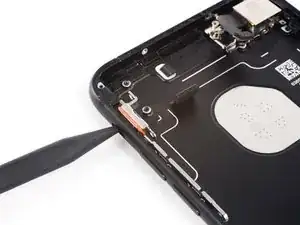
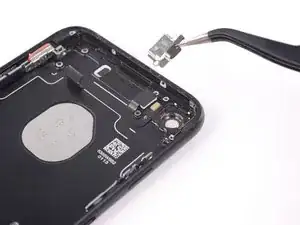
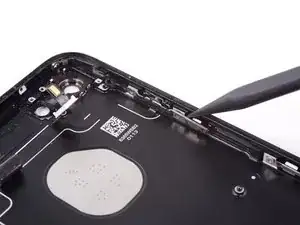
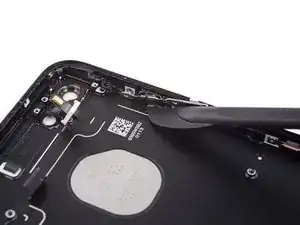
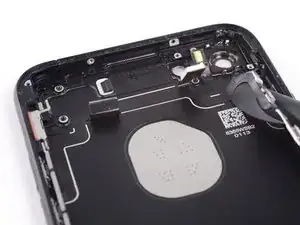
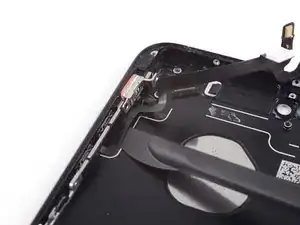
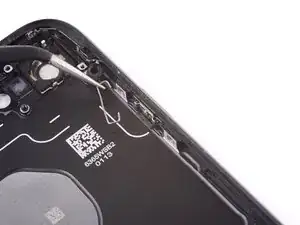
    • Schiebe die Klinge eines Hellebardenspudgers unter das Ende des Kabels mit dem An-/Ausschalter, um es vom Kleber auf dem rückwärtigen Gehäuse zu lösen.

    • Fahre mit Trennen fort und bewege die Klinge in Richtung des Oberteils des iPhones.

  57. VWNjEPUORn31CqP4
    VWNjEPUORn31CqP4
    cA1AdVVHUYFDcftZ
    vKuiJADYPg6tuBg2
    • Schiebe die Klinge des Hellebardenspudgers weiter unter dem Lautstärkekabel fort.

    • Bewege dabei die Klinge ganz langsam, um das Kabel nicht zu beschädigen.

  58. DqkFISeIksufwgDq
    DqkFISeIksufwgDq
    toiP5CAqlKxfwlMh
    EbwIvoXHByCKIsRv
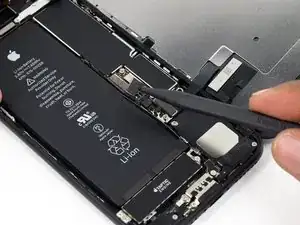
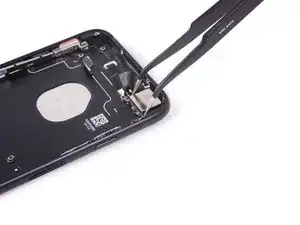
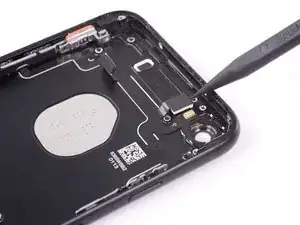
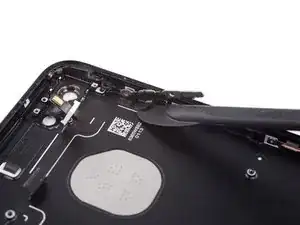
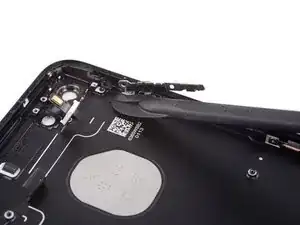
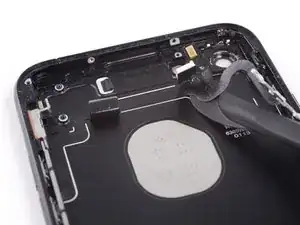
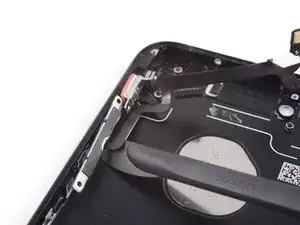
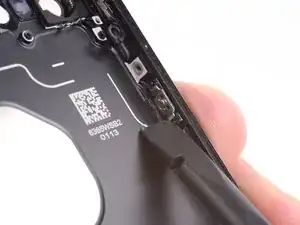
    • Schiebe die Klinge des Hellebardenspudgers unter den Teil des Kabels mit der Lautstärkeregelung.

    • Schiebe sie vorsichtig unter dem Kabel in Richtung Unterteil des iPhones und löse so die restlichen Klebeverbindungen.

  59. 5lBn2ZaNXdn2RG6a
    • Entferne das Strom- und Lautstärkeregler-Flachbandkabel.

    Thank you very much for this guide, I did the job perfectly, without this guide I would not have succeeded.

    Thanks thanks thanks :-)

    agibru -

  60. XXVR6YS3BKfhQiuW
    XXVR6YS3BKfhQiuW
    1qXInaJIhjnGFZaN
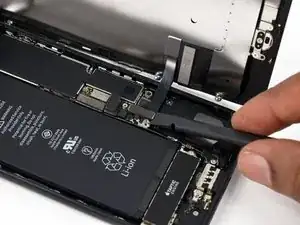
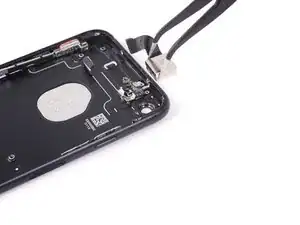
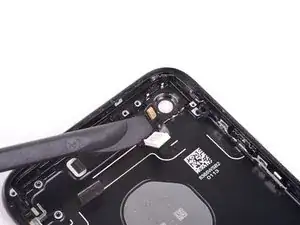
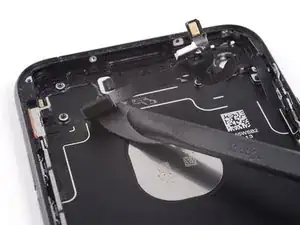
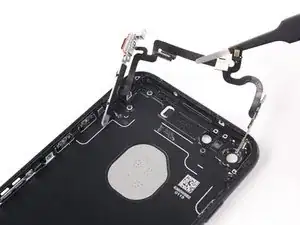
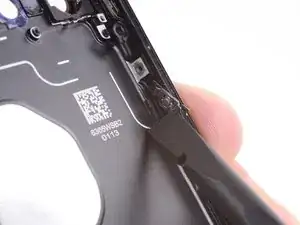
    • Ziehe die Klammer zur Unterseite des iPhones und und hebe sie dann an, um sie aus ihrer Halterung zu befreien.

  61. RHBrA2BxVUI1c3Ge
    RHBrA2BxVUI1c3Ge
    kAZn5MmH1bOqYYQE
    • Entferne die Klammer vom Rückgehäuse.

  62. tuCQUABPCWGQYHXt
    tuCQUABPCWGQYHXt
    tathw22bdpgDtLGi
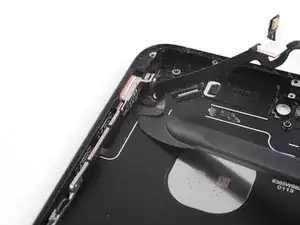
    • Schiebe das untere Ende der Klammer des An-/Aus-Schalters aus dem Stift, der sie befestigt.

    Step 89: helps to push the Power/Lock Button in while using the spudger. Otherwise, the bracket may get caught under the rim of the case.

    Mike -

    good one mike! that helps alot. you need to use a little bit of force to lift up the right hand side ..towards bottom of phone..

    ANDREW -

    In my opinion its better to use a flat ended screw driver as it requires quite a bit of force to get these out. they clip in and clip out. when re attaching listen for the click sound so you know its located well.

    ANDREW -

    I was having great difficulty on this step with this step with spudgers, flat head screwdrivers, etc. After much struggle I tried hooking the curved end of a Halberd Spudger, and it worked immediately with little effort.

    TL;DR - Hook a Halberd Spudger under the bottom right edge and gently pry.

    Trevor Picard -

  63. jeNYg13jdtahQryh
    jeNYg13jdtahQryh
    EJFgua5PYyLFVack
    • Ziehe die Klammer vom Rückgehäuse ab.

  64. poCpwJtM5rSaMqBs
    poCpwJtM5rSaMqBs
    VnDujZByK3kkH4Gn
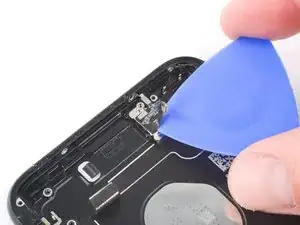
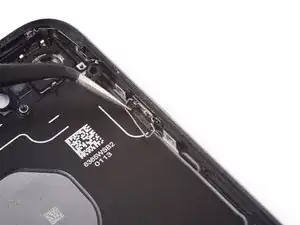
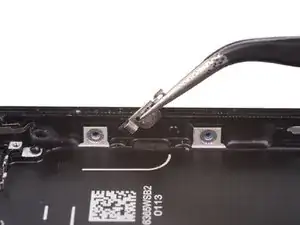
    • Drücke die Abdeckung des An-/Aus-Schalters mit der Spudgerspitze aus dem Rückgehäuse.

    • Entferne die Abdeckung des An-/Aus-Schalters.

    arrivé jusqu’ici pour nettoyer mon bouton on/off. merci pour ce tutoriel

    Flavien -

Abschluss

Um dein Gerät wieder zusammenzusetzen, folge den Schritten in umgekehrter Reihenfolge.

Scott Havard

Mitglied seit: 28/06/16

50572 Reputation

3 Kommentare

Alright so quick question…….

the clip shown in step 57 the one that resembles a staple,is this necessary?

Im doing a housing swap for myself and I cannot get these back on going on an hour now my hands are huge so im wondering if everything will be okay if I don’t replace these.(normally if it were another person’s device I would never take a shortcut,Never have and Never will in fact I despise this,but it’s my phone so it’s cool).

thanks

Vegeta Barrett -

I can't see a response. Are the clips necessary?

Martha Brewer -

It is probably to keep it in place, so I think it’s not necessary but recommended

Ward Morren -