Einleitung

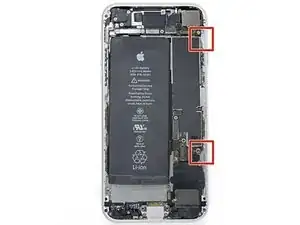
Nur grundständige Anleitung, um ein iPhone 8 zu öffnen, um interne Komponenten zu reparieren oder zu ersetzen.

  1. kH33mVcxVN2MyNsd
    • Bevor du anfängst, sollte der Akku deines iPhones auf weniger als 25% entladen sein. Ein geladener Lithium-Ionen Akku kann Feuer fangen und/oder explodieren, wenn er beschädigt wird.

    • Schalte dein iPhone aus, bevor du daran arbeitest.

    • Drehe die beiden 3,5 mm Pentalobe Schrauben an der unteren Kante heraus.

    • Wenn du das iPhone öffnest, werden die Dichtungen beschädigt. Halte deshalb Ersatzdichtungen bereit, bevor du weitermachst, oder achte penibel darauf, dass keine Flüssigkeit eindringen kann, wenn du beim Wiederzusammenbau keine neuen Dichtungen verwenden möchtest.

    just how long are those screws- i turn and turn and turn and the lift off is soooo slight, seemingly insignificant…

    An. Jahnke -

    I would recommend, from the very beginning, dumping all tools out of the kit (if you got it) and using that white paper tool box as a tray to organize the screws and braces in. It’s nice to work over because it catches screws well and makes it easy to see them if you drop any.

    Johnny Emrica -

    That’s a great idea thank you

    Mohamed Dekkiche -

    Screw to the left of the charging port will not come out. Screw on the right came out no problem. Any ideas?

    Bill Maher -

    Maybe the screw is stripped…

    Gabriel-Science -

    I already replaced my iPhone 8 battery with one from iFixit and honestly I wasn't impressed. It worked well for a few months, but then I started noticing the peak performance capability dropping significantly thereafter. I followed the initial charging instructions to a tee and only let it drop below 20% once a month. Normal everyday use for me... no intense apps like games, etc. I considered having Apple do it this time around, but for these older models they don't keep the batteries in-stock and you have to give them your phone for up to a week. So in the end, I opted to try another battery from iFixit instead. Hopefully this one will last longer.

    tripmusic -

    Does it lasted longer ?

    Gabriel-Science -

    How with the gigantic kit do I not have a 3 1/2 pentalobe driver the very first screwdriver I reach for and that I need is not in any of these kits. What’s up with that?

    Michael Stephens -

    Same problem. The kit comes with a screw driver, but not for this pentalobe screw. This is a problem.

    Yuji Ishitsuka -

    I had to search what screwdriver bit I had to use from the ifixit toolkit; it's the P2 bit. (Maybe it's more obvious if you bought the battery kit, because it only has one type of pentalobe screwdriver.)

    Nathaniel Zielstra -

  2. uSKuDUqkPXShJGIe
    uSKuDUqkPXShJGIe
    VcewaYwFWPodicdm
    UuEMr1v4SuV4fLE3
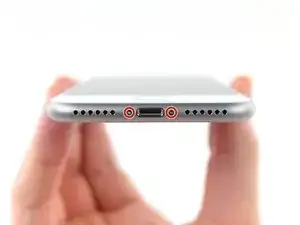
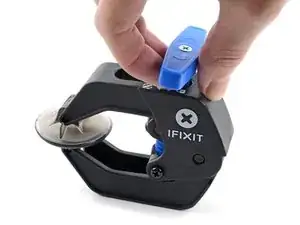
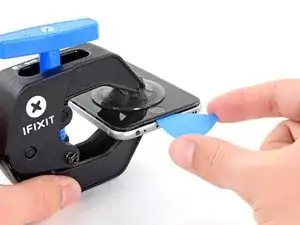
    • Wir haben die Anti-Clamp entwickelt, um Geräte sicher zu öffnen. Die nächsten drei Schritte zeigen die Benutzung der Anti-Clamp. Wenn du sie nicht verwenden willst, überspringe die nächsten drei Schritte und folge einer anderen Methode.

    • Genaue Anweisungen, wie die Anti-Clamp benutzt wird, findest du hier.

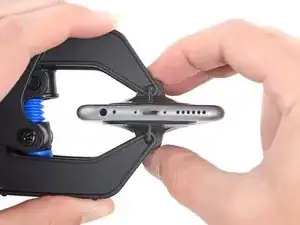
    • Drücke den blauen Griff zurück, damit die Arme der Anti-Clamp frei beweglich werden.

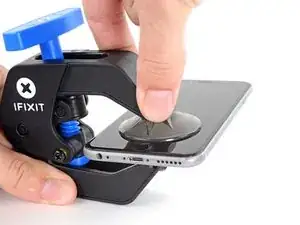
    • Schiebe die Arme entweder über die linke oder die rechte Kante des iPhones.

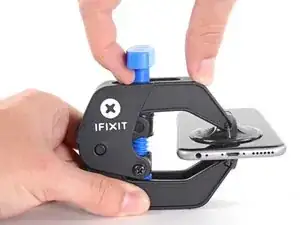
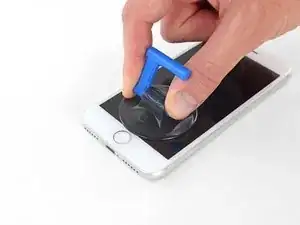
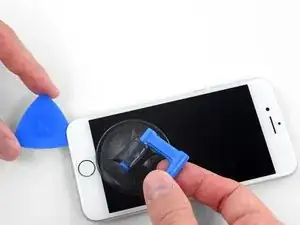
    • Bringe die Saugheber am unteren Rand des iPhones direkt über dem Home Button an, einen auf der Vorderseite, den anderen auf der Rückseite.

    • Drücke die Saugheber zusammen, so dass sie auf den Oberflächen haften.

    • Wenn die Saugheber nicht gut auf den Oberflächen des iPhones haften, dann kannst du die beiliegenden Stücke aus Klebeband verwenden, um eine griffigere Oberfläche zu schaffen.

  3. TWCRek6KAd4BXPEo
    TWCRek6KAd4BXPEo
    5bA1wXPF4DYK1xqZ
    WBMxwmobsDvHpXqL
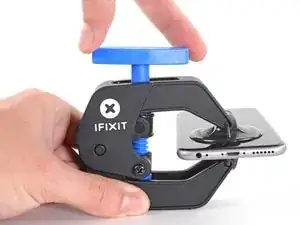
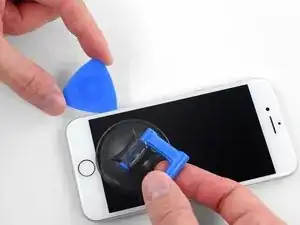
    • Drücke den blauen Griff vorwärts, damit die Arme wieder fest sind.

    • Drehe den Griff eine volle Umdrehung im Uhrzeigersinn, oder bis du merkst, dass sich die Saugheber dehnen.

    • Achte darauf, dass sich die Saugheber weiterhin gegenüber stehen. Wenn sie sich nicht mehr gegenüber stehen, dann löse die Saugheber ein wenig ab und schiebe sie in die richtige Position.

  4. 1UMWDAgvEgkQkwPM
    1UMWDAgvEgkQkwPM
    5SG2UIItrZgdZEa4
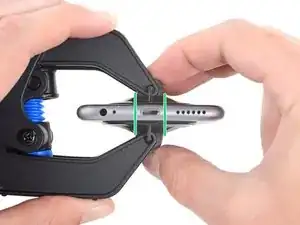
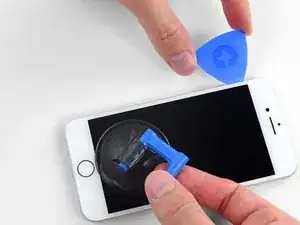
    • Führe einen erwärmten iOpener durch die Arme der Anti-Clamp.

    • Forme den iOpener so, dass er auf der Unterkante des iPhones liegt.

    • Warte eine Minute, damit sich der Kleber lösen und ein Spalt entstehen kann.

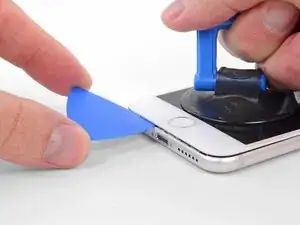
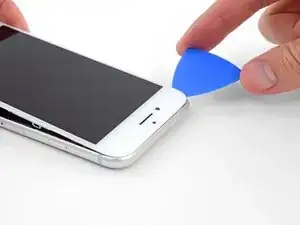
    • Wenn die Anti Clamp einen ausreichend großen Spalt erzeugt hat, setze ein Plektrum unter das Display ein.

    • Wenn es nicht gelingt, mit der Anti-Clamp einen ausreichend großen Spalt zu erzeugen, dann erwärme die Stelle nochmals und drehe den Griff eine viertel Umdrehung im Uhrzeigersinn weiter.

    • Drehe den Griff jeweils nicht mehr als eine viertel Umdrehung weiter und warte jedes Mal eine Minute lang. Gib der Anti-Clamp Zeit, ihre Arbeit zu erledigen.

    • Überspringe die nächsten drei Schritte.

    it looks like a....

    Gergely Soki -

  5. HWFBtehBMjCQcFAc
    • Die nächsten drei Schritte zeigen, wie das Display mit einem Saugheber abgelöst werden kann.

    • Es ist leichter das iPhone zu öffnen, wenn du das untere Ende erwärmst, so werden die Verklebungen aufgeweicht.

    • Du kannst das untere Ende des iPhones mit einem Haartrockner oder einem iOpener etwa 90 Sekunden lang erwärmen, dann sollte der Kleber weich genug sein.

    No hair dryer so GENTLY heated over stove burner

    John Toth -

    Hello,

    What temperature is suitable for removing the front display ? I bought i-Fixit ProTech which is not include the heating "roller" . Thanks for help

    Jiří Sítko -

    I was about to ask the same Question...

    Enno Winch -

    Ich habe eine heiße Wärmflasche verwendet. Das hat gut funktioniert :-)

    Moritz Hartges -

    I laid my phone face-down on my 3D printer’s heated bed, and set the temperature to 60 C. After a few minutes, it was ready to loosen.

    Nate B -

    Hey, that's smart !

    Gabriel-Science -

    If you don’t have an “iOpener” or heat gun, try using an electric heating pad. I have a small $11 pad I got at CVS for my knee. On medium heat it worked fine for removal and with the “pennies” for setting the new seal.

    Pete P -

    I used a heated tea kettle and a tea towel, it worked!

    Adam Yavner -

    I put on the furnace vent for 10 minutes to get it warm to the touch but not hot.

    terrelldoc -

    I attached it to the after burner of my rocket ship and that worked.

    Matt Brown -

    I'm holding mine just above an erupting volcano but I'm still waiting to see if it has worked. How long does it need?

    Paul Aron -

    It won't work if you don't throw it in the lava.

    Gabriel-Science -

    I used a water-filled ziploc bag, heated it in microwave. fast, cheap, worked.

    John Barker -

    Hairdryer works fine for this step. No issues.

    tripmusic -

    Agree! Just did it for 2 times to make sure I didn't overheat the phone.

    André Lopes -

    The most effective way to heat up the glue is to leave the phone in full sun - if it's available. In fact I would always wait for a sunny day to repair any glued together Apple device. The heat will be very even and the phone was probably designed to survive anything the sun can throw at it - although it can get very warm. (I'm in the UK) If you leave the phone turned on it will give a warning if it goes near the temperature limit.

    John -

    I'm sorry but I tried both the hair dryer (for 3 minutes!) and the eye opener (also 3 minutes) and no luck. Not even a hint of loosening the adhesive holding down the display!! Do I send this kit back for a refund or what??!!

    John Noble -

    No luck, guys. 3 minutes of hair drying and 3 minutes heating up the iopener. What next?

    John Noble -

    Okay, a half hour later i finally got the screen loose, but not after super heating it for at leat 10 minutes with a hair drying and burning my hand trying to pry it open. Also, watch out for the power button because it inadvertently keeps switching the phone back on while you wrestle with it. More later . . .

    John Noble -

    . . . and now I need to buy a new phone!!! the cable broke as I was trying to unscrew one of the top screws, so thanks! I FIXed IT but Good!!!!

    John Noble -

    Nate B's advice was key. I couldn't get the temperature of the display hot enough to break the seal with a hair dryer. A heat gun set to low speed and 550F (287C) got the display up to just over 130F, close to the 60C Nate mentioned.

    Matt C -

    This part was actually much easier than I thought. I used a hair dryer on max for 2 minutes on each side of the phone, less than half an inch away from the phone, just on the bottom half. It was hot! Screen came right out!

    Nuno Lopes -

    I used a tube sock full of about 1 cup of white rice. Tied a knot in the top of the sock. Put the sock of rice in the microwave on 60% power for 1 minute. Kept doing this until the temp felt right. Put the sock of rice down, put bottom edge on sock, then covered w/ other half of the sock/rice. Put a piece of paper towel between phone and sock/rice to absorb any moisture. When lifting up on front panel, I rested the phone on the sock/rice. Worked nicely once I got the temp of the rice high enough.
    (threw the rice away later :-) )

    Burning Sensation -

    “Threw the rice away later” has to be the best advice here. I wrapped my phone in a small heating pad and turned it up to 6 of 8. Worked great in 5 min or less! No need for water bottles, microwaves, heat guns, volcanoes, …. I kept the heating pad later ; )

    dantegd -

    I popped my iPhone under a desk lamp with a 60w filament light bulb in it, switched it on, (See this photo) then read the iFixIt instructions and comments. By the time I’d done that, the glue had softened enough to start work. I managed to do the whole process, slowly and methodically, without incident. The iPhone even worked after I’d put it all back together. So we’ll done iFixIt. Another satisfied customer!

    Tony Houlihan -

  6. VRy3fVrOovwUCabE
    VRy3fVrOovwUCabE
    A5IlSaM3n1xvayKW
    • Setze einen Saugnapf auf die untere Hälfte der Vorderseite , direkt über den Home Button.

    • Passe dabei auf, dass der Saugnapf den Home Button nicht bedeckt, sonst kann der nicht mehr dicht abschließen.

    Even with using high heat from a blow dryer, I had to put the suction cup over the home button or the bottom edge wouldn’t lift at all. That waterproof adhesive is incredibly strong.

    Aaron Soderholm -

    As others have said, this part really stinks, but it’ll work if you keep trying. Agree with multiple rounds of hair dryer on high (did about 60-90s each time), and with having to out the suction cup over the home button. You don’t need a big gap to pry it open - it’ll be slight …

    Johnny Emrica -

    Patience is the key here. Expletives and patience. Like previous comments say, putting the suction cup over the home button (I used packing tape to maintain the seal) will allow you to apply force to the proper location to separate the screen. Good luck!

    J Rawlinson -

    Get a suction cup pliers. It’ll make this part fun

    Bradley Steiner -

    iSclack EVO opened the iPhone easily even without heating with no fear of accidentally over-opening it like with a simple suction cup.

    Matti Haveri -

    If you don't have the anti-clamp device, to prevent the screen from tearing open when suctioning it, I suggest some layers of tape around it and the back of the phone (the tape has to be stretchy enough to just minimise the momentum when separating the screen), or some big rubberbands

    Raziocinjo -

    This was the time consuming part. I’d recommend having a thin bladed knife or similar to get things going. I used the small blade on my Swiss Army knife, but be careful. When it goes, it can be unexpectedly sudden. I also used a strong rubber band to stop any excessive opening of the screen.

    Tony Houlihan -

  7. PnYJMHrBqA2Jh22u
    PnYJMHrBqA2Jh22u
    5BxGfRPfmCqCLMOc
    xYlJ5IgLFMxCDZ2B
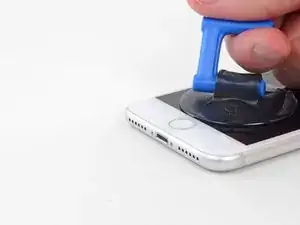
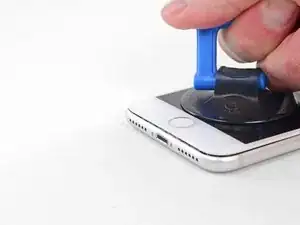
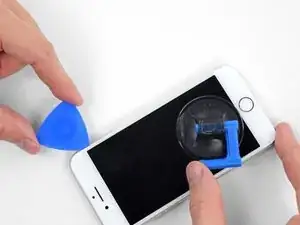
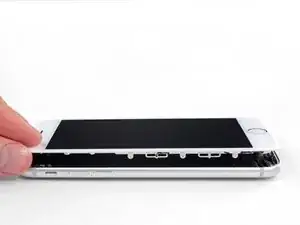
    • Ziehe gleichmäßig und fest am Saugnapf. Es sollte sich ein kleiner Spalt zwischen Display und Rahmen bilden.

    • Setze ein Plektrum in den Spalt ein.

    • Die wasserdichte Verklebung am Display ist sehr stark. Um den Spalt zu öffnen, musst du recht viel Kraft aufbringen. Wenn du Schwierigkeiten hast, solltest du nochmals Wärme anwenden und dann die Scheibe vorsichtig hoch und runter ruckeln, um so die Klebeverbindung zu schwächen, bis du genug Platz hast, um dein Werkzeug einzuführen.

    The screen on my phone was so broken, a suction cup did not work, so I softened the adhesive with a blow dryer and used a Jimmy to carefully pry open the phone from the bottom just enough to slip a pick in.

    charguy -

    Just completed a smashed screen replacement, this is probably the most time consuming part. Used packing tape to cover the screen to help create a suction surface (had to replace it a couple times because it pulls away after a purple good pulls ) Used consistent heat for about 5 minutes, then stuck a pick in the tiniest opening… and pry pry pry!

    Brian Gill -

    I failed at this step. No amount of heating, pulling, and rocking opened up enough of a gap to slip in even a knife let alone the blue plastic tool. That's with a phone that has an undamaged screen - just trying to replace the battery. Apple won this round :(

    Michael Sherman -

    Be really careful here. I placed a sucker to the front and rear to help lever off the screen. However, the whole thing came away much easier than I anticipated and I ripped the front part completely away from the rear, tearing all three connector cables. New iPhone required.

    Chris Wood -

    Note that the opening pick they show here does not appear to come with the kit, which is a bummer! The plunger, the mini blue crowbar thing, these are too thick. I ended up using a really thin guitar pick.

    Johnny Emrica -

    Following careful methods can mostly preserve the seal and reusable. Won’t be as water tight but probably still pretty good.

    Bottom edge is pull up with suction + separating tool. Use small precision scissor to cut any tape that gets overly stretched upon initial opening.

    - For the 2 long edges, use an exacto knife to separate the seal from the screen. This keeps the tape on the chassis. Go slow along the long sides. Becareful to avoid scratching the paint on underside of the screen’s edge.

    - Top corners have a thick sealed tape. Best to just use separating tool to twist it open.

    In summary, top and bottom edge use separating tool. Side long edges can use exacto knife to gradually gently separate the seal from underside of the screen’s edge.

    Howard -

    4 picks and an exacto knife, plus 45 minutes later, I finally got it to open! Thanks tor the tip!

    Cat -

    Intact screen, check. Tool kit, check. Hair dryer hot enough to make the phone too hot to touch, check. Following all instructions, check. Screen still in place and refusing to come off, check.

    I heated, reheated, pulled and pulled. I simply could not get it off. Worked at it for an hour and a half, and I’m not a small guy. Yes it is hard to hold, but could get a grip. Just could not get it to budge. Off to the iPhone repair shop tomorrow. Anybody want to buy a repair kit and replacement battery?

    Jim Meyers -

    After struggling for 30m, I looked up some alternate methods and found this helpful:

    https://www.youtube.com/watch?v=25zAK5mG...

    - I used a utility knife and pried up right under the home button

    - the angle matters! I was trying to go too far down before going in. The top surface of the phone is rather thin, so you go in after barely getting under the chassis lip

    - tilt utility knife left to right once you’ve got it under to work it in

    - leave the utility knife in, and now add that pick

    Jared Wilk -

    Pro-tip: don't be an idiot like me. Instead, remove the screen protector you have on the phone before applying the suction cups. Derp.

    hunter.geofizz -

    I struggled with a hair dryer at first and a singular suction cup. However, I tried putting packing tape on the spot where I put the suction job (even though my screen isn't cracked) and I was able to do it first try with ease. Definitely recommend packing tape.

    Alessio Toniolo -

    Suction cup pliers. Dead easy

    Bradley Steiner -

    After successful screen replacement, returning to give my thanks here. Excellent tips from you all - if you’re using force, you’re doing it wrong. Heat, very very gentle exact-o knife barely down then fully under the screen below the home button … perfect. Slow and patient around the upper corners, and don’t forget to heat there as well! Thank you all!

    dantegd -

    The problems with this step are (1) not having three hands and (2) managing to hold the phone in a way that doesn't put reverse pressure somewhere else on the screen. Exacto knife was the best tip. It's a little dangerous. On a misstep you may scratch the screen or jab yourself, but it's what got me in.

    thewrytstf -

    sorry, could not lift off the display any nano-meter even after applying enough force I think and heating it up. need to visit a store.

    Andi Tony -

    I used a razor blade and plenty of heat, and it somehow worked like a charm at the cost of me cutting myself. Definitely be careful when doing this, I used the razor blade on the left side of the iphone then wedged in a small screwdriver and then used the pick to cut the rest of the material away.

    Sharaf Kazi -

  8. 2QPL6xQ1bKKTHEE2
    2QPL6xQ1bKKTHEE2
    Scr2EQgs2BWhSj3N
    KyO5DVLoiSXnDh2Z
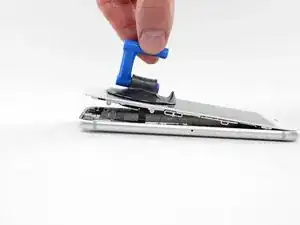
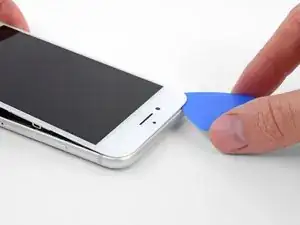
    • Schiebe das Plektrum entlang der linken Kante von der unteren Ecke an nach oben in Richtung der Tasten für die Lautstärkeregelung und des Stummschalters. Trenne so die Klebeverbindung des Displays auf.

    • Halte vor der oberen linken Ecke an.

    • Versuche nicht, die Oberkante des Displays vom Rückgehäuse wegzuhebeln, denn hier halten Plastikclips die Teile zusammen. Die Clips könnten abbrechen.

    My Plektrum worked ok, but the edges broke off a bit towards the end

    griffin.weber -

  9. g1bJoLynAKeivqUm
    • An der rechten Seitenkante verlaufen empfindliche Kabel. Setze das Plektrum an diesen Stellen nicht ein, die Kabel könnten beschädigt werden.

    I was trying to replace my battery, and accidentally cut one of the cords on my screen. I marked my pick, so i don't know how it happened.

    Gib Jeffries -

  10. bYHHQWBLX2SbZ4ZM
    bYHHQWBLX2SbZ4ZM
    oWPIhKQUMFLQKwJF
    VbhlSMqUKVaR3i4t
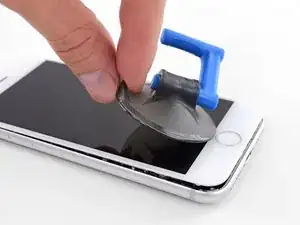
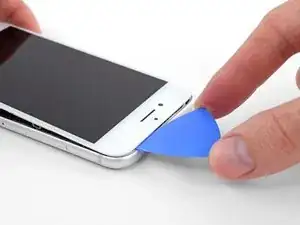
    • Setze das Plektrum an der rechten unteren Ecke ein. Schiebe es um die Ecke herum, dann entlang der rechten Kante nach oben. Trenne dadurch die Verklebung.

    • Setze das Plektrum nicht tiefer als 3 mm ein, du könntest sonst die Displaykabel beschädigen.

    No pick in the kit you sent me.

    Ted Cooper -

  11. JsELGeLj2sULj4Rl
    JsELGeLj2sULj4Rl
    1Q5TB6TXChTQrCSO
    • Hebe vorsichtig den Saugnapf an und mit ihm den unteren Teil des Displays.

    • Hebe das Display maximal 15° an. Du könntest sonst die Flachbandkabel des Displays überdehnen und beschädigen.

    • Ziehe an der kleinen Lasche am Saugnapf, um ihn vom Front Panel zu lösen.

  12. 1wx6fuMwGlVmTVwg
    1wx6fuMwGlVmTVwg
    L5DvjVj5xMJAlXg4
    y6nMrARZIGjH4KZO
    • Schiebe das Plektrum unter das Display um die obere linke Ecke und die Oberkante entlang, um die letzte Klebeverbindung zu trennen.

    I did end up using just a smidge of IFIXIT adhesive remover along the edge before opening and that seemed to really help

    Karen Flowers -

    I have been using the pointed tweezers to pull the adhesive strands apart and out as the display comes off.

    Adam Yavner -

    This bit was awkward as to get a good grip I kept inadvertently switching the %#*@ phone on!

    wendyhoward -

  13. pmOBsioPu6PHdocL
    pmOBsioPu6PHdocL
    wCWsnncFGO1Jy1KT
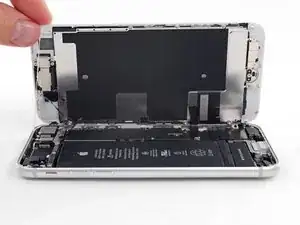
    • Schiebe die Displayeinheit leicht nach unten, weg von der Oberkante, um die Clips zu lösen, mit denen sie am Rückgehäuse gehalten wird.

    I had trouble sliding down the display and found I hadn't separated the stop enough.

    Jeffrey Anderson -

    When you are pulling the display downward, be very careful! I pulled a little too hard and the display cables tore from the downward (toward home button) motion. Now I have to replace the display! 😭

    So Munch Love -

  14. XaJPKiESSbHGIDqx
    XaJPKiESSbHGIDqx
    TKsLuMfvlLBnsdMa
    uyGD4MIvBrhLyuiO
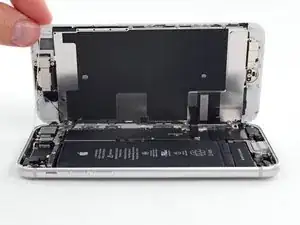
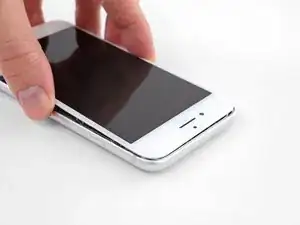
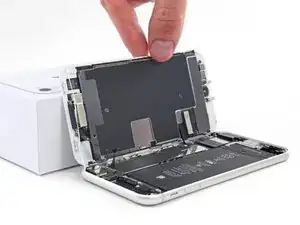
    • Öffne das iPhone, indem du das Display von der linken Seite her umklappst, so wie wenn du ein Buch öffnest.

    • Versuche noch nicht, das Display ganz zu trennen. Verschiedene empfindliche Flachbandkabel verbinden es noch mit dem Logic Board.

    • Lehne das Display an einen geeigneten Gegenstand, um es gut zu stützen, während du weiter am iPhone arbeitest.

    Nach RECHTS klappen - nicht nach links!

    Manfred Wachtel -

    Als ich das Flachbandkabel auf der rechten Seite sah, hab ich mich auch gefragt, ob die das mit nach Links klappen ernst meinen, und das „Buch“ lieber auf japanische Art nach rechts aufgeklappt. Das sollte dringend in der Anleitung korrigiert werden!

    Sebastian Plickert -

    “Up from the left” means lift up the left side.

    Which is the same as folding to the right.

    “Like the back cover of a book” explains it even more clearly.

    Maybe it gets lost in translation?

    Nick Shtangey -

    Fold to THE RIGHT - not to the left!

    Jim Glenys -

    When I saw the ribbon cable on the right side, I also wondered if they were serious about folding it to the left, and the "book" would rather be opened to the right in the Japanese way.This should be corrected urgently in the manual!

    Jim Glenys -

    Hi Jim, the display opens from the left side, toward the right side. It should look like the back cover of a book. Hope this helps. Good luck with the repair!

    Adam O'Camb -

    DO NOT LAY THE TWO HALVES FLAT!!! There is a reason why the third photo shows the screen half leaning against a box! This really needs to be a warning in addition to the one about not separating the display.

    Mangled Jargon -

    If you're skipping the screen and taptic engine removal like I did, I suggest you tape the back of the phone to the table, and also tape the screen to the vertical object it lays on, so it stays still. That way you will avoid having to constantly readjust it because of the sliding of the housing of the phone when you're working on it. Be careful where you're putting the tape on the screen though, if you're doing it on the internal components.

    Raziocinjo -

Abschluss

Um dein Gerät wieder zusammenzusetzen, folge den Schritten in umgekehrter Reihenfolge.

Adam O'Camb

Mitglied seit: 11/04/15

212278 Reputation

0 Kommentare